The heart-shaped symbol is often used to express love and is considered the most positive emblem in the world. Hearts are an indispensable decoration for a wedding hall or a place for heartfelt confessions. Make it beautiful DIY heart craft can be made from a variety of materials. In this article you will learn how to quickly make a heart from corrugated paper, which can be given as a gift or used for decoration.
Materials:
- cardboard;
- corrugated paper of different colors;
- scissors;
- glue.

How to make a heart craft with your own hands
1. Cut out two templates from thick cardboard and glue them together so that the product is dense and holds its shape well.

2. Take ribbons of corrugated paper and twist them into roses. We glue each layer-turn of petals with glue.
3. The petal coils must be formed in such a way as to create a rosette on a stem. After this, we cut off the leg, leaving only a part for gluing to the template.

4. Glue a tape of corrugated paper of any color (pink or white) along the edge of the cardboard hearts. We fill the core with roses prepared in advance, red or some other color. The smaller the roses, the more delicate the finished panel will look. Additionally, you can glue the tape so that the heart can be easily hung on the wall.

5. If you glue a wooden stick to a cardboard heart, you can make a topiary. Today there are many devices for decorating handmade products that help make exclusive crafts. You can use special aerosol paints with glitter or glitter powder.

6. Larger roses will be obtained if the corrugated ribbon is twisted into a narrow and dense strip, and then roses are twisted from the resulting spiral. It can turn out very differently, depending on the cardboard template and the size of the roses.


Instead of corrugated paper, you can use regular napkins. By using different paper patterns, sizes, shapes and colors, you can turn your heart into a beautiful decorative item or souvenir.
- This is the best solution for expressing warm feelings for another person, as well as a great way to show creativity.
- Volumetric heart made of paper using the technique quilling, quilling 3d. The craft is made from paper strips, which are rolled by hand with a rod or a special tool into tubes, figures and other beautiful structural elements
- . See how paper is folded in half and three times, how to make bends to make a beautiful heart made of colored paper
- It’s not difficult to make a heart-shaped box from colored paper - an original and simple craft
- As an option, a voluminous heart on a postcard. Such a heart can be cut out of cardboard between two opening leaves of a postcard - paper crafting or kirigami postcards
- You can make a volumetric heart using the modular origami technique from paper modules: first, paper modules are made by cutting out pieces of paper from a sheet of paper and folding them in a special way, from which the volumetric heart is made.
- Volumetric heart made of fabric (cotton, lace, linen, denim, felt, burlap in different techniques, like a tilde heart or a coffee heart, etc.)
- Crocheted or knitted heart, amigurumi heart. You can knit two flat hearts and sew them, then do the stuffing or immediately make a knitted volumetric heart
Volumetric heart made of felted felt
A three-dimensional heart made of threads is made by applying glue to a heart-shaped surface (for example, foam plastic, a heart made of plastic, plastic, etc.), lubricating the threads and winding, followed by drying and removing the thread heart from the frame, like papier-mâché
- Volumetric heart made of paper using papier-mâché technique It is performed by gluing a heart-shaped object with scraps of newspaper or paper, followed by drying and removing the paper heart from the frame. Next, the craft can be painted, drawings or patterns can be applied to it.
- Volumetric edible chocolate heart
Just a million ideas for making a three-dimensional heart with your own hands. It can be molded from ordinary and polymer clay, from plasticine and salt dough, felted from wool and made into modular origami, sewn from felt and cut from wood, and amazing hearts can be made from balloons and papier-mâché, from various types of wire, too. great hearts come out.
Master class on making an edible heart from mastic. Roll a small sausage with your finger and cut it in half at an angle, turn it over and combine both halves.
Using the quilling technique, we wrap a large pile of pink stripes around a toothpick. We draw a heart on the sheet and fill it with slightly flattened blanks, gluing it onto the pva.


This three-dimensional heart can be depicted from triangular origami modules, red and white.
Anyone who is not new to this type of applied art will easily understand how to assemble such a fluffy heart..)
How nice it is to receive a heart as a gift! But you can also make a heart with your own hands.
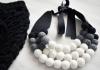
I liked the small hearts - pendants - pendants made of beads:

You can never leave such a heart all day long.
How to weave such a heart from beads yourself, see here.
Another good idea is to make a heart out of napkins:

You can make a separate heart for decoration or a heart tree
For this we need glue, scissors, cardboard, and colored napkins.

The whole idea is to create volume in the product. If there is nothing to put inside the templates, then you need to cut out several, creating this volume, and it would be nice to make a heart out of foam plastic inside.

We fold the napkin in four, fasten it in the middle with a stapler, cut out a circle, then lift it layer by layer, making a rose.

As a result, we attach the stem. This can be any part of a branch or a prepared peeled root; we strengthen it in any container of our choice. There are many options here. Usually they use polyurethane foam, cut off the excess and decorate it.
Finally, your tree can be decorated with beads or ribbons.
Craft volumetric heart for Valentine's Day or any other holiday can be made from a variety of materials, using the most incredible techniques.
But still, the simplest option is to make a voluminous heart from improvised materials, such as napkins or scraps of red fabric, as, for example, in the heart-shaped topiary craft for Valentine’s Day:

If you know how to sculpt well, then you can try to make a three-dimensional heart from polymer clay, which can then turn into a wonderful decoration in the form of a pendant, earrings, serve as a pendant or a keychain.
Watch the master class below on making a heart from polymer clay:

Very beautiful and elegant, quite professional looking hearts are made of beads.
For such work, you must, of course, already have certain skills in working with beads, but you can still try simple patterns for weaving voluminous hearts from beads for a gift for Valentine's Day, which are shown below:


Of course, you can make voluminous valentines from more traditional materials, such as cotton pads or plain white and red paper, be inspired by the ideas presented below, some I specially selected from the Internet for the site. RU:


Happy creativity!
Volumetric spatial heart can be made in a variety of ways using excellent technology from all kinds of materials: paper, fabric, plasticine or plaster, mastic, wood, etc.
This heart craft is a wonderful DIY gift for any holiday or romantic holiday, decoration of the interior or other items, clothing, a toy on the Christmas tree or just a decorative craft.
I’ll give you my top list of crafts, how to do it volumetric heart with your own hands and different methods and techniques.
The finished craft can be decorated to your taste and discretion.


To make it yourself, you need a pattern. Two heart-shaped parts are cut out of paper, applied to the fabric, cut out with an allowance, then sewn together and the craft is turned inside out, subsequently compacted with padding (sintepon, foam rubber, cotton wool pieces, etc.).
After the fabric heart is ready, you can decorate it at your discretion (applique from pieces of fabric and lace, decoration with buttons, beads, sequins, ribbons, etc.).


A voluminous heart can be cut out for decoration from different products (a heart made from a tomato, a strawberry, a cheese, etc.)
The heart can also be made from baked goods (heart buns, cake, etc.).

Volumetric paper hearts look interesting from all sides, no matter how you look at them. They can be hung, glued or attached to a shaped card. But first things first. Here are several options for making voluminous valentines with your own hands.
Paper heart using origami technique
Creating such volumetric paper heart won't take much time. It can be either a small surprise for the holiday or a simple decorative element. To make it you only need square paper. Prepared the master class.
First, fold the square in half in the transverse direction. Photo 2.

Then we unfold the square, placing it so that the fold is vertical. After this, we make a small hem at the bottom. Photo 3.

Now fold the workpiece in half. Photo 4.

Let's unfold it so that the half with a narrow fold is located on top. And let's start forming the heart. To do this, we will first make a fold on the right side. Photo 5.

Let's bend it symmetrically to the left. Photo 6.

Let's rotate the resulting triangle 180 degrees and make folds at the corners, bending them up and to the sides. Photo 7.

Let's straighten the folds we just made; we needed them in order to outline guidelines for subsequent work. Photo 8.

At the intersections of the resulting folds with the vertical lines, we make new folds of the side corners. Photo 9.

We bend the corners located below on the inside up and to the right. Photo 10.

Now they need to be hidden. To do this, we put the bent corners into the previously created pockets. Photo 11.

All that remains is to work on the final shape of our heart. Therefore, we make small folds in the corners. All of them are located on the wrong side of the workpiece. Photo 12.

We carefully inflate our heart through the hole located below. At the same time, we bend it slightly at the top. Our 3D paper heart is ready. Photo 13.

This craft can be made from paper of any color. Several voluminous hearts made according to the proposed master class will look good.

Pattern for this heart: //drive.google.com/file/d/0BzETiNieTq_XQzcxWDZjanNHOHM/view
 The options can be very diverse.
You can use red flowers and voluminous hearts as decorations.
These valentines look very tender.

Option 6. Multilayer card with hearts
Cut a sheet of white cardboard in half lengthwise and fold it like an accordion 4 times.
From colored paper we cut out rectangles (4 pieces) that are sized to fit the side of the accordion.
 Glue them 2 pieces on each side of the paper strip. We prepare stencils of three hearts of different sizes.
 On the first sheet we cut out the largest heart, on the second - a smaller one, on the third - the smallest, and the fourth side remains intact.
 This is what the work looks like from the reverse side.
 Fold the accordion and you get a multi-layered valentine.
 If you unfold it, then all the hearts are clearly visible through the holes.

Option 7, in the spirit of “yin-yang”
We prepare a stencil in the form of two hearts connected by a curly part in the center.
 We cut out a blank from double-sided colored cardboard using a stencil.
 We bend along the line of joining the side hearts. And glue a beautiful openwork heart in the center.
 Connect the side hearts together. Decorate with small hearts.
The result is a multi-layer valentine in the shape of a book.
 You can use 2 adjacent shades. To do this, cut out the middle part with one heart from pink double-sided cardboard, and let the second heart be red.
 Glue the red heart to the side. We place a beautiful multi-layered heart in the center. Bend the sides into the middle.
 We connect the halves and decorate with flowers. This valentine looks more original.
 These multi-layer valentines can be made using stencils from colored cardboard and paper. Some of them even resemble a puzzle, so they will be interesting not only for an adult, but also for a child.
Openwork valentines
Openwork paper hearts they look gentle, like a weightless cloud or a pattern from a skilled artist. They are very easy to make, and the result exceeds all expectations. Here are several options for openwork hearts.
Option 1
First, we cut strips of pink paper about 1 cm wide. Their number must be even.
 Now we stack all the blanks one on top of the other, in a stack. On one side we fix the strips with a stapler or PVA glue. And on the reverse side we shorten them trampled on. 2 long ones remain in the center, each subsequent one (symmetrically on both sides) becomes shorter by 1.5 cm.
 We divide the strips in half and bend them downwards so that the fixed ends remain in the center of the work. We trim all the edges and again fix them with a stapler or glue.
An openwork heart comes out of stripes.
 If the top edge of the strips is connected to the bottom, you will get an equally beautiful heart.

Option 2
Using a stencil, cut out a heart from colored paper. Fold it in half and draw a beautiful pattern. You can depict a tree with fruits in the form of miniature hearts.
Using sharp scissors, cut out according to the graphic design.
 We open the resulting blank and see that the pattern on the left and right is the same. But in general it is a branched tree. This technique is called.
 All that remains is to glue the openwork heart onto a sheet of colored cardboard in a contrasting shade. The valentine card is ready.

Option 3
Using a stencil, we cut out a blank from white paper and a heart of the same size from red paper. On white paper we draw openwork patterns that are closely intertwined with each other.
 Now we fold the red and white hearts and begin to cut out the extra fragments of the pattern with sharp scissors.
 This is how beautiful a heart with a beautiful pattern looks.
 Glue it onto a yellow rectangle so that the design can be seen even better.

Option 4
Using a stencil, draw a small heart on a sheet of pink paper. The paper must be double-sided.
 In this heart we draw a spiral line that follows the contours of the image.
 Fold the sheet in half and cut out two hearts according to the graphic design.
They come out like a long spiral.
 We fold a white sheet of paper in half and trace the palm so that the little finger is on the fold line of the paper. Cut it out and get something like this.
 In the center we glue two openwork hearts, glued together by the centers.
A valentine card entitled “Our hearts are in your hands” is released.

Option 5
Again, cut out the heart using a stencil on a sheet of double-sided colored paper.
 Fold it in half.
 And starting from the bottom corner we make cuts, trying not to reach the top edge by 0.5 cm. The distance between the cuts should not be too large (up to 1 cm depending on the size of the base).
When we approach the semicircle of hearts, we need to make an additional fold and make cuts.
 Then we unfold the workpiece to its original position. The result is a heart with horizontal stripes.
 Now all the stripes need to be bent alternately to the right and left sides so that the heart acquires volume.
 The result is weightless clouds in the form of openwork hearts. Smaller hearts look no less original.
 If you attach a pink thread or fishing line to them, then the crafts can be hung on a chandelier.
These openwork hearts are quite easily made from ordinary colored paper.
Intertwined hearts
IN wicker hearts It also has its own zest and a certain charm. They are easy to make, and the result is a beautiful interweaving of straight or curved lines.
Here are a couple of options for making intertwined hearts from colored paper.
Option 1
First, let's prepare a stencil. Take a rectangle measuring 8 by 14 cm. Cut off the corners on one edge and draw wavy lines on the other, as shown in the photo.
 Cut out 2 blanks from red and pink paper using a stencil.
 Let's connect the resulting stripes in a checkerboard pattern; the result should be a two-color heart with a beautiful weave.
 Now let's take another stencil of the same size and draw other lines on it, straight and with curves.
 A heart will come out with a different ornament.
 The more creative the design on the stencil, the more original the weaves will be at the stage of connecting two halves of different shades.
 If you use double-sided colored paper, then the valentine will be beautiful on both sides.
Option 2
We cut a lot of thin strips of red, pink and crimson shades. The width of each strip should not exceed 5 mm.
 Now you need to make a wicker rug. To do this, we first place the strips vertically, and then, alternating them, weave in horizontal stripes. We monitor the density of the weaving.
 On the wrong side we glue hearts cut out of cardboard. They should be of such a size that they fit completely on the weave area of the strips.
 Cut out hearts. The resulting valentines are in such a small multi-colored square. Original and unusual.

Option 3
We will use 2 stencils, in which the pattern is slightly different.

We attach them to colored double-sided paper and cut them out according to the graphic design.
It turns out 2 parts of pink and raspberry shades.

Now the parts need to be connected, alternating colors. Glue the top parts: first the dark one, then the light one.
 Then we fix the central parts.
 Cut out the heart along the outline. The result is a magnificent two-color openwork weave that attracts the eye.
 As you can see, weaving paper allows you to create bright, unusual ones that you can admire for a very long time.
Did you like the product and want to order the same from the author? Write to us.
Send your photos
Do you also make beautiful crafts? Send photos of your work. We will publish the best photos and send you a certificate of participation in the competition.Sometimes you urgently need to decorate a written note with something. Schoolchildren know many ways to decorate cards using available materials. But adults who don’t really like hand-made things don’t always imagine how to quickly and beautifully transform, for example, a letter to a friend. It is this kind of elementary decor that will be discussed in this article. How to make a heart out of a paper clip without using other available materials? The answer to this question will be given below.
Step-by-step instruction
How to make a heart from an ordinary paper clip? It's simple: we need a nice wire product. It is better to use metal clips in a plastic shell for this purpose. They are bright and catchy, which means they will look impressive on white paper. It is advisable to choose a larger paper clip than a regular paper clip. But this is a matter of taste and possibility.
Let's start making it. Let's take a step-by-step look at how to make a heart out of a paper clip.
Take a paperclip and place it in front of you. The flat side should lie on the table, and the convex, multi-level edge should be upward. If the person making the heart is right-handed, it will be more convenient for the two edges to point to the right and the “head” of the paper clip to point to the left. Now you need to visually divide the edge that lies closer to the body in half. The next stage is to make a break from yourself in the middle. It is imperative to ensure that the upper level does not leak down. Otherwise, there is a chance that the paperclip will get twisted and the heart will not work. Well, the final touch remains. We bring the bend to the middle and slightly pull the upper part towards the ceiling. This is necessary to make the wire more flexible, and in the future there will be no problems with putting the heart on the paper.

How can you use wire decor?
From a bent heart-shaped paperclip you can make a bookmark, decorative elements for a postcard, make a curtain, or use it as a hanging decor.
How to make a bookmark from a heart paperclip? Everything is very simple: according to the diagram given in the first paragraph, you need to assemble a wire structure. At this stage, the primitive bookmark will already be ready, but if you want to get creative, then you shouldn’t hold back your imagination. On a paper clip in a plastic shell, sparkles, rhinestones, beads and even beads hold well. All this variety must be attached with glue or secured with a hot gun.

We have already figured out how to make a heart out of a paper clip, now we need to understand where it can be used. Wire structures look interesting when they hang on a string. In this way, you can assemble a whole curtain, or you can use it separately, for example, attach it to a balloon ribbon.
Making earrings
Such decoration will not be of the status of an adult lady, but a five-year-old girl will come in very handy. First you need to do all the preparatory work from the point on how to make a heart out of a paper clip. And then the creative process begins. If you don’t have any materials at hand other than office supplies, it doesn’t matter. We fasten a rubber band for money on one side of the heart, and without pulling too much, we wind it to the other side. After three such manipulations, the elastic band should run out. But this is a standardized parameter. Everything will depend on the size of the heart and the length of the elastic band. For a good result, you need to wrap two to three rubber bands on one heart. If you have a spool of thread at hand, you can use it. It will turn out especially beautiful if the mesh is shiny. The final stage is to put on the earrings. That's it, the earrings are ready.

Folding letters or patterns
You can use paper clips to make not only cute shapes, but also letters of the alphabet, numbers and punctuation marks. With the help of all this wire alphabet it is easy to construct a message. Having understood how to make a heart from a paper clip, it is easy to collect the necessary symbols by analogy.

This decoration will perfectly complement a postcard, box, or even a photo album. For design, you can use both colored paper clips and ordinary metal ones. To make the decorative inscription look more festive, you can paint it with a spray can, or you can add it with sparkles or beads. This is a good way to write initials or short messages. Long inscriptions will not look impressive, as it will create a busy effect.

The heart shape is widely used for making a variety of crafts. Greeting cards for newlyweds or lovers are often made in the shape of hearts. If you want to tell your loved one about your sincere feelings, you don't have to buy expensive gifts. Master the origami technique and try to make paper hearts .
Paper heart-shaped ring
Cut out a square from pink or red construction paper. Fold it in half, and then unfold it and divide one half into four equal strips. They can be drawn with a simple pencil to make it easier to fold the paper in the future, and the finished paper will turn out smooth.


The result is a heart-shaped paper ring that you can give to your friend or lover. This craft is easy to make not only from colored paper, but also from decorative paper or banknotes.
Paper heart using origami technique


If you squeeze in the central part with your fingers and then press down, you should get a voluminous triangle on one side.
Do the same on the other side.


You don't have to make complicated heart-shaped crafts. Try also making a simple heart from a rectangle with your own hands. To do this, you just need to fold the paper correctly.

The craft is done in a few minutes.

Heart-shaped paper envelope

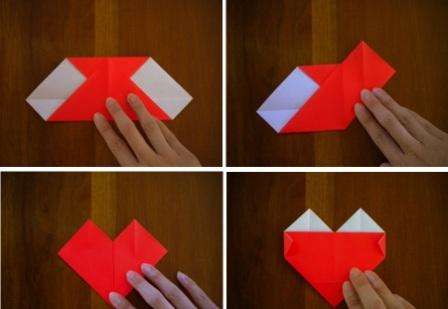

Now fold the side edges as in the photo, and you will get a heart-shaped shape for the envelope. Using the same technique, you can make a garland of paper hearts.
Braided paper heart for beginners


This craft can be done even with small children who will learn to alternate colors.
Do-it-yourself volumetric heart

Volumetric hearts can become a real decoration of the wedding table and serve as bonbonnieres.

Working with paper is very convenient, so even without special skills you can make an original heart-shaped craft. Experiment with different types of paper, because silk, corrugated or office paper can turn out completely different DIY hearts.