We all know that fashion never stands still. She can subtly rush forward, offering fantastic outfits and images, or she can go back, looking for “highlights” from fashionistas of past centuries.
It is thanks to this phenomenon - the cycle of fashion - that we owe the return of the brooch to the outfits of modern beauties. Surely many remember how lovingly their grandmothers kept brooches in ancient boxes and put them on on the occasion of a celebration.
Today, wearing brooches is also considered a sign of good taste, so fashionistas wear them not only on special occasions, but also in everyday life.
The brooch will be a wonderful gift for your mother, grandmother, friend or colleague on March 8 or any other holiday. Today we will tell you about several ways to make a brooch with your own hands.
You can make a brooch using almost any technique:

Brooches with embroidery

Brooches made of felt and beads

Brooches made of lightning

Satin ribbon brooches

Crochet brooches

Complex fabric brooches
It is quite possible to learn how to make all this beauty, the main thing is to know the main stages of creating a brooch.
Brooch with embroidery on a fabric basis

To make such a brooch with your own hands you will need:
- small embroidered plot
- cotton or linen fabric for the back piece
- piece of cardboard
- lace
- a special lock for the brooch (you can, of course, get by with a regular pin, but it will be quite difficult to attach it).
Cut the embroidery into a circle shape. We try it on a cardboard circle (to prevent the embroidery from moving to the side, it is better to secure it with pins).

We tighten the needle along the edges with a “forward” seam, tighten the thread and secure it.
Don't forget to put some filling inside if you want the brooch to be soft and voluminous.


We do the same with the back part, making it a little larger in size. You don't have to put any filler in the back.

Attach the brooch clasp to the back.

Now we sew both parts together, putting lace between the parts.

The brooch is ready!
Instead of lace, you can use satin ribbons to decorate a brooch:


To make such a brooch you will need:
- blank - the basis for a brooch (sold in handicraft stores)
- embroidery on canvas or evenly woven fabric
- piece of cardboard
- padding polyester or other filler (optional)
- hot gun
The process of creating such a brooch is even simpler. We stretch the embroidery onto a cardboard base (see description for the previous brooch), and then glue the embroidery to the metal base.

The brooch will turn out very delicate if you pass a satin ribbon through the edges of the blank.

A beautiful version of a brooch made from ribbons in the video master class:
As you can see, using this manufacturing option allows you to get an exclusive piece of jewelry in a vintage style.
Unfortunately, special accessories for making jewelry can be very difficult to find in small towns. And online stores often offer such accessories in sets of 5-10 pieces per package, which is not very convenient for those who want to “just try it out.”
Felt brooch

In order to make such a brooch you will need:
- felt in two colors
- floss threads to match the felt
- beautiful vintage button
- brooch holder
Cut out flowers and petals from felt using the suggested template.


Cut round holes in the center of the flowers.

Using floss threads, sew the veins of the flower.

Sew a brooch fastener to the leaves on the reverse side.

Choose a beautiful button and sew it on.

Original master class
Brooch braided with beads
Another way to make a brooch frame is to braid with beads.

For example, watch this video tutorial on cabochon braiding.
Cabochon- a precious or semi-precious stone processed in a special way. After this treatment, the stone acquires a smooth convex polished surface without edges. And you can weave an embroidered plot in the same way.
There are many ways to decorate a handmade brooch. You may want to decorate the edges with braid.

Or crochet the edge:

The back part can be made not only from fabric, but also from felt:

- A strip of fabric at least 40-50 cm long and not 7-10 cm wide (you can use 2-3 stripes in one flower for splendor);
- Beautiful beads or buttons, you can also use beads;
- Sewing threads and needles;
- Brooch base;
- Tailor's scissors ()
Recommended fabrics: natural thin fabrics such as silk, chiffon, cambric, let, muslin and even dress wool.

How to make a flower from fabric with your own hands
Step 1

Fold a strip of fabric like an accordion (the size of the petals depends on the width of the fold);
Step 2

To prevent the accordion from falling apart in your hands, you can smooth out every wrinkle.
Step 3

Secure the resulting “accordion” with a tailor’s pin.
Step 4

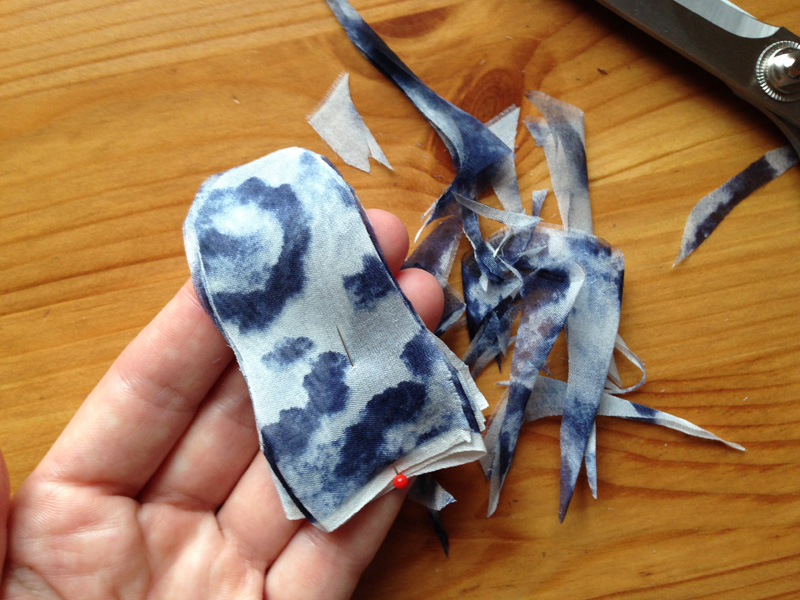
Step back from one short section of 1.5-2 cm and cut out the shape of a petal.
Step 5


Cut the strip, iron and adjust the shape of the petals, if necessary.
Step 6

Gather the strip along the edge of the cut by hand using small stitches. Or sew a line with the maximum stitch length on a sewing machine.
Step 7

Pull the strip

Twisting it into a spiral to form a flower shape.
Step 8
Fasten the thread.Step 9

On the front side of the flower, sew a beautiful bead or button into the center.
Step 10

Sew the base for the brooch on the wrong side.

This is how you can easily and quickly make a flower out of fabric.
Petals and open sections of the strip do not need to be treated with anything.
Wear this beautiful accessory as a brooch or hair clip, or use it as decoration for a bag or belt. If you want to get petals of the same, even shape, you can first draw a template and use it to cut out the base for the flower.
A beaded brooch is an original and very beautiful accessory that invariably emphasizes the charm and grace of its owner. Today we will tell you how to weave such decorations. We have collected for you the best ideas for inspiration and step-by-step master classes that even novice craftsmen can handle.
Beads can be ordered profitably on AliExpress. Large selection of colors, excellent quality, good reviews, low price - check for yourself on the store page using this link.
In this article you will find all the necessary information on how to make a beaded brooch with your own hands, as well as some valuable tips and interesting patterns. Some (more complex) accessories come with weaving patterns, while others come with an accessible description. In our selections you will find brooches embroidered on felt, as well as wicker jewelry. Flowers, birds, leaves, dragonflies and other most popular bead crafts - you can make all this and much more yourself.
Before starting work
If you have never worked with beads before or your familiarity with weaving techniques is superficial, you should pay attention to beadwork master classes for beginners. Brooches are quite simple accessories, but each of them has its own nuances. For beginners, it is best to take a closer look not at wicker jewelry, but at those embroidered with beads on felt.
The simplest brooches are petals, embroidered flowers, birds and other decorations that do not require small details. So, for example, to make a beaded brooch in the shape of a woven flower bud, you will need to weave several petals separately and then carefully fasten them together - this is not too easy. For an embroidered flower, all you need to do is draw an image and attach beads to it.
In a word, it is better for beginners not to take on bulky brooches. However, you should not take this as a rule - it is quite possible that you will be able to do something complex with your own hands the first time.

Which beads to choose?
The choice of beads for a homemade brooch depends on its style. In some cases, you will need not only standard round beads, but also several other types of beads.
The following usually works:
- small beads with a large hole for a needle;
- standard glossy or matte beads;
- beads in the form of grains of rice;
- bugles;
- small and medium size beads;
- half beads;
- rhinestones;
- ornamental stones.
Other accessories for creating a brooch:
- felt;
- fabric base (for example, denim or wool);
- threads (preferably silk);
- fishing line;
- needles of various sizes;
- glue gun;
- tweezers.

You won't need all of these materials, but usually many of them go into the work at the same time.
Master class: brooch in the form of an owl
This step-by-step instruction will appeal to beginners, because you can make such a brooch with your own hands in literally half an hour, and to “assemble” it you will need the simplest materials. The master class should not be neglected by those who have been working with beads for a long time, because owls are very popular today. This means that you will get a fashionable exclusive brooch that even the most advanced fashionistas will envy.

What do we need?
- large beads of several colors;
- beads in the form of grains of rice;
- two large rhinestones of the same size;
- thin fabric base;
- cardboard;
- thick leather base (can be replaced with thick material);
- thread or fishing line;
- Super glue.

How to do it?
First of all, we design the owl's eyes. To do this, we string small beads onto a fishing line or thread and close it into a circle slightly larger than a rhinestone. Connect the circle and place a rhinestone pupil in the center. Glue it. We fix the eyes on a fabric base using thread or glue.

We sew a beak made of oblong dark beads and a bang made of light beads to the base. The owl's head is almost ready, and this is already half of the brooch.

Draw the owl's body and add a few more elongated beads to the head. We sew another row of beads around the eyes - we use the same small beads.

We lay out beads in a continuous row along the contour of the body. You can string beads onto a fishing line and then sew them to the base of the brooch. We do the same with the owl’s body: we collect it on a fishing line and glue or sew one bead at a time.

We cut off the excess fabric and glue the future brooch to a small oval piece of cardboard.

Then we make two holes in the leather base for a pin, insert it and glue the structure to the workpiece.

We make the legs and wings using small oblong beads, add another row to the body to hide the excess fabric. Ready!

Try different color combinations. Make your owls black and white, brown, or even very bright. In any case, your homemade beaded brooch will turn out very cute, touching and original. This is a great gift and a wonderful everyday accessory for girls and women of any age.
Master class: bird brooch
A very beautiful brooch on felt that any woman will like. In this step-by-step instructions you will find a pattern for weaving and embroidering a bullfinch, but your bird can be anything - it depends on the chosen pattern and colors.

What do we need?
- a piece of felt;
- sew-on rhinestones;
- standard size beads (two or more colors);
- beading needle;
- thread or fishing line;
- pin or ready-made accessories for a brooch.
Please note that felt can easily be replaced with a piece of woolen fabric or any other material (glued with cardboard and a piece of leather - for reliability).
Before starting work, you need to select a stencil of any bird and print it. If it is not possible to do this (or you are good at drawing), then copy the image on paper. The main thing is that you have a ready-made template of the size you want the brooch to be. We advise you to pay attention to our selection of bird stencils.
How to do it?
Place the bird figurine on the felt and trace it. Cut it out.

We cover the wing with large rhinestones. Glue or sew them.

We cover the wing with beads. To do this, fasten the thread from the wrong side, string two beads and make a seam. You can sew on one at a time if your rhinestones have a complex shape.

We make the trim along the contour of the future brooch. It’s better to do this in several passes and don’t be lazy about changing the thread and tying knots - this way the rows will lie more evenly.

Add a second, third and other colors to create the bird's breast and neck.

Fill all the small details with beads (you can also fix them with glue), and then make another additional row along the entire contour.

The brooch is almost ready. All we have to do is cut out another piece of felt using the stencil, connect it with a pin, and then glue it with the embroidered part, placing the stencil itself between them.

This beaded brooch can decorate not only the lapel of a jacket, but also a fabric handbag. By the way, it is believed that birds bring good luck, so your homemade brooch is not only a beautiful accessory, but also a kind of talisman.
Master class: brooch in the shape of a clover
A beaded brooch in the shape of a clover leaf is your talisman of good luck. This accessory looks great on a scarf, jacket, handbag and even on a hat. Cute, neat, original - this brooch will be a great addition to your look.

What do we need?
- green felt;
- green satin fabric;
- small beads with a small hole;
- brown rhinestone;
- green beads;
- green bugles;
- flat wide beads;
- a piece of leather;
- pin or ready-made accessories for a brooch;
- threads;
- Super glue.
How to do it?
First you need to draw a quatrefoil on paper: yourself or using a stencil. Transfer the image to felt.

We string small brown beads onto a thread and close the ring. It is better to do it in two rows.

We sew fabric to one half of the clover. We also cut it out using a stencil in advance. To make a beautiful fold, use thread and beads. For convenience, it is better to stretch the felt over something.

We place a rhinestone in one of the corners, and on top the ring that we made in the second step. We process the outline with green beads. We fill the space with beads and seed beads of various sizes in random order. Parts can be sewn or glued.

Gradually fill all the free space with decor.

Release the felt from the clamp and cut off the excess.

Glue a pin or hardware and a piece of leather to make a strong base. The brooch is ready!

You can give such a homemade beaded brooch as a gift or simply always carry it with you for good luck. This is a very beautiful accessory that will make you stand out and be remembered by others.
Bonus: video lesson
In this master class you will learn how to make a sponge brooch - another popular accessory today. In a similar way, you can make a brooch with any other image.
Choose any of the presented master classes and be sure to try making a beaded brooch with your own hands. It's quick and easy, and as a result you will get a very beautiful accessory that you will wear for many years. In addition, your brooch will be unique: even if you choose a popular silhouette, the colors and sizes of the jewelry will be exclusive. Create and wear with pleasure!
Views: 145,636
Beads are an affordable, beautiful material for needlework. The variety of shapes and colors allows you to create any kind of bead crafts, from small simple jewelry to large compositions. Today on the Internet you can find a huge number of patterns for beadwork: -trees made of beads-, toys made of fabric and beads, paintings, keychains, earrings and necklaces, -bracelets made of beads-, various embroidery patterns on clothes and a variety of -flowers made of beads- and beads. Having basic bead weaving skills you can create an amazing decoration- brooch. We will show you how to make a beaded brooch with your own hands for beginner craftswomen, and provide diagrams and master classes, following which you can easily make your own unique product.
How to do it right
You can make a brooch with your own hands not only from beads, but also from its varieties - bugles, beads, pearls. The product must be woven using fishing line and special bead needles. You will need pins to secure the product. And of course, you will need diagrams with detailed instructions according to which you can easily make a brooch. If you want to achieve the goal, we suggest you start weaving.
Beaded brooch "bullfinch"
This beaded brooch can be made on felt. To create a product you you will need fishing line, beads of different colors, rhinestones, decorative felt as a base, bead needles.
- First, draw a sketch, make a template and apply it to felt. Trace around with a pen, drawing the contours of the wing, breast and beak. Cut out, departing from the contours up to 1 cm.

- Place the rhinestones on the wings at a short distance from each other, glue them, and then sew them with thread. Cover with black beads as shown in the photo. The thread must be secured from the wrong side and brought to the front side. Having strung two beads, we lay them along the rhinestone and bring the thread inside out. Next, we draw the thread between the two beads and pass the needle through the second bead, stringing the next two, and so on.

- We also embroider the contours of the wing and head. The eye can be decorated by gluing a rhinestone and trimming it with beads. Make the beak from a piece of baked clay, not forgetting to make holes for sewing.

- Embroider the head and wing by adding beads of different colors. A multicolor beaded brooch will look much more interesting.

- Starting from the wing, we embroider the chest of the bullfinch.

- Embroider the tail.

- We cut the felt and seal it with cardboard. We attach the base and cover it with a piece of felt or leather.

- We receive the finished product.

It will look impressive brooch in the form of an owl. To make it you will need:
- Two rhinestones.
- Beads of two colors.
- Nose bead.
- Bugles to imitate feathers.


This beauty will certainly become your favorite.

In order to make a beaded brooch in the shape of a dragonfly or butterfly, you will need a lot of skill. We offer a master class on creating a “butterfly”. You will need beads of different colors, amethyst, threads, glue, sequins, and a pin.

- We make a sketch in full size (10×7 cm).

- We trim the amethyst with white beads. To do this, we bring the needle out from the wrong side onto the face, thread two pieces onto the needle and move the needle to the wrong side. Next, bring the needle between the beads and string two pieces again.

- Making the body of a butterfly. We sew across the pattern of the body.

- So, moving from bead to bead, we trim the entire body with silver beads.

- They will fall like fish scales.

- You embroider the next row of sequins by bringing the needle between the sequins of the first row and adding small beads to cover the thread.
- Above the row of small beads we sew a row using larger beads.

- At the ends of the wings we make legs from beads, at the end of which we attach larger beads.
- Each row of legs is separated with embroidery.
- Next we sew on the elongated beads.
- We string small beads between the beads.

- Between the trimmed amethyst and the beads we make legs from beads of different sizes and colors.
- We sew smaller beads near the body of the butterfly.
- We make the lower part of the upper wing in the same way, using beads of different sizes and stitching rows of legs with beads.

- The top wing is ready.
- On the lower wing we stitch the upper part with sequins.
- We fill it with beads in the same way as the upper wing.

- When half of the butterfly is ready, you can start decorating the second half.
- Glue the leather blank.
- We insert the needle between the felt and the skin and collect two beads. We step back one and insert the needle from the inside to the front side.

- We insert the needle into the last bead from the bottom up so that it turns over.

- Next, we embroider one bead at a time.
- We don’t touch the felt at the butterfly’s head, but sew small beads on the beads on the antennae.

- We only sew the edges of the leather.
- The luxurious brooch in the shape of a butterfly is ready.


A brooch in the shape of a dog is made by parallel weaving. To do this you will need round beads of several colors, wire and wire cutters. The weaving pattern is shown below.

Ears and paws trail parallel to each other. It is better to start weaving from the nose, highlighting it with a black bead. You can make a voluminous brooch. To do this, weave two identical dogs and connect them to each other. Add to this brooch and you will get your own set of jewelry.
To create such an original product you will need red beads of different sizes, red felt, a base for the design, threads, a needle, glue, scissors and a pin.

- We use a stem stitch. We string three beads, go back to two and go through these two beads again.

- When you put beads on the thread, pull the thread and move the beads towards the sewn beads so that there are no gaps.

- If you hit the needle exactly in the middle of the line drawn with a pen, you can get a completely even outline.

- To make the sponges voluminous, we cut out the parts from red felt.

- Now start embroidering with white beads. When finished, cut the outline of the brooch and trace it onto a piece of cardboard.

- We process the edges with a monotonous thread in two folds, hiding the knots inside, as shown in the photo.


Video with master class lessons
A brooch made with your own hands will definitely attract the admiring glances of others towards its owner. Such an exquisite item will be the highlight of your outfit. Even if you are a beginner craftswoman, with the help of our instructions and master classes you can make an original product for yourself or as a gift. And if you are an experienced needlewoman, share your brooch beading patterns for our readers.The brooch has long been considered one of the symbols of femininity and beauty. The brightest representatives of the fashion industry considered this accessory an integral part of their appearance. With the help of a brooch you can highlight the advantages of your outfit, complement your look and highlight your style. Glamorous handmade brooches are back in fashion - a vintage embroidered brooch will decorate not only a dress or blouse, but also a jacket or coat.
Today, this detail acquires not only the meaning of beauty, but can also appear not only in the form of an elegant feminine adornment. It is very often used in the festive industry: at weddings and bachelorette parties, and sometimes even children's parties, a brooch can become one of the brightest attributes. She can also find a place on the cover of a notebook or handbag - it all depends on the desire of the owner.
 Imagination and a little diligence can turn a brooch into not just a decoration and a stylish attribute, but also turn it into a delightful creation of the hand-made style that is fashionable today. How to make a brooch with your own hands is a question that any girl can ask herself in order to diversify the contents of her jewelry chest or bring her unique idea to life. Master classes for beginners on making such an elegant accessory will help you make any brooch yourself.
“A brooch is an elastic concept,” you might think when you hear this word. Indeed, today there are a huge variety of similar accessories in various styles. The most relevant products in the modern fashion world are:
- in boho style;
- knitted;
- from organza;
- from lace;
- in the form of a flower.
 Brooches are divided into types not only by shape and style. They can be textile and metal, with precious stones, there are “removable” ones that need to be pinned to clothing or any other surface, and there are those that are immediately sewn to the product.
And these are not all types. You can find it on store shelves a huge variety of options offered to the buyer. This or that brooch will suit any image and style, emphasizing the individuality and personal preferences of its owner.
DIY brooch
This accessory is very easy to make yourself. It's not at all difficult to make a brooch with your own hands. Master classes offer many examples of production. Do-it-yourself textile brooches are quite easy to assemble. You just need to find the appropriate materials and get inspired to create a small masterpiece. A little diligence - and the decoration is ready! To make it yourself, the master class will take very little time, and after looking at at least one example, you can invent and create, inventing the brooch of your dreams.
When creating jewelry, not only what material is in front of the master is of great importance, although this factor, of course, is one of the decisive ones. However, from the same material available, two different people can make different products, even if they work according to the same rough pattern or master class. A lot depends on the artist’s imagination and sense of style. When hand-made, each brooch turns out to be unique and original, even if it is made strictly according to the stages of the master class.
Gallery: DIY brooch (25 photos)


Making brooches in boho style
 Distinguished by originality and special taste, Such brooches are more relevant today than ever before. The main feature of such a brooch is considered to be many small details, combinations of eclectic materials, and the presence of ethnic and eco-motives. The basis can be a variety of fabrics: linen or cotton, leather or suede, velvet or denim. Even wool or corduroy can be used to create a boho-style brooch.
The color can also be absolutely any - both as a basis and as a decor, you can use a rich palette from grayish-pastel to bright and catchy tones. A textile brooch in the boho style can be designed in one color scheme, or it can be replete with a variety of colors and shades.
How to make a boho brooch? Here is one example of its creation:
To create a boho brooch you will need a needle, thread, scissors, several pieces of fabric that should vary in texture and color (for example, linen and bright colored fabric), a button, small details (beads, pendants, chains, etc.), pieces of lace .
- Twist a strip of linen fabric of any color into a thin rope.
- Take a button and “wind” a snail-shaped flagellum around it, placing each layer against the previous one and securing it with threads.
- Twist the same flagellum from a piece of colored fabric and continue sewing in the shape of a snail. Alternate flagella.
- Pieces of lace can be inserted between the flagella.
- Periodically, it is necessary to pass a thread through the “snail” in a chaotic manner - this way the shape of the future decoration is fixed and the risk of deformation disappears. It is important to carefully maintain the shape during this procedure.
- When the workpiece reaches the required size, it is necessary to secure the tip of the flagellum.
- If the shape and size are the ones you need and there is no need to change anything, we trim the resulting circle with lace.
- Sew beads, chains, pendants and other small details onto the resulting product.
- If the brooch should be removable, you need to sew a special latch on the reverse side, which can be purchased at any craft store.
Such a brooch ideal for decorating a skirt or belt, if it is large in size or for attaching it to the chest or boho scarf in case of a small size of the product.
Making a flower brooch from organza
 Organza is a material that gives a girl’s appearance a feeling of lightness and airiness. Organza flowers as brooches are one of the current trends today. At the same time, making such a flower with your own hands is very simple. The uniqueness of such a brooch is that even girls with no experience can make it, and it will look simply excellent! It is quite difficult to spoil such a craft, because the algorithm for creating it is very simple, and organza does not require precisely and neatly cut parts and lays down beautifully even if its processing is done with slight, perhaps even deliberate, carelessness.
To create a flower you will need: organza, scissors, a candle, a glue gun (can be replaced with a thread and a needle), additional decorative elements (beads, seed beads, etc.), a special latch (we buy it in the store).
- We cut out petals from organza, the size of which should vary slightly. It is best if such blanks are made in the form of a six-leafed leaf, the petals of which are not clearly defined, but have a rough shape, or, conversely, four-leafed petals, with pronounced cuts almost to the middle. You should get approximately 5-6 petals of each size: large, medium, small. They can be cut according to pre-prepared templates.
- We burn the edges of each petal in a candle flame. It is important that the fabric only lightly, as if distantly, touches the fire, otherwise the edges will burn and have a rough shape with a black border.
- We stack the petals on top of each other in descending order: first we put all the big ones on top of each other, then the middle ones, and the top layer should be the small petals. We correct the petals that stand out from the general concept.
- If the appearance of the flower suits the master, then each petal must be glued together using a glue gun or sewn with thread.
- We decorate the core of the workpiece with beads or seed beads.
- Sew the resulting flower onto the latch.
Such a brooch can be decorated with any additional elements - it all depends on the imagination of the manufacturer or on the availability of parts.


