To work you will need:
- “Iris” in red, white, dark green and light green colors;
- hook 1.3 mm;
- cardboard;
- stuffing material (sintepon or cotton wool);
- needle;
- spool threads in green and black colors.
Legend:
- VP - air loop
- Pst - half column
- Sc – single crochet
- Dc – double crochet
Work order: how to crochet a watermelon and a watermelon slice, step by step
Watermelon
We begin to knit a watermelon with dark green threads.
Row 1: Cast on 20 ch.
2nd row: sc, 17 dc, sc.
3rd row: ch, 2 pst, 15 sc, 2 pst.
Row 4: Change the thread to light green without cutting the dark green thread - ch, sc, 17 dc, sc.
Row 5: ch, 2 pst, 15 sc, 2 pst.
Rows 6 – 7: We knit similarly to the 2nd and 3rd rows with dark green threads.
8th – 9th rows: We knit similarly to the 4th and 5th rows with light green threads.
Alternating stripes of light green and dark green, we knit in the same way up to the 33rd row.
Cut the thread to a length of 15 cm. Close the knitting.
Sew a watermelon barrel. We assemble the lower part of the watermelon with the remaining tail of the thread, tighten the thread and secure it. Turn the watermelon right side out.

Stuff the watermelon with filling. We collect the top of the watermelon with threads, gather and tighten. We fasten the thread.

Watermelon tail
We knit with dark green threads. We dial 5 ch, knit 4 sc from them. We knit 3 ch, in the first ch of a chain of 5 ch next to the fourth sc we knit 8 dc, hst in the third ch.
We sew the tail to the watermelon in the place where the edge of its part was assembled.

Watermelon slice
We begin to knit with red threads.
1st row: ch 3 in the ring.
Row 2: 6 sc from the ring.
3rd row: 12 sc.
Row 4: (inc, 3 sc) – three times. (15 sc)
Row 5: (increase, 4 sc) – three times. (18 sc)
Row 6: (increase, 5 sc) – three times. (21 sc)
Row 7: We connect the white thread - (increase, 6 sc) - three times. (24 sc)
8th row: Connect the green thread - (increase, 7 sc) - three times. (27 sc)
Cut out a circle of cardboard with a diameter equal to the diameter of the slice.

Bend the circle in half and insert it into the slice.

We tie the edges of the slice together with half-columns from edge to edge. We embroider seeds with black bobbin threads.

This is the final result of a crochet watermelon and a watermelon slice:

Materials: 200 g of Soufflé yarn (100% acrylic, 270m/100g) red-pink, 50 g dark green and 30 g each light pink and light green. 10 g of “Iris” yarn (100% cotton, 150m/25g) black. Hook No. 3. Thick needle with a wide eye for embroidery. Thick cardboard.
Performance: Knit a flat sc circle with red yarn. To do this, connect 4 VPs into a ring using SS and in the 1st row, tie 6 RLS into a ring. Continue knitting the sc in a spiral, adding 6 sc evenly in each row. Perform increments in sliding increments. So knit 19 rows. Then knit 1 row in light pink, continuing to increase, then 1 row in light green and 4 rows in dark green without increases (a total of 120 sc in the row).


Using black yarn, embroider watermelon seeds.
Fold the watermelon slice in half and sew end to end along the dark green edge. In the corners, remove part of the green trim into the seam to get a real slice of watermelon.
But I don't really like this method of stitching. To make it convenient to sew a watermelon slice, you will need to work a little. The dark green binding is best done as follows. Knit the 1st row of dark green color completely. Close the SS row to the top of the 1st sc row. Secure the thread (pull the loop, pull the ball into the loop and tighten the thread). Skip 5 columns before. row, attach the thread to the 6th column, stretching the broach from the place where the thread is fastened. Tie 50 sc, fasten the thread, skip 10 stitches before. row, attach the thread to the next column, knit 50 sc and secure the thread - this is the 2nd row of green. We divided the binding into right and left parts, between which we formed a broach of thread. Next we continue to knit in circles. On the left side, stepping back from the edge of 5 stitches, attach a thread, tie 40 sc and secure the thread. Do the same on the right side of the binding - this is the 3rd row of green. In the 4th row, similarly knit only 30 sc on each part of the harness. And right away in the knitting process we set the shape of a watermelon slice, convenient for sewing. Now you can simply sew the piece end-to-end. When sewing, all broaches are simply tucked inside the segment.


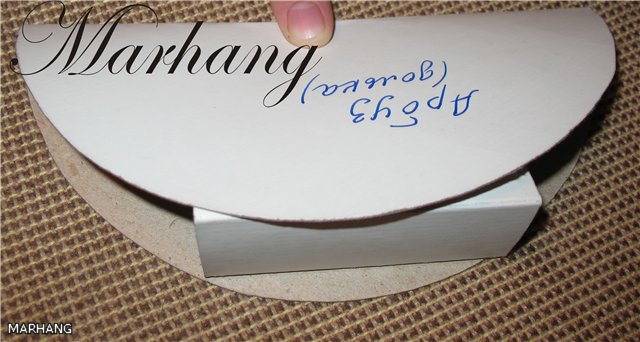
Before stitching, insert a rigid frame inside the slice so that the watermelon slice holds its shape. Thick cardboard can be used as a frame. Cut out circles from cardboard with a radius equal to the radius of the inner (red-pink) part of the watermelon slice. Fold the circle in half and insert the slices inside. To make the frame more rigid, between the edges of the bent cardboard circle, you can insert a spacer, also made of cardboard (see diagram and photo) or put pieces of foam rubber.


So perform 10 circles - watermelon slices.
Knit another dark green circle, consisting of 12-14 rows. Attach all the watermelon slices at one end to this circle. One slice can be left separately.
Place the finished watermelon in a deep plate of a suitable size. Place a single slice next to it.
The kitchen is a special place in the house. It should be bright, cozy and beautiful, because this is where the housewife spends a lot of time cooking. One of the best ways to decorate your kitchen is to knit potholders in the shape of animals, flowers, fruits, and berries. To keep a piece of summer in your home, you should add a simple crocheted Watermelon potholder to this collection. The juicy, sweet berry will remind you of hot summer days even in the snowiest winter.
Article navigation
Scheme
To knit potholders, a standard circle crochet pattern is used. Below are two options - either of them can be used. The difference is in the distribution of increases.
In this scheme, the increases are “scattered” around the circle, they are almost invisible.

In the diagram below, increases from row to row are located on top of each other. This method is simpler, but when knitting with some types of yarn, the increases become very noticeable.

Description
VP- air loop, CCH- double crochet, SS- connecting column.
Knit with red thread. Please note: in this description, knitting follows the second pattern.
Dial 6 VP, close in a ring using SS.
1 row: 3 VP, 11 DC in the ring. Finish the SS row in the last VP of the row.
2nd row: 3 VP, 1 Dc at the base of the first VP, * 2 dc in one loop
3rd row: 3 VP, 1 SSN at the base of the first VP, 1 SSN, * 2 dc in one loop, 1 dc* - repeat until the end of the row. Finish the SS row in the last VP of the row.
4 row: 3 VP, 1 SSN at the base of the first VP, 2 SSN, * 2 dc in one loop, 2 dc* - repeat until the end of the row. Finish the SS row in the last VP of the row.
5 row: 1 VP, knit sc to the end of the row. Finish the row of SS in the first VP, while changing the color of the thread to white.
6 row: 3 VP, 1 SSN at the base of the first VP, 3 SSN, * 2 dc in one loop, 3 dc* - repeat until the end of the row. Finish the SS row in the last VP row, while changing the color of the thread to green.
7 row: 1 VP, knit sc to the end of the row. Finish row SS in first ch. Fasten the thread and cut it.
Knit the second part in the same way - the tack will be two-layer. When you finish knitting the second part, do not cut the thread - it will be needed to tie the parts together.
Decorate each part of the watermelon by embroidering seeds with black or dark brown thread.
Place two round pieces next to each other. Start connecting them: grab the loops of two parts at once, knitting half-columns. This way they will be sewn without using a needle.
After knitting the last row to the end, fasten the thread. Then cast on a chain of VP of the required length for the loop. Close the loop by knitting a SS into the loop from which the VPs were cast on.
The crochet “Watermelon” potholder is ready!
Video tutorial
There are several more options for knitting potholders in the shape of a watermelon. Each of them is beautiful in its own way. Below is a master class on knitting a watermelon potholder in a different way. How do you like this result? An equally beautiful potholder with a detailed explanation of the knitting process. Definitely, you need to try both options. Or you can supplement them.
Master class on knitting a watermelon slice from Sontina. It is done quite simply.
Cast on 4 air loops with red thread and connect them into a ring.
1st row: in a circle - 6 RLS
2nd row: 2 sc in each loop (12)
3rd row: 2 sc in every second loop (18)
Continue knitting, adding 6 loops in each row (in the 4th row - in every third, in the fifth - in every fourth, etc.) Knit 16 rows (96) This is what I got:

Next, tie a white thread and make another circle, knitting 2 sc in every 16th loop.
After this, tie a light green thread and make another row, knitting 2 sc in every 17th loop. And finally, we tie a dark green thread and make three circles, adding 6 loops in each.
I didn’t have dark green threads, so I wove regular dark green sewing thread into the marsh-colored threads. It turned out very well.

Break the thread (I left the one for sewing). Cut a circle out of cardboard with the same diameter as the red part of the watermelon.

Fold a cardboard circle along the diameter, cover it with a circle of watermelon on top and start sewing from the corner, pushing a little fabric inside so that the watermelon takes the shape of a real one:

First, sew up both corners, then put foam rubber or padding polyester between the cardboard halves so that the resulting watermelon holds its shape, and sew up the remaining hole. You will get a slice like this.

Now we take black threads (I used floss) and embroider the seeds in random order.

That's it, our watermelon is ready! You can make 10 of these slices and put them on a plate, you get a whole watermelon cut into slices.

To make a pineapple, we need some yarn in yellow, brown, light green and dark green colors and a hook that matches the thickness of the yarn. I crocheted No. 3, threads - polyester with lurex 100g/400m. The size of the finished pineapple including leaves is 28 cm.
Designations:
VP - air loop
RLS - single crochet
С1Н - double crochet
СС - connecting post
Sequence of work:
Using a yellow thread, cast on 5 VP.  Connect them into a ring with a connecting post.

3 VP, 2 C1H in the ring, VP, (3 C1H in the ring, VP) - 5 times, SS in the third air loop.

Fasten and break the yellow thread. Tie a brown thread. 3 VP, 2 С1Н under the VP of the previous row, VP, (3 С1Н under the next VP of the previous row, VP, 3 С1Н under the same loop, VP) - 5 times, 3 С1Н under the next VP, VP, SS. Fasten and break the brown thread. This results in a hexagon like this:

Knit the required number of hexagons. It depends on the thickness of the thread and hook, as well as on the desired size of the pineapple. I knitted 18 motifs:

Now we tie all the motifs together with single crochets using a dark green thread. I got three rows. If the threads and hook are thinner, there may be more rows.

We roll the resulting fabric into a cylinder and connect it with single crochets.

We knit all unconnected edges together with RLS. This results in a cylinder like this:  Now we knit the bottom. Use a brown thread to knit a circle, the last row of which has 48 loops (if the threads are thinner, there will be more rows and loops). Leave a long thread.
How to knit a circle: start knitting from the center, in each row add single crochets in 6 places, double crochets in 10-12 places, changing the places where loops are added. If you add in the same places, you will get a hexagon.

Sew in the bottom, evenly distributing the stitches.

Similarly, we knit the top of the bottom, only with a dark green thread.

Sew on the top, having previously stuffed the pineapple with padding polyester. If you wish, you can insert a box of beads inside to make a rattle.

Now let's move on to the leaves. Cast on 20 VPs with a dark green thread.
1st row: RLS in the 2nd loop from the hook, 18 RLS
2nd row: VP, 16 RLS, SS
3rd row: skip 1 loop, 16 RLS
4th row: VP, 14 RLS, SS
5th row: skip 1 loop, 14 RLS

6th row: VP, 16 RLS
7th row: skip 1 loop, 16 RLS
8th row: VP, 14 RLS. SS
Row 9: skip 1 loop, 14 sc, fasten the thread.  In the same way we knit light green leaves:

Now we fold the light green and dark green leaves and tie them with SC with a dark green thread:

By analogy, we knit leaves of a different size - 30 and 40 loops. In total, I knitted 6 pairs of leaves for 20 loops, 3 pieces for 30 loops and 1 piece for 40 loops:

Now we sew the leaves to the top of the pineapple, starting from the middle.

The end result is a pineapple like this. You can make the leaves at your discretion - larger, smaller, shorter, longer. I can only say that the more leaves and the more stable they are, the more your pineapple will look like a real one.
Do you have your own master classes? Would you like to place them on our website? Send information by email [email protected]
Knitted toy. Fruits and Vegetables Crochet | Category: Knitted toys 
We knit a banana.
1st row: knit 4 tbsp into a ring (single crochet)
Row 2: increase in each stitch = 8 dc
3rd row: we make increases through 1 loop, i.e. we knit one loop, and in the second we knit 2 tbsp b/n = 12 tbsp b/n
4-24 row: knit in a spiral without increasing = 12 st b/n
Row 25: decrease through 1 loop, knit one, skip 1 = 8 sc.
stuff the toy with padding polyester or cotton wool. Handicraft stores sell woolen combs. 1 kg costs 27 rubles, very well suited for stuffing toys and pillows. If your child is not allergic.
Row 26: knit without decreasing = 8 st b/n
Row 27: knit 1 loop, skip 1. We make decreases after 1 column = 4 tbsp
We tighten the loops and finish the job. We hide the tail of the thread inside the banana.
Knitting radishes.
We put 6 tbsp into the ring.
Row 2: increase in each stitch of the previous row = 12 sts.
Row 3: increase through 1 stitch = 18 sts.
Row 4: increase through 2 stitches = 24 sc.
Row 5: increase through 3 stitches = 30 dc
6-8 row: knit without increases = 30 st b/n
Row 9: decrease every 4th loop, i.e. We knit 3, skip one = 24 tbsp
Row 10: decrease every 3rd stitch, i.e. We knit 2, skip one = 18 tbsp
Row 11: decrease stitches after 1=12 st b/n
Row 12: Decrease each stitch = 6 dc
We tighten the loops and finish the job.
We knit 3 tails according to the pattern. Dial 20 ch. we knit 7 half-columns, 2 tbsp, then in 1 tbsp. In the previous row we knit 2 half single crochets, in the next row - 2 tbsp. s/n, 1 half double crochet, 3 tbsp. b/n and further according to the scheme. Chain of v.p. we tie it on both sides.


Leaf for pear.
We dial 4 vp, enclose them in a ring of connections. Art. We knit 6 treble stitches into the ring, cast on 3 vp. and enclose them in pico conn. in a column at the top of the last st s/n. We knit 6 tbsp. We connect the last st s/n with the first.


Fruit basket
Would you like to take some vitamins? Autumn is at the door!
The fruit crochet experiment started with a bunch of grapes. Here is a whole basket of fruits and a description of how to work on them.

Pear

PEAR
Yarn for knitting - “KABLE” (Cotton 100%, 430m/100g.)
Hook No. 2.
Operating procedure:
Link 3 ch. and close it in a ring. Knit in a spiral, marking the beginning of the row with colored thread.
1st row: 6 tbsp. b/n. into a ring;
3rd row: knit 2 stitches above every second stitch of the previous row = 18 stitches. s n. ;
4th and 5th rows: knit 20 p/st. s n. ;
6th and 7th rows: 24 stitches each. s n. ;
8th and 9th rows: 28 stitches each. s n. ;
10th row: increase over every fourth column of the previous row;
11th row: increase over every fourth column of the previous row;
12th row: increase over every eighth column of the previous row;
After all the increases, the number of columns in the row should approximately reach 51-52.
Next, knit 10 rows without increases. Then finish knitting, stuff the pear with padding polyester or other printed material, thread the thread into the needle and pull all the loops tightly so that the wide part of the pear gets wrinkles.
LEAF
Knit a chain of 15 vp with green yarn, then knit stitches of different heights along the chain: 1 dc, 2 dc. s n., 3 tbsp. s n., 3 tbsp. from 2 n., 3 tbsp. s n., 2 p/st. s n., 1 tbsp. b/n.
Draw the sepal with a three-dimensional outline along the fabric.
Sew a leaf to the top. Also insert a wire folded in half into the top and paint it with a three-dimensional outline (stick).
Lemon

You will need yarn for knitting “NARCISSUS” (Cotton 100%; 400m/100g.)
Hook No. 1.5-2
Tie 3 vp, close into a ring.
1st row: 6 single crochets in a ring;
2nd row: knit a row without increasing = 6 single crochets;
3rd row: above each stitch of the previous row, knit 2 single crochets = 12 tbsp. b/n;
4th row: above every second stitch of the previous row, knit 2 single crochets = 18 dc;
5th row: increase over every third column = 24 st.b/n;
6th row: knit without changes = 24 tbsp;
7th row: increase over every fourth column = 30 st.b/n;
8th row: knit without changes = 30 tbsp;
9th row: increase over every fifth column = 36 st.b/n;
10th row: knit without changes = 36 tbsp;
11th row: increase over every sixth column = 42 st.b/n;
12th row: no changes = 42 st.b/n;
13th row: increase over every seventh column = 48 st.b/n;
14 - 19th rows: no changes = 48 st.b/n;
In the next rows, make decreases, that is, knit one of two stitches. To do this, insert the hook into the loop of the column of the previous row, grab and pull out the working thread, then insert the hook into the loop of the next column and pull out another loop from the working thread. There are 3 loops on the hook. Grab the working yarn and pull through 3 loops at the same time.
Rows 20-22: perform 6 decreases evenly in each row;
Mandarin

MANDARINS
Yarn for knitting: “BRAID” (60% viscose+40% polyester; 313 m / 100g.)
Hook No. 2
1st row: 6 tbsp. b/n. into a ring;
2nd row: above each column of the first circle, knit 2 tbsp. b/n. =12;
4th row: increase over every third column = 24 st.b/n;
5th row: increase above every fourth column = 30 st.b/n;
6th row: increase over every fifth column = 36 st.b/n;
7th row: evenly distribute 4 increases around the circle = 40 st.b/n;
Knit the next 4 rounds without increments, 40 stitches per row.
Then knit 3-4 rows with decreases (knit one from every 6th and 7th stitch of the previous row).
** Decrements - insert the hook into the loop of the stitch of the previous row, grab and pull out the working thread, then insert the hook into the loop of the next stitch and pull out another loop from the working thread. There are 3 loops on the hook. Grab the working yarn and pull through 3 loops at the same time.
Finish knitting, stuff the tangerine with padding polyester, thread the needle, pull the loops tightly and fasten.
LEAF.
Knit a chain of 15 vp with green yarn (Iris), then knit stitches of different heights along the chain: 1 dc, 2 dc. s n., 3 tbsp. s n., 3 tbsp. from 2 n., 3 tbsp. s n., 2 p/st. s n., 1 tbsp. b/n.
Knit the 2nd row on the opposite side of the chain in a mirror manner.
Strawberry

STRAWBERRY
Yarn for knitting - “NARCISSUS” (Cotton 100%; 400m/100g.)
Hook No. 2
Tie 4 ch. and close it in a ring. Knit in a spiral, marking the beginning of the row with colored thread.
1st row: 6 tbsp. b/n. into a ring;
2nd row: above each column of the first circle, knit 2 tbsp. b/n. =12;
3rd row: above every second stitch of the previous row, knit 2 single crochets = 18 dc;
4th row: decrease over two pairs of stitches in a row = 16 stitches. b/n.;
5th row: knit 16 stitches without decreasing;
6th row: add 5 stitches evenly per row = 21 sts. b/n.;
Knit the 7th and 8th rows without changes = 21 tbsp. b/n.;
9th row: add 5 stitches evenly per row = 26 sts. b/n.;
10th row: add 6 stitches evenly per row = 31 sts. b/n.;
Knit the 11th and 12th rows without changes = 31 st. b/n.;
13th row: in any part of the circle, add 3 stitches in a row = 34 sts. b/n.;
14th row: add 2 more stitches = 36 st. b/n.;
15th row: knit without changes = 36 tbsp. b/n.;
Then move on to decreases:
16th row: decrease evenly over every 5th and 6th columns;
17th row: decrease over every 4th and 5th;
18th row: decrease over every 3rd and 4th columns.
Fill with padding polyester and pull tightly.
Tie a sepal from a bright green iris:
5 v.p. close in a circle, 10 tbsp. b/n. in the ring, then a row of 15 st.b/n.
Knit the 3rd row above each column of the previous row like this: *3 ch. for lifting, 1 tbsp. s n., 1 tbsp. from 2 n., picot, 4 v.p., 1 tbsp. b/n.**. *…** repeat 4 more times. We get 5 petals in a circle.


