House slippers are a great gift! Handmade with warmth and love, they will warm the feet of you and your loved ones!
I sewed these indoor slippers for all my family and friends. I’ve already made about fifty slippers! I determined the dimensions experimentally, but it’s better to check before cutting.
Step 1. Cut out the details.
Details of the upper part of the slipper:
- On the left in the photo there are 2 parts - this is the very top, it can be cut out of some beautiful fabric, not necessarily very durable. I usually cut from faux fur (old fur coats are used!)
- The 2 central parts are the lining, it serves for warmth. I usually cut it out of thin batting, the kind sold in hardware stores; they also use it to wash the floor.
- On the right in the photo are the details that need to be cut out of fabric that will be pleasant to the body.
All details are cut out the same way.

Details of the bottom of the slipper (sole):
- On the left in the photo is the outer part of the sole, it needs to be cut out of thick, very durable fabric, I cut it out of felt. From the same fabric I cut out heels.
- The 2 central parts are the lining, it serves for warmth and softness. I also cut it out of thin batting.
- On the right in the photo is the inner part of the sole. It needs to be cut out of fabric that will be both pleasant to the body and at the same time very durable. This part begins to wear out very first, especially under the heel.
Don't forget to cut out the pieces for the left and right legs.

Also for sewing you need to cut out strips of elastic fabric 3 cm wide. It is advisable to use synthetic fabric for this, it is stronger.
Step 2. Pin together the top parts.

Step 3. We sew a line from the wrong side, thereby fastening all 3 parts.

Step 4. If the top part is made of faux fur, then you need to cut off the excess fur along the edge. Cut it boldly, don’t be afraid, the fur along the edge will still get in the way. You can also cut off the excess lining and, in general, trim the entire part.

This photo shows the piece trimmed (left) and uncut (right).

Step 5. Now we take a strip of elastic fabric, place it with the right side on the front side of the part to the inner edge and sew it on.
|
|
|


Step 6. Turn the strip to the wrong side and sew with a “Multiple Zigzag” stitch (knitted stitch).
Stitch type:
![]()
|
|
|


View from the back side:

Step 7. From the wrong side, cut off the excess strip close to the stitching.

View of the upper part of the slipper from the wrong side:

Step 8. Place the inner part of the sole on the wrong side of our part, face down, aligning the central marks (indicated in blue in the photo). We pin it with a pin.

Step 9. Align the side marks and also pin.

Step 10. Now you need to sweep away the parts.

Step 11. We sew a line with wrong side, thereby fastening the sole and the upper part.

Step 12. Now again take the strips of fabric and place them right side on the front side of the slipper. The beginning of the strip must be folded (see photo).

Let's add a line:

End of line:

General form:

Step 13. Turn the strip onto the wrong side of the slipper and sew a “Multiple Zigzag” stitch. The slipper blank is ready.

Sewing slippers with your own hands is quite simple and it will take little time. Just follow our step-by-step instructions exactly.
Step 1
Draw the outline of the foot on a piece of cardboard. Mark 1 cm wide allowances around the outline.
Step 2
 Using a measuring tape, measure your foot height at the top of the flip-flops. Draw a horizontal line along the top line of the flip-flops according to the measured height measurement. From its ends, draw a semicircle that goes around the contour of the sole. Also add 1 cm allowance. Transfer the lines of contours and allowances in a mirror image to another sheet of cardboard. Make 2 patterns separately for the top of the slippers and for the sole (symmetrically for the left and right legs).
Step 3
 Cut out 1 piece each for the right and left legs from non-woven fabric for the top and sole, then cut 2 pieces for the right and left legs from fabric for the top and sole.
Fold and pin three identical pieces. Edge the straight edge of the top of the slippers with the finished bias tape.
Step 4
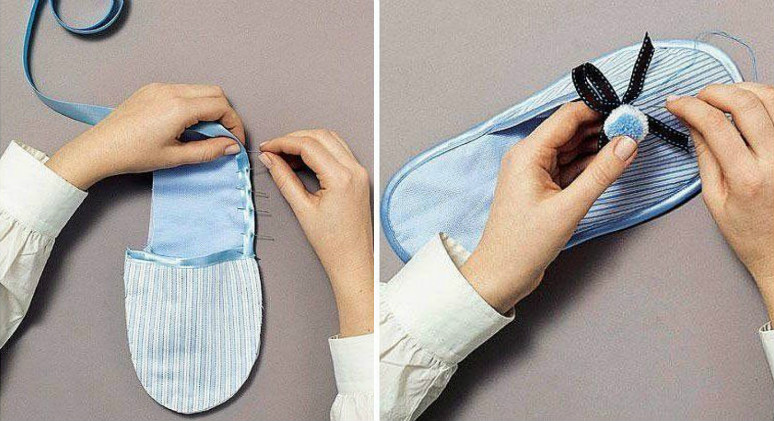 Sew the upper piece to the sole piece. After this, surround the sole with the finished bias tape.
Fold the bow, baste in the center and sew on a pompom or decorative button, taking the top of the slippers. Photo: pinterest.com
Having a good pattern, you can sew comfortable slippers with your own hands, because this is a necessary thing in any home.
We will work with existing fabrics, we will not buy anything, we will use material from unnecessary old things, as well as pieces of leather from worn-out handbags or even boot tops.
In any home there will be skirts, jackets, drape coats that you would hate to throw away, but will never wear again. Usually they are lying around in a bag somewhere in the basement. At least that's how it is for me.
Even if you've been happily wearing them for a long time, there are always good pieces there. Let's give unfashionable, but still very good things a second life.
One tip: if you have an old wool sweater lying around, you can felt it in the machine, dry it, iron it - this is an excellent material for sewing homemade slippers! Once felted, it is no longer subject to shedding.
Here are presented, by and large, three patterns for cutting and sewing soft, cozy slippers with your own hands.

There are several more options for soft slippers with knitting patterns; by following the link you will find both crocheted and knitted, as well as varieties, for example, only with crochet trim. Slippers from an appendix to an old magazine, poor quality photo, but I’m convinced that the material is still relevant.
2 sewing patterns from Peasant Woman
Who doesn’t know, in Soviet times there were magazines for women called Peasant and Rabotnitsa. Frankly speaking, the name is not very good, but at one time they were loved by many. Recipes and patterns were given there. It’s a pity that there were no good color pictures, but we were glad that we had them.
Overall, the materials were very useful and the ideas inspired creativity. Since I recently came into possession of the files of this publication, I present something useful.
Using almost the same pattern, you can sew both regular flip-flops (without backs) and fully closed slippers.

The first model is more open, the second one has an original valve. Size 36-37. If a larger size is needed, then increase the pattern along the entire contour. If the leg is narrow, then increase only in length.
The simplest material will do, perhaps even one that has been collecting dust in the pantry for a long time. For the upper part you need corduroy, drape or soft leather. You can use thin fabrics: fold them in several layers and stitch them for density. It is better to make the sole from the leather of old boots or bags.
Inside the slippers you can put an insole of leather, fur, or drape.
Cutting details (1 piece each - this is for one slipper, without seam allowances, we will take it 0.5 cm):
- Valve
- Sole (cut along the inner contour of the bottom part)

Sewing order:
Cut out parts from the material. Process the top. Cut a slot along the inside for the leg. We either hem the inner edge or trim it with a beautiful braid or edging. You can also decorate it with fluffy fringe.
Next we work with the bottom detail. We cut out the sole separately and glue it with instant glue. Now you can connect the top and bottom parts. First, we tighten the top piece with thread along the outer edge. We do the same with the bottom part. Both parts must match the points from 1 to 10, which are written in circles.
They will look a little different - more gathers on the back of the top and the nose of the bottom. We sew them from the face.
You can make a decorative seam with leather or thick colored thread or lace. Or treat it with braid. One slipper is ready. Let's move on to the second one. Just remember that the pattern will be reversed in relation to the first one.
If you decide to decorate your slippers with original flaps, then cut out part 3. Finish the edge. You need to sew the valve along line 11-12. It is secured with ties attached to the point marked with a cross on the top part and the valve itself. The ties can be a continuation of the braid with which the edge is finished.

Option based on a pattern from Burda
The following method of sewing slippers for the house was proposed at one time by the magazine Burda. True, because of the pom-poms and the sharp, upward-looking nose, they look more like little slippers. :)

The pattern is simple, first you just need to measure the length of your foot - it should match the length in the diagram. Enlarge it in a graphics editor to the desired width and print it on a printer.
The black part is the sole, and the red part is the upper.

The picture below briefly shows the operating procedure. Light green indicates the lining - the inner part, and a colored pattern - the outer part.
Increase the pattern of the sole and top to 28 centimeters.
Description of work
- For each slipper, cut out two uppers from material and one sole from felt. To get shoes for the right and left feet, cut one sole as in the pattern, and turn the other over to get a mirror image. Do the same with the side parts - two along the pattern, two upside down. Additionally, cut out a fleece top and sole for each slipper. This will be the inner part, the lining. Don't forget a 5mm seam allowance.
- Place the sides of the fabric face to face, pin them together, and then sew them together. Press the seams in different directions. Repeat for the inner side elements (Fig. 1 and 2).
- Fold the outer and inner sides for each slipper and pin them face to face, sew along the inner circumference (Fig. 3). Make notches on the circumference with scissors, turn it inside out, iron it.
- Place the lining and soles facing each other. First sew on the sole, and then the seam on the heel (Fig. 4).
- Place the lining and sole together, right sides together, and stitch, leaving a small hole of 8 cm (Fig. 5). Connect the heel seam.
- Turn the slippers inside out through the hole left, then carefully sew up this hole by hand (Fig. 6).
- Make a pompom from wool and sew it to the slippers (Fig. 7).

We always associate slippers with coziness and comfort. After all, these are comfortable and sometimes warm indoor shoes, in which it is easy and pleasant to walk around the house. Today, stores offer a wide selection of shoes for the house, both warm and regular, for the hot season. But we will tell you how to sew slippers with your own hands!
Shoes can tell a lot about a person. About how neat you are, whether you follow fashion. Your shoes, sandals, and boots can tell you whether you suffer from diseases of the joints of your legs. But if the shoes that we wear to go outside or go to work must meet some standards, then you can choose any indoor shoes depending on your desires. We offer you several ideas on how to sew slippers with your own hands.
You can make many pairs of slippers for each family member and guests. The slippers can be different, or they can be made in the same style. Homemade slippers can also serve as a gift for a family member or close friend.


How to sew home slippers with your own hands. Instructions
In order to sew home slippers, you will need durable soft material. The material can be old items made of thick knitwear, drape, leather, jeans or fur. Before you start sewing, decide on the model and color, sketch out a sketch and make a pattern. It is very easy to make a pattern based on the shape and size of the foot by placing the foot on a piece of paper and tracing it. For example, if you decide to make homemade felt slippers, then making them may only take you half an hour.

To start, make a pattern as above, simply trace your foot, placing your foot on a piece of paper. Then, to the resulting drawn foot, draw two rectangles on the right and left, which will serve as a jumper holding the slipper on the foot. Once the pattern is ready, cut it out and place it on a piece of felt. It is enough to make a pattern for one foot, for example, the right one, its reverse part will serve as a pattern for the left foot.

Trace the pattern placed on a piece of felt with a pen and cut it out. Then connect the side parts of the jumper with each other into a ring, and try on the future slipper on your foot. Fix the jumper by adjusting it to the leg and sew. So you have a slipper. You can decorate it as your heart desires. Any decoration is suitable here: buttons, rhinestones, beads, fur.
You can also make fabric slippers at home. In order not to fantasize with the pattern, you can tear up old slippers that have served their purpose and make a pattern in their likeness. If there are no old slippers in the house, then make a pattern yourself, also tracing your foot placed on a sheet of paper.
What to make the soles of house slippers from?
Stores sell felt insoles with pimples. For the sole, you need to buy these insoles (price 36 rubles and 70 kopecks) and trim them a little along the heel and toe.

Then, using “Moment - 1” glue, place the sole on the sewn or knitted slippers and carefully sew around the “gypsy” needle with thick thread with tight stitches. You will get a beautiful and neat sole.
Advantages of a “bumpy” sole
- Felt breathes well and is washable;
- Durable “pimples” give the product an anti-slip effect;
- The inexpensive material is durable and abrasion-resistant, and the sole looks very decent.
And most importantly, you can make an excellent sole for slippers from it in almost 10 minutes!
If you don't want to use felt insoles as soles, look for another dense material. This can be several layers of thick fabric, leatherette, thick denim. After all, the main load falls on the sole, and if it is too thin, it will quickly fray and wear out. And walking in slippers with thin soles will not be very comfortable.

House slippers should be comfortable, light and soft so that your feet can rest after a hard day at work.
Today, various styles of slippers never cease to delight our female eye. We cannot pass by the beautiful house shoes, which are embroidered with crystal stones, decorated with sequins and rhinestones. Winter versions of slippers fascinate us even more: boots with ears or warm flip-flops with fur. In this article we will tell you how to sew slippers using a pattern.
House shoe models
Today in store windows we can see a huge assortment of house shoes. Modern designers annually update their range of slippers with new types and interesting colors.
House slippers are not a cheap pleasure, so many women are interested in how to make a pattern for house slippers with their own hands and sew shoes using it. But for this you need to decide on the style of the product.
House shoes can be divided into several types:
- flip-flops;
- closed-toe slippers;
- indoor boots;
- 3D house shoes;
- UGG slippers;
- moccasins;
- slippers-socks.
To understand how to make a pattern for house slippers, boots or Ugg boots, closed-toe slippers or indoor slippers, you need to take a few tips:
- To avoid taking measurements, you can take an old slipper, put it on paper and outline the sole.
- In order to sew on the edging you will need an awl.
- As a rule, the sole is cut out of leatherette, split leather or leather.
- The insole can be cut from cloth or suede.
- To sew a high-quality and durable product, you need to purchase special nylon threads.
Material for sewing house shoes
To make a pattern for house slippers with your own hands, you need to select a fabric and stock up on everything you need. Material for sewing house shoes should be of high quality and light, for example:
- fleece;
- mahra;
- jeans;
- wool;
- plush;
- suede leather;
- felt.

You can cut out and sew light house slippers or moccasins from denim, felt and suede. Beautiful products are made from fleece, terry and plush. From these types of fabric you can sew any model of house shoes.
How to sew home slippers: felt pattern
To create these house shoes you will need to make a complex pattern. You will need the following materials:
- 0.5 m felt;
- scissors;
- gypsy needle;
- glue from a gun;
- bright floss threads;
- bullseye patch;
- cardboard;
- pencil.
The DIY slipper pattern will look like this:

Manufacturing process:
- Take a piece of cardboard and place your feet on it, using a pencil to outline your left and right feet.
- Now cut out the soles with scissors and trace them on the fabric.
- Let's cut out these elements.
- Next we need to create the upper of the shoe. To do this, we again take cardboard and draw two semicircles. The sizes of these parts depend on the fullness and length of your foot.
- After that, we transfer these two parts to felt and cut them out.
- You should end up with four patterns.
- We must sew the upper part of the slipper with the sole.
- This can be done using floss threads.
- Once the two elements are sewn together, we can move on to decoration.
- We must sew a colorful patch to the top of the product.
- Now, using the same pattern, we sew and decorate the second slipper.
- Felt house shoes with bright stripes are ready!
How to sew Ugg slippers
Fleece slippers are ideal for sewing such a product; they will be warm, soft and will last you for many years. To create a pattern for home slippers, you will need 1 m of fleece, 0.5 m of suede and 0.5 m of leather. It would be good if these materials were matched to match. You also need the following sewing supplies:
- threads to match the fabric;
- needle;
- scissors;
- glue "Moment";
- centimeter;
- ruler;
- cardboard;
- pencil;
- pins.

Pattern of Ugg slippers:
- Cut out rectangles 38x20 cm from cardboard for the boot (two parts).
- We pin the patterns to the fleece, trace and cut out with a 1 cm allowance.
- We cut out suede insoles 23 cm long.
- Now we take the leather and cut out the soles approximately 24 cm in length.
- Using pins, we chop off the upper parts of the boot face to face.
- Trim the seam allowances, fold the back edges of the boot and grind them down, leaving a hole in the lining through which you will turn the product inside out.
- Sew the top of the boot from the foot to the top vertically.
- To ensure that the boots do not dangle and sit beautifully on the foot, we move on to the darts. Make four notches in the places where the product bends (in the area of the boot) and carefully sew them together, trim off the excess.
- Now turn the outer part of the sneaker right side out, insert a suede insole into it and sew up the hole with a hidden seam.
- Carefully coat the leather sole with glue and connect it with pins to the foot of the product.
- We do the same with the second boot.
- When all the work is ready, take the boots and fold the top of the products.
- You can embroider these lapels or decorate your ugg boots with ribbons.
How to sew homemade slippers and socks yourself
Making a pattern for house slippers with your own hands is quite labor-intensive and meticulous work. To simplify the task, you can use beautiful terry socks. Thus, you can create original house shoes in just 10 minutes!
For this you will need:
- red terry socks;
- leatherette - 0.5 m;
- glue "Moment" (or glue from a gun);
- decoration (bows, beads and stars);
- scissors;
- needle;
- marker;
- red threads.
Step-by-step guide on how to make slipper socks:
- The sole should be made from leatherette. To do this, place your feet on the material and use a marker to outline the outline of your feet.
- Using scissors, cut out the soles and glue them to the socks.
- After the slippers have dried, you can proceed to decorating.
- Make a lapel on the product blank.
- Take a slipper and decorate the side (outside) with a striped bow, right on the lapel.
- Sew beads just below and attach a couple of metal stars.
- The second slipper should also be decorated in this way.
Using this pattern, you can sew similar house shoes, but come up with other ways to decorate. It all depends on your taste and ideas!
what are the shoes decorated with?
The fashion trend in 2017 was chic fur slippers and flip-flops with fur. The pattern of home slippers made of fur is simple: to do this, you can take an old fur coat from a fox (nutria or rabbit) and cut out four parts according to your measurements - two semicircle tops and two insoles (the process has already been described).

Then we carefully sew the upper parts of the shoes with the lower elements using special nylon threads. We cut out the soles of old slippers from leatherette and glue them to the insoles.
If you want to surprise your guests, you can decorate your slippers in an original way. Here everything will depend on your imagination. You should start from the general color scheme of the slippers; you don’t need to glue a large number of different decorations on them. Everything must be done with taste. For example, after you have made a pattern for house slippers, decorate the product with bows. Attach decorations to the sides of the outside of the boots. So, what else can you decorate your slippers with?
Elements for decorating house shoes:
- ribbons;
- stars;
- zigzag braid;
- floss threads;
- buttons;
- stones;
- embroidery;
- rhinestones.
In order for the decorations to sit firmly on the product and not fall off after the first wash, they should be set with glue or sewn tightly with thread.


