Knitting enthusiasts quite often end up with balls of thread that are no longer needed, but at the same time it’s a pity to throw them away. Of course, you can try to knit colored socks or a rug later, but it is better to transform old items and decorate them with ordinary threads. In this article we have collected for you many ideas for crafts made from threads that everyone can make.
Interesting ideas for crafts made from threads: creative headphones
Necessary materials :
—threads (2 colors)
- scissors
- adhesive tape (scotch tape).

Step 1: Take threads of 2 colors. The length of each thread should be 3 times the length of the wire. Tie the ends of the threads to the wiring.
Step 2: Attach the wires with tied threads to the tabletop using adhesive tape (so that they do not move).

Step 3: Take a thread of the main color that will be visible. Pass this thread under the others and then lay it on top of them. This creates a loop through which you need to pass the main thread and tighten it.

Step 4: Repeat the previous step. To change the thread, repeat 15 times, then take a different color.
When making knots, do not forget to ensure that the “ladder” is spiral.
Wall decor made of threads
Necessary materials :
- wooden stick 90 and 120 cm;
- multi-colored threads;
- scissors ;
- PVA glue.
For ease of use, secure the stick between two chairs.

Step 1: We cut threads of different lengths, and each color of thread has its own length. In our case, the long thread was 60 cm, and the short one was 30 cm.

Step 2: Apply PVA glue to the stick. We begin to hang threads on it, throwing them over it. We try to place the threads evenly.

Step 3: After hanging all the threads, wait for the glue to dry. Then we cut the threads diagonally.
Fantasize and choose your drawing, subsequence flowers, cutting method. The result is a very original piece of decor that will bring a touch of creativity to your interior.

Thread decor
How to make a picture from knitting threads
Materials:
-canvas on frame;
-thread of medium thickness;
—adhesive tape (scotch tape);
—aerosol paint.

It is recommended to spray paint not indoors and while wearing protective clothing.
Step 1: Create a pattern using threads on the frame. On the back side of the frame we secure the threads with adhesive tape.

Step 2: Paint the canvas with one or more selected colors.
Step 3: After the paint has dried, remove the threads.
Original decoration using isothread technique
Materials used :
Thick paper (cardboard, box);
- threads of different colors;
Scissors .

Step 1: Cut out a geometric shape from thick paper, any one you like.
Step 2: We make small cuts (2 cm) along the entire length of the figure at the same distance from each other.
Step 3: Take the thread, insert it into the cut and wrap the entire figure (using the remaining cuts), creating a pattern.
Step 4: At the end of the work, after you have received the desired pattern, leave a loop of thread from which you can hang the decoration.
Decoration made from floss threads
Materials:
— a metal ring (like a washer);
- scissors ;
- chain ;
- multi-colored threads;
- Super glue .

Step 1: Take a long thread, fold it in half, thread it through the ring, forming a loop. The thread is secured to the ring when it is passed through the resulting loop.
Step 2: Hold the ring in one hand and with the other hand wind the thread around the ring, pushing it through the loop. Repeat until the entire ring is wrapped. At the same time, make sure that the thread lies tightly to each other.

Step 3: Make several similar rings, only in different colors. To do this, repeat step 1 and 2.
Step 4: The resulting rings are put on a chain.

Alternatively, you can replace the chain by connecting the rings with the thread with which they were wrapped. It is done like this: in the 1st ring, the thread is not cut after wrapping, but is threaded into the 2nd ring and wrapped around it several times, making a knot at the end. In the same way, you can attach the 3rd and subsequent rings. The thread color can be one or alternate. If the thread runs out, then simply tie a new one and continue connecting the rings.
When you receive the required number of rings, tie threads to the outer rings and connect them into a circle.
Wicker cup made of threads
Materials used :
- threads;
- PVA glue ;
- brush;
- scissors ;
- cup ;
- wide adhesive tape (or cling film);
dye .

Step 1: Apply several layers of cling film or tape to the outside of the cup.
Step 2: A 50 cm long thread is cut and twisted in a spiral to form a circle.
Step 3: Turn the cup over, bottom up, and place it on the table. Place the twisted disk (circle) in the center of the cup. We apply glue on top of it so that the spiral does not fall apart.
Step 4: From the glued disk, we begin to wind a new thread in a circle, in the shape of a cup. We coat the thread well with glue for reliable fastening. We do not wind the thread to the very end of the cup, leaving about 3 cm from the bottom.

Step 5: The end of the thread needs to be secured. Then we proceed to generously coat the resulting shape of threads with glue. Leave the work for a while until the glue is completely dry.
Step 6: After the glue has dried, carefully remove the resulting
Unusual wall decor made of threads
Materials:
- small nails (or buttons);
- long brown thread;
- sheet of plywood.

To decorate the wall, take a large sheet of plywood on which a large tree is made. You can also create a tree on a small piece of plywood. Then you will get a picture that will decorate your apartment.
So, let's get to work:
Step 1: On a sheet of plywood we make a sketch of our future tree.
Step 2: Drive small nails along the contour of the drawn tree. Don't try to maintain symmetry or draw precise lines: the tree should look natural and alive.
Step 3: We begin to create the tree, moving from bottom to top. To do this, we wrap the thread around the nails. Strict sequences no, everything is done chaotically.
Step 4: Since the work is large and labor-intensive, you can take a break and leave the work for a while. In this case, wrap the end of the thread behind the nail. Returning to work, unwind the thread and continue weaving the tree.

Many housewives will not hide the fact that they have impressive reserves of leftover yarn that are gathering dust idle in the closet. All you have to do is take a creative approach to the accumulated goodness to turn it into excellent, hand-made thread crafts.
A variety of techniques will allow you to make interesting decorative objects, original gifts and simple trinkets.

Craft options
Since ancient times, women have been passionate about creating a wide variety of things from threads. However, modern mothers can always buy any toy they like in the store. But the joy of joint creativity is priceless, so you can sometimes find them doing handicrafts with their children.


What can you make from leftover yarn? For example, decorative elements in the form of vases, lampshades, flowers. Various paintings will look good. Children will be delighted with voluminous toys in the form of fluffy animals.

What will be useful at work?
To understand how to make a craft from threads, you need to have a clear idea of what you will need. It's about the tool and the material.

Each new creation requires a different approach, but the general list will be something like this:
- yarn (wool or cotton, for example, floss);
- needle;
- scissors;
- PVA glue (needed for creating paintings, lampshades);
- glue gun (useful for creating animals);
- sheet of cardboard;
- wire.

Furry animals
Wool yarn is an excellent material for creating voluminous crafts. It makes furry animals, fluffy yellow chickens and much more.

The toys are just a simple pompom, so it all comes down to the ability to create it. Below we will try to provide detailed instructions on how to make a craft from threads.

Making pompoms is quite simple. First, you should cut out circles from cardboard, the diameter of which will determine the size of future pom-poms. A hole is made in the middle of the resulting blanks. After which the two circles are added to each other.

Next, armed with a needle and thread, you need to tightly wrap the cardboard circles by threading the thread through the hole in the center. The number of turns determines the splendor of the future pompom - the more, the better.

When it is no longer possible to wind, the free end of the thread is cut off, and the thread blank is cut along the entire circumference. It is convenient to use a blade for these purposes.


By spreading the cardboard to the sides, the product is tightly tied in the center. The final stage involves removing the cardboard elements, after which the finished pompom is straightened. Protruding ends and irregularities are removed using scissors.

Pompoms of different sizes will create different body parts of an animal or bird. If you use yellow material, you can create a cute chicken by gluing two pompoms together with hot glue using a gun.

The finishing touch will be the design of the beak and eye. In a similar way, you can make a dog, cat, frog and much more.

Creating paintings
If you have an impressive amount of thread scraps of different colors in your bins, then you can create a beautiful picture from them.

To work you will need cardboard, PVA glue and scissors. Drawing templates can be found on the Internet or prepared yourself. The image should be simple and have large elements.


First, the outline of the future image is drawn on the cardboard. If you have a template, you can paste it directly onto the cardboard. Next, the yarn of the desired color is cut into small pieces using scissors.

For convenience, the finished cuts are placed in separate boxes. Those parts of the future painting where one of the colors will be used are generously smeared with glue, and then sprinkled with chopped yarn.

Gently pressing it to the base, achieve gluing; the excess can be blown off or shaken off. The remaining work is done in the same way. Having filled the entire picture with yarn, it is framed.

Interesting options for thread crafts are obtained if the theme of the paintings is simple landscapes and flowers.

Openwork crafts
Below will be presented another master class on crafts made from threads. We're talking about an airy lampshade. To make it you will need:
- balloon;
- threads of small thickness (preferably cotton);
- PVA glue;
- scissors.


First you need to inflate and tie the balloon tightly. Then its surface is generously lubricated with glue, after which the ball is wrapped with thread. The main thing is that at the end there are no large clearings left on the surface.

The workpiece is left to dry until the next day. Then the ball is deflated and carefully removed from the thread sphere. Next you need to make a hole to place the cartridge inside. Energy-saving light bulbs are optimal because they heat up less than conventional incandescent light bulbs.

Openwork balls are suitable for creating baskets, toys and other decorative elements. You can wrap yarn around a vase, giving it an original appearance.

Decorative flowers
Floss can make very beautiful flowers. The principle of operation is similar to making an openwork lampshade or vase. If there is no suitable container on which to wind the threads, you can use regular crumpled paper. For better results, it is useful to wrap it with tape.

The blanks are wrapped halfway so that petals can be cut out from the resulting cup. To prevent fraying of the ends, a piece of thread is glued to them. The wire makes a good flower stem if you wrap it with yarn of the appropriate color.

When the individual elements of the future flower are ready, they need to be connected and fixed with glue. Thanks to the combination of different sizes and shades you can get excellent bouquets.

Photos of thread crafts inspire many with their unusualness and beauty. Anyone can join the ranks of handicraft masters, especially since the hobby is interesting and does not require large financial expenditures.

Creative work with threads and yarn will allow you to escape from the everyday hustle and bustle and give you a lot of pleasant time with your family.

Photos of crafts made from threads


The first thing that comes to mind when looking at threads is knitting. But you can make very beautiful products from any threads without using a hook or knitting needles.
This could be various jewelry in the form of earrings, hair clips or scarves, as well as items for your home interior that will make it special.
I offer some interesting ideas for things that you can make from threads with your own hands.


Accessories made from threads
Thread hairpin
Most girls go to many stores to find a beautiful and unusual hair decoration. Hairpins and elastic bands are the most popular jewelry for women's hair.
To make this accessory yourself you will need:
- threads;
- buttons;
- rubber;
- decorative elements.
Preparation method:
Wrap the thread around two fingers. Choose the thickness of the ball yourself. Once you have decided, rewind it once or twice in the middle. You should now have a bow. Glue a button in the middle. Its size should harmoniously fit into the size of the bow. Attach the resulting braid to an automatic or hair elastic. If desired, you can take several types of threads. Also suitable for decoration are beads and artificial pearl sequins.

Wrist bracelets
If you have old bracelets that have lost their appearance, do not throw them away. You can make interesting new products out of them. Such decorations will only be available in one copy.
To work you will need:
- bright threads;
- glue;
- beads or other decorative elements.
Manufacturing process:
To make a new design, use threads of the desired color. Wrap them so that the base is not visible between the steps of the material. Secure the ends of the weave with super glue. But so that they are not visible. Decorate with beads, shiny sequins or decorative flowers.

Scarves
We all know that knitted scarves are very beautiful and stylish. For those who do not know how to knit, you can make a scarf with your own hands without knitting needles. If you need it only as a decoration, then this option is exactly what you need. Take the thickness of the thread that interests you and weave it into a thick braid. Try to keep the bindings the same distance. The weaving should not be very tight. Otherwise, the final result will be a loss of volume of the product. This type of scarf will not warm your neck in cold weather, but it will look amazing. There is another option that is more complicated.
For it you will need:
- threads;
- glue;
- fabric or leather;
- scissors.
Manufacturing process:
Take a chair. Wrap the threads around its back several times. Tie in three or four different places with a small piece. These places need to be covered with small pieces of fabric or leather. It is best to attach them with glue. For greater individuality, you can sew sequins in certain places.


Christmas tree decoration
To make interesting hats for the New Year tree, you will need:
- cardboard;
- bright threads;
- scissors.
Preparation method:
Cut the cardboard into small rings. Next we will wrap them with threads. Before this, the threads must be cut to a length of 20-25 centimeters. Weaving must be done very tightly. After the surface is covered, we pull both ends of the thread into the ring. They should come out the other side. We tie the elongated ends with the same thread color. Your DIY Christmas tree decoration is ready. In order to get a larger figure, use cardboard from the box, but it will need to be glued.


Tit
This is already more troublesome work. It will take several hours of your personal time. But the result will please you. After all, I always wanted to see such a bird, and now I have the opportunity to watch it all the time.
To make it you will need:
- threads of three colors: gray, black and yellow;
- cotton wool for filler or padding polyester;
- a small piece of cardboard, approximately 14 by 20 centimeters.
Manufacturing process:
In advance, form a ball from cotton wool or soft filler, the diameter of which will be up to five centimeters. Then we begin to wind black threads onto the cut out cardboard. If your threads are thick, then 50 turns will be enough. If thin, then do more. After the threads are wound to the end, cut them completely on one side. You should end up with a ball of thread that is bent on both sides. Thus, we make gray and yellow threads.
Take a yellow and black bunch. They need to be placed at right angles. In the middle of the thread you need to intertwine so that you get a loop. Let's move on to the gray beam. We must bandage it in the middle with the same color. To form the body, you need to take a gray bun and a ball, which you did earlier. We wrap the threads around the cotton wool. They need to be stretched so that the tit's belly is the same. To form a tail, you can tie the tip with the same color of thread.
The back and head will be made from yellow and black skeins. This is a very delicate job, so you need to do it carefully. Yellow - you need to stretch it evenly on the sides. We also tie the ends. They can be cut off or left. On the upper part, in the middle, we stretch the thread that will form the head. The tit's neck does not stand out very much, so there is no need to tighten the weaving much.


Vase
Another option for using threads could be a vase. More precisely, its design.
For this work you need:
Process :

Thread rugs
To work you will need:
Production process:
Making such rugs does not require a lot of time and money. We take the grid as a basis. If it is not possible to purchase such material, rugs can also be made on burlap. You need to cut out the required shape and size from it.
Next, you need to select the appropriate threads for the rugs. It is better if they are thick and soft. They need to be cut about 10 centimeters long and attached to one side of future rugs. To do this, fold the thread in half, grab the resulting loop with a hook and pull it from one hole to another. After this, insert the tail of the thread into the loop and tighten it tightly. These handmade rugs are very soft and beautiful.


.
.

.

Video: how to make a rug from threads with your own hands
A real housewife will not waste even a piece of thread. She will always find a use for them. Using our methods, your guests will be delighted with what they see. After all, there is nothing more beautiful and stylish than handmade products. Try, experiment and only then will you be the happiest person.
http:/vnitkah.ru/nitok/chto-mozhno-sdelat.php
Oksana Andronova
Every child has toys. You can buy some in the store whatever: any size, color, from teddy bears to newfangled minions. But a toy made by mother or father’s hands has a special charm in the eyes of a child. I suggest making a bird from thread. Having mastered simple techniques, you can do it at home with your child. You can play with it, decorate the interior of your home, or give it as a gift.
So let's get to work.
We need three colors of yarn, seeds for the beak, beads for the eyes, 20x14 cardboard, newspaper and glue.
1. We wind yarn of one of the colors (your choice) on the long side of the rectangle. This will be the bird's head. We make about forty turns.

2. For the wings and hooters, choose a different color and wind the yarn on the short side of the cardboard.

3. Cross the yarn for the head and wings.


4. We tie the yarn for the breast in half.

5. From a sheet of newspaper, crumple a ball approximately five cm in diameter.

6. Wrap it with breast yarn.

7. We lay the crossed yarn on top, tie it at the bottom - this is the tail.

8. All that remains is to glue the beak made of seeds and eyes made of beads.

Publications on the topic:
Flowers made from threads are used to decorate clothes, hats, and bags. An applique of thread flowers can serve as a good gift. For.
We will need: 1. Silicate glue 2. Sticker 3. Scissors 4. Cardboard 5. Any thread 6. Christmas tree decorations 1. First, we take cardboard.
Master class “Christmas tree toy” There is very little time left before the New Year, and I am already thinking about how I will decorate the Christmas tree. I would like to do...
In order to make such a hedgehog we need: PVA glue, wool threads, scissors, a white sheet of cardboard and a simple pencil. For.
Hello, dear guests of my page! Here comes the New Year. The New Year brought smiles and fun, especially for children. The guys got in.
One day Arisha and I were sitting at home and were bored. I don’t want to read, I don’t want to write, and I don’t want to play either. And I remembered how my grandmother taught me.
The method of tying threads into a bundle is used to make tassels, bows, berries, and figures of people. Flowers are made using the same method. I made it.
Learn to make a wicker decoration on cardboard, a bullfinch from threads and other birds. Learn how to shape chickens and bunnies into pom poms using thread.
How to make chicken?
Let's start with poultry. In the year of the Rooster, such a craft will be very relevant. You can make an adult bird or chicken. To create it you need to take:
- yellow and white yarn;
- yellow thread;
- scissors;
- beads for eyes;
- apple seeds for noses;
- foam;
- red threads for paws;
- glue;
- cardboard for templates;
- scissors.

From cardboard, cut out 3 templates in the form of squares with sides of 8, 7 and 6 cm. Wind threads around each of them, cut them on one side. You got 3 bunches. We design them differently. Wrap yellow yarn in the center of the longest one (chest), and leave the second largest (back) the same. The third one will soon become wings, tie it with a thin yellow thread in the middle. Cut a piece of foam rubber and wrap yellow yarn around it. This is a head preparation.

Connect the parts of the chest and back as shown in the photo, intertwining them.

Tie the resulting knot on one side and the other with a thin yellow thread. Soon this round center piece will become the head.

Here's how to make the chicken next. With your own hands, unfold the back and breast so that the bird’s head is at the bottom, put the wings on top, and on them the foam ball that you wrapped around the beaches.

We don’t touch the wings yet, but we lift the tufts of the back and breast to cover the foam rubber blank with them. We tie it at the back with yellow yarn to designate the tail.

The little chick continues to form. Separate about half of the wings while working on the first part. Press these wings on the sides, without pulling them too much, also rewind them in the tail area. Now take the remaining strands of thread, place them on top of the created wings, and also rewind the thread at the tail.

If during the process you cannot immediately grab the required amount of yarn, at this stage of work, tuck them with a hook under the thread that marked the tail.
Use scissors to trim it to give it a nice, slightly rounded shape.

Sew the beady eyes into place, and glue the seed nose.

Isn't it true, the little chicken looks great anyway, but if you want, give it legs. You can take pieces of wire, form legs from them, make three fingers from the same material on each, then wrap them with wire.
If small children will play with the chicken, then sharp objects are not needed. In this case, cut off the red threads, gluing them, form the same blanks with three fingers, after which you can glue them to the chickens.
See what else a New Year's chicken made from thread or made for Easter can be.
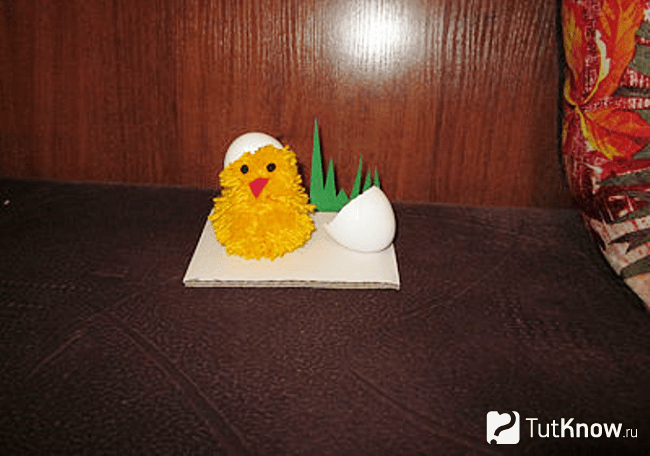
To create this adorable bird that looks like a ball of fluff, you need to take:
- yellow knitting threads;
- scissors;
- a piece of cardboard;
- colored paper;
- eggshells;
- glue.
Do the second one in the same way, but wrap it around 3 fingers. Also tie with a thread, connect the threads of 1 and 2 pompoms, tying them together.

From colored paper, cut out two eyes and the beak of a New Year's chicken. Glue them on his face.

Wash the eggshells and dry them. Place one half on his head, attach the second half next to him on the flooring. Cut out grass from green paper, glue it on, thereby completing an interesting work.
If you want the chicken toy to be openwork and airy, then watch the corresponding master class.
For this lesson take:
- foam egg blank;
- yellow threads;
- cling film;
- scissors;
- PVA glue;
- colored paper;
- pins.
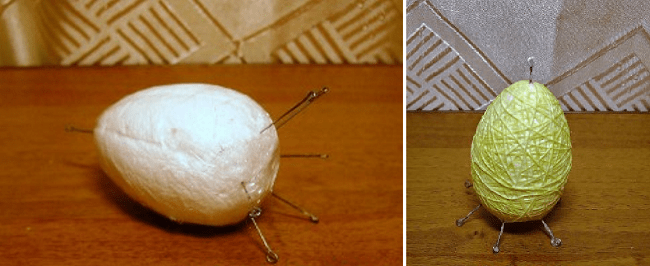
Let the product dry completely, cut the threads on one side of the egg, and remove the foam blank from this hole.
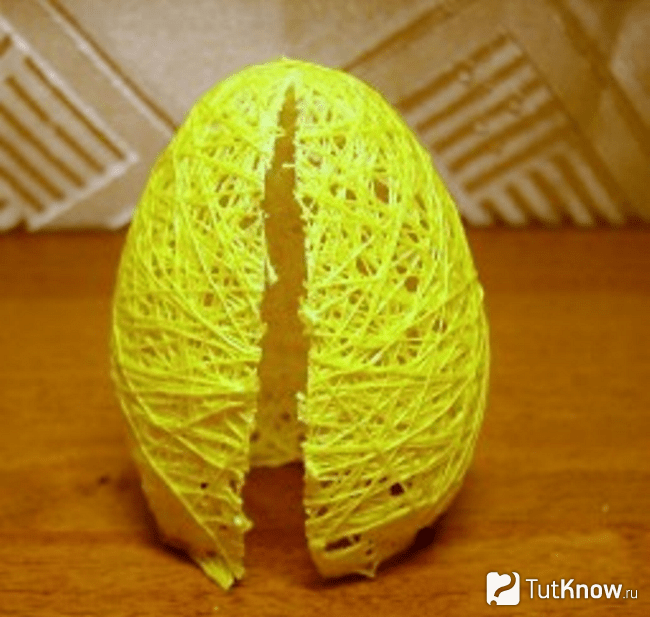
Now you need to sew up the cut area with the same yellow thread, you can additionally secure it with glue. Make a beak out of red paper. You will need a small square, which you need to fold diagonally in half, then bend its corner and sides, as shown in the photographs.

Make bangs for the fluffies from threads, a bow for the girl from red paper, and legs for both chickens.
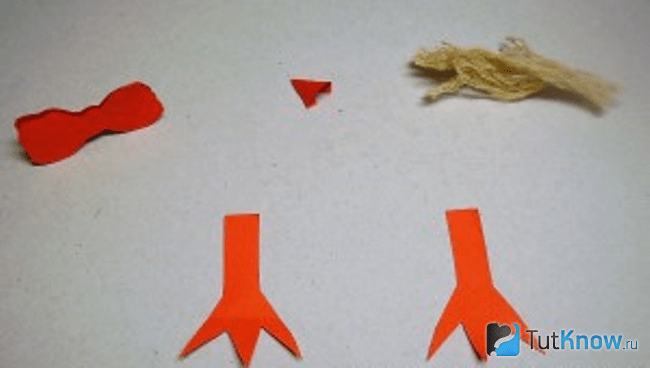
You can make a top hat for your chicken boy. To do this, cut out a ring from black paper, glue a strip onto it, gluing it to the side. The bottom of the hat is attached to the top.
These are the wonderful and cute chickens you will get.

Other birds and animals made from threads
Creative work that will tell you how to make a bullfinch from threads is very relevant in winter. For it you will need:
- threads of red, black, gray;
- scissors;
- apple seed for beak.

- Using template cardboard or your hands, wind identical pieces of black thread, the same amount of red thread you will need.
- Place black ones on them, tie them in the middle with dark thread. Remove the black threads from one half to the other, secure them here, in the area of the future tail, using a piece of gray yarn.
- Then you will need to wind threads of this color and place them under the central part of the bird.
- We fix this part by wrapping it on one side with red threads. Bring these gray wings back, tie them with thread in the tail area, and trim them with scissors.
- Glue a bone on the nose, this is what a wonderful bullfinch you have made from threads.

The basis for it is created from pieces of white and yellow thread. Blue ones are placed crosswise under the center of these two blanks. Then the white and blue ones need to be lifted and twisted. Blue and black yarn will become the bird's wings.
Using this technique it is easy to make a sparrow and other birds.

Here's how to make a rabbit from the same material.
The list of necessary items consists of:
- gray and white threads;
- thick brown and pink fabric;
- cardboard or special blanks for pompoms;
- fishing lines;
- beads;
- scissors;
- needles.
- Wind gray yarn onto special blanks for pompoms; if there are none, cut them out of cardboard and shape them into a half ring. For one pompom you will need 2 pieces.
- First, a thread is laid between them, then the yarn is wound tightly in several turns. When this is done, the threads on the larger side of the semicircular workpiece are cut, you need to remove them from the device and tighten the main thread.
- In this way, two pompoms of different sizes are formed. Tie them to each other using the threads on these parts.
- Cut out the semi-oval ears and their inner parts from pink material. Glue these two types of elements together. Form a fold at the bottom, also fix it, and then the ears themselves on the head with glue.
- You can make a hare's tail from a small white pom-pom or fill a light circle of fabric with padding polyester and gather it around the edges with a thread. The tail is sewn or glued.
- Thread several turns of fishing line into the pink bead, which will become the animal’s whiskers. Sew his shaped nose and eyes into place.

A hedgehog made from threads will not be prickly at all, even soft.

To create a hedgehog, you will need a special tool used to make pompoms, but if you don’t have one, you can use a regular cardboard blank in the form of a ring.

Either of these tools is wound with 3/4 brown wool and 1/4 gray wool. Once the pom pom is formed, use scissors to give the hedgehog's face and nose a natural shape. Sew on the eyes and nose. You can create a whole family of these funny hedgehogs.

It is also not difficult to make a lion from threads. To do this, take:
- two identical cardboard semicircles;
- threads of black, yellow, orange, pink, white;
- scissors;
- two pencils.

- As shown in the photographs, first wind a pink thread in the center on two blanks, and a little black thread on the side.
- Now the black one needs to be covered with white yarn. A thick layer of yellow is wound on top of it, and a little black in the middle.
- Place two pencils crosswise on the workpiece. First wind an orange thread on them, and on top of it 3 rows of pink.
- Cut the threads of yarn on one side, tighten this multi-layered “pie” with the warp thread. Using scissors, give the lion's head the desired shape.
Easy DIY crafts for the New Year
As you may have guessed, they will also be based on threads. Let's start tinkering with Santa Claus.

First, prepare everything you need, these are:
- foam cone;
- PVA glue;
- cotton pads;
- red threads;
- tailor's pins;
- scissors;
- 2 shiny chenille wires;
- cling film.
Now wind a thread around the workpiece, moistening it with glue. You can pass it through a bottle containing glue.

At the end of this work process, leave the workpiece to dry completely near the radiator or other heating device. Then it needs to be decorated with cotton pads.

Make sleeves using a cone as well, but in a smaller size. To make the threads dry faster, make two cones and form both sleeves at once.

Their edges also need to be decorated with cotton pads, then glue these pieces of clothing to the fur coat. Cut out 4 blanks for mittens from felt, and also use PVA to attach them in place.

Cut the cotton pads into two parts and decorate the collar of the fur coat with them.

Create Santa Claus' staff from 2 twisted chenille wires, glue it to our hero's hand.

To make his hat, wrap a foam egg with cling film and place pin stops. Wrap the round part of the egg with threads, also securing them with glue. Make a face out of foamiran and glue some eyes for toys here. Attach the hat, trim it with cotton pads, and the mustache, eyebrows, and beard are made from light wool for felting. This is the wonderful result your efforts will lead to.

For another New Year craft that you will create step by step, you will need:
- threads;
- PVA glue;
- ribbon;
- cling film;
- a plastic cup;
- scissors;
- narrow and wider braid;
- cardboard;
- hot glue gun;
- a piece of wallpaper.

Make 2 holes in a plastic cup, one opposite the other, thread a thread through them. Pour glue into this container.

In such a device, the desired section of the thread will be lubricated with glue, so it will be convenient to shape the cone with this material. Cover it with thread, then move on to the second bell.

Also dry these elements near the battery, then you can start decorating them. Lubricate the wider shiny braid with hot glue and attach it along the edge of the bell. We further decorate the bell with a thinner ribbon.

If you have New Year's beads, cut the required length from this strip, twist them, and glue them in the form of a snowflake on the bell.

You can make bows yourself from shiny fabric or purchase ready-made ones in the store.

Thread strips of braid into the top hole of both bells and tie a knot on the inside.

Next, for this craft for the New Year, which we cover step by step, you need to make a beautiful bow. To do this, you need to glue thin tinsel to a wide ribbon and tie it in a bow using braid.

All that remains is to tie a bow to both bells and decorate the Christmas tree or room with them.

How to make wicker jewelry yourself?
You will find out the answer to this question right now. We will also make them from threads. Here are the stages of creating a beautiful ornament that can easily turn into a brooch if you pin a pin on the back or into a pendant if you attach a braid of thread to it.

To make this decoration you will need:
- 4 toothpicks;
- threads of white, yellow, blue, pink;
- scissors.
- Iris threads are perfect for this craft. Take a pink ball and wind the end of the thread into the center of the toothpicks crossed together. Now tie the end of the yellow thread and form a quadrilateral out of it.
- Place 2 more toothpicks inside between the data so that there are 4 of them. Tie the edge of a blue thread to one, wrap it around the wooden sticks as shown in the photo.
- The next rows of the pattern are formed from white or light pink thread. Due to the fact that you now have 8 toothpick tips, the pattern becomes more voluminous.
- Next comes a yellow, then a pink thread, from which we form quadrangles lying crosswise in relation to each other. The creation of the brooch is completed with yellow, then blue thread.
pliers;

Thread a colored thread through a needle and make the first top row, passing the tool either from above or from below the laces. Complete the next row in a checkerboard pattern, in relation to the top previous one. Having made a fragment of the required width from a colored thread, take a black one; golden-colored jewelry looks good on it. By threading them through the needle, form such a beautiful row.

The next fragment consists of white threads; against their background, golden beads also look great. When the decoration of the desired size is formed, cut off the main threads at the back and tie them in the form of a knot on the pendant.

Wrap gray threads around two fingers, remove them from your hands, tie the piece to the bottom of the decoration, wind it just below the middle with gray yarn, trim the edges to make a beautiful, even tassel. Make a few of these.

Using pliers, attach two rings for the chain at the top of the pendant, thread it here and secure it.

The wicker decoration is ready.

At the end of the article, we invite you to familiarize yourself with a simple method that will tell you how to quickly make a wicker decoration.
Another highlights the process of creating a bird from threads.


