What is it difficult to imagine the New Year without? That's right, without the corresponding decorative elements, the main ones of which are snowflakes. And our collection of paper snowflakes is constantly growing! Surely you have all already seen and know how to make such light ones:
Winter is the most creative time of the year! Yes, yes, don't be surprised. If you count how many cards, various crafts, decorations, gifts and snowflakes are made in the world (this is not counting the production of snow in the clouds), then this entire huge set will more than cover other pre-holiday preparations! And every year I want to do something new, original and pleasing to the eye. If you are looking for such an idea, then you are on the right track. Moreover, 2019 is coming to an end.
We propose to make new voluminous paper snowflakes - many step-by-step master classes, step by step, diagrams and various photos of ideas for the New Year 2020! If you have your own original ideas for snowflakes, send them to our New Year’s party using the form at the bottom of this article.
New video on how to make beautiful voluminous openwork snowflakes:
Snowman made from strips of paper
Plain white paper can be an excellent material for making New Year's snowflakes. For example, you can cut out many thin strips from it, which will become the basis for the snowflake shown in this master class.
 For such a snowflake we will prepare:
- white paper;
- a ruler with a simple pencil;
- scissors;
- decorative rhinestone.
We will make a snowflake from thin strips of paper of various lengths. Therefore, first we cut them, the thickness of all strips is the same and is 0.5 cm. But the length will differ. We will need 6 strips 20 cm long, 12 - 16 cm, 12 - 12 cm and 10 strips 10 cm long.
 For one ray we will need the following blanks - 1 strip 20 cm long and 2 pieces each 16, 12 and 10 cm long.
 Take the longest strip and glue its ends together.
 Then we fix a 16 cm long strip from the edge, forming a kind of loop from it.
 On the right we fasten a strip of the same length.
 The next strips will be 12 cm long; we glue them on the sides symmetrically.
Finally, we fix the remaining 10 cm long strips. This is how we made the first ray.
 We need to glue 5 more rays from narrow strips.
 For the center of the snowflake, cut out a small circle from cardboard. We glue the first rays onto it, placing them opposite each other.
 Then we glue a couple of rays on top at the same distance from each other.

 We secure the remaining pieces. This snowflake is made from thin stripes. We decided to decorate its center with decorative rhinestones.

Snowflakes from openwork napkins
Openwork paper napkins can be an excellent material for creating New Year's crafts. After all, you can make a variety of snowflakes from them. 2 MKs on openwork snowflakes from Marina.
We show one of the options for creating such New Year's decor in this new master class for 2019.


First, fold the white openwork napkin in half. Then cut along the marked fold line with scissors. Next, each half needs to be cut in half. As a result, we got an openwork napkin, cut into 4 equal parts.

Now from these quarters we will make rays for the future snowflake. To do this, first fold the workpiece in half, marking the fold line.

Focusing on this line, we bend half of the openwork part.

Then we bend the second openwork half symmetrically.


By bending both sides, we get a blank for the first ray of a snowflake.

This is what it looks like from the front.

We continue to make other rays using the same principle.


And so we continue to work.

In order to make a snowflake, we needed 10 rays. If desired, the center can be decorated with a shiny rhinestone. We made such a New Year's snowflake from openwork napkins.

Now we propose to make a convex round snowflake from openwork napkins according to the 2018 master class. Very light and beautiful, suitable for children, see detailed instructions.

To create such a snowflake we prepared:
- openwork napkins (6 pieces are enough);
- scissors;
- glue;
- decorative rhinestone for the middle.

We will make the snowflake itself from peculiar little bags. To create them, we first need to bend the openwork napkin in half. After that, cut it with scissors along the fold line.

Then fold each half in half again and cut. As a result, we get 4 blanks from one napkin.

Now let's use glue and connect the edges of this workpiece so that we get a little bag.

In total, our snowflake will require 12 of these bags.
We take another napkin, it will serve as the basis for our snowflake. First glue 2 bags on it opposite each other.

Then we fix 2 more blanks in the other direction.

After this, evenly distribute the remaining bags and glue them onto an openwork napkin.

For the middle of the snowflake we will use other blanks. To create them, just cut a napkin in half.

After this, we immediately make small bags from the halves of openwork napkins.

In total we produce 4 such blanks.
We begin to glue them into the middle of the snowflake.

Fix all 4 bags evenly.

And we decorate the middle with decorative rhinestones. Our snowflake made from openwork napkins is ready.
Lush volumetric snowflake
Having 3 squares of paper, we can make the New Year's snowflake shown in this master class by Marina.
 To create it, let's take:
- 3 squares of blue paper;
- PVA glue;
- decorative rhinestone.
 Our craft consists of three elements, each of which will require one square blank. Let's start working on creating the first element. To do this, mark the transverse folds on the first blue square.
 After this, fold the side edges of the square to the middle line.
 Now let's fold the other sides.
 We unfold one side as follows, giving it the appearance of a trapezoid.
 We do the same on the other side.
 Now the corners of the resulting workpiece need to be carefully straightened so that they acquire a square shape.
 We do this with all four corners.

In place of these squares we make folds on both sides.
 Next, we will straighten these folds and give the workpiece itself the appearance of an elongated rhombus.
 We must make such diamonds from all four corners.
 The resulting diamonds need to be narrowed a little more; to do this, we make folds on the sides.
 The workpiece acquired this appearance after the folds were made.
 It remains to fold it as follows. To do this, you need to turn the workpiece over to the other side and make folds along the transverse folds.
 This is what this blank looks like from the other side.
 From the remaining two squares we make similar blanks, and then glue them together.
 And in the center of the craft we place a decorative rhinestone. It turned out to be such a voluminous snowflake.

Snowflakes curls


Simple strips of paper are used to create basic elements that can be glued together in any order. The number of options for such snowflakes tends to infinity, as in nature :)
A simple snowflake using the false quilling technique
Our master class on creating an openwork snowflake using the false quilling technique will help you make a decoration from strips of paper with minimal time and materials.

For the creative process you need to prepare the following materials:
- a sheet of white (or double-sided blue, silver) A4 paper;
- simple pencil;
- ruler;
- eraser;
- glue;
- scissors.
How to make an openwork snowflake using the unusual “false quilling” technique
The snowflake will consist of three types of elements, to create which you will need strips 1 cm wide. Each type of element must consist of six parts, so we need to draw a sheet of 18 stripes. The first 6 stripes should take up the length of the entire sheet. Draw the next 6 stripes perpendicular to the first. Draw the third type of stripes under the long ones, starting from the perpendicular stripes.
 Cut strips of paper and fold them into three rows, depending on their length. In places where pencil lines are very visible, use an eraser.
 To make it more convenient to work with strips, wrap them around a pencil and remove. Unlike the “” technique, our task is somewhat simplified, since we will not be working with dense curls, but with their similarity.
 Take a strip from the “short” row. To wrap the strip into a ring, twist it around your finger, close the edges and glue it. Make the next turn a little weaker and glue it again at the base. Make a third turn in this manner. Cut off excess paper with scissors.
Do this with the remaining five short strips, making sure they are the same size.
 Make exactly the same ring curls with stripes from the middle row.
 Bend the longest strips in half.
 Wind each end tightly onto a pencil and carefully remove the ring - you will get these double curls.

 Press the smallest curl rings on both sides with your fingers, giving them an almond shape.
 Press the middle curl rings from the ends to the center to form a figure of a four-pointed star (diamond).
 Let's start collecting snowflakes. Connect the six almond-shaped parts together with glue. You will get something like a flower.
 Glue double curls between the “petals”.
 For convenience, glue double curls through one petal.
 Then glue on the remaining double curls.
 Glue the “stars” where the double curls meet.
 That's all, the voluminous openwork snowflake is ready!
Look how twisted it is, like lace!
Thanks to the three-dimensional elements, folding such a snowflake is easier than when creating a quilling figure. Even small children can cope with such creative work if they are shown everything and helped, if necessary. Older children will figure out the intricacies of the work on their own. You can also come up with other elements and make several snowflakes to decorate a festive tree or interior. The main thing is desire, and everything will work out for you!
Snowflake made of paper squares

What to prepare to create snowflakes from paper squares:
- squares 8*8 cm, cut from decorative double-sided colored paper (scrap paper);
- scissors;
- pencil;
- glue;
- rhinestones, sparkles, sequins.

How to fold unusual snowflakes from ordinary paper squares
To work, you need two squares of the same size. If you want to make small snowflakes, use small squares and vice versa.

Cut squares of the required size from decorative paper. It is best to use paper that has a pattern on one side and a base color on the other, then the snowflake will look original.
Fold the squares in half twice.

Straighten the squares, the main lines will appear on them.

Fold the edges to the center line, pressing the folds with your finger.

Do exactly the same on the other side. When you straighten the squares, you will see that markings of small squares have appeared on them.

Using scissors, cut along the center folds to the length of one square.

Fold the corners at each edge as shown in the picture.

Tape the corners so that the patterned side is on top.

Glue one part of the snowflake onto the other so that the rays do not overlap each other.

Decorate the resulting snowflake with self-adhesive rhinestones, or stick on glitter with glue.

A beautiful figured snowflake made of squares is ready!
So, with very little effort, we got an unusual snowflake. Such beauty was created from two squares, it’s hard to believe! You are convinced that children can handle this kind of work, which means you can make a lot of wonderful snowflakes and use them to decorate rooms, gifts for loved ones and relatives, a festive tree or a Christmas wreath. And if you connect several snowflakes, you can make a garland, pendants or a crown decoration for the holiday.
Volumetric snowflake made of foamiran
Our regular author Marina will show you how to make a shiny three-dimensional snowflake in her new master class.
Snowflakes can be made from various materials. In this master class we propose to make such a craft for the New Year 2019 from shiny foamiran. But you can choose colored paper, the folding technology is the same.

To make such a snowflake we prepared:
- shiny (glitter) foamiran of blue and silver color;
- scissors;
- toothpick;
- sharp knife;
- ruler;
- glue gun

Step-by-step instruction
We decided that our snowflake would be two-color, so we use foamiran in two colors - blue and silver. If desired, such a craft can be made in one color. The snowflake will consist of individual elements - rectangles. First, we cut out 3 rectangles measuring 2.5x14 cm from blue foamiran.

Now you need to make certain cuts on each rectangle. But first, let's use a ruler and a toothpick. On the wrong side, set aside 1 cm along the edges and draw small vertical lines with a toothpick. After this, the central part needs to be divided into 5 equal strips, the width of each of them will be 5 mm.

Next you will need a sharp utility knife. With its help, using a ruler, we carefully make cuts along the intended lines, not reaching 1 cm from each edge. This is best done under something hard (for example, a cutting board).

This is what our blue rectangle with cuts looks like, see photo:

We prepare other preparations in the same way. In total, 3 blue and 3 silver blanks will be used for our snowflake.

Now you can start creating the openwork rays of our snowflake. To do this, take one rectangle and carefully fold it in half, aligning the edges.


Using the same principle, using a glue gun we create the remaining shiny rays. There will be 6 of them in total.

For the base of the snowflake, cut out a small circle from silver foamiran. Glue the first blue ray to its wrong side.

We place the second (silver) ray opposite the first.

Now we fix the blue and silver rays between them using hot glue.

On the other side we also glue a couple of rays.

All that remains is to design the middle of our snowflake. To do this, cut out a small circle from silver foamiran and glue it.

Our voluminous snowflake made of shiny foamiran is ready.
Snowflake made from cardboard tubes
New Year's decor can be created even from scrap materials. An example would be a simple and interesting snowflake made from cardboard tubes, and the detailed process of its creation is shown in Marina’s master class. Such crafts can be done with children at home or in middle and senior groups of kindergarten.

To make such a snowflake we prepared:
- cardboard rolls from toilet paper or paper towels;
- ruler;
- pencil;
- brush;
- PVA glue;
- glitter;
- glue gun;
- scissors.

The first step is to make preparations for the future snowflake. We flatten the cardboard blank, and then make markings at a distance of 1 cm.


Then we need a glue gun, warm it up. He will help us connect 6 cardboard elements in a circle. This will be the base of our snowflake.

To create other elements of the snowflake, we must fold the cardboard strip in half.

In this way we add up the 12 remaining elements.


You should get 6 such blanks for a snowflake.

We begin to glue these blanks inside. We do this using a glue gun.

This is what our snowflake looks like at this stage.

All that remains is to decorate it and apply glitter. To do this, you first need to coat the top part of the craft with PVA glue; it is more convenient to do this with a brush.

Then pour glitter onto a sheet of paper.

Place the snowflake on this sheet with the coated side down. If necessary, glitter can be sprinkled on individual places. We made this snowflake from a cardboard tube.

Other options (photos and videos)
And more voluminous snowflakes from the Internet:


Original snowflakes made from strips of paper:
From voluminous snowflakes you can make beautiful garlands on the walls:
Form for submitting works to the competition
the best photos will be published in this article, their authors will receive diplomas for 1st, 2nd and 3rd place. The remaining authors (whose works have not been published) will receive diplomas from the competition participants. Diplomas are sent for free, without payment or registration fees.
Before sending, please read and. Any questions you may have can be asked in the comments below the article.
Please carefully enter all the data that will be automatically inserted into the diplomas!
Good afternoon, today I am uploading the biggest article on in a variety of ways make a snowflake with your own hands. Today you will see snowflakes made in different techniques from cut out of paper to molded from liquid caramel. You will see beautiful craft snowflakes - woven from beads, sculpted from dough. Will many interesting MASTER CLASSES on snowflakes(glue, beads, paper). You will definitely find an idea for your homemade snow art here. Making snowflakes with your own hands is easy and pleasant at home - doable ideas for snowflake crafts with kids and smart ideas for adult creativity.
So let's see what we'll be doing today.
- Culinary snowflakes (made from dough, made from caramel, from corn balls)
- Snowflakes made from recycled material ( from toilet paper, from threads and glue)
- Snowflakes in twisted Quilling technique(with elegant decor
- Snowflakes made of plastic ( bottle bottoms and children's thermo-mosaic)
- Snowflakes from natural material(made of ice, wood)
- Snowflakes from felt, crochet and wicker from beads.
That is, there will be a lot of interesting things. So... let's get started.
PAPER SNOWFLAKES for interior decor.
how to do it yourself.
Let's start with paper ideas for creating craft snowflakes. And this is not just cutting out of thin paper... now I will show you 3D snowflakes, using the origami technique, using the rolling-quilling technique, and cardboard roll snowflakes.
FLAT SNOWFLAKES MADE OF PAPER.
(openwork beauties and crafts made from them).
Snowflakes can be ordinary FLAT... when they are made from paper triangle roll... a pattern is cut out on it... a triangular fold is unfolded and you get an openwork snowflake and paper in which the reflection circular symmetry of the pattern.

A lot of ideas and carving patterns of openwork paper snowflakes I will describe it in a separate article (so as not to clutter this page). And then a link to it will appear here.
Because paper snowflakes can be made NOT ONLY using the LACERY CUT-OUT technique. And now you will see this for yourself.
As you can see in the photo above, paper snowflakes can not only be glued to windows (as in childhood), they can be used to decorate gift packages, postcards, trees near the porch, and ribbons hanging from curtain rods.
You can also make paper snowflakes New Year's wreaths on the wall. A wreath of just white snowflakes looks very gentle and beautiful... and it’s very good if you choose another color (red or blue) in pair with the white color.

These are the kind of delicate snowflakes that I teach you how to cut in a special article.
You can make other snowflakes from paper snowflakes silhouette displays on the wall- For example Christmas tree silhouette. And with the light hand of an unknown author, I learned the idea of how to create snow-white figurines of ballerinas in a snowflake skirt from paper. Dancer silhouette We also cut it out of white paper... and make the central hole on the snowflake larger so that it fits.

You can also add this Christmas wreath made of paper snowflakes LED New Year's garland.
The photo below shows that this requires a wire frame - but this is optional. You can simply cut out a ring of cardboard, wrap this ring with a garland - and then use tape (with double-sided Velcro) cover a cardboard ring with openwork snowflakes from thin paper.

Snowflakes are also cut out from thicker cardboard or felt. and hang them on Christmas trees. Naturally, there is no need to fold the cardboard into a triangular wrap - we simply transfer the outline of a thin paper snowflake onto the cardboard, trace it with a pencil and cut it out. And then you can decorate a paper snowflake with a pattern.
SNOWFLAKE WITH GLUE PATTERN– to make the pattern convex and contour, you can simply take a jar of PVC glue that has a thin spout and squeeze the pattern onto the plane of the snowflake (as in the left photo below).
SNOWFLAKE WITH A PATTERN OF COTTON SWIPS. You just need to take cotton swabs and cut off the cotton tops from them (smooth them a little with the same glue) and apply them in the form of a pattern on a cardboard cutout (as in the right photo below).

VOLUME 3D-SNOWFLAKES made of paper.
(multilayer, fan and origami crafts)
Here are more ideas for multi-layered snowflakes . The principle of the craft is simple– cut out snowflakes of different sizes from thin paper. We transfer their contours onto thick cardboard - cut out silhouettes of cardboard snowflakes.
We take a piece of polystyrene foam (the one used to insulate cracks on windows is suitable; you always have leftovers of such material at home) and cut several small pieces. These plump squares we use foam plastic as spacer between cardboard layers snowflakes.

Or use our paper snow art add some ORIGAMI principles. That is cut out paper modules - bend them so that you get FIGURED RAYS and place the rays in the form of a snowflake on the round base (attaching them to the base with glue).
Or collect cardboard 3D-snowflake of two stars cut out on thick cardboard. Every star has vertical cut - between the legs. And cardboard stars put on each other This cut (see photo of the snowflake above) is very easy to do with your own hands.

Schemes and master classes for creating these snowflakes (pictured above) are in the article
You can also do snowflake crafts like a paper fan. They only look complicated, but are very simple to make. I even found a master class. Very simple.

Below I give a diagram for assembling such a voluminous paper snowflake. You can see for yourself how simple the steps are master class on assembling a fan paper snowflake. A simple craft that can be easily done at home with children.
Moreover, the edges of such a snowflake accordion can be make it curly in advance(like in the photo below).
You see, when we were drawing our accordion model, we came up with make some of the teeth on the paper accordion higher than the rest- in the form of a three-leafed peak.

Such a FAN SNOWFLAKE can be made from NOTE PAPER... and additionally decorate with Christmas tree branches, pieces of shiny tulle rags and pictures cut out from a postcard. Like in the photo below. It turns out one-piece art craft do it yourself - you can stick it on a gift bag. Or hang it from a loop on the Christmas tree...

Snowflake made from toilet paper rolls
THREE DIY CRAFTS.
You can also make a beautiful snowflake from toilet paper rolls. Here's how to do it yourself. Toilet paper roll squeeze it a little and cut it into rings. Every squeezed ring lay symmetrically in a circle in the shape of a snowflake.

This paper snowflake can be painted red and sprinkle nail glitter.
And pay attention to the photo below that inside the ray-rolls there are more a few smaller rolls of paper.

Toilet paper rings can be cut very thin and tie them bunch in a circle(pull the thread and pull it into a bun). You will get an aerial miracle like the one in the photo below. Paint everything with white paint and sprinkle with silver glitter.

And even if you don’t have toilet paper rolls, you can make a snowflake from ordinary white sheets of office paper(cut strips and twist them into rings of different sizes... And then from these rings collect rays of snowflakes... and then collect and glue all the rays together - and you get a paper snowflake like in the photo.
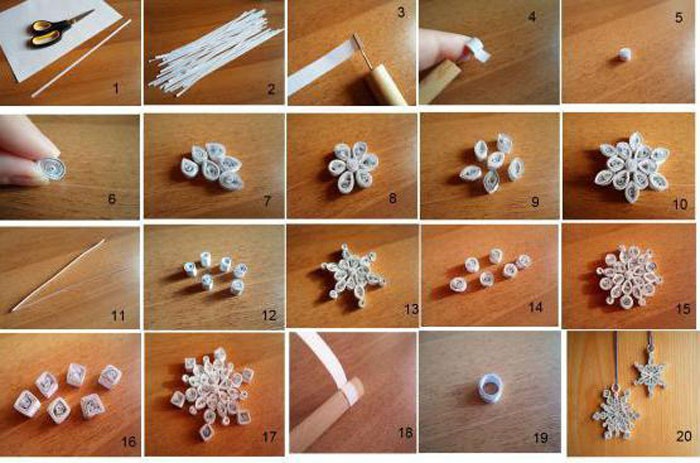
Snowflakes made of paper - using the QUILING technique.
(photos of the best options)
You can also make paper snowflakes with your own hands - USING THE QUILLING TECHNIQUE. For this you need twist FIGURED flagella from thin strips of paper.

It's easy. I simply wrap the strip around a toothpick (or a special pin for quilling), and then remove the twist (I loosen it to the size we need, smooth it, press it with my hands, giving it the desired shape... and fix the tip of the twist with glue).
Make a lot of twist modules of different shapes and assemble them quilling snowflake. You can practice making this paper snowflake craft at home with your children. Children will have fun twirling the modules and folding the snowflake pattern.

Such a paper snowflake craft can be made using the Quilling technique from colored paper. It turns out even more beautiful. Airy lines and clear spots of color. And opportunity decorate the nodal points of the pattern bright rhinestones. These are the colorful snowflake crafts we make.

A snowflake made of paper in red and white colors looks beautiful. If you are planning a party and have decided to decorate the Christmas tree in white and red colors, then such paper snowflakes will help you save on buying New Year’s decorations. They can be made in the same color scheme but different in shape and size.

Snowflake craft made from caramel.
Take caramel candies white (milk) and red (for example, barberries). We put them in different saucepans, pour water on the bottom (so that the caramel does not burn) - and put it on the fire. Our task melt the caramel until liquid. When the caramel becomes liquid, we will make snowflakes out of it. Take a sheet of foil for baking(smooth, not crumpled) - put it on a board. And on this metal sheet we draw snowflakes with liquid caramel - pour in a thick stream(it’s more convenient to pour from a hot saucepan with a spout). Let it cool and get caramel-glass snowflakes - such crafts can be hung on ribbons by the window and let the rays of the winter sun play with them and sparkle.

You can also simply string pieces of marmalade onto a wire and also get an interesting snowflake. Or glue a snowflake out of corn balls. Children will love this New Year's craft. This is more interesting and tastier than paper crafts.

DIY snowflakes - made from pasta and glue.
And children will also love these New Year’s pasta crafts... When we take pasta of different shapes, we put them in a snowflake pattern on paper - and then carefully one after another glue them together with barrels. This pasta snowflake can be painted with gold paint
You can also glue pasta to round pieces of cardboard or linen paper so that they have a strong base for gluing.


How to make a craft snowflake FROM DOUGH.
Here is a master class on how to make a snowflake from dough. Make cookie dough and use regular cookie cutters to press out a symmetrical circular pattern.

You can cut out a snowflake made from salt dough. Squeeze out with a foam bowl. And if you don’t have such a snowflake mold, then you can do it the artisan way - put it on the dough cardboard figure snowflakes and trace it around with a knife.

SNOWFLAKES MADE OF PLASTIC.
(beautiful DIY crafts)
I found several examples of New Year's crafts made of plastic with the image of snowflakes. Let us look at them now - you will probably choose a method for yourself.
Model 1 – snowflakes from the bottoms of a plastic bottle.
We take a plastic bottle of mineral water - it is made of bluish plastic - that is, it has a beautiful snowy tint. Just what we need.
Using scissors or a file, cut off the bottom. On it we draw the outlines of a fluffy snowflake with white or blue paint. And we drill a hole through which we thread a ribbon hanger. A good craft for working with children - you cut bottles (an ordinary knife works well), and the children draw a snowflake pattern.

DIY snowflakes from transparent plates.
You can also made from a thick sheet of transparent plastic cut out neat stars and decorate them in the center with a snowflake design. You can take plastic from old packing boxes with a transparent display side. Another sheet of plastic can serve transparent kitchen table mat. Or a thick stationery folder will also work. We get a beautiful New Year's craft with our own hands.

Snowflakes made from lids.
Even plastic bottle caps can serve the common purpose of New Year's apartment decor. They can be glued to a piece of cardboard or plywood, and then cut along the contour. Or attach the lids to each other with glue from a glue gun.

Snowflakes-crafts from thermo-mosaic.
You can also take an ordinary children's thermo-construction set - with these bubbles - you string them on pins, making a pattern, and then bake them in the microwave or oven - and you get a whole craft item. In our case, we lay out a snowflake pattern and get an original patterned beauty made of plastic, made with our own skillful hands.

Snowflakes made from GLUE and THREAD
Three simple crafts for kids.
And in this chapter of our article I have collected THREE IDEAS on how to make a snowflake USING GLUE, where it is the glue itself that will be the main material snowflakes. Let's look at these methods - they are all simple and easy to do with your own hands in ordinary home conditions.
MASTER CLASS No. 1 – snowflake from a GLUE GUN.
The simple method is to apply a snowflake design on a sheet of polyethylene using a glue gun. We dry it and cover it with glitter.


MASTER CLASS No. 1 – a snowflake made of glue on a thread frame.
Very beautiful snowflakes, translucent and delicate. Now you will learn step by step how to make such a craft with your own hands.

STEP 1 Draw a snowflake on a sheet of paper - the snowflake pattern can be anything - but with one mandatory condition - the drawing must be FRAMED - so that there are closed cells (for what, you will now understand).

Cover the sheet with the design with thick film (or simply put this sheet inside a plastic office file).
STEP 2. And now, according to this pattern, we lay a thick thread (from any suitable yarn for knitting). To ensure that the thread fits easily into the mold, it needs to be moistened - but not in water, but in PVA GLUE. The wet thread will easily take the shape we need. And it will harden and become stale in it due to the glue drying.
STEP 3. Now (without even waiting for our thread frame to dry) we will fill the cells of the snowflake with glue. Directly pour from the tube inside- we make one like this puddle, the sides of which are thread.

And so that the glue filling is not white, but colored - it can be mixed with paint. We take a drop of gouache on a brush and mix it in our glue puddle, right in the cell of the snowflake.
We do this - with each cell - leaving empty cells between them. And carefully place our sheet dry out of the reach of children. Let it lie there for a couple of days so that everything dries thoroughly.
When the snowflake dries, it will be gone easy to separate from polyethylene and hang it by a string on a window or on a Christmas tree. But it’s better to put it on a window - since the light will beautifully penetrate through the blue adhesive cells of the rays of the craft snowflake.

Here's another good way to make a snowflake from glue and thread with your own hands.
MASTER CLASS No. 3 – snowflake made from sewing threads and glue.
We need a sheet of polyethylene - glue and white spool threads.
On a piece of paper - make a round puddle of glue— the size of the puddle should match the size of the silhouette of the future snowflake. That is, first we will cut out our sample snowflake shape made from cardboard and then we make a puddle of glue that is proportional to this snowflake silhouette.
Next, we CHAOTICALLY LAY the thread onto this puddle of glue - place it and place it as it fits - in several layers - in different directions. And we dry this whole puddle. And then, when everything is dry, we take this round thread glue plate... we apply a snowflake template to it and cut it out along the contour. We get a beautiful, elegant, hand-made snowflake craft.

DIY snowflakes
Made from NATURAL MATERIAL.
You can make a snowflake from the material that nature gave us. These could be knots from chopped tree branches.
You can make a snowflake from leftover lumber brought from the dacha.

You can make snowflakes from straw and thread - as shown in the photo below. If you look closely at the photo you can see how to do it all.
Better yet, I’ll draw and tell you step by step how to make one such snowflake. And it will become more clear.

You can also do craft snowflakes made from ICE. Take several cups and freeze ice cubes in them (pour water and put them in the cold. Take the ice cubes out of the glasses and paint a snowflake on each one and melt a hole with a hot nail. It is better to carry out the work in a cold room outside - so that the ice cubes do not melt. And then you can use them hang beautifully along the window ledge - on the back street side. Or on a tree near the gate... or under the canopy above the porch. Let them hang and tinkle in the wind.

How to make snowflakes from felt.
I have . It’s very large, and there are a lot of ideas about what decorations you can make for your Christmas tree from bright felt.
And of course you can cut snowflakes out of it. Made from thick felt Simply cut out the contours and the snowflake will keep its shape. Made from thin felt The snowflake needs to be glued to the base.

But PETAL snowflakes - they are made very easily with your own hands. Now you will find out how...

Round piece of felt cut diagonally in circles- like pizza into pieces - we get something like flower petals. Each petal round it, sharpen it along the edge(some kind of pattern - a rib or a pipette).
And then At the very root, we STITCH and PULL each petal - that is, we press the blades of the petal to each other and sew them together with threads. We get a petal snowflake made of felt - decorate it with oval beads or long glass beads.
And here is a model of a snowflake, which at first was flat - and then it was made voluminous by carving and bending. And they decorated it with large rhinestones and a small textile decorative flower.

You can make beautiful craft Christmas wreaths from felt snowflakes.

SNOWFLAKES made of beads.
MASTER CLASSES of weaving and DIAGRAMS.
Well, finally the turn has come to the beaded snowflakes. Very beautiful things. And most importantly, they are created very quickly - it takes a beginner 30 minutes to create such a snowflake. I checked it on myself - last week I wove this BLUE SNOWFLAKE - I wove it without a pattern based on this photo(made of gold and white beads with bronze bugles - it turned out great). First time in my life. And everything worked out. I wove not on a fishing line, but on the wire– large snowflakes should be woven exactly this way – with wire – so that the rays stay straight to the sides.

The alternation of large long beads and small grainy beads - in the SAME COLOR SAMPLE - looks beautiful. Especially beautiful are homemade snowflakes made of beads and beads, made in a snowy, dazzling white color.

The beads look beautiful their transparent crystals. It turns out to be a crystal icy snowflake - just like a real one, made with your own hands.

And here is a MASTER CLASS on weaving snowflakes from beads. In the detailed photo instructions we see every step of the lesson on assembling a snowflake from blue beads. And it immediately becomes clear that making such a snowflake with your own hands is quite simple and easy. Try it and everything will work out. You only need six large beads - the rest are ordinary beads.
And here's another master class on weaving figured snowflakes from beads of different colors. The red dots show the movement of the beads along the beads - either end-to-end passages through the previous row or new layers of bead rows and one-to-one passages through the first tier of the pattern.

And here are more diagrams... IN THE FIRST SNOWFLAKE, the rows are shown in different colors - so that the weaving sequence is clear. AND SECONDLY, you need to take a closer look and figure out for yourself what follows what.

And here are examples of snowflakes that have the SAME START OF WEAVING - that is, you see that the central part of three snowflakes is the same. We begin weaving according to the same pattern for everyone, and only then add different patterned rays as you like.

Here are examples of snowflakes in the assembly of which more people participate: and long tubes of bugles. The weaving pattern of such a snowflake-star is clear even from a photograph. But if not, write in the comments, I’ll draw a step-by-step picture and post it here.

These beaded snowflakes can become designer earrings.

Or wicker snowflakes can become decor for a New Year's ball. Also, as you can see, it is original and beautiful.

Here are some ideas for doing it yourself. I poured out a SEA OF SNOWFLAKES for you today - whole snowdrifts of snowy ideas. Choose any one for your home New Year's joy.
Happy crafting.
Happy New Year.
Happiness to your Home and Family.
Olga Klishevskaya, especially for the site ""
If you like our site, you can support the enthusiasm of those who work for you.
Happy New Year to the author of this article, Olga Klishevskaya.
We will send the material to you by e-mail
What we associate the New Year with first of all is winter. And winter itself is with snow. Therefore, New Year's decor is often supplemented with a variety of snowflakes and stars. The editors of the site suggest that you arm yourself with suitable materials and create wonderful snowflakes and stars out of paper for the New Year with the whole family.
Snowflakes can be very different
Paper snowflakes can be not only traditionally carved from a corner of paper folded several times. Today it is a real art to turn a simple sheet of paper into an elegant and ornate miracle. There are several ways to make a snowflake to decorate your home using minimal tools and paper.
Twisting paper strips: the grace of quilling
There is no need to rack your brains for a long time about how to make beautiful and light snowflakes for the New Year, when there is a wonderful filigree paper rolling technique - quilling. Interesting elements are collected into beautiful patterns that can be used to create anything. On the eve of the New Year, we are interested in snowflakes, so we sit back and figure out how to make a small miracle from paper strips.

| Illustration | Description of action |
|---|---|
 | We assemble the base element for assembling the beam. We install two modules with the hypotenuse of the triangle to the left and the pockets to the right. In these pockets we insert the legs of the third module, also facing the pockets to the right, to the end. |
 | For a small beam you need two basic elements. They can be obtained by inserting the legs of one element, consisting of three modules, into the pockets of the second. |
 | It turns out a small beam consisting of 6 modules. To make all the small beams you need 36 modules, and for 6 large beams, which consist of 15 small modules, you need 90 pieces. You also need to make 12 modules to connect all the beams with each other. |
 | Total: 6 small and 6 large rays. |
 | We take a large beam and two connecting modules. We insert a pocket into one module in the direction of the elements in the beam with one leg. We do the same with the second module. Let's insert the connecting modules into the remaining 5 large beams. |
 | We alternately connect small beams with large ones using pockets and connecting modules. |
 | It turns out to be a beautiful snowflake-star. |
Volumetric fluffy snowflake for the New Year
For the version of a three-dimensional snowflake for the New Year, which is beautifully made with your own hands, you need to take two colors of paper, scissors and glue.
First, fold the square in half, the resulting triangle in half again, and again in half.


Article
To make this you need to cut a sheet or newspaper or a page from an unnecessary book into 10 strips.
1.Then weave them.
2.Wrap the two outer strips on each side of the snowflake and glue their ends together.
3. To prevent it from unraveling, we use clothespins.
4. Repeat the operation on each side of the woven snowflake. Just don’t touch the middle fifth stripe.
5.Now take 10 more strips and repeat operations 1-4. Of course, you can limit yourself to this and get two four-pointed stars. But we will go further.
6. Add the two resulting stars to get an eight-pointed snowflake.
7. Now all that remains is to braid the middle fifth strips. We bend their reverse side to the opposite four-pointed star and weave it in. If the length is not enough, glue the strips. Here we also use clothespins.
8. All that remains is to coat it with glue and sprinkle it with glitter, glue the loop and mask the place where it is attached with a piece of New Year’s rain. Our three-dimensional eight-pointed snowflake - the star is ready
Another version of the snowflake
Turn over to the other side and repeat the procedure
Using the same principle, suspension
Another option for a volumetric snowflake
It is made from two sheets of plain paper.
1-2. First we bend the sheets as in the picture.
3. Cut out a tick from the resulting triangle.
4. Make cuts on the remaining tick, but do not cut all the way through, otherwise the snowflake will break.
5. Bend the rays so that the snowflake is voluminous.
6. We bend each middle ray on all four petals of the snowflake inward and glue it in the center.
7. Repeat operations 1-5 with the second sheet of paper. Then we place it under the first half of the snowflake, so that the lower rays are between the upper ones. Then we bend it as in step 6, but glue the rays not in the center, but in the places where the rays diverge at the top snowflake.
You can make more snowflakes from old books or magazines
master class from Tiffany Lin
Tiffany marked out one-inch petals for future snowflakes. We can focus on two centimeters, for example.
In total you need to cut 140 strips. Of these: leave 20 strips along the length of the page, cut the next 40 by 1 cm, cut the next 40 by 2 cm, and cut the last 40 by 3 cm shorter. Refer to the photo above.
Fold each petal using 5 strips of each size. We take the longest strips, for the central ray of the snowflake, once, and the rest twice (once on each side).
Glue it and place it under a press while gluing.
To be safe, you can temporarily tie the tip of the petal.
Additionally, we cut out more stripes for the central part of the future snowflake. We also glue this ring and fix it so that the glue sets successfully.
When the petals are glued, use a glue gun to process the end of the workpiece.
No need to spare glue! We process it well.
Then we glue the petal blank to the central ring.
We do this with four petals, gluing them so that we get a cross.
Then we glue the remaining petals. This method allows you to symmetrically glue all the blanks.
After this, we glue the petals together so that the snowflake does not fall apart.
Decorate the snowflake with sparkles.
On the eve of the New Year, people spend a lot of money on Christmas tree decorations and interior decorations. But you can completely refuse to buy them, since decorations and toys are easy to make with your own hands. Moreover, children will help you with joy, just give them an idea.
To do this you will need colored paper, PVA glue, scissors, a little perseverance, accuracy, patience and, of course, creative activity. I suggest making a snowflake-lantern and a star together with your child.
Snowflake lantern
Take 5 sheets of colored paper and make them square. Then fold them diagonally, connecting the top left corner to the bottom right corner. It turns out to be a triangle. Bend again. Now, starting from the fold, make 5 cuts with scissors, but do not cut the leaf completely. When everything is ready, you need to unfold the sheet and glue the strips, one at a time. Here you should be careful not to glue two strips side by side.
When everything is glued on one side, turn the sheet over and glue the remaining strips on the other side. It turns out to be a small flashlight.

Proceed in the same way with the remaining sheets.

When all the lanterns are ready, connect them into a large snowflake. The lanterns should have the tops and the right and left ends glued together. Glue the loop. The snowflake lantern is ready.

Star
You will need 5 sheets of colored paper. Each leaf must be made in the “Boat” style.

Then glue their “noses” together to make a star. Add a loop and the decoration is complete.

The star has a small peculiarity. It can be made in larger sizes if the components are added in the second, third or fourth row.
Create with your children, thereby contributing to the development of their thinking and motor skills. Plus, you won't have to spend money on Christmas decorations. You can buy your child with them. But it's best to do it yourself.


