Elena Kokshareva
Hello, dear colleagues! The long-awaited spring is approaching March 8! We all want to please our dear and beloved women, mothers and grandmothers, to do for them handmade gift.
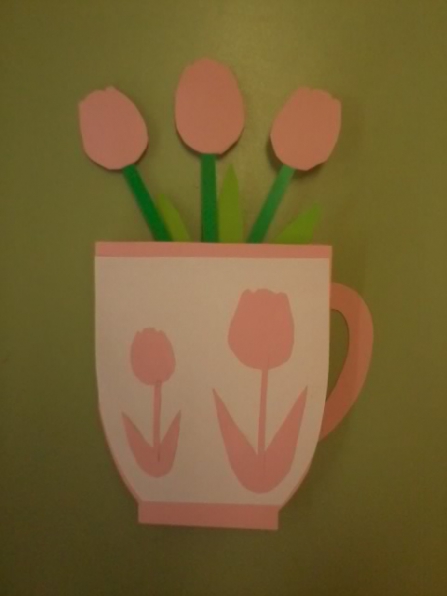
I present to your attention postcard in the shape of a cup with flowers for your beloved mommies.

Postcard decorated outside and inside.


Children chose their own color postcards, shape of flowers.
For work we need: double-sided cardboard (cup, colored paper for flowers and leaves, white paper, 3 strips of green cardboard, ribbon bow, glue, scissors.


Fold a sheet of cardboard in half and cut it into the shape of a cup. On the first page we cut off the handle, the handle remains only on the second page postcards. To the front postcards glue a white sheet in the shape of a cup, but without a handle and slightly smaller in height.

The front part can be decorated with two ways:
1. Glue a white sheet with a cut out pattern using the punching technique.


2. Glue flowers, leaves and stems cut from paper of the same color as postcard.

Looks the same. My children and I chose method 2. The children cut out flowers (they made them out of petals, leaves and stems themselves, and then glued them onto a white sheet of paper.
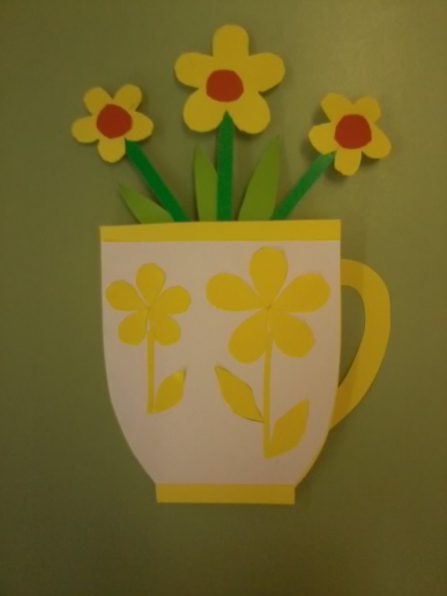
I offered the children three types colors: tulips, flowers with round leaves and flowers with heart-shaped leaves.


The children chose themselves which flowers they would cut out. Flowers should be the same shape on the cup and on the stems.
Then we cut out 3 flowers (one large and two small ones, glue them to cardboard stems, glue the centers of the flowers. Glue the finished flowers to postcard inside, decorate with leaves and a bow.

And next to the page is a poem for mom.

From colored paper
I'll cut out a piece.
I will make it out of him
Little flower.
Gift for mom,
I'll cook.
The most beautiful
I have mom!
Look what we came up with!

All postcards very tender and beautiful, just like our favorite ones mommies! With coming holiday, dear women!
This paper cup will be a wonderful box for a small gift: cookies, candy, etc. Make cups of different colors and sizes: get creative!

So let's get started.
Let's start with the handle. This is the most complex part of the cup. Cut out three parts from the template (see below).

We bend the edges of the long part.

We bend the edges at the handles themselves.

Glue the long piece to one of the “squiggles”. Don't worry if traces of glue are visible at this stage, they won't be visible when the cup is completely finished.

Glue the second squiggle.

This is what it should look like from the other side. Using these folded tabs you will glue the handle to the cup itself.
Set the handle aside and cut out the two “mill” pieces. Fold the sides. You can make a small hole in the middle of each “mill” to make it easier to align them exactly in the center.
Attention! Don't glue these two pieces together in the center! If you are not comfortable, then carefully pin it in the center with a pin.

Glue the first folds to each windmill wing. Do it carefully so that nothing moves.

Now we can glue together all the wings of our “mill”.

This is what our cup looks like from the bottom now.

Don't panic if the edge of your cup isn't straight. Run scissors along the edge, straightening it out.

Now we make the so-called stand. Cut out small “windmills” and glue them together like you would a large cup.

We got three parts like this.

Glue all the parts together. We start with the stand. Then we glue the handle. The cup is ready!


For the lid, cut out two parts. Bend the sides of the long one. Carefully glue both parts together.


Cup and cup lid template:


Taken from nexttonicx.com
Translation by Ekaterina Balagurova
Other Master classes from the section
You will need: one cell from an egg carton yellow paint yellow and green paper A wire wrapped in yarn (about 30 cm long) Scissors Hole punch two or three yellow beadsTarget: Making postcards using the 3D applique technique.
- Learn how to make three-dimensional paper appliqué.
- Strengthen the ability to work with templates, cut out parts from paper with scissors.
- Develop fine motor skills, imagination, and creativity.
- Cultivate patience, perseverance, and accuracy in work.
Materials and equipment:
Colored cardboard;
White paper;
Yellow or orange velvet cardboard (for the center of the flower);
Green colored paper (for leaves);
Cup and flower patterns;
Simple pencil;
Scissors;
Glue stick.
Step-by-step manufacturing instructions.
Fold the colored cardboard in half and place it horizontally with the fold up. Trace the template on colored cardboard and cut it out.

We cut out flowers of different sizes from white paper according to templates, from colored green paper - petals, from orange velvet cardboard - centers for flowers.

To add volume, we bend the petals of the flowers. Then we collect the flowers: we glue one flower onto another (first a large flower, then a smaller one), coating the middle with glue and displacing the petals. Glue the center to the flowers.

Glue flowers and leaves onto the cup and create a composition. You can paste wishes on the spread of the card.


It’s nice to receive such a handmade gift for a holiday!
And prosperity. Creating a floating cup with your own hands is a creative, very exciting and low-cost process, and its result will delight you!)
The flying bowl looks very attractive and will add additional coziness and comfort to any home or office interior. Can be a wonderful gift for your loved ones and colleagues! Making a floating mug will not be difficult, the main thing is to know the basic principle of its manufacture and pay special attention to details and colors.
Master - Ovchinnikova Yaroslava
Materials
1) tea or coffee pair (cup and saucer)

2) glue to connect the “spouting” structure with a bowl and saucer. It is better to use the universal Moment gel adhesive for ceramics, plastic or glass. An alternative can be any other adhesive designed to work with smooth surfaces. A glue gun is also used, but it is intended mainly for working with rough surfaces. There is a possibility that the cup will come off in the near future after gluing.
3) thick wire, or triple wires. You can use other flexible items, such as old aluminum forks or spoons, or a metal hanger.

superplastic) is a self-hardening thermoplastic. When heated, it becomes plastic and convenient for giving it the desired shape. When cooled, it becomes hard, elastic and durable.

5) painting scotch– they can replace superplastic
6), can also replace polymorphus. It resembles plasticine, but unlike it, it hardens well in air. Contains natural ingredients (dough made from cereal flour), so it is absolutely safe for children.

7) decoration items cups: coins, flowers, cones, feathers, candies, beads, buttons, ribbons and much, much more.
Cup assembly process
The process of creating a floating mug is not at all complicated, but there are several important nuances that need to be taken into account when creating it.
The main secret in creating a flying bowl is to choose the right tea pair. The cup and saucer should not be too heavy. If you take this condition into account, it will be easier to create a flying bowl!
We construct the base of the floating cup; this is the element that connects the saucer to the cup. To do this, take a wire of the required length. It is important to note that the distance between the bowl and saucer should be approximately two cups. With these parameters, the flying cup will look most balanced.
Inside the bowl we form a loop from the wire, the diameter of which should be 2-4 cm. This will help to achieve better fixation of the wire in the cup. We twist the second end of the wire into a flat spiral in two or three turns. This way we will get a kind of stand, which we will fix in the saucer.
The tilt radius of the resulting structure should not exceed 45 degrees, otherwise the structure will be unstable!

Polymorphus is the best material when making a flying cup.
Take a piece of polymorphus and immerse it in hot water for 20 seconds. During this time, the material is converted into soft plastic.

We stick the resulting plastic, like plasticine, around the base, giving it the desired shape. If the plastic hardens before you finish the job, simply dip it back into hot water. The prepared base will completely harden within 15 minutes.

If you don’t have this material on hand, you can use modeling compound. An alternative to these two materials can be masking tape, which is simply wrapped around the wire base. Or you can wrap the wire with felt or other fabric, after coating it with glue.
An important aspect is to constantly try on the base on a saucer with a cup in order to spot any flaws in time!

You should pay special attention to the edge of your cup in the place where the structure will be attached!
In this place it is necessary to make a kind of step in the form of a support. This way the structure will hold much more securely.

When the base is ready, you can begin fixing it on the cup. Lubricate with glue all surfaces of the base in contact with the saucer and cup. Press firmly and hold for 3-5 minutes. Don't forget to glue a step to support the cup!
We fix the flying cup on soft objects in the desired direction and leave it in this position for 5 hours. During this time, the glue will dry well and securely fix the resulting floating bowl.

When the floating cup is well glued, you need to check how stable it is.
If the saucer is not able to hold the cup, then it is necessary to reduce the radius of the structure until it becomes stable.
The last stage of making a flying bowl is the most interesting and creative. Decorating a spill cup! Apply adhesive gel to the decorative elements and glue them.

It is better to glue the large elements first, and glue the smaller ones last. This will hide small visible defects and gaps between elements.

After all the decorations are glued, you need to let the cup stand for 5 hours so that the glue dries.
The process of assembling a flying bowl is discussed in detail in the master class
Hand-made from the Masterclassy website:
Flying mug of flowers


Nata Liana tells how to make a floating cup “Summer Mood”:

Flying mug of fruits and berries
With the help of plastic fruits, berries, and mushrooms, you can create such an abundance of fruits and berries pouring out of a cup. will perfectly complement your fruit and berry

A floating cup can be decorated with bright gifts of autumn. Dried leaves and flowers can also be used. The mug can be replaced with a wooden barrel made from simple ice cream sticks.

Flowers and fruits are harmoniously combined in a floating stream. Butterflies, dragonflies, and ladybugs will be a wonderful “live” addition.

Floating money mug
The floating mug looks very stylish. The design technique of using an unfastening zipper will also add originality to your mug. Keys, bells, old small toys - everything can be used as decorative elements for your mug.

With coins you can also use imitation bills, in which.

The secrets of creating a money mug can be found in the Sveta DIY video tutorial:
The money tap is created using the same principle as the flying mug. Instead of a mug, we accordingly use a plastic tap, and a saucer can replace a small chest or. Coins will look more impressive if they are coated with gold spray paint or varnish.

Master - Anastasia Spitsyna
Cash flows can be depicted using paper bills.

Master - Oksana Ankudinova
How to create a money tap can be seen in the master class
DIY gifts:
Flying mug with birds
The bird is a symbol of lightness and freedom; it is very often found in interior solutions in various styles and variations. This motif is also reflected in the decoration of the floating mug.
A floating mug can become a wonderful house for a nest of birds. The nest resembles a home and an idyll in it.

A cup with daisies and a bird with a nest looks like a real symbol of family, love and fidelity.

A bird with delicate roses, fluttering butterflies and other decorative elements will help create a summer soaring composition.

You can decorate the flying cup with simple pasta. It’s better to take bow-shaped pasta, paint it with acrylic paint, and decorate the middle with pearls. We decorate the mug with them and the waterfall of bows is ready!

This mug looks elegant both in pastel colors and in classic colors - black and white.


Flying mug made of beads
Pearls are the most noble decorative element that will add festiveness and pomp to any craft! A simple white tea pair can be transformed into such a pearl miracle!

A very delicate floating bowl will be made from soft pink and matching pearls. A white dove will perfectly complement the composition).

Beads of different colors will also help create a unique spill cup. Flowers and ribbons of the same shade as the mug will perfectly decorate and complete the image of your cup.


Will make yours more magnificent and elegant:

Handicraft masterpieces cover in their master class how to make an Easter floating bowl:
DelkiRu talks about another type of Easter composition in his master class:
Unusual flying cups
Instead of a flying cup, you can make a flying teapot. This composition will look very original on your kitchen table. When performing such a craft, it is better to choose a teapot of small size and weight so as not to overload the structure. It is better to make a “stream” from a teapot from thin, strong wire (for example, knitting needles) and superplastic.

Hanging flying cups with flowers can become an original decoration! The main thing is to securely fasten them.

On the eve of the celebration of someone dear to your heart, you want to give a gift that would impress and leave pleasant memories. We suggest making voluminous postcards with your own hands, they are also called pop-up postcards. What are these wonderful postcards?! At first glance, these are ordinary postcards, but when you open them, a three-dimensional figure or an entire composition suddenly appears in front of you! Such cards will not leave anyone indifferent! Especially if they are original and keep the warmth of your hands!
DIY cards with flowers inside
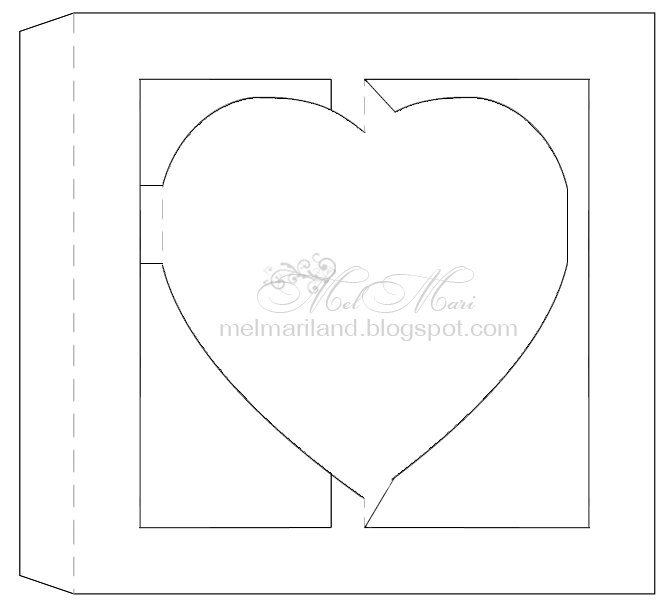
Even a child can make a heart-shaped card with a three-dimensional flower inside:

YOU WILL NEED IT
We make both simple and complex creation technologies.

A lush flower for the inside or outside of a card can be made from colored or even plain paper painted with watercolors or pastel crayons. You can cut flowers using this template:

Print out the flower template and color it with paints. Fold it according to the marked fold lines and glue the resulting flower onto the base of the card.

Such a lush and bright card with flowers inside, made with your own hands, will undoubtedly delight the recipient.

He explains how to make it in his master class. TheJulianaHappy:
The option with delicate, pastel colors looks very cute. Making stamens for flowers is not difficult!

The original master class is in English, so for your convenience we offer a brief translation of the process of creating this flower card.

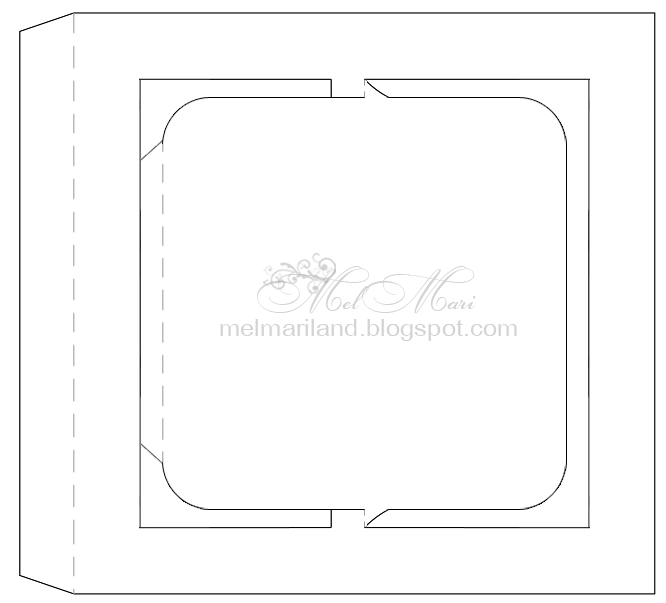
Standard materials and tools: colored paper, cardboard, scissors, glue, plastic to imitate glass in a window.
Take thick colored paper and fold it in half. Cut out a square window in one half.

We make a frame from colored paper of a different color. The glass for the window can be made from a protective film for your phone or transparent plastic. Glue the resulting window frame to the base of the postcard. You can do without “glass” at all.


Glue it into the hole
We glue a flower pot out of cardboard and glue it in the middle of the card on the fold line. Glue the sides of the resulting pot together so that when you close the card, the pot folds up.


Next, from colored paper we cut out green stems and all kinds of bright flowers: crocuses, hyacinths, daffodils and tulips. Perhaps your bouquet will not be spring, but summer, which means that cornflowers, daisies, pansies, etc. will appear.


Glue the flowers into the pot
The height of the flowers should be such that they do not stick out from the card, but are visible through the window!


The window can be decorated with a cozy curtain.

Original master class
Using the same principle, you can make a card with flowers from felt or painted cotton pads. Additionally, insert a laconic but warm congratulation along with the flowers!

In addition to flowers, balloons, stars, and bows may appear from the card.

How to make a panoramic flower card along with a congratulatory envelope shows in his master class TheWorkshop:
We take thick paper - the basis for our postcard. Create a rectangle in the center of the fold line of the card. The width of the rectangle is 3 cm, length is 7 cm.

We make cuts along the pink lines with a stationery knife. Then we fold the resulting rectangle inside the postcard. We attach the base of the card to another sheet, b O larger in size than the original base.

Then we make a floral design: a flower pot, the flowers themselves, fluttering butterflies and grass. We combine all this and glue it to the front of our postcard.


Original master class.
Using the same technique, you can make an original vase postcard. You can also make flowers in such vases with your own hands from paper or other available materials.


We bring to your attention a master class on making a very delicate three-dimensional card, which will not only congratulate the recipient, but will also fit perfectly into the interior of, for example, a children's room.

First we make a box frame. To do this, take thick blue paper and cut out a template for the box from it. We fold the edges of the template 4 times, 5 mm on each side, thereby forming a frame. Glue the resulting frames together.

On top of them we glue colored or scrap paper in a color that matches your composition.

Next, we will prepare the elements of the future composition. Glue together a balloon from paper circles. We fold the circles in half and glue them together. A waxed cord is glued into the base of the basket and directly into the circles, forming a ball.

We cut out clouds from scrap paper and a sun from yellow paper. Glue the elements of the composition into a frame. We glue the balloon as follows: we glue the base of the balloon with bulk tape, and the balloon itself with glue. We glue the clouds using the same principle: one with glue, the other with bulk tape.

We make green grass from a simple napkin. First we cut it, then glue it. On the right side of the box we glue a tree made using a hole punch for Scrapbooking. The final touch is to glue serpentine, butterflies and a congratulatory inscription into the empty spaces! We glue a ribbon with embroidery or lace to the bottom of the box. The original three-dimensional postcard is ready!

Original master class.
3D postcards using Kirigami technique
Kirigami is the art of cutting and folding figures and cards from paper. This is the main difference between Kirigami and other paper folding techniques and is emphasized in the name: “kiru” - cut, “kami” - paper. The founder of this trend is the Japanese architect Masahiro Chatani.

For production, sheets of paper or thin cardboard are used, which are cut and folded. Unlike traditional 3D postcards, these paper models are usually cut and folded from a single sheet of paper. Most often, three-dimensional models of architectural buildings, geometric patterns and various everyday objects, etc. are developed.

It’s better to start with a simple three-dimensional DIY birthday card. For example, using thick paper of two contrasting colors, you can make a birthday cake card:

To make it, use this template:

Using various templates, you can make more complex cake cards:


He explains how to make a kirigami cake in his master class. OksanaHnativ:
Using this technique, you can cut out various congratulatory inscriptions. The cake can be decorated and colored to your liking.

To create it, take this template:

White embossed paper will also make an impressive postcard:

By combining two mirror “cake” parts cut from different sheets, you can make a whole three-dimensional cake in a postcard!


Use the following template:

There are a lot of options for creating voluminous postcards! Cut and fold your paper masterpieces!
Volumetric postcards using scrapbooking technique
Scrapbooking is the art of decorating photo albums, but its techniques are also very popular when creating cards.
Using Kirigami elements, using the Scrapbooking technique, you can also make a three-dimensional postcard with your own hands. We cut out and fold “steps” from scrap paper for the “pop-up” candles on the second half of the card. Glue the candles and glue the resulting blank onto the base of the card.

You can make a simple but original greeting card from scrap or colored paper. We cut out the candle flame and decorate it with sparkles, then glue it to 2-sided tape. We glue the second part of the candle with glue. The congratulation itself can be tied or glued to an elegant satin ribbon. Simple and original!

A postcard made from paper of a different texture will look completely different)

By placing each element of the card on top of each other, again using double-sided tape, you can create such a voluminous, bright cake!

Let's take a look at Tatyana Sadomskaya's master class on how to easily make a voluminous, delicate postcard using the Scrapbooking technique using ready-made pictures.

To create such a postcard, Tatyana used:
- scrap set ScrapBerry’s “Favorite Pet”
- scissors
- thick cardboard
It is better to use scrap paper with a large number of miniatures that can be cut from a single sheet, as well as colored stamp prints and chipboards.
Before creating a postcard, you need to decide on its plot in order to choose the color of the base of the postcard and its “characters”. In this case, the basis is paper with a calm beige print, and the components of the plot are cut out of it: kittens, a puppy, flowers, a crown on a pillow.

Don’t forget to decide before starting this work what will be in the foreground and what will be behind it!
In our case, we put the larger kitten in the foreground, this will enhance the feeling that it is closer than kittens with a dog.

We make the necessary cuts. The result is a design with “steps”. We glue leaves of arbitrary size onto the resulting “steps”. These leaves imitate a wooden fence.

Next, we gradually glue our elements, starting from near to far. We start from the foreground and glue the kitten. We glue it onto beer cardboard, because it gives additional volume and casts a shadow. Using the same principle, you can glue several other elements, for example, balls and flowers. When the inside is ready, glue it to the base of the card.

We also decorate the outside of the card with an elegant floral print.

For greater elegance, decorate the elements of the card with sparkles (use glitter).
Original master class.
For inspiration, check out this masterpiece 3D cake card:

Volumetric postcards-dioramas
We present to your attention a master class on making a 3D postcard - a small three-dimensional scene. On such a stage, everyone can place various fancy figures and decorations)

To make a postcard, we take 4 sheets of thick cardboard, in this case we take cardboard in four shades of orange. You can choose colors to suit your taste.

On sheets of cardboard, draw the outline of the frames with a pencil and cut them out. Make the frame outline 1 cm wide.

From the remaining fragments of paper we cut out two strips, each measuring 10 by 4 cm. We line each one into 4 parts of 1 cm each. We cut off all the corners of the resulting strips. Fold the strips along the lines to form a paper zigzag. These zigzag pieces will support the diorama fragments. Glue the zigzags to the frame on both sides.

Glue the second frame clearly along the line on the other side of the zigzag.


The top of the zigzag should cover one side of the frame. The same must be done with the opposite side. Thus, the first scene of the diorama is ready!

Using the same principle, we make the remaining frames of the diorama.
It's better to decorate each of the frames (especially the last one) in advance than to try to squeeze decor into the finished card.
The back wall does not have to be solid; you can make a transparent diorama without a back wall.

Decorate not only the “wall” of the diorama, but also each frame. Use more voluminous decorations, such as beads, bows, feathers, ribbons, etc. This will make the card seem more voluminous and will enhance the 3D effect!

Original master class.
You can come up with absolutely any plot! Create your own little theater!
For example, the waiting Assol!

Or a hot air balloon in fluffy clouds.

Bright meadow with lupine and butterflies!

Birdhouse with birds and flowers:

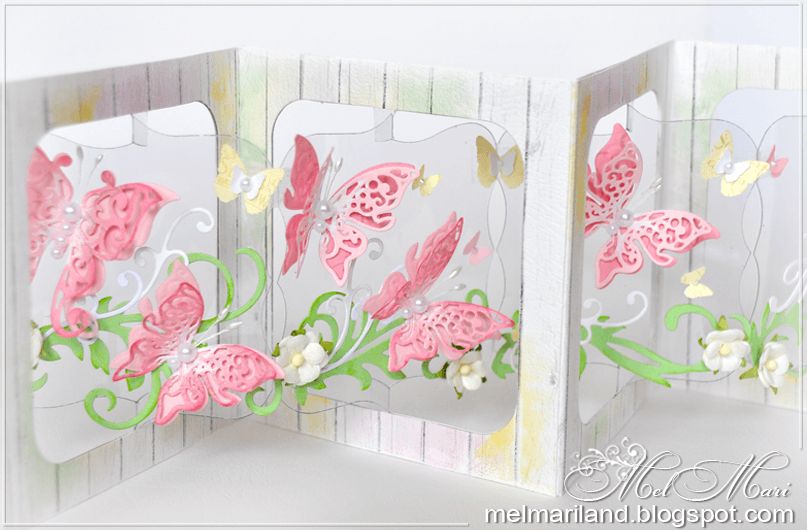
Accordion postcard (diagrams and templates)
Another type of voluminous postcard is the accordion postcard.
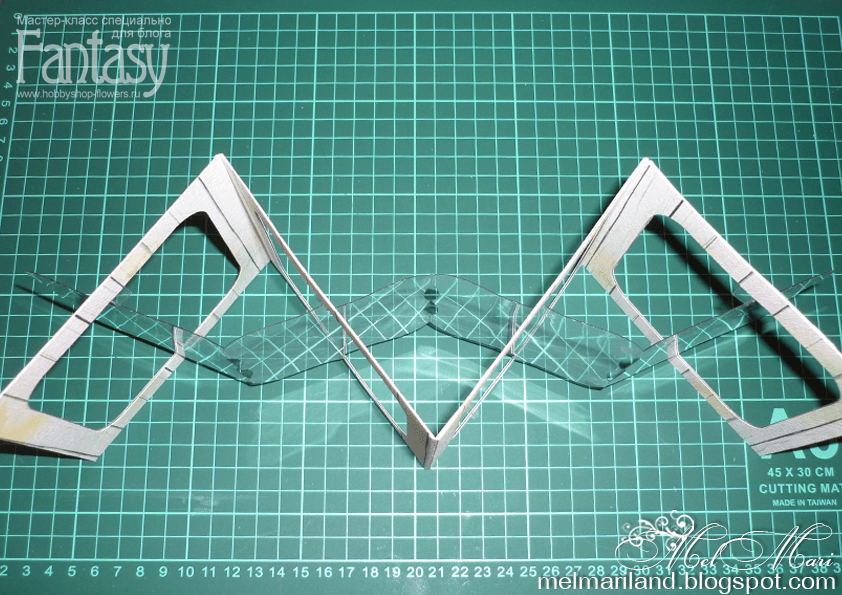
To create such a postcard you will need: thick scrap paper for the base frame, a die-cut scrap knife or stationery knife, transparent plastic for the internal parts, stamens, semi-pearls and other materials for decoration.
We take the template and make blanks for the postcard. We cut out 8 blanks for the base frame from thick scrap paper and 4 from transparent plastic.

Thick paper blank...

...and transparent plastic
We glue the plastic blanks to a paper base. To make the card fold, we make a double crease of about 2 mm on the outer folds. We connect the resulting 4 parts - glue them with glue or use 2-sided tape. Glue the remaining 4 frames on the opposite side.


Now you can begin the most creative part of creating a card - decorating it! Glue fluttering butterflies and twisted greenery to the plastic. The postcard is ready!


Original master class
See below for various templates for making the bases of such postcards:


Using your imagination, you can create all sorts of variants of such folding postcards. For example, with a predominance of children's themes. The number of components may vary.


Birds, flowers, butterflies always look very light and airy on postcards!


Postcards for all occasions
We have already seen that handmade postcards are more original than those you can simply buy.
YOU'LL LIKE IT!
Let's give, and sometimes for no reason at all! 🙂


