Every expectant mother, preparing for the birth of her baby, wants her baby to have all the best and most beautiful things. When a woman goes on maternity leave, she has more free time, but there is no longer an opportunity to engage in active activities. Many people are fond of knitting. If you are new to this and want to learn how to crochet booties for beginners, read on. The article discusses simple options. They can be easily dealt with.
What thing to do?
Many expectant mothers begin to prepare for the meeting with the baby in advance, buying caps, diapers, rompers, vests, and bed linen. Women often ask about what and how much they should have. It all depends on the time of year in which the baby is born. If you like to do handicrafts, you can knit a hat, scarf, baby sling beads, educational toys and crib decorations for your child. If the apartment is cool, you will need booties for newborns. You can crochet them yourself. They will keep the warmth of mother's hands and warm the baby's feet.
Which knitting method should you choose?
The easiest way to make booties is to crochet. The patterns for beginners are very simple and do not require much experience to complete. In addition, it is easier to get various decorative elements here - flowers, circles, balls, holes.

Knitting may seem more difficult, especially for small objects. In addition, it is easier to crochet a complex three-dimensional shape without seams. To create a beautiful thing, it is enough to know how to make ordinary single crochets. More complex elements will be required for openwork knitting and decorative surface patterns. If you decide to learn crochet for beginners, booties are a very good first try.
Design and style

The variety of models and decorations of booties is amazing. You can use any ideas that you like. For girls, most often they choose openwork knitting with abundant additional decor in the form of ribbons, bows, flowers, and beads. Crochet booties for boys can be made blue. The most original option would be the shape of a stylized car. Thematic models with animals are interesting. Butterflies, berries, daisies are more feminine styles.
The shapes may also vary slightly. They make booties with ties. They are the most versatile because they stay firmly on the leg, even if the baby actively moves them. A sandal or boot will also not slip off, but booties, shaped like a bast shoe or an ordinary slipper, must stay firmly on the foot, otherwise the child will definitely throw them off or lose them. So, when choosing a sample or coming up with a design yourself, proceed from considerations not only of beauty, but also, above all, of convenience and functionality.

What will you need?
If you have not yet decided which specific options you will make, or want to try several, buy any hook No. from 1.5 to 2.5. It is chosen, as a rule, in accordance with the threads. Thin is a must have. It is always useful for creating small parts of decor.

It is better to use special children's yarn. It usually costs more, but is considered hypoallergenic. This is especially important for those things that will come into direct contact with the skin. You can, of course, buy any threads in the shade you like, but if they make your baby red, you will have to use your booties for the doll or as decoration.
Select decorative elements in advance. For girls, beads, ribbons, and flowers are used. If you are going to make car booties, use buttons as headlights.

For the animal's face, it is worth buying ready-made eyes, although it is not difficult to knit them yourself.
If you are afraid that all this beauty may accidentally fall off during use and harm your child, add originality to the item by selecting colors.
A charming effect can be achieved through openwork patterns and frills. However, such models require special care, as they require constant counting of loops and following the pattern of the pattern. For beginners, it is better to practice with simple options.
How to crochet booties for beginners?

As a first experiment, choose a standard form without openwork elements. Try to see what your knitting density is. Estimate the size of the foot that is obtained from the purchased threads (using the sample you like). If there are no recommendations for the hook number and the name of the yarn, it may turn out that using the proposed pattern you will knit slippers for a two-year-old child. This will depend on the thickness of the threads. If there are specific instructions, try to adhere to them.
Execution Sequence
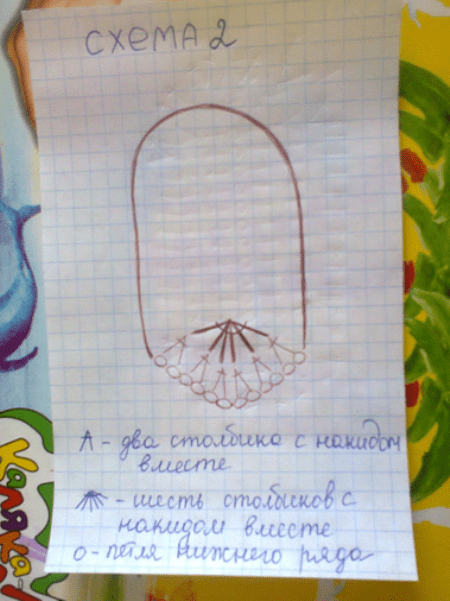
To get a simple shoe shape, like sandals, the crochet pattern for booties will be as follows:
1. Make the required number of air loops for the sole. You do it according to

a pattern where crossed sticks represent a double crochet, a black oval represents an air stitch, and a purple oval represents a connecting loop.
2. The upper part, where the toe decrease is performed, is knitted in the following sequence in rows:
- go around the circle with single crochets, knitting them behind the back wall;
- The next two rows are also made with single crochets;
- in the first loop, in which you make an air at the beginning, knit a single crochet, nine single crochets, decrease with single crochets, that is, do two together, decrease with double crochets, double crochet, three double crochets together, double crochet double crochet, decrease with double crochets, decrease with single crochets, single crochet to the end of the row;
- In the first loop in which you make an air stitch at the beginning, knit a single crochet, seven single crochets, a single crochet, a single crochet, three double crochets together, a single crochet, a single crochet, single crochets to the end of the row. ;
- In the first loop in which you make an air stitch at the beginning, knit a single crochet, five single crochets, a single crochet, a single crochet, three double crochets together, a single crochet, a single crochet, and the remaining single crochets.
Do not forget to make a connecting loop at the end of each row, and start with one air loop.

3. The cuffs can be made as one piece with a strap, or the clasp can be knitted separately and sewn on later. If done together, then for the right bootie the thread is attached to the seventh column, for the left one - to the eleventh. Knit 12 air loops. Then you work in the following rows:
- half double crochet in the third stitch from the hook, 2 chain loops, half double crochet in the next 9 stitches, half double crochet in the first stitch (the one you joined the thread to), 19 half double crochets (there will be 3 left loops left), skip 2 loops, single crochet in the last loop.
- 2 chain stitches, turn the work, half double crochet in the first and next 28 stitches, 1 chain stitch, skip one half double crochet, half double crochet in the last 2 stitches.
- 2 chain stitches, turn, half double crochet, half double crochet into the hole, half double crochet to the end of the row.
4. If you are making a version for a boy, perform a turn, 2 chain stitches, the entire row with single crochets, fasten the thread and cut it. For a girl, you can make ruffles, then after turning, knit 5 double crochets in the second column, and this sequence: skip 1 half double crochet, 1 single crochet, skip 1 half double crochet, 5 double crochets in the next one, repeat in a circle 8 times , fasten the thread and cut. All that remains is to sew on the button.

Boot with ribbons
For the cold season, it is worth making booties in the form of a boot from warm yarn. They can be worn under overalls, for example. Although this option looks good in an openwork light design. Perfect for little princesses. This item is also knitted from the trail, then a vertical headband several rows high is made. The toe and heel are made separately.
Step by step
If you have found a beautiful pattern, but do not know how to crochet booties, for beginners we can advise you to understand the general sequence of work. The proposed actions are:
1. First, the sole is made in the form of an oval, expanding towards the future toe. In this part you will have to make more columns. The increase, as a rule, occurs evenly in each row.

2. When the mark is ready, a vertical rim is formed. It is obtained by knitting single crochets behind the back wall of the loops of the outermost row of the sole. This part can be one or more rows high.
3. The next step is the toe, where the decrease occurs.

4. Then the heel part is performed. If the model is one-piece, the third and fourth steps are combined, since knitting occurs in the round.
5. Separately, decorative elements, fastener straps, and laces are created, and then attached to the finished base.

So, you have learned how to crochet booties. For beginners, this task is not too difficult. Having done it once according to the scheme, you will be able to fantasize in the future, coming up with different design options on the same basis.
During quiet evenings on maternity leave, waiting to meet your beautiful baby, knowing the gender of the unborn child, you can not only think about things that you can buy, but also make them yourself. For a girl, you can, for example, knit her first booties. What are booties for and is it difficult to knit them? This will be discussed in this master class.
A little about what booties are needed for
These little knitted slippers are needed, first of all, in order to smartly go out somewhere. This could be the first trip to the doctor or the first walk on a visit. Don’t forget about the recently popular photo shoots, where you simply can’t do without beautiful booties and other necessary accessories.
Is it difficult to knit booties?
Not at all. Having crocheting skills and knowing the basic elements of knitting, you can knit your first ones, even for an older child. And if you rely on a detailed description of knitting with a pattern and photo, then even without the skills, you can learn if you want.
The first question that arises when creating booties is their size.
It is calculated as follows.
- The length of the baby's foot and its width are measured.
- The width is subtracted from the length and the length of the chain of air loops is obtained, from which the knitting of the sole of future booties begins.
Crochet booties with a detailed description prepared by: Liliya Pervushina
Moms and grandmothers, aunts and sisters - the article is dedicated to you and your children, grandchildren, nephews and younger members of your family. After all, we will teach you how to crochet booties for newborns: we have collected patterns and descriptions especially for you.
We We will tell you step by step the secrets of knitting booties, we will demonstrate photos of simple and affordable models, talk about diagrams and patterns. So, let's get down to a fabulous activity that will bring you a lot of pleasant memories, and your baby - incredibly beautiful and stylish shoes created by caring and loving mothers.
We present to you booties for newborns of a slightly unusual, but very successful model.
This simple method of knitting booties-slippers is suitable for craftswomen who are beginning their acquaintance with the world of handmade items. No complex combinations, patterns or anything else – just 2 elements and a simple but original decor. We will knit with crochet number 3, and we will take soft, natural and thin yarn. The length of the sole of the bootie will be 9 cm, this is exactly the size of a baby’s foot from 0 to 2 months. You can also measure your baby's foot yourself.
We invite you to study a master class during which you will learn how to knit tiny and very stylish booties. Naturally, we should knit the sole of our booties. Use this diagram, and then pay attention to the photo of the finished product.

Then you can start knitting the sidewall, which we will make according to the pattern. 

When the side is ready, we knit a chain along the top edge.


Here are the promised 2 parts from which we will form our bootie.
 Fold the side part in the form of a miniature turban.
  We sew the side to the sole and get an almost finished product.
All we have to do is make a fastening in the form of a loop and a decorative clasp. A simple button will not work here, because it will be very heavy for a tiny leg. It's better to make a flower clasp, which will significantly decorate your product. For boys, you can choose more conservative fastener colors - blue, gray, brown. But mothers of girls have an unlimited field for imagination. Create unique booties and enjoy!

How to crochet booties: training for mommies
We invite you to familiarize yourself with another way of knitting wonderful baby booties. This time we will have fishnet booties, which can be knitted for both girls and boys (you should take darker threads).

First stage - materials
- 50 grams of “Iris” thread (cotton);
- 15 grams of thread of a different color (for openwork);
- 40 cm ribbons (for decoration) or knitted thread tassels;
- hook number 3.
Since our threads are thin, we will knit in 2 threads. It’s better to make a pair of booties right away so that they come out identical.
Now we will learn in detail how to crochet booties. At the end of the section, you will be able to watch video lessons from experienced knitters and try to make your own masterpiece with them.
Second stage - sole

- To begin with - 13 air loops and 3 lifting loops.

- For the first row, starting from the fifth stitch, we make 11 double crochets. In the last loop we also make 5 double crochets, and then another 11 double crochets. After this, we knit 4 double crochets in one loop and finish with a connecting loop.
- For the second row we go up 3 air loops, make 11 tbsp. double crochet and knit 5 times, 2 tbsp. with a double crochet in each of the loops. We knit another 11 sts. double crochet and 4 times 2 double crochets in each stitch. At the end we knit 1 double crochet and again a connecting loop.
- For the third row, we again rise by 3 loops, knitting 12 tbsp. double crochet, and then go over 8 times, 2 tbsp. with a double crochet for each loop. We knit another 13 stitches and again go through 8 times, 2 stitches each. At the end we make 1 tbsp. with a double crochet and end with a connecting loop.

- The knitting of the sole has come to an end.

- At the same time as the first, as we have already said, it is better to knit the second sole so that the knitting style and all parameters are identical.

- The next stage is knitting the sides. First you need to strengthen the sole. Around the columns from the previous row we knit one row with single crochets and any additions.


- The hook is inserted from the wrong side and from right to left, and then, wrapping around the column of the previous row, pick up the thread and pull it out to the wrong side of the sole.

- After we have strengthened the sole, we should tie the sides. To do this, we knit 2 rows with a single crochet, ending the rows with a connecting loop. We begin each subsequent row with two lifting loops.
Third stage - toe
It's time for us to knit the toe of our bootie. To do this, we find the center by folding the product in half lengthwise. Now from this central point set aside 15 stitches to the left and to the right, marking the point with a paper clip or thread. 
1 row– rise by 3 air loops, then knit 4 tbsp. double crochet and 10 times 2 tbsp. with a crochet together. After this, we make 5 more double crochets. Let's turn the knitting over
2nd row– we repeat the same thing.
3rd row– rise to 3 air, then 4 tbsp. double crochet, 1 chain stitch and 5 tbsp. double crochet 
We knitted the toe of the bootie.
The fourth stage is the top of the product
Crocheting booties for beginners continues with making the upper part of the product. 
We make 2-3 connecting loops to get closer to the center, then knit 1 row with double crochets.
The top of the bootie will be made according to the pattern.
To knit row 1 we use all double crochets.
We begin the next row with three lifting loops, and then repeat the alternation until the end of the row - 1 chain stitch, 1 double crochet, through the column of the previous row. 
Now you can buy whatever your heart desires for a newborn. But not a single purchased item will convey your warmth and love to your baby like something you made with your own hands. Clothes such as booties will be suitable for any baby, especially since knitting them does not take much time and will not be difficult even for beginner knitters. As a result, you will receive an elegant, exclusive item.
Popular patterns for crocheting and knitting booties for newborns
If you look online, you will find many different models of booties. And not every pair can be mastered beginner knitter. I chose the simplest descriptions, but at the same time interesting and beautiful , in my opinion, knitted and crocheted booties that even a beginner can handle.
- The simplest “marshmallow” knitting for beginners

You will need 50g medium weight yarn in two colors . Cast on 28 stitches using the first color on straight needles. Knit garter stitches 52 rows (by the way, you can adjust the shoe size by the number of rows knitted). Then close on the right side 8 pieces at a time . The number of remaining loops became 20. Next, we will continue knitting in a different color: first perform 4 rows in knitting, then 4 in purl. Repeat this 7 times and finish with knit stitches. . Close everything at once.
After this, connect, more precisely, sew the part with the edges facing each other to create a vicious circle. Then sew the main part of the workpiece, and along the rest of the part (knitted with strips) lay a basting stitch and pull it towards the center.
Decorate the top of your baby's shoes knitted applique , beads or any other decorations according to your taste and imagination. Turn away the protruding edges.
- Another simplest version of one-color booties with knitting needles. Thread thickness is medium or higher

The size of the product can be increased or decreased due to the length of the knitted toe.
Cast on 37 stitches and spread them across 4 knitting needles - 9 pieces each . Join the knitting into a circle by knitting the last two stitches together. Then knit 12 rows in a circle with a 1 by 1 elastic pattern. Don’t forget to make a row of holes where you will insert the braid or lacing. It works like this : Knit 2 with one, 1 yarn over, 1 knit (alternate until the end of the row). Then knit two rows with facial loops, after which they need to be distributed as follows: 11 loops on the first knitting needle (try to ensure that the place where the knitting is connected into a circle is in the middle), 7 loops on the other, 11 loops on the third and seven on the fourth .
Now let's move on to knitting a toe . We knit it on 11 loops of the third knitting needle in a garter pattern, in reverse rows. We do not touch the remaining loops for now. We knit 18 rows of toe . Next we knit the sides. To do this, we cast on one loop from each edge loop on the sides and add all the postponed loops to the work. The sides are also knitted with garter stitches - 10 rows.
Well, then we will continue the sole from the top of the toe with facial loops, evenly grabbing and knitting together sole loops with side loops. Continue knitting until the side knitting needles run out of stitches. When all the eyelets are locked, the seam created on the heel is sewn together.
- Crochet "shoes"

We cast on 13 loops, knit a single crochet into the second loop from the hook and knit according to the pattern.

After knitting seven rows, we will get the finished sole of the shoe. We knit further from 8 to 11 row just single crochet - no additions or decreases.
Having knitted everything to the end according to the pattern, we get an almost finished slipper. Then we knit along the top edge three rows in single crochets and, fasten and break the thread.
To make the fastener, cast on a chain of 21 loops and knit a single crochet into the second loop from the hook, then knit according to the pattern.
Sew on the buckle and secure it with a pretty button.
Master class on knitting booties with your own hands
I suggest you try your hand at knitting a charming pair of shoes, your choice by knitting or crocheting, and an accessible description and detailed photographs will help you with this.
- Crochet booties
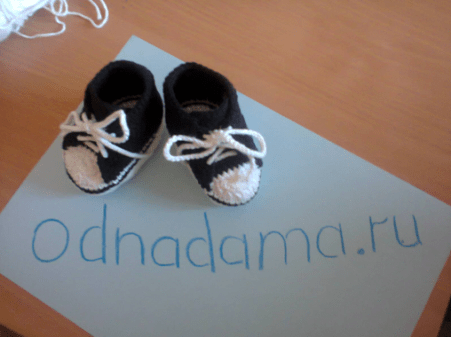
For these booties, I took the remains of the Turkish yarn “Lanoso” Egyptian cotton for children with a thickness of 50g/105m.
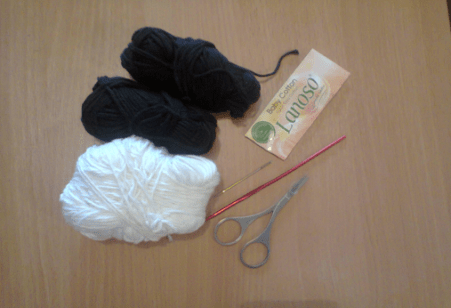
Materials
Let's start knitting from the sole - cast on 11 chain stitches. Add two for lifting.

Step 1. Cast on 11 chain stitches
And we knit according to the pattern.
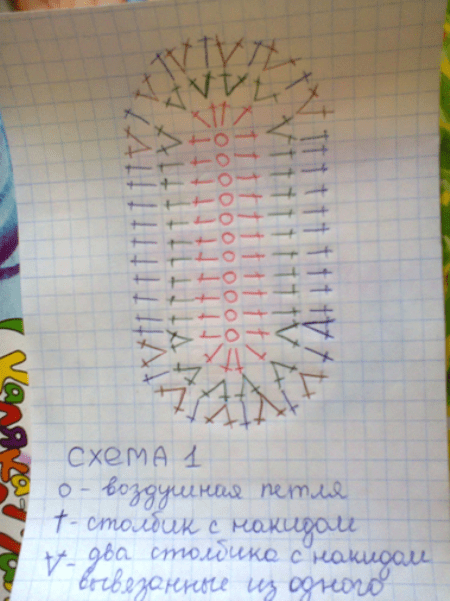
Schematic drawing
In the outer loops of the chain in the first row we knit 6 double crochets (dc), in the second in each of these six there are two dcs - it turns out 12.
In the third row we alternate 2 dc – 1 dc.
Step 2. In the third row, alternate 2 dc – 1 dc
The sole is ready.
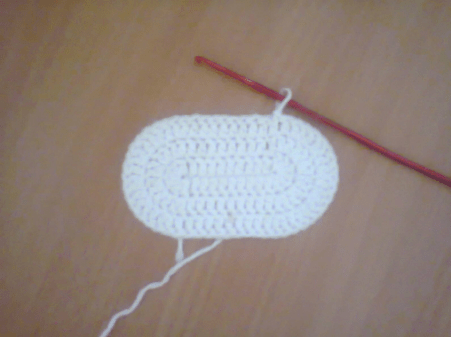
We tie it with single crochets (SC). We knit three rows in total. The resulting part is folded and a kind of “boat” is obtained.

Step 3. We roll up the base and get a “boat”
We take black yarn and knit one row with single crochets. After the black row, we knit another row of sc with white threads.

Step 4. One row of black yarn without crochet and another row of SC with white threads
Fasten the thread and cut it. We knit a second similar piece.

Step 5. Knit the second sneaker
In the resulting workpieces, remove all protruding ends of the threads so that they do not interfere with your work in the future.
We begin to knit the side parts of the “sneakers”. On the toe we count 12 loops - we leave them for the tongue, and with black thread we knit a row of dc above all the other stitches.

Step 6. Using black thread we knit a row of dcs
Then we unfold the workpiece and knit another row in the opposite direction.

Step 7. We knit another row in the opposite direction.
From the third row we begin to knit eyelets for the laces. To do this, at the beginning of the row we knit 3 chain stitches, count two stitches from the edge and knit a DC in the third. We continue to make dc until there are two columns left to the end. We collect three air loops and attach them to the edge of the row.
Unfold the knitting. Along a chain of three loops we knit three half double crochets. Let's move on to the fourth row. We also knit three chain stitches, skip two stitches and again knit a double crochet into the third.
We continue knitting similarly to the third row. There should be three rows with holes in total.

Step 8. Make 3 air loops, count two stitches from the edge and knit a dc in the third
We simply knit the sixth row with a DC, cut the thread and fasten it.
The main part of the “sneakers” is ready.

Step 9. We knit the sixth row simply with dc
We begin to make the tongue according to the diagram.
Scheme of the tongue for the sneaker
Along the edge of the twelve remaining loops we knit six double dcs with one vertex. We unfold the knitting and knit the resulting six double crochets together. We cut the thread and fasten it.

Step 10. We knit six double crochets and in the other direction six double crochets.
From the edge of the tongue we start knitting with white thread - 10 sc, unroll the knitting and knit another row. Change the thread to black and perform 6 rows of dc. We fasten the thread and cut it.

Step 11. Start knitting from the edge of the tongue with a white thread, and then change to black
We do the second one in the same way.
For the laces, we knit two chains of air loops with a length of 40 cm with white yarn.
Step 12. We knit the tongue on the second sneaker and knit chain laces
We tuck the laces into the finished “sneakers”. To prevent them from losing their shape, I advise you to put padding polyester or cotton wool inside.

Step 13. Cord and it’s time to try it on
Your crocheted sneakers are ready. This description is intended for babies from 0 to 6 months. The size of the sole is 8-9 cm. It is easy to knit a shoe of a larger size if you cast on a larger number of stitches at the beginning, instead of eleven.
- Knitted booties
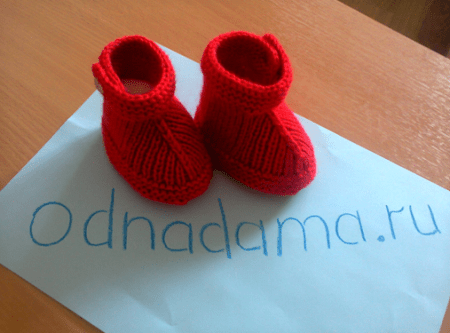
For this model, I took Baby Wool Alize yarn 50g/175m in two threads. According to my description, the size of the sole turned out to be 8-9 cm, that is, also for a baby aged 0-6 months.

Materials
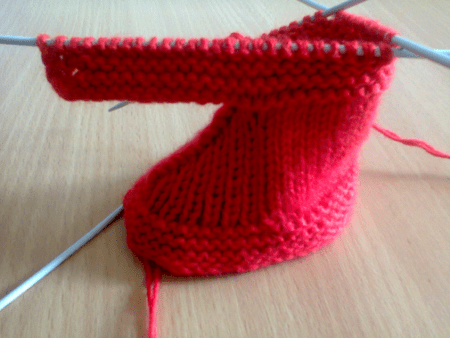
We start knitting from the sole. We put 8 loops on the knitting needles.


Step 2. Garter stitch
In total we get 14 loops. We continue knitting 34 rows in garter stitch.

Step 3. Knit 34 rows in garter stitch
In the 35th row we decrease one loop from each edge.
We repeat decreases in the 37th and 39th rows. There are 8 stitches left on the needles.

Step 4. From rows 35, 37 and 39, decrease one stitch from each edge
Close all the loops until only one remains. And along the edge of the sole we begin a set of stitches on four knitting needles.

Step 5. Close all the loops until one remains and cast on the loops on four knitting needles
We should have 60 loops.
We knit 6 rows with a scarf pattern.

Step 6. We knit 6 rows with a scarf pattern
We divide the work into two parts - heel and toe. We perform the toe with a 1 by 1 elastic band, and the heel with the stockinette stitch. In the first row on the sock exactly in the middle (between 15 and 16 loops) add one loop. We knit four more rows according to the pattern.

Step 7. We perform the toe with a 1 by 1 elastic band, and the heel with the stockinette stitch
Then on half of the sock in each row in the middle we knit three loops together.
We continue this way until there are seven loops left on the sock, while knitting the heel with a knit pattern.

Step 8. Continue this way until there are seven loops left on the sock
We close these seven loops, and add 16 more loops to the number of loops on the remaining knitting needles.

Step 9. Cast off seven loops and cast on 16 more loops for the remaining ones.
We knit 6 rows with a scarf pattern. Don’t forget to make a hole in the third row for a button (knit two together, yarn over one).
Step 10. Knit 6 rows with a scarf pattern and make a hole
We close all the loops, cut the thread, and fasten. We remove the protruding ends.
We knit the second one in the same way.

Step 11. Knit the second bootie
Sew on the buttons. The shoes are ready.

Step 12. Booties for the little princess are ready
- When choosing yarn for knitting children's products, it is better to give preference threads marked “baby” . This yarn is soft and hypoallergenic , so the baby will wear products made from it with pleasure, and it will not cause him any inconvenience or harm. For one pair of booties, one skein weighing 100g is enough. All other necessary information can be read on the label.
- When choosing a model, it is better to focus on options that have
You can crochet a lot of beautiful things for kids. The simplest thing is booties for newborns. Ideas that can be gleaned from the article and on the Internet will help you make a model of baby booties exclusive and fashionable. Boring socks are a thing of yesterday. Today, booties are full-fledged shoes for babies (sneakers, sandals, openwork shoes, sandals).
How to choose a model and materials
The model is selected based on the season. For summer, these can be light openwork booties made of cotton yarn in the form of sandals or sandals for girls and sneakers for boys. For winter, you can make warm sneakers or classic booties using dense knitting.
The highest quality threads are selected for needlework. Ideally, it is better to buy special children's yarn, of which there is a wide variety today. Since baby booties don’t require a lot of thread, you can use what’s left over from yarn that was purchased for larger crafts. The main thing is to make sure that the thread is soft and does not prick. This is important, since, for example, summer models are worn on the baby’s bare feet.
Hooks are selected depending on the thickness of the thread. We must remember that the thicker the thread, the larger the tool number.
To decorate the booties, you can use buttons, knitted decorative elements, embroidery, beads, ribbons and lace. Of course, for boys the decor is more restrained. If booties are knitted for girls, then you can give free rein to your imagination and make the decoration more colorful.
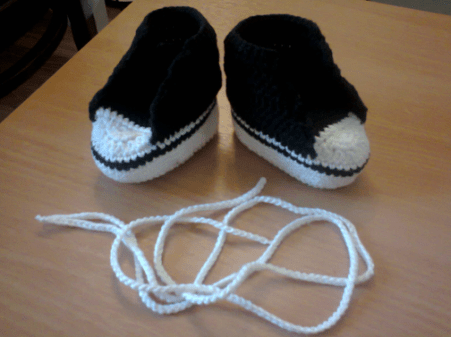
How to knit baby booties “Sneakers”
Such fashionable and beautiful “sneakers” will be a real decoration for a little champion.

Materials and tools
- Cotton or wool yarn - 50 g. Cotton boots will be thinner, wool boots will be warmer. Yarn should be taken in two colors - white and a contrasting shade (blue, red, green, hot pink, etc. are suitable).
- Hook No. 3.5.
Description
The description is very detailed with step-by-step photos, so even novice needlewomen will not have problems with knitting.
1. Outsole
The sole is knitted with white threads using regular stitches. according to the scheme:

2. Rise
After the sole is ready, you need to knit two more rows with stitches in white. and break the thread.

The workpiece looks like this

Using a thread of a contrasting shade, you need to embroider a strip between two rows of rise
3. Toe
The first row of the toe consists of 30 stitches and is performed in st. without nac. The next row is already st. with nak. and is performed in three tbsp. at a time. As a result, there will be 10 loops. The third row is the final one. All 10 columns of the previous row are knitted at once in one step.
Then, you need to move the thread to the edge of the toe and knit st. without nac. two rows - this is the shoe tongue blank. After which the thread is carefully secured and broken.

First row of toe

Second row of toe


Beginning of the tongue
4. Main part
A stripe is embroidered between the first two rows of the toe using a contrasting thread. Next, the main part of the sneakers will be knitted with the same thread. The front rows are knitted st. without nac., purl – st. with nak.
You will need to make holes in the purl rows for lacing. They are made in this way: two air lifting loops, a column with a nak. in the next loop, chain stitch, skip 1 stitch from the previous row and two sts. with nak. knit together. As a result, one loop is shortened and a hole is obtained.

Holes for lacing should be made at the beginning and at the end of each purl row.

You need to knit seven rows of the main part, break the thread and carefully fasten
The beginning of the tongue is already there, you just need to knit seven more rows with contrasting threads and three with white ones. The final row of the tongue (the 4th row is done with white thread) should be done like this - two tbsp. without nac. together, one without nak., two half-columns with nak., three tbsp. with nak., two half-columns with nak., one tbsp. without inc., two without inc. together.
There is no need to break the thread; you can immediately tie it. After tying, the thread can be cut.


The tying is done using regular stitches. without crochet
6. Finish
Now you need to make the logo of a sports company on the white upper part of the tongue so that the sneakers look like real ones. All that remains is to insert a crocheted or purchased ready-made cord into the holes for the laces.
One bootie is ready, the second one is knitted in the same way. The sneakers are ready!
How to crochet summer booties for girls
Summer booties in the form of shoes are ideal for both home and walking, and they can be made in just one evening.

This beautiful, delicate model for the summer will be an excellent solution for little princesses.
Materials for work
- Cotton yarn – 1 skein.
- Crochet hook 2.75.
- Two buttons for fastening.
Note: This model of booties is designed for an eight-month-old baby.
To make the product larger or smaller, at the very beginning (a set of loops for knitting the sole) you need to change the number of loops in the chain.
Description
1. Outsole
For the soles of booties, the following scheme is used:


The finished insole is 10-11 cm, depending on the thickness of the threads and the size of the hook. For newborns, the sole size should be about 8 cm
2. Main part
The first row of the main part of the product is performed in a circle with ordinary double crochets.

Each time the hook is inserted into the base of the column of the outermost row of the tied foot so that the side braid is visible

First row of booties base

Main part of the bootie (1 row)
3. Toe
The second row is knitted taking into account the decreases to form the toe - three air. p. on the rise, eight double crochets, 2 double crochets together (decrease), 2 double crochets, 2 double crochets together, 2 double crochets, 2 double crochets together, 1 double crochet, 2 double crochets together, 1 double crochet, 2 with a double crochet together, 2 with a double crochet, 2 with a double crochet. Next, until the end of the row, simply knit a st. double crochet

As a result, such a toe is formed
4. Heel and strap
The heel is made of 22 double crochets and ends with a row of 21 double crochets. strap loops. The strap is also made from st. double crochet At the end of the strap you need to knit a hole that will serve as a buttonhole. The loop is knitted this way: 3 tbsp. with double crochet, one air. loop, skip one loop, st. with a crochet to the end of the strap. The thread breaks.

Heel
5. Completing the toe
To finish the bootie, you need to shape the toe. The thread is attached to the place where the shoe strap begins and the toe is knitted - nine single crochets, two single crochets together, one single crochet, two single crochets together, three single crochets, two single crochets together, one single crochet, two single crochets together. Next, single crochets are knitted to the heel, and the thread breaks.
The thread must be secured by retreating 4-5 loops from the strap to the toe. Then knit 11 tbsp. with two yarn overs through one loop. Then knit them together.

The resulting workpiece must be tied with thread

The toe is ready
All that remains is to sew on the fastener buttons. The baby's shoes are ready! These crocheted booties will be a great addition to a little fashionista’s outfit.
How to crochet openwork booties for a baby
For needlework you will need:
- Cotton or acrylic yarn – 50g.
- Two hooks (No. 1 and No. 5).
- Thin satin ribbon – 80 cm.
- Beads for decoration.

A universal model for babies of any gender. Depending on the color of the yarn, you can make booties for a boy or a girl.
Description
1. Outsole
The sole is made according to the scheme:


For children aged 3 to 9 months, the initial row of air. loops should be made equal to 25 + 3 p.raising

The result is a foot like this, according to the diagram
2. Main part
The first row of the main part is knitted with purl stitches. without a crochet.

The hook must be placed under the base of the posts
When the first row is ready, you can start drawing - air loops st. double crochet, chain stitch, st. with a double crochet in the same loop of the previous row, 2 loops are skipped. So until the end of the first row. The next two rows are knitted in the same way.

The drawing looks like this (1 row)

Figure 2 and 3 rows

If the baby is older than 6 months, then you will also need a 4th row
3. Toe
In the middle of the side of the bootie you need to make one connecting post and 3 lifting loops.

This knitting continues until the middle of the side of the bootie on the other side
The knitting is turned over and the work comes from the inside of the bootie. You need to make 3 lifting loops and knit two stitches. double crochet and then knit them together. And so continue until the end of the toe row.
The knitting turns over again. Two lifting loops, yarn over. Next, you need to insert the hook under the loops of the previous row, make a yarn over, pull out a loop and make another yarn over.

Thus, you need to knit to the end of the toe row
A ribbon will be inserted into this row
Then you need to turn the work and continue knitting from the inside. The next row goes two sts. with a double crochet, and between them one air loop.

The top of the bootie should look like this
Now you can start tying the top with peaks. To do this, a st. is knitted in an arc. without a crochet, and in the next arc three stitches. single crochet, peak of three chain stitches and three tbsp. double crochet This is how the entire upper part of the booties is tied.

Tying (step 1)

Tying (step 2)

Almost finished bootie
The lower part of the bootie can be tied with peaks, or it can be left without finishing. All that remains is to insert the ribbon and sew on the beads.
Note: The beads must be sewn firmly so that the baby cannot tear off the decor and choke! If there are concerns, then it is better to limit yourself to just ribbons.
On the Internet you can find many models of baby booties, knitted or crocheted. Such handmade things not only look beautiful and fashionable, but also carry a huge charge of love and warmth.


