You've probably admired Balmain's collections more than once, which always featured a lot of embossed weaves and lace patterns. But today the conversation is not at all about these collections, and not about the fantastic luxurious costumes created by Olivier Rousteing. Today he devotes all admiring epithets to Romanian lace lace, the beauty of which is impossible to resist.
The basis of Romanian lace is a cord crocheted in a “caterpillar” pattern. Everyone, even novice needlewomen, knows this cord. The cord is made with cotton threads, quite dense, because we want to get relief patterns. Linen, wool, viscose - these threads can also be safely used for work.
Next, a prepared cord of a certain length (you need to calculate the appropriate length in advance) is laid out along the contour of the drawing. Which design or motif you choose depends on your product and your desires. The design must be transferred to thick fabric, which is an auxiliary element in the work. When the design is ready and the cord is attached to the fabric, the inside of the design should be filled. This part of the work is done with a needle, and in fact, then you embroider without clinging to the fabric.
The motifs of the drawing can be filled with connecting bridges, mesh, hemstitching…. In some places, where the contours of the pattern are close, individual parts of the cord are carefully sewn together with couplings, over the edge of the cord. Threads for embroidery should also be cotton, but thinner than those you used to make the cord; “Iris”, in some cases silk, “Floss” are suitable. The latter must be assembled in several additions. In general, this work may require threads of different thicknesses. You need to embroider with threads of the same color as the laid cord.

Despite the expected heaviness of lace ornaments, all things look very elegant. The Romanian lace lace technique is very suitable not only for clothing items, but also for interior design. We can say that it is simply impossible to create luxury in your home without Romanian lace.
Romanian lace for decorating clothes and interiors

There can be many ways to weave cords, or better yet, unlimited. In addition to the “caterpillar”, you can consider quite complex weaving of cords, and not necessarily with crochet, there are other methods, such as macrame. Then the beauty of the completed motif will be simply amazing.
The cords of individual parts of the pattern can be made with thread of different thicknesses. By showing your imagination, you can create your own masterpieces, the main thing is to be patient. By the way, creating Romanian lace patterns does not require any special knowledge or professional skills. You can draw any geometric shapes, filling them with various motifs, or you can use floral patterns: curls, leaves, beautiful flowers, smooth lines and other similar designs.

According to historical findings, lace lace was mostly used for home decoration. The national clothing of Romania was dominated by cross stitch and tapestry techniques. Every woman could weave cloth, spin yarn, weave and embroider at home.
In modern fashion, Romanian lace is used to create many items of clothing, as well as individual elements, such as collars, belts, handbags, jackets, vests, boleros, capes, tunics and, of course,
Content
It was Romanian lace that made its country famous throughout the world, but in order to learn how to create masterpieces, you don’t have to go to Romania. You can create original and unique products on your own; the main thing is to be patient, because the result is worth it. Not only Romanian lace, but also other similar products, enchant with their beauty, seduce and attract any attention. They have been decorations for many centuries and never cease to delight the eyes of others. There are many different methods to create lace, such as bobbin or shuttle weaving, knotted macramé or knitting, fork or crochet.
The history of lace
According to history, Romanian products decorated houses, thanks to them, life became diverse and special, but Romanian lace was used not only for the interior, they also decorated clothes. Each element of such a masterpiece was made by hand, as were the materials for it. Craftswomen wove fabric at home, created threads and wool to create lace.
Today there is already a huge amount of material to create unique and original lace. The classic Romanian product consists of lace itself, tapestry and various floral designs.
The traditional process of making a tapestry involves the use of a special fabric called canvas; you can also use a simple nylon fabric that does not have a pattern. In order to make the drawing as realistic as possible, the colors are selected separately, this also emphasizes the effectiveness of the form, thus creating the illusion of the present.
Before forming the design, a special fabric is processed so that after embroidery it does not shrink; on such fabric the tapestry looks much more effective, even if it is small in size. To work with it, you need to use a special needle with a long eye; threads are most often used using floss. After preparing the tapestry, a cord is knitted and sewn onto the fabric along the contour.

Peculiarities
As a rule, Romanian lace is created using a lace, everything is very simple. The lace is knitted, laid out along the contour, and the space of the pattern is filled with various couplings or other elements; for this, a simple needle is used. From this it follows that Romanian lace belongs to the group of coupling products.
The main advantage of such a product is that it is voluminous due to the thickness of the thread and material used in its manufacture. Therefore, it is possible to create designs with unusual effects in terms of color or thickness. A variety of threads are suitable for work, for example, linen or silk, wool or cotton, as well as viscose.

The Romanian lace cord is created using a crochet hook and is a quick and easy process. The product will look beautiful and monumental if you use a hook and thicker threads. Despite the fact that Romanian lace turns out to be heavy, such things look elegant and graceful in the interior; with its help, you can make your home environment more comfortable and romantic.
As for creating a pattern for Romanian lace, no special knowledge or professional skills are required; any geometric shapes that can be traced or filled in the middle are suitable for the project. For example, circles or ovals, triangles or curls, leaves or beautiful flowers, smooth lines or other various designs.
Romanian lace is used to create many things, such as collars and belts, handbags and jackets, vests and much more, and very beautiful dresses are also sewn with its participation.

Tools and materials
In order to make Romanian lace, you need to prepare working tools and materials.
- Fabric, preferably durable, to make it more convenient to work; you can use non-new material.
- The threads used to create lace are thick, and those used for embroidery are thinner, the shade of which should be the same.
- Special crochet hook.
- An embroidery needle, preferably with a thick eye, this will allow you to pierce the cord easily.
- Sewing thread, the same color as used to create the basting cord. Black or dark colors are not recommended because they may fade.
- Sewing needle.
- Scissors.
- Thimble.

Instructions for Beginners
- First you need to prepare a drawing to create a product; for a novice craftsman, a simple napkin is most suitable. You can come up with an image yourself, or you can use ready-made samples, for example, cutwork or a pattern for bobbin lace. If the image is created independently, then the width of the finished cord should be taken into account, and the image should be applied to paper.
- When the drawing is ready, the paper on which it is depicted, fabric and polyethylene are sewn together, this will protect the cord from contamination during operation.
- There are several methods you can use to tie a cord. In the first case, create a very long cord, which is wound into a ball as you knit, and when sewing it to the fabric, cut it in those places where necessary, in accordance with the pattern. Trimming is done with a small supply of cord so that it can be unraveled and the lace elements can be connected with these threads in certain places. The second method involves immediately creating a cord of the required length, during this process constantly applying it to the drawing and adhering to the diagram. Many craftsmen choose the second method of creating lace, because the work does not seem so boring.
- When the cord is prepared, it is basted to the fabric, in accordance with the outline of the image. It must be sewn firmly to ensure maximum fixation. Important! The end parts of the cord are sewn together at the junction and never overlap each other.
- In work, of course, unlike the ends, the cord can intersect, thus creating different curls. Therefore, in places where the material touches, it is sewn together with the same threads, firmly and imperceptibly.
- At the sixth stage, embroidery is performed.
Cord
As a rule, many needlewomen use a cord that is knitted using the “Caterpillar” method to create Romanian lace. There is another option for the cord used, called “Wide Track”. The principle of creation in both versions is the same and simple, but there is only one difference. In the first method, knitting is created on two loops, the second method involves creating a cord on three loops. Before knitting the two side loops together, you need to knit a single stitch behind the front and back walls.
To create Romanian lace, namely a pattern, these two cords are enough, and in order to tie the finished product, openwork cords are used.
Scheme for creating a cord “Caterpillar”
- A loop is created on the hook.
- An air loop is knitted.
- The hook goes under the thread of the first loop to pull up the next one.
- Both loops on the hook are knitted using the usual method.
- Turn the knitting clockwise 180 degrees.
- Starting from the third step, repeat knitting until you get a cord of the required length.
Cords help bring the most unusual fantasies and incredible ideas into reality; with its help they create not only Romanian lace, but also embroidery, appliqués, and three-dimensional patterns. The cords are created by crocheting or knitting, and then sewn to the fabric with threads. In addition, they are used as a connecting element not only in Romanian lace, but also in Irish or guipure products. For the Romanian type of lace, cords of various configurations, thicknesses and lengths are created, with its help various contour patterns are made, and brids or lace seams help fill the internal space.

Methods for creating a pattern on a canvas
In order to transfer the image to the canvas, special methods are used. The most popular and frequently used method is carbon paper. The drawing of the future product is applied to tracing paper, a special canvas is prepared, the area of which on all sides should be larger than the image. After the preparatory work, processing is carried out, then the canvas is soaked in water and carefully ironed.
To create a drawing, it is best to take not black tracing paper, but a special material that is intended for needlework, because black copy paper can stain the canvas. Special paper has the main advantage - all the marks it leaves behind can be easily removed.

The canvas is stretched and carbon paper is placed on top, so that the ink side faces down and the canvas is covered over the entire area of the design. A drawing is placed on top, secured with pins, and the outline of the drawing is drawn.
If the image has completely faded, the canvas must be washed in water with vinegar, and then with the addition of starch. After which, it is ironed well, but carefully so as not to spoil the image.
At the final stage of work, take a cord of the required length and baste it along the contour of the design with thread, this will avoid staining it. As a rule, yellow, green or blue threads are used for this task, but not white or dark ones. And so that the product does not change shape, the cord is firmly attached to the fabric; do not forget about a reserve of approximately 3 mm, this is necessary to hide the connecting seam.
The video will additionally show how to properly create Romanian lace and where to start
Post Views: 952
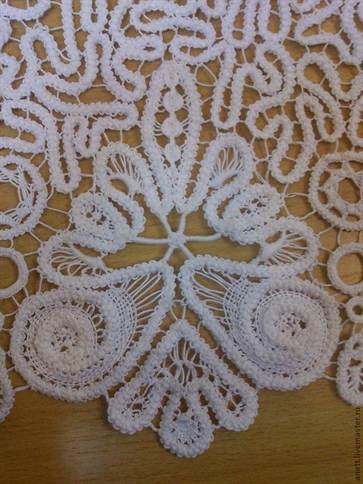
In its classical application, Romanian lace is more often found in interior items - tablecloths, curtains, napkins. To decorate clothes, it is usually used in combination with other techniques. Very beautiful lace wedges, inserts, and yokes look luxurious and stylish. If you decide to use Romanian lace for your models, keep in mind that, despite the apparent airiness, this openwork is quite dense, even rigid. And this is unacceptable for some things. You can choose life-size Romanian lace patterns for knitting from our article.
To make Romanian lace need to prepare:
- fabric: durable, not thick, preferably plain (we will mark a pattern on it, the print will get in the way), can be used;
- plastic film according to the size of the knitting pattern;
- threads - “Iris”, “Snowflake”, “Chamomile”, etc. We will need a set of two types of threads of the same color, of different thicknesses: for knitting a cord - thick, for embroidery - thinner;
- hook No.1.0;
- embroidery needle: the eye of the needle should not be thick, otherwise it will be difficult to pierce the cord
- sewing threads for tacking the cord: the color should be contrasting in comparison with the main threads. Required condition: threads should not shed;
- regular sewing needle;
- scissors are small, with pointed tips;
- thimble.
Knitting lace: master class with description
Stage one
We decide on a lace pattern: we look for ready-made patterns or, using our imagination, we come up with a plot for knitting ourselves. Patterns for cutwork or pinning for bobbin lace can be successfully adapted. When drawing the diagram, you must take into account the thickness of the cord. We draw the drawing on paper at a scale of 1:1.
Stage two
We place the paper design on the fabric, cover it with polyethylene and sew it all together. Polyethylene will prevent the threads from getting dirty from the paper.
Stage three
We have come to knitting the cord. Here you will need to decide what is more convenient for you: knit one, very long cord and then cut it in accordance with the diagram, or knit the cord in pieces, immediately to the desired length.
With the first option, when cutting the cord, do it with a margin. The excess length must be unraveled and the cord sewn to the desired place using these threads.
With the second method, do not forget to periodically check the length of the cord with the diagram during the knitting process.
Master class on knitting cords for laying out a pattern
Cord “Caterpillar”
For knitting, it is best to use cotton, silk or mixed threads. The knitting technique is shown in detail in the diagram images.
Now let’s look at the step-by-step master class:
We knit 2 VP. The first one – let’s not delay it.
Insert the hook into the 1st stitch (it is not tightened).
Grab the thread and pull out the loop. We got 2 stitches on the hook.
We knit them together like sc.
Turn the knitting to the left, leaving the thread behind the work. This technique - turning to the left and thread behind the work - will be used constantly on this cord.
Place the hook under the broach.
We knit a loop. We get 2 stitches on the hook again.
We turn again.
We place the hook under both broaches.
We knit both loops together.
It turns out a neat and nice cord.
Knitting the “Caterpillar” cord: MK video
Cord “Wide track”
The knitting technique is the same as in the previous cord, but the wide one is knitted on 3 rather than 2 loops.
Master Class
We knit 3 VPs, do not tighten the first one.
From the central stitch we knit another 1 stitch. On the hook we get 2 stitches.
From the outer loop we knit a stitch and knit both stitches together.
We turn the knitting to the left, leaving the thread behind the work, and knit a loop from the previous sc. R.
We knit both stitches together again.
Then we knit a stitch from 2 broaches and tie the loops together.
We turn the work and continue knitting using this master class. It turns out to be a wide caterpillar.
Knitting a cord “Wide caterpillar”: video master class
There are many more options for knitting cords. Choose the one you like best. We offer you some schemes for you to choose from.
Knitting the “Hearts” cord: MK video
Stage four
We draw Romanian lace with a cord, sewing it along the outline of the diagram. The cord must be securely fastened. You cannot sew the ends of the cords overlay, it should only be a joint. And when laying out the curls of the pattern, adjusting the cords on top of each other is quite acceptable.
Stage five
You need to sew the cords together at the joints and overlays using the same threads and very carefully. Ideally, unnoticed. How to do this correctly - see the master class in the photo.
Stage six
Consists directly of embroidery.
To do this, we use thinner threads than for knitting cord. Romanian lace is most often embroidered with darning, buttonhole, scalloped, knotted or cordon stitches. Let's take a closer look at the master class on their implementation.
Scallop seam
Reminiscent of, but different from, a buttonhole stitch. The peculiarity of the stitch is that the thread is drawn in the form of a loop around the exiting end of the needle. Usually a single loop is enough, sometimes a double loop is done. Although simple, scallop stitches come in many different forms, with the difference depending on which direction the needle goes through the loop. Variations arise due to the peculiarities of the location of the stitches relative to each other, as well as due to different lengths of the stitches
Let's take a closer look at the technique of embroidering scallop stitches.
To fill a square with mesh, for example, we begin embroidering scallop stitches along the bottom edge of the cord on the top side of the square. 1st r. embroider from left to right. To do this, we draw the thread down from left to right in an arc, insert the needle into the 1st point of the cord from top to bottom. We pull the thread, the arc decreases, tightens and the thread lies at the base of the loop into which the needle was led. We repeat this until the end of the row. The stitches must be identical.
They differ only in location and combination. When moving to the lower river. We draw the thread with a needle inside the cord, the distance depends on the pattern. We embroider the next row in the opposite direction. Now we also draw the thread down, but from right to left, in an arc. We also insert the needle into the 1st point of the upper river. pattern formed between two scallop stitches, from top to bottom right, and tighten the thread. We repeat this until the end of the river.
Scallop stitches should be free and not touch the fabric on which the design is applied. We thread the beginning and end of the working thread into the cord. We cut off the tip. The most common:
- dense scalloped stitches: embroidered on each stitch of the cord and fit tightly to it;
- rare scalloped stitches: embroidered through 2-3 stitches of cord;
- a row of groups of scalloped stitches: stitches are embroidered in groups of 2-3 stitches each, then a gap between them and again a group of stitches;
- a series of free rare scallop stitches - the stitches are embroidered through 1-2 stitches of the cord and sag freely.
Darning stitch
In the example, the seam is made on three threads. Execution order: insert the needle from left to right under the thread, bring it out in front of the middle thread, go around it from above and insert it under the right thread from left to right.
In the opposite direction, with a needle we go around the right thread from right to left from above, insert it under the central thread, go around it from below, bring it up and go around the left thread from right to left from top to bottom, etc.
Cordone seam
The seam is used to sew individual columns, which are most often used as bridles.
The working thread comes out of the cord and wraps around the stretched threads until the entire column of tensioned threads is covered with stitches tightly adjacent to one another so that the column looks like a lace.
Loop stitch
The execution of the seam depends on its position. It can be positioned from left to right or right to left:
- if the seam is located from left to right, then the 1st stitch is obtained as follows: we draw the working thread clockwise so as to obtain a closed spiral turn, we pass the needle vertically down under the bridle that we are stitching, to the right of the starting point;
- if the seam is located from right to left, then the 1st stitch is obtained thus: we draw the working thread counterclockwise so as to obtain a closed turn of the spiral, we pass the needle vertically down under the bridle, which we are stitching, to the left of the starting point.
To obtain knots on top of the brid, we pull the thread down under it (towards ourselves), then pull it away from us in a vertical plane. As a result, the loop is crossed, stretched, the knot moves upward, and the working thread is also directed upward. The next turn of the spiral repeats the first, the new stitch lies to the left of the previous one.
Knotted sutures
It is used when a pattern is formed by tying several threads with different knots. The most common knots are the oblique tambour and Turkish knots.
With an oblique tambour knot, the threads forming the “flagella” are pulled together by means of an oblique cross-shaped knot, in which the working thread is folded back in a loop to the right, and the needle passes above the working thread and under the next three threads, comes out over the loop and pulls the three threads into the “flagella”.
The picture shows how the working thread runs in the middle of a narrow path on the outside, and how 3 threads are pulled in the middle with one knot, and the working thread connects one group of “flagella” to another.
The Turkish knot tightens the “flagella” with a double knot, without a transverse thread.
The figure shows that every 3 threads are connected with a Turkish knot. The algorithm is this: keep the work vertical. We fasten the working thread on the left cord, take it out of the loop of the third transverse thread, lead it parallel to this thread until the middle of the seam, then lead the working thread in a loop to the right and make the first tambour knot, lead the working thread in a loop to the right and make the 2nd knot, to the right of the 1st one. th. We bring the working thread to the right stitching cord, insert the needle into the loop of the third thread, draw it lower along the cord and remove it from the loop of the third thread as well.
Since the working thread, which binds the “bundle” with two knots, runs parallel to the third transverse thread, the “bundle” is no longer made of three, but of 4 threads.
Simple Russian seam and Russian seam with loop stitches in Romanian (lace) lace: video master class
There are many ways to fill patterns, each selected for a specific model.
For beginners, we offer a master class of several typical options.
And now that we have studied in detail how Romanian lace is made in stages, we suggest watching a general master class with photos.
Romanian lace, knitting a leaf: MK video
https://youtu.be/NQRFwiL0A3U
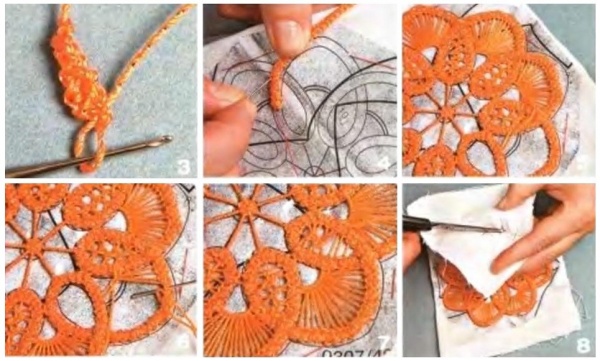
Napkin
We transfer the drawing of the diagram onto the fabric and cover it with film.
We tie the laces, leaving long pieces of thread at the ends. We fix the cords tightly on the fabric.
Using the threads left at the ends of the cords, we sew them together.
The pattern is already being drawn.
The petals in the small and large flowers for this model are made using different techniques.
Completed master-class on embroidery.
We tear off, remove excess threads, lightly clean with a dampened cotton swab, and iron through the fabric.
We knit a collar using the Romanian lace technique: video master class
https://youtu.be/UOCmqTr2p_4
And now, concluding our master class, we bring to your attention several options for schemes. By printing them in full size, you can make Romanian lace for various models of clothing or for interior items.


It was Romanian lace that distinguished its country from other countries, but in order to start working with this lace and do beautiful work, you do not need to immediately go to Romania. You can make interesting and unusual products with your own hands, the main thing is to be patient, because the result is definitely worth it. Not only Romanian lace, but also other similar products, for example, Hungarian or Vologda lace, captivate with their beauty, attract and focus everyone’s attention. I really love watching video tutorials on making lace and various new items that craftswomen generously share on the Internet.
Such lace has long been considered jewelry and never ceases to delight people. There are many different ways and techniques for creating lace, for example, whooping or shuttle weaving, knotted macrame or simple knitting, fork or crochet. Our tutorial is dedicated to creating lace Romanian lace, which is often used to create floral motifs, leaves and butterflies.
What materials and tools will we need for the work?
In order to create Romanian lace, you need to prepare special tools and materials:
- Durable fabric.
- Thick and thin threads with one shade.
- Crochet hook.
- Embroidery needle with a thick eye.
- Sewing threads, similar in color to those used to make the cord.
- Sewing needle.
- Sharp scissors.
- Thimble.
First, you should take a drawing to create a thing; for a beginner in this business, it is best to take a simple napkin. You can choose a drawing or create one yourself. You can take the following ready-made specimens, for example, cutwork or a pattern for bobbin lace.
If you make the drawing yourself, then you should take into account the width of the finished cord and apply the picture to paper. When the image is ready, the paper with the image, fabric and polyethylene are combined, this will help protect the cord from contamination.
Romanian lace patterns, mk.
You can tie the cord different ways. In the first option, you can make a very long cord, which is gradually wound into a ball as you knit, and during the process it needs to be cut in certain places where necessary, in accordance with the image.
We do the cutting with a small supply of cord so that we can unravel it and use these threads to connect the lace parts in some places. In the second method, we immediately make a cord of the required length, during this process we constantly apply it to the image and work according to the diagram. Many craftswomen choose the second option for creating lace, because this way the work seems more exciting.
After preparing the cord, it is attached to the fabric in accordance with the contour of the pattern. It must be sewn firmly to secure it firmly. Important! The last particles of the cord are sewn together at the junction; they cannot be overlapped.
In the process of work, unlike the ends, the cord can intersect, thus making different curls. Therefore, at the intersection of the product, it is sewn together with the same threads, firmly and imperceptibly.
At the end we do the embroidery.
Gallery: Romanian crochet lace (25 photos)


Lace lace master class and detailed description
 Romanian lace is lace lace. The lace is crocheted. The lace turns out quite beautiful. Lace, because when making this lace, different cords are used, which are placed on the pattern.
One of the popular cords that is used in the manufacture of Romanian lace is caterpillar cord.
Some parts in Romanian lace are connected to each other. To connect these parts, bridges created with a needle are used. And the empty spaces between the lace details are also filled with a needle.
Step-by-step creation process and description:
- Step 1.
First we need to find an image for our future item. For the first time, you can take a regular napkin. You can come up with any design, you can take samples for cutwork or pins for bobbin lace.
- Step 2.
After choosing a pattern, we sew together the fabric and paper with the image, and then polyethylene.
- Step 3.
Let's start knitting the cord. There are two options for the process itself. You can create a long cord by winding it into a ball as you work. Once you have knitted the large ball and you begin to sew the lace onto the base fabric, it will need to be trimmed in one place to match your design. It is necessary to cut with a certain margin in length.
Another way is to immediately create a cord of the required length, periodically applying it to our pattern.
Now about the cords:
The most commonly used cord is known to everyone with the name "caterpillar". The second type of product is a “wide caterpillar”. It is knitted in much the same way as a simple caterpillar. The main difference is that a regular caterpillar is knitted on two loops, and a large one on three loops. Before connecting the two side loops together, we make a regular post for both walls.
These two cords are quite enough to lay out the image itself. To tie the finished item, you can use all openwork cords.
- Step 4.
You need to sew it quite firmly so that the cord is fixed. Remember, the ends of the lace are never placed on top of each other, they are connected end-to-end.
We may be indebted to Romanian lace for the glorification of our country, but even better is the fact that you can learn this type of needlework not only in Romania. In our article we will talk about Romanian lace; for beginners, the step-by-step instructions presented below will be very helpful.
You can create interesting, unique products yourself, but this will require a lot of patience. We can definitely say that the time and effort spent are worth admiring the result. This handicraft technology appeared a long time ago and has been delighting others with stunning jewelry for decades and even centuries. There is more than one method by which you can create lace; one of them will be shown in our master class.

Historical facts
The information that came to us from our ancestors tells us about the extraordinary Romanian products that were used to decorate houses, household items and clothing. This diversified homes and women’s outfits, adding sophistication and beauty. Each lace was made by hand, so the product was considered completely unique. The craftswoman first wove threads at home, and then began to create lace.
Today you don’t have to waste time on creating threads, because they are sold in huge quantities in specialized stores and there will be no problems with the choice. If you are interested in the classic look of the product, then it comes from tapestry, woven lace or flower-like shapes.
For production, both before and now, a certain fabric is used, either nylon or canvas, the main thing is that there is no pattern on it. The choice of color combination is a separate matter; you need to take into account the convexity of the shapes, the pattern, the desired realism, all depending on the chosen scheme and model.
Before starting work, the canvas was processed so that it would not shrink after the work was completed. If the pattern was made on a tapestry, then a non-standard needle was used, which had a large eye. Floss is an excellent choice of threads both in thickness and quality. Weaving methods are completely different - from bobbins to macrame and crochet weaving.

Few features
As you can see in the video, cord is used to make Romanian lace. With a regular needle, contours are connected using couplings or various elements. Therefore, we can say that Romanian lace products are called coupling lace.
What is especially attractive is that the finished products are quite voluminous, this depends on the specific model. Some use threads made from linen, silk, wool or even cotton and rayon.
Crocheting a cord is quite simple and quick. If you take a larger hook, you will end up with voluminous lace. Even the fact that Romanian lace is a little heavy when finished does not change the fact that it looks sophisticated and elegant in the interior. A warm and romantic atmosphere is created in a house with such interior items.
To make clothes from such lace you need some knowledge and skills. But if you decide to make yourself some piece of clothing the first time, with some effort, you will succeed.
Lace is used to create various designer items, for example, clothes, bags, and napkins using this technique also look cool.
Simple lesson
We will bring to life the original model with a clear execution technique. Let's take a step-by-step look at the sequence of actions from the very beginning. We will make the product as in the photo:

First, we’ll make a fabric dummy to roughly understand how the finished product will fit.

To work, we will need a cord from which the product, fabric, threads, needles and a hook will be woven. This item is not made whole, but in parts, and then sewn together.

You can look for any patterns that you like on the Internet or in books and use tracing paper to translate it, and then on the prepared canvas we lay out the appliqué according to the shape with a cord and secure it with pins.

The cord is completely sewn to the base. You can make the first element just for testing.

It is most convenient to work with a hoop. If you do embroidery, then this hoop is perfect for you. The main thing is that they hold the fabric in the right tension.

The cord is sewn onto the fabric using thread exactly according to the pattern.


And so we gradually fill the entire figure.


In total you will get 12 finished parts of the same size, and one larger one for the back.