A hexahedron or cube is a polyhedron whose sides are all squares. Do you like riddles and puzzles? This article will teach you how to make a cube out of paper or cardboard. Let's consider such unusual products as the Yoshimoto cube and the transforming cube.
From the scan
Developments are called schemes that allow you to make three-dimensional figure made of paper or cardboard. First, let's learn how to build a sweep. To make it you need paper, pencil, ruler and scissors.
All sides of the cube are squares. So, first you need to draw a square on a piece of paper. At the same time, do not forget about the rules of geometry - a square has all sides equal, and the angles are 90°. Next, let’s remember how many faces the cube has – six. That is, there should also be six of them in the gluing diagram. Draw four squares around the central square. Where should I put another one? Just draw it on the side of one of the squares. The edges are in place, there are not enough allowances for gluing. They need to be drawn on three side squares. They are 0.5-1 cm.
Do not forget to cut their corners at an angle of 45°, so they will not interfere when gluing the figure.
The scan is ready! This is what you should get:

Now you need to arm yourself with scissors and glue and assemble the figure. Cut out the development using scissors. Next, you need to bend all the edges of the cube, as well as the allowances. Lubricate the edges with glue and connect the cube together. Volumetric paper cube is ready!

Origami cube
The origami technique is very ancient. Its appearance is associated with the production of paper in Ancient China. The Japanese adopted its secret, and it was there that the art of origami originated. Previously, figures made of paper had a sacred meaning. They decorated temples, wedding and funeral ceremonies. The Japanese believed that hanging balls folded using the origami technique above the patient's head would help ward off illness and evil spirits. Later this art began to be not only religious, but also entertaining.
Most origami patterns date back to ancient times, but modern masters have also made a significant contribution to the development of this unusual type of creativity. We invite you to try folding a cube using the origami technique. To do this, you need to take a square sheet of paper and make a fold in the center, and then bend the edges towards the middle. This initial figure is called a door.


Fold the edges toward the center and tuck the top and bottom corners into the pockets:


Turn the workpiece over and bend along the lines indicated in the diagram:
The result is a module. To collect a cube of such modules you need six. Each part has pockets; it is into them that neighboring modules are inserted. Connect the parts according to the diagram:


The origami cube is ready. For beauty, you can make each side from paper of different colors.

Unusual puzzle
Do you want to please your beloved children with an unusual puzzle or make an unforgettable photo album? Then a short master class on creating a transforming cube will be useful to you. On each side of such a cube you can place a picture or photograph, and inside there are as many as six more pictures.
To make such a cube you will need:
- 12 pictures or photographs;
- Glue;
- 8 cubes with 4 cm sides;
- Scotch.
You can take the most ordinary children’s cubes or glue them yourself using this pattern:

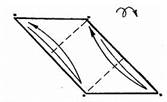
First, look at the places where the cubes are attached:

It is important to understand! The whole secret of transforming such a puzzle is to correctly glue pairs of cubes.
To make it more clear, let's look at this process step by step. First, glue two pairs of cubes together as shown by the yellow stripes in the diagram:

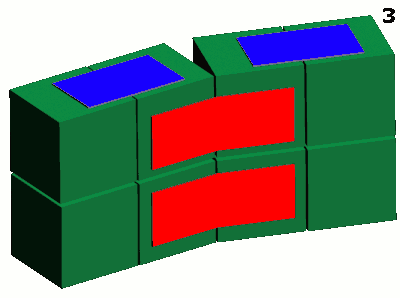
Place these four cubes side by side and glue them together in the places indicated in blue:

Place the cubes as shown in the diagram. In this case, the yellow glue will be on the side opposite the red one. Glue along the red lines:
The photo must be placed on the four cubes. The size of the photographs is 8 by 8 cm.
It is important to glue the photo carefully, especially if you do it with glue. Otherwise, you can inadvertently glue together those edges that are responsible for the correct transformation of the puzzle. So it's better to use hot glue or double-sided tape.
An unusual photo album from a transforming cube is ready! You can see in the photo how you can lay it out and view pictures.

Paper is such a fragile and at the same time versatile material, with which you can sometimes create very interesting and original things that can decorate your home or give joy to loved ones. There are many techniques that use paper as the main material for work. For example, origami is a very ancient and at the same time popular technique of folding various paper figures. You can fold anything - from simple geometric shapes to insects and. Of course, it’s better to start getting acquainted with origami with primitive crafts. For example, try your hand at making a paper cube.
How to make a cube out of paper: necessary materials
To create a three-dimensional cube from paper, you will need paper, preferably colored paper, so that our figure looks fun and unusual. Six sheets of paper of different colors are optimal, then each face of the future cube will be different. Also have scissors ready; origami glue is not needed.
How to assemble a paper cube: step-by-step instructions
So, let's start making crafts from paper cube:
When all the edges of the pieces are inserted, you will have a multi-colored cube.
Children learn the art of origami from school, and in most cases they become familiar with paper, glue and scissors when they are still young. kindergarten, where together with the teachers they make the first primitive crafts. By cutting out figures from paper, first flat, then three-dimensional, the child is preparing to study geometry, and it is very important to instill in him a love for Aristotelian science right away, so that interest does not disappear later, and everything works out. A volumetric square made of paper is a figure with which one usually begins to get acquainted with stereometry. Having learned simple techniques for making this polygon, you will be able to build amazing structures based on an ordinary cube.
Basics of geometry
Anyone without advanced mathematical knowledge can make origami out of paper. A square - at first glance, a very simple figure, and constructing it will not be difficult. However, you need to start the process prepared, having an idea of paper assembly and not getting too upset at the first failures. Before you start getting interested in how to make a square out of paper, you need to familiarize yourself with the basics of geometry. Do not forget that a cube is a rectangle in which all sides are equal and the angles are right. This condition is mandatory, but errors of a couple of millimeters are acceptable.
Assembly materials
The production of a square occurs in several stages. You will need a sheet of paper, glue or tape, a ruler, a pencil and scissors. If you are afraid to draw a diagram yourself, you can print the finished diagram on a printer. To make the cube bright, each side can be covered with colored paper, shiny tape, or painted with multi-colored paints or crayons. To prevent the sides of the square from getting dirty over time and to maintain their original appearance, it is recommended to cover it with a transparent film.
Paper square: manufacturing diagram

Children and adults will love making geometric figures - the process is so exciting that very soon you will have a whole collection of various cubes. Before starting work, you need to stock up on the required amount of paper, which will be enough for all sides, so that later you do not have to add missing elements to the existing frame. The development is performed on whatman paper or cardboard. The material should be moderately dense so that the figure does not wrinkle during assembly, but a sheet of paper that is too thick will also not work. A special condition is the presence of additional edges on the sides of some sides, with the help of which the cube will be glued together. A volumetric square consists of eight identical sides. In order not to make a mistake with the choice of whatman paper, perform all the calculations before drawing the drawing on a sheet of paper.
Cube assembly
Once the development is ready, it must be cut with scissors. The connection can be made with any glue or To ensure that the edges of the square are even, each fold line must be bent several times before gluing. Now the pencil drawing can be erased so that the cube has an aesthetic appearance. Depending on the purpose for which the craft is being made, it can be decorated different ways: cover with shiny glossy film or colored paper, paint or stick bright stickers.

Make it a fun process, and soon your home will have a collection of cubes of different colors and sizes. Once you know how to make a square out of paper, it will be easy for you to create miniature crafts that can be turned into, for example, dice. If it grows in the house Small child, you can cover several figures with colored tape to get a unique set of doll furniture.
A little imagination...

If you decide to make an unusual origami out of paper, the square can be turned into For this, it should be made from the material white. The optimal length of each face is 1.5-2 cm. Before you start making a miniature cube, you need to practice and start learning the art of origami from a figure bigger size. As soon as the technique is fully studied, you will be able to create masterpieces based on simple Knowing how to make a square out of paper, you can easily move on to the next stage of learning - modeling original three-dimensional crafts.
Paper people
In Russia and the West, a tendency has long been noticed to produce children's kits for creating people and animals, which are based on a three-dimensional square of paper. The diagram is no different from the development of a simple cube, only for some parts the proportions are changed. So, by putting together squares of different sizes, you can construct interesting crafts. Once your child understands this simple technique, you will be able to create masterpieces with your own hands and not spend money on expensive handicraft kits. It is better if the drawing is applied to the paper immediately, and not after assembling the entire figure.

To preserve the aesthetics of the product, the edges must be glued together with hard glue, not tape. is clearly visible on paper, and the craft will not look in the best possible way. Having figured out how to make a square out of paper, you can easily make unique crafts and collect a whole collection, because origami is a fascinating art that is accessible to people of all ages.
How to make a cube out of paper? There are two ways to quickly and easily create this equilateral paper hexagon.
The first method is to first draw and cut out the net of the cube and then glue it together.
If this method suits you, you need to prepare necessary tools and devices. In order to make a scan, you will need paper, a pencil, a ruler, as well as scissors and glue. This set of stationery will undoubtedly be found in everyone who needs to make a paper cube.
The diagram of a volumetric hexagon is very simple. Initially, you need to draw a figure in the shape of a cross and divide it into six equal-sized squares so that one side of the cross is doubled longer than any another. Please note that there should be narrow stripes on the outer sides of each square.

With the help of these strips, it will be easy to carefully glue the figure together. This is one of the ways to make a cube out of paper.
The second method does not require the use of any special devices. The technique by which this polygon can be created is called origami. How to make a paper cube using origami? It's not difficult at all. You need to start folding a hexagon from a square piece of paper. First of all, you should fold the sheet into a standard origami figure - a double triangle. Such a figure will be obtained if you fold the paper in half, making a rectangular piece of paper from a square, and then fold it again, again getting a square. After this, we open the resulting figure so that we get a triangle on both sides. This is the first answer to the question of how to make a paper cube using origami.
Then you need to perform a few more manipulations with the double triangle.
Its edges on both sides must be folded towards the top. Again we get a square, the opposite corners of which are folded towards the center. So, we made a hexagon that has two pockets on each side. They need to fold two halves of paper at the top of the figure. Next, take a needle and make a small hole in the top of the hexagon, and then you need to blow hard into it. This creates the desired volumetric body.
There is another technology for making a cube using origami. But it requires six pieces of paper, which are folded into a certain shape and then collected into a cube. Accordingly, the more materials are used, the less rational the volumetric body is, therefore this method We don't describe origami. The two options discussed above are less labor-intensive and therefore ideal.

Now you know two convenient ways how to make a cube out of paper very quickly and without extra effort. But your theoretical skills can only be developed in practice, so take a square piece of paper, the necessary tools, and make this beautiful hexagon, which can be used not only as visual material, but also as interior decoration!
Print Thanks, great lesson +2
Volumetric crafts always interesting for children. Therefore, it will be great if you study with them geometric figures with the help of these creative activities, where you can not only have a great time with them, but also clearly show the figures.

- Stationery glue
- Scissors
- Pencil
- Ruler
- Eraser
- Paper
Step-by-step photo lesson:
We select paper. It is best to take half-cardboard, because it will hold the square shape better than plain paper. Color is also important. You can take either regular white or a bright, rich shade. In addition to paper density and color, sheet format is also important. If you are planning to make a large volumetric square, then take not A4, but A3 or even A2 format.
Now let's move on to the markup. For this we take a pencil and a ruler. We retreat at least 1 cm from the top edge. Next, we count out as many centimeters as one face of the cube will have. Separate with a line and then repeat this procedure two more times. Then on the left side we retreat a short distance. We form a contour along which we will cut and glue the cube.

Cut along the contour. This is how the workpiece should look like in the photo. If you have any inaccuracies, you should redo it. Because in this case, a volumetric square of paper cannot be obtained.

We make inward folds along each line. For accuracy, it is better to use the sharp end of a compass or a utility knife. With the tool, you can lightly draw lines under the ruler and get perfect folds.

Glue the bottom of the cube together.

Then apply office glue to the remaining parts of the square and glue them to the desired sides.

So we got a volumetric square of paper in a matter of minutes. Of course, everything comes with experience and over time you will get more and more accurate and faster.

Video lesson


