Model of the German tank Landkreuzer P.1000 Ratte (project)
In 1942, Krupp engineer Edward Grote proposed to Hitler to create a tank weighing 1000 tons. It was planned to install two naval guns with a caliber of 280 millimeters on the tank. To prevent the tank from sinking into the ground under its own weight, it was planned to install tracks 3.5 meters wide. The final dimensions of the land cruiser were 35 meters long and 14 meters wide.
The giant tank was planned to be equipped with two 24-cylinder MAN V12Z32/44 diesel engines with a power of 6,256 kW (8,500 hp) each or eight 10-cylinder Daimler-Benz MB 501 diesel engines with a power of 1,472 kW (2,000 hp) each. ). Presumably the estimated speed could be about 40 km/h. At the end of 1942, drawings of the tank were ready, which received its own name - “Ratte” (rat).
Despite the fact that the tactical value of this tank was not great, Hitler still authorized its design. A little later, another version of the tank weighing 1,500 tons was proposed, which was called the Landkreuzer P.1500 Monster. It was supposed to use engines from submarines. However, in 1943, the Ministry of Armaments and Ammunition closed both projects.

Model of the Soviet tank MS-1
Tank MS-1 (T-18) is the first mass-produced Soviet tank, which was completely developed in Soviet Russia. Some design solutions were adopted from French and Italian vehicles, but the MS-1 was superior to its foreign counterparts in many technical parameters.
The first Renault FT tanks were unloaded at the port of Odessa along with French and Greek infantry units on December 12, 1918, and on March 18, 1919, four tanks were captured. One of the tanks was sent to Moscow as a gift to V.I. Lenin personally, and three were taken to Kharkov. V.I. Lenin really liked the trophy, and he decided to show it at the May Day parade in Moscow. After this, a decision was made to produce tanks in the RSFSR.
The first 15 tanks were manufactured in 1920-21 at the Krasnoye Sormovo plant in Nizhny Novgorod. Each of the cars was given its own name.
From 1928 to 1931, about 1000 MS-1 (T-18) tanks were mass-produced. In 1938, the tank was modernized. But according to the results of field tests, this modernization did not give desired results.
To this day, about 20 MS-1 tanks have survived, which are on display in various museums and in the form of monuments.

Model of the German tank VK1602 “Leopard”
Despite the fact that the tank with the “cat” name “Leopard” was designed for a very long time, it was never embodied in metal.
VK1602 "Leopard" was to become the only representative of the new class of armored vehicles "gefechtsaufklärer" ("reconnaissance and combat"). It was developed as a replacement for the VK1303 tank and a further development of the experimental VK1601 tank (Pz.Kpfw II Ausf.J). In 1941, MAN began work on the project and received a contract for the supply of 5 pre-production copies. At the end of November, drawings were ready to build a wooden model of the machine.
Simultaneously with MAN, Daimler-Benz was engaged in similar developments.
In 1942, it was planned to release the first production Leopard, and then reach a rate of 20 tanks per month. But customer requirements changed, and the first copy was never released. At the beginning of 1943, the development of the VK1602 was finally abandoned, since it no longer met the requirements of the military.
However, some developments of the VK1602 Leopard tank served as the basis for the creation of other armored vehicles.
At the moment, there are several small-scale plastic models of this tank.

Model of the American tank T1 Cunningham
In the 20s of the last century, the command of the American army recognized the M1917 tank, which was in service at that time, as obsolete and decided to create an improved light tank weighing no more than 5 tons. For this purpose, engineers from Cunningham, which at that time produced popular tracked tractors, were hired. After becoming familiar with foreign designs (primarily the British Medium Tank Mk.II), a prototype of the T1 light tank was created. Field tests of the prototype showed that the tank required numerous changes in design, as its tractor past was making itself felt. Although the tank could reach a record speed of 29 km/h for that time, the high-tech chassis could not cope with overcoming various obstacles on rough terrain.
The next prototype T1E1 received an improved hull design and was put into service in 1928 with the designation M1. After military tests, the T1E2 modification appeared, which had a more powerful engine and a modified turret.
The latest modification of the T1 was the E3 version. But all these modernizations did not allow the T1 tank to be put into mass production. To this day, only one copy of the T1E2 tank has survived.

Model of the Soviet self-propelled gun SU-26
During the Second World War, many interesting vehicles based on the T-26 tank were created at industrial enterprises both in our country and abroad. One of these designs is a self-propelled unit, which was produced by workers besieged Leningrad. But very little information has been preserved about these armored vehicles. In the documents of the 124th Tank Brigade, which was formed in Leningrad in September 1941, there is the following entry: “The brigade has 5 37-mm guns, two of which are on the T-26 chassis.” But, unfortunately, it was not possible to establish what these self-propelled guns looked like.
Self-propelled guns with a 76-millimeter regimental gun of the 1927 model were also manufactured on the basis of the T-26. The gun had an armored shield, which provided protection for the crew from the front and sides. They were manufactured at the Kirov lifting and transport equipment plant.
According to the documents, they were designated as SU-T-26, T-26-SU, SU-26, or simply as SU-76. According to the report, 14 self-propelled guns were produced. All of them entered service with tank brigades of the Leningrad Front. As of May 17, 1942, the 220th Tank Brigade had four 76-millimeter T-26-based mounts, which were used until 1944.

Model of the German light tank Leichttraktor (Rheinmetall)
After the first one ended World War and Germany found itself in the role of the “losing side”; strict conditions of surrender were imposed on it. Under the terms of the treaty, Germany lost about 90% of its heavy weapons. But later, the Union Commission of the victorious countries allowed the construction of a small batch of armored vehicles. On March 28, 1928, the Reichswehr command announced a competition to build a tank weighing up to 12 tons. According to project documentation, the tank was called VK 31.
Three major companies took part in the competition (Daimler-Benz, Krupp and Rheinmetall-Borsig). But later Daimler-Benz refused to participate in the competition. Rheimetall engineers had no experience in building a tank chassis and therefore used the chassis from a tracked tractor-transporter. Krupp engineers did not trust the tractor chassis and decided to develop an original chassis design.
The Soviet Union also took part in the formation of German tank forces. In December 1926, an agreement was signed on the creation of a Soviet-German tank school. But later, Soviet military experts decided that the VK 31 was of no interest to the Red Army.
A total of four tanks were built, which were used in Germany as training vehicles.

Model of the German Pz.Kpfw tank. Maus
Before the start of World War II, German intelligence services repeatedly received reports of Soviet miracle tanks, which had extraordinary technical data. After the Germans saw the Soviet KV tank, they finally believed in the possibility of the existence of tanks of unprecedented size in the USSR.
First, German engineers began to design the design of a breakthrough tank, which received the index VK 70.01. It was later renamed VK 72.01 (K) and given the designation Pz.Kpfw. Löwe ("Lion"). In June 1942, the Lion project was closed because Hitler had the idea of building a new heavy-duty Maus tank.
The contract for its development was signed with Professor Porsche. According to the technical specifications, the Maus was supposed to weigh 160 tons and be armed with two guns (150 and 105 mm). But in the end, the weight of the tank was 188 tons, which greatly hampered its movement across bridges.
Two prototypes of the heavy-duty Mouse tank were made, but they never had time to test them in real combat conditions. One of the tanks was blown up, and the second was partially dismantled.
Both prototypes went to Soviet Union. They were carefully studied and sent to the USSR. Later, from the remains of two tanks, it was possible to assemble one, which is now on display at the tank museum in Kubinka.

Model of the French light tank Renault NC-31
The NC index in the marking of French tanks was planned to be replaced by armored vehicles that were supposed to replace the outdated Renault FT-17.
In 1923, Renault signed a contract for the development of two prototype tanks. They were given the names NC-1 and NC-2. Both tanks were almost identical. When building prototypes, we used a hull from FT, installing a more powerful engine and a new chassis. The crew composition and tank layout remained the same. In field tests conducted in 1926, the NC-2 prototype showed a top speed of 18.5 km/h. This was a record figure for all French tanks at that time. Fuel consumption also decreased, which increased the range of the tank. The use of a new caterpillar made it possible to increase the smoothness of the ride. And yet, after all the modernization of the chassis, the tanks were notable for their low cross-country ability in sand and mud. The first prototype NC-1 was also tested, but the French army abandoned it.
The experience of building the NC-27 and NC-31 tanks was very interesting to specialists from other countries, including Soviet tank builders. On the skeleton of the NC-27, the T-19 tank was manufactured in the USSR, but later the mass production of this tank was abandoned.

Model of the Soviet KV-2 tank
During testing of the experimental KV tank in battles on the Karelian Isthmus in 1939, it was revealed that the armor protection of the new tank showed excellent performance. But the 76-mm gun could not cope with the enemy’s numerous concrete fortifications. It was decided to equip four KV tanks with large-caliber guns. They decided to install a 152-mm M-10 howitzer of the 1938/1940 model on the new KV. A new turret was created especially for this gun. large sizes. Thus, heavy KV tanks were divided into two types: “tank with a large and small turret.” Later they were given the designation KV-1 and KV-2.
But it was not possible to test how the new guns would behave on the Karelian Isthmus, since the main line of Finnish fortifications had already been destroyed. However, numerous defects in the components and parts of the new tank were discovered.
At the beginning of June 1941, there were 134 KV-2 tanks in service. But there were about 20 combat-ready vehicles.
And yet, the fascist invaders were terrified of meeting with the KV-2, since they did not have guns capable of seriously resisting the armored vehicle.
The last time the tank took part in battles near Moscow was in the winter of 1941–1942. Only one copy of the KV-2 has survived to this day, which is located in the Central Museum of the Armed Forces in Moscow.

Model of the English medium tank Vickers Medium Mk.I
The Vickers Medium Mk.I tank was created by Vickers in 1922-1923. At first it qualified as a light tank. But later, with the advent of lighter tanks, it was reclassified as a medium tank. The Mk.I was the first production tank with armament mounted in a circular turret to be produced in England.
Serial production was established from 1923 to 1925. Then it was replaced by a more modern tank, the Medium Mark II, developed on its basis. It is unknown exactly how many armored vehicles of the Mk.I type were produced. The total number of Mk.I and Mk.II vehicles was 168 vehicles, most of which were tanks of the latter type. In this regard, it can be assumed that the number of Mk.Is could be several dozen pieces, approximately about fifty.
The Vickers Medium Mk.I medium tank was introduced into service with the British Royal Tank Forces in 1924 and withdrawn from service in 1938.
There were several modifications of this tank. In addition to the basic modification, vehicles were produced with slightly increased armor thickness, with a new rotating commander's cupola, with the 47-mm cannon replaced by a 95-mm tank howitzer, and some others.

Model of the Soviet heavy tank IS-3
After the bloody battles on the Kursk Bulge ended, a group of Soviet scientists began studying and analyzing the characteristic damage caused by shells hitting tanks. It turned out that different parts of the tank turret and hull were damaged in different ways. To answer all the questions of interest, the design of a new tank began.
All work was entrusted to two design bureaus: Experimental Plant No. 100, headed by Zh.Ya. Kotin and A.S. Ermolaev, as well as the Chelyabinsk Kirov Plant, headed by N.L. Dukhov and M.F. Balzhi.
This is how a completely new model of a breakthrough tank was born.
The IS-3 heavy tank (object 703) had a flattened turret, original for its time, with a 122-mm D-25 cannon. And large angles of inclination of the turret contributed to a greater ricochet of armor-piercing shells.
In May 1945, the first experimental batch of IS-3 tanks left the factory floors. But they did not have time to experience battles. There is an opinion that the IS-3 took part in battles with the Kwantung Army in August 1945. On September 7, 1945, at a parade of allied forces in Berlin, 52 IS-3 tanks marched along the Charlottenburg Highway.
The Soviet heavy tank IS-3 was mass-produced until mid-1946. A total of 2,311 armored vehicles were produced.

Model of the Soviet heavy tank KV-5
Back in the 20s of the last century, the design of Soviet super-heavy tanks was carried out. However, before the start of the Great Patriotic War, this issue was raised quite sharply. On April 7, 1941, a resolution was issued by the Council of People's Commissars and the Central Committee of the All-Union Communist Party of Bolsheviks on the development of super-heavy tanks KV-4 and KV-5. The design of the tanks was entrusted to SKB-2 of the Kirov plant under the leadership of Zh.Ya. Kotina.
When creating the KV-5 tank project, the KV-4 drawings prepared by N.V. Tseits were used. He became the head of the further design of the 100-ton KV-5. In order for the huge tank to fit on a railway platform in width, it was decided to make the vehicle's turret high and the height of the hull was reduced to 0.92 m. Two standard diesel engines of 600 each were used as a power plant. Horse power. At the end of July 1941, workers of the Leningrad Kirov Plant made some components and parts of the future tank on their own. But the work had to be curtailed, since the Nazis were already close to Leningrad. It was planned to continue work after the evacuation of the plant to Chelyabinsk. But after the evacuation, all efforts were devoted to improving serial armored vehicles and increasing their production.
Work on the creation of the KV-5 heavy tank was completely stopped.
With this article you will learn how to make a paper tank with your own hands. This instruction includes 2 options for making such crafts. They vary in complexity and technique. The first master class is quite simple and quite suitable for beginners. The second is labor-intensive and complex. If you don't have any experience with origami, try a simpler one first.
A paper tank sounds quite serious. It seems that making such a craft is very difficult. And this is not true at all! Given some free time and some patience, you can easily create one. Read on and you will learn how to make a paper tank with your own hands. 
Materials and tools:
- plain or colored A4 paper;
- gray pencil;
- thin metal ruler;
- PVA or stationery glue;
- scissors.
How to make a simple tank out of paper
This craft is easy to make and perfect for beginners. To make it, you will need one sheet of A4 colored paper, a small piece of paper in a contrasting color, scissors and a pencil. 
Production time – 20 minutes
Difficulty level – easy.

Step 1: Make the folds
Take a standard A4 sheet of paper. 
Fold it in half lengthwise. 
Fold the top left corner to the bottom edge. Iron the folds well and unfold. 
In the same way, fold the bottom left corner to the top edge. Expand. 
You should end up with cross-shaped folds. 
Step 2: Form the Flaps
Place the craft vertically. Fold the right corner down. 
Divide the bottom side into 2 equal parts. 
Leave the first part in place, and fold the second to the lower right corner. 
Repeat on the left side. 
At the top in the foreground you should have a regular triangle. 
Repeat on the other side. 
Step 3: Narrow the Middle
Fold the bottom side towards the center line. 
Fold the paper right down the middle and turn it back toward the bottom edge. 

Iron all the folds with an iron ruler so that they are even and neat. 
Step 4: Form the Tower
Fold the bottom corner of one of the triangles up. 
Lift the right one up as well. 
Roll the craft into a cylinder with all the formed elements facing up. 
Insert the “arrow” inside the square. 
Fold the remaining two corners of the “arrow” into the bottom pockets so that you get it as follows (see photo below). 

Step 5: Add a Muzzle
Take a small rectangle of a contrasting shade. 
Roll it into a thin tube. 
Insert the tube inside the tower. Ready! 
You can also make this tank by watching the following video.
How to make a paper tank with a rotating turret
To create this origami you will need:
- 1 sheet of A4 paper,
- scissors,
- pencil,
- iron ruler,
- glue,
- a thin object for smoothing out small wrinkles.


Production time – 1 hour
Difficulty: medium
Step 1: Form the Undercarriage
Take a sheet of A4 paper. 
Fold it in half, and then in quarters. Cut the sheet into 2 equal parts in the middle, that is, into 2 long strips (in the photo these strips are folded in half in width). 
Take one of the strips and divide it into 2 parts in width, that is, in fact you should have 2 quarters of an A4 sheet in your hands. Set one quarter aside and work with the other.
Fold the quarter sheet in half. 
Expand. Fold the bottom side towards the center line. 
Fold the right side towards the center as well. 
Roll the craft into a cylinder. 
Press this cylinder down. 
Bend all corners of the resulting figure by approximately 0.5 cm. 
Fold all the corners inside the shape. 

Use a metal ruler to smooth out the folds to make them more pronounced. 
Fold the top flap towards the center of the figure. 
Repeat on the other side. 
Lift the right semicircular pocket at the bottom slightly. Make it longer. 

Repeat this on all 4 sides. 
Tuck the outer flaps on both sides to the highest point. 
Turn the craft over. Fold the corners up approximately 0.5 cm. 
Repeat on all 4 sides. 
Fold the folded corners back down. 
Place the side elements perpendicular to the axis. 
Using the previously folded folds, bend the craft upward along its perimeter. 

The chassis is ready. 

Step 2: Make undercarriage protection
Take the second quarter of an A4 sheet. 
Fold the top edge about 0.6 cm, then fold it over again. You need to wrap the paper in one direction 2 times. When folding, it is convenient to use a metal ruler. 

Repeat on the opposite side. 
Place protection on the chassis. The width of the first should be approximately 0.1-0.2 cm longer than the second. 
Fold the extreme corners along the folds on one side by approximately 0.5 cm. 
Fold the corners inward along the curved lines. 

Iron the folds with a ruler. 
Tuck the outermost element up so that the “horns” stick out to the side. 
Turn the craft over and insert the chassis into it. The latter should fit comfortably and tightly into the protection. 
Draw a line with a pencil for the second edge of the protection. 
Fold the paper inward at the marked point. 
Fold the corners on the second side of the protection approximately 0.5 cm. Fold the corners inward along the marked folds. 

Fold the rear flaps down, reducing their width by approximately 2 times. Make them longer. 
Repeat on the other side. 
Take protection and chassis. Put the first one on the second one and check how well they fit together. If necessary, correct minor defects by lengthening or shortening the protection accordingly. 

Step 3: Make the fixing element
At this stage you need to make a fixing element for the chassis and protection on which you will put the tower. Also, with its help, the tower will be able to rotate in different directions.
Take the second half of the A4 sheet. 
Fold the right edge towards the center line. Unbend. 
Cut a quarter of this piece along the folded line. 
Fold the paper in half lengthwise and mark creases along the edges. 
Fold both edges towards the center along the marked folds. 
Fold the corner down on the right. 
On the opposite side, also bend the corner so that you get a triangle in the foreground. 
Expand. You should end up with cross-shaped folds. 
Fold the side flaps inward along the marked folds so that you have a triangle in the foreground. 

Fold the left corner from the bottom side up. 
Repeat on the other side. You should get the following figure. 
Fold the bottom side towards the center line. 
Fold the top side towards the center as well. 
Place the craft on the chassis so that the square element is exactly in the center. 
Next, you begin to bend the figure around the chassis. Make sure that it follows all the contours of the element placed inside. 
Wrap the craft around the chassis completely. Trim off any excess length. 

Insert one edge of the element into the other so that the square is located at the top at the center point. 

————————————————-
Disconnect the fastening.

Place the guard on top of the chassis.

Wrap these parts again with an element with a square at the top. Some actions will be quite difficult to perform, but do not rush, act carefully and you will succeed.

The lower part of the tank is ready!

Step 4: Make a Tower
Cut out a square with a side of approximately 6-7 cm. Bend it along both diagonals.

Fold the paper in half.

Fold the corners down to create a perfect triangle.

Turn the figure over.

Fold the left corner towards the top.

Repeat on the other side.

Rotate the craft. Fold the side corners to the center line so that they are slightly shifted upward.

Insert the lower flap with right side into the pocket located at the bottom of the side flap.

Insert the right flap into the pocket as well. It should look like this.

Turn the craft over.

Lift the inner pockets slightly upward.

Turn the pocket slightly outward.

Repeat on the other side.

Fold the top corner down. You have made the base for the tower.

Step 5: Make the Turret Guard and Muzzle
Cut out a piece of paper measuring 8 cm x 6 cm. For this work, you can use paper of the same shade that you previously used or use a contrasting color. We used a different shade and it really looks cute! If for each element we use different shades paper, it will look original and fresh!

Fold the piece in half in width. Next, you need to fold this paper in three along the points indicated by the arrows in the photo below.

Here the paper is already folded in three.

Open one spread. Fold the lower left corner from bottom to top. In the same way, symmetrically fold the right corner to the top. Pull the middle up and fold the craft in half. Gently pull the inner valve upwards.

Unfold the craft.

Decorate the third part on the other side of the craft in the same way.

Make sure that the internal valves are placed symmetrically.

Take your tower.

Insert one edge of the green guard into the inner pocket at the top of the tower.


From the bottom side, insert the protection into the inner pocket at the bottom of the tower. Cut off the excess length of the protection.

Fold the cut corner into the middle.

Place the defense on the tower and secure both elements. If necessary, use a little glue.

Cut a small rectangle to fit the circumference of the tower.

Roll it into a thin strip.

Bend one end of the strip perpendicularly and fold it in half to form a small triangle at the top.

Insert this end inside between the green guard and the tower.

Wrap the strip around the tower. Insert its other end on the other side of the protection. If necessary, secure the work with glue.

Roll a tube from a thin piece of paper and secure with glue. This will be the muzzle.

Place the turret on the chassis. To do this, insert the square located at the top of the chassis into the internal pockets at the bottom of the tower.
Place the barrel inside the tower and secure it with glue.


The work is ready!
We tried to tell you in as much detail as possible and show you the technique for making this tank. But if you still have questions and you don’t fully understand how to make this paper tank correctly, watch the following video.
Creating paper tanks can be of interest not only to boys, but also to girls. Firstly, these figures will be excellent toys for them. Secondly, the process of creating a figurine itself arouses unprecedented interest in children and develops motor skills. And thirdly, during the process of forming such figures, many parents tell their children about the great wars and their features, attracting children to the history of their state. So, how to make a tank out of paper and where to find a layout and drawing?
Creating paper tanks can interest not only boys, but also girls
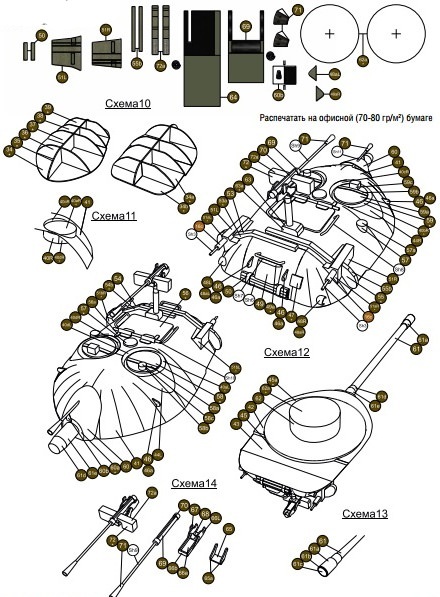
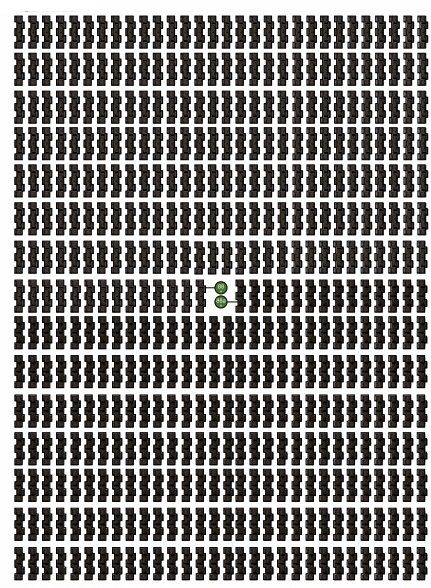
A paper T 34 tank corresponding to a real vehicle can be glued together using ready-made developments. To do this, you will first need to print the required scan on thick paper. Then you should cut out all the drawn parts.

 To make T 34 from a reamer, you must follow the instructions:
- Fold lines should be found on the cut out elements. A ruler is applied to each of them, and then the free edge of the paper is lifted and ironed. This creates an even fold.
- Once all the folds have been marked, you can proceed to gluing the model.
- The first step is to glue the main body of the tank. To do this, it is advisable to use transparent acrylic glue or quick-drying PVA.
- Then all minor parts are glued to the body.
- Then you can move on to the cannon. First of all, its base is glued together, and only after that the cannon is supplemented with secondary elements. The finished model is glued to the main body of the combat vehicle.
- After this, the caterpillars are assembled. First, the inner circles are made, and only after that they are framed by a single track strip. The finished tracks are attached to the sides of the hull.


It is worth considering that there are different designs of the T 34 tank, which may differ from each other in color scheme and convention. If you can only print a black and white version of the machine, you should color it using acrylic paints. Such processing of cardboard will give the future toy the appearance of a tank with a natural coating.
Gallery: paper tank (25 photos)


Tank IS 7 made of paper
To make this tank, you should also use a ready-made reamer.


- All elements of the development are cut out using a stationery knife.
- Next, using a ruler, folds are made at all places marked for these purposes.
- A supporting structure for the body is made. It is made from two rectangles installed parallel to each other and secured with 3 transverse strips located at an equal distance from each other.
- A body with a circle cut out in it is glued onto the resulting base.
- The sides of the body are glued, niches for the caterpillar are formed. A tank bottom is being formed.
- The base for the cannon mount is being made. It is done in the same way as for the body. A manufactured turret is installed on the hull. A machine gun and additional elements are glued to the turret.
- Next, the tracks are made: the middle ones are smooth, the rear ones are with teeth.
- The tracks are glued to the bottom of the main body and secured with caterpillar tracks.
This model is quite complex to assemble, so when creating it with children, it is necessary to provide them with extensive assistance. When assembling it with children, you can dispense with several small parts, thereby simplifying the gluing process.
How to make a T 90 tank out of paper?
T 90 can be made using the origami technique. To do this, you only need paper: A4 sheet and a small sheet of paper for notes.

T 90 can be made using origami technique
How to do:
- First, an A4 sheet is folded. First of all, it bends in half lengthwise.
- The perpendicular sides of the sheet are folded, connecting to each other. First, the short side is applied to the lower long side, and then to the upper one. Similar manipulations should be performed on both sides of the sheet.
- The leaf turns over. The corners of the short side are bent towards the ends of the crosses formed from the fold line.
- The sheet is turned over and bent along the resulting lines, forming basic form double triangle.
- The long sides are folded towards the middle so that the resulting double triangles are on top of them. The result is a double arrow.
- The newly folded edges are folded towards the outer sides of the rectangle.
- The lateral corners of one of the triangles are bent towards the apex.
- The workpiece is turned over and conditionally divided into 3 parts so that in the end the top of the folded triangle touches the middle of the base of the open one.
- The free corners of the triangle bend inward.
- The “ears” from the previously folded triangle are set into the resulting pockets.
- The result is a tower.
- A small sheet of paper is rolled into a cylindrical shape using a knitting needle or skewer.
- The barrel is inserted into the hole in the turret and glued.
A figurine assembled in this way can be decorated using thick paints, felt-tip pens or pencils.
How to make a tank from origami modules?
To create tanks, you can use the assembly diagram offered by modular origami. To begin, the assembler will need to prepare 1688 triangular modules.
How to assemble:
- First of all, the tower is assembled. Her first and second rows close in a circle. Each row consists of 30 modules.
- The workpiece is turned inside out and supplemented with a third layer consisting of a similar number of elements. In this way, the tower is built up to layer 8.
- The ninth row is assembled from 30 modules, but they should be installed backwards.
- Next you need to start working on the tracks. A chain of 4 rows is made, each of which has 50 modules.
- The fifth row uses 46 elements. The reduction should be carried out in places where the track bends.
- Row 7 consists of 46 elements installed backwards.
- The same scheme is used to create the second caterpillar.
- For each caterpillar, 3 wheels are made. To do this, a circle is made of 2 rows, each of which involves 10 modules. The figure is turned inside out and completed with 5 rows.
- The wheels are placed inside the caterpillar. These elements are connected by a middle bar made of 34 rows: 1 – 5 modules, 2 – 4 elements. Next, the rows alternate.
- A slightly bent piece is inserted between the tracks.
- A tower is placed on top.
- The cannon is made of 20 rows, the width of which alternates: 1st row - 2 elements, 2nd row - 1. The last three rows increase to 4, 3 and 4 elements.
- The machine gun is inserted into the turret.


