Craftswomen from all over the world have made a variety of animal hats: cat hats, bears, mice, dragons and hats with cartoon characters. And it’s good that the room for imagination is simply endless, and both mothers and babies are happy with the result.
By the way, the desire to put such a knitted hat on the baby appears along with the baby. My daughter is already too old, as it seems to me, and a friend who recently had a daughter came to me with a request to knit her several hats for a photo shoot. Agree that the cuteness of photographs with sleeping children in knitted hats, knitted panties, crowns, and headbands is simply off the charts. How can you resist taking a few good shots with your baby?
Before this hat, I had never knitted anything to order (not in the sense of money, but in the sense of request, but also for money 🙂), but on the occasion of such joy, I decided to do it. I think I did pretty well. All the colors were chosen by the customer, my job was only to make the hat she chose in the right size.
In fact, it turned out that such animal hats can be knitted in a couple of hours. I knitted it in one evening, and the next day I was already fussing over the next headdress for the little princess.
Let's start crocheting an animal hat.
Materials
- kartopu flora yarn (100% acrylic, 230 m per 100 g) K732, K890 and remnants of white, green, black and orange.
- hook No. 3.5
Designations
- v.p.- air loop.
- RLS- single crochet.
- CCH- double crochet stitch.
- SS— connecting post (connecting/blind loop)
Scheme for the purple part of the hat
We start with a magic ring (sliding loop).
We start all rows with 3 chain stitches for lifting, which we count as one double crochet. At the end of each row we make a connecting loop into the 3rd lifting loop.
1st row: 12 dc in the ring.
2nd row: 24 SSN. We knit 2 dcs in each column.
3rd row: 36 SSN. We knit 2, 1, 2, 1...
4th row: 48 SSN. Knit 2, 1, 1, 2, 1, 1...
5 row: 60 SSN. Knit 2, 1, 1, 1, 2, 1, 1, 1...
6th row: 72 SSN. Knit 2, 1, 1, 1, 1, 2, 1, 1, 1, 1…

We knit rows 7, 8, 9, 10 and 11 without increments, 72 stitches in each row.

We change the color of the yarn and, also without additions, knit 6 rows with single crochets, 72 sc in each.
Advice: It is advisable to knit rows in turn: one on the front side, one on the wrong side. This will make a beautiful transition to the ears, which we will knit in turning rows.
At the beginning of the row, cast on 1 chain stitch and knit a sc into the first stitch. Close the row at the top of the first column, ignoring the lifting air loop.
 I didn't cut the thread because I had 2 skeins of brown yarn. I knitted the ears from the second skein, and left this tip hanging so that I could later knit the hat with the ears. If you have 1 skein, you can get the second end of the thread from the inside, or cut it and attach it with this end. Whichever is more convenient for you.
Next I will show you how to crochet ears. We divide the cap into 5 parts as follows. We have 72 columns. This means we leave 14 stitches on the ears, 16 on the back, and 28 on the front. I marked the 1st and 16th stitches of the back of the hat, as well as the 1st and 28th stitches of the front.

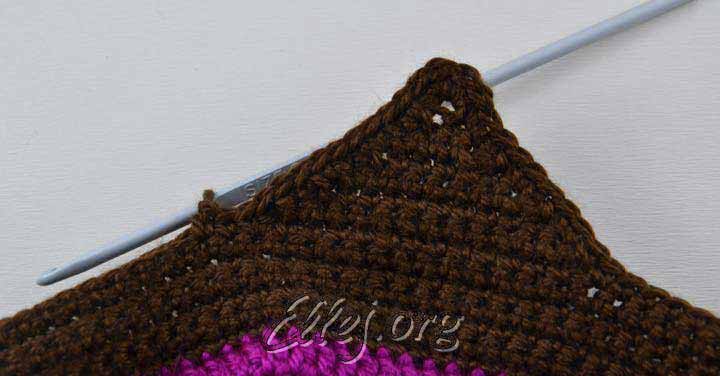
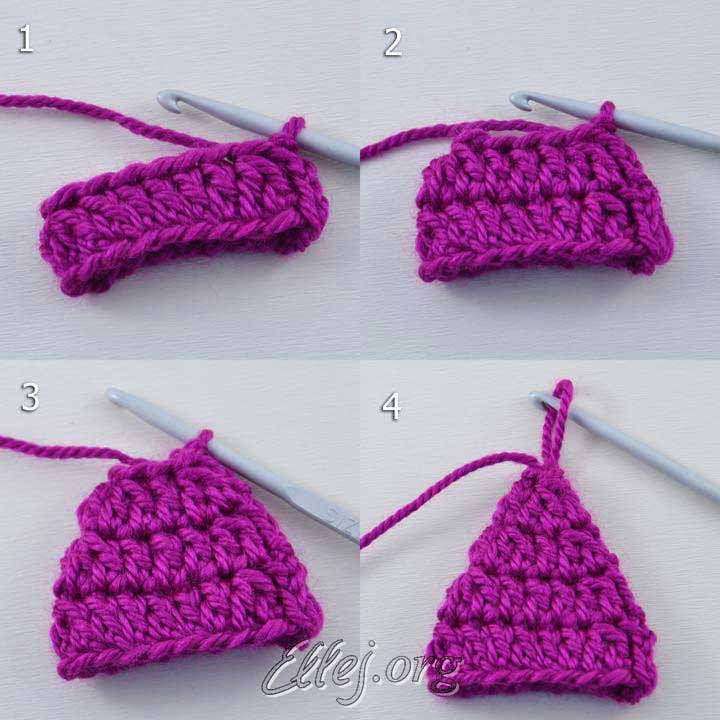
The sixth brown row of the cap was purl. We attached a thread and tied 14 sc between the markers on the front side. Cast on 1 ch and turn the wrong side towards you. Now we will reduce the number of columns in the row. We knit the first stitch into the second stitch of the previous row.

At the end of the row we knit 2 stitches together.

So we continue to reduce the number of columns by 2 in each row almost to the end.


When there are only 3 stitches left in the row, cast on 3 vp. and make a loop into which we will later attach the pigtail. We cast on 3 loops and knit a sc at the end of the row. 
We cut the thread and knit the second eye in the same way.

When both ears are tied, we return to the left loop on the hat and tie the entire hat from the front side with single crochets.

We also tie the ears, and under the chain that we knitted at the tips of the ears, we knit 3 sc.
The base for the animal cap is ready. All that remains is to make the details of the muzzle. 
Now we knit the ears-on-top. Using a purple thread, we cast on 21 loops and close them into a ring with a connecting loop.


We make tassels at the tips of the ears: tie 2 purple, 2 brown and 2 white threads (~10 cm long) together in the middle, fold them in half and sew them into the tips of the ears. 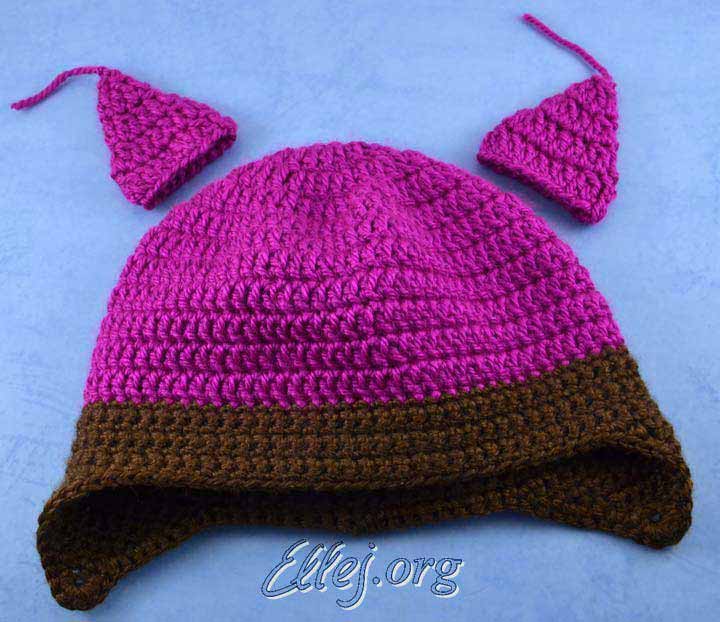

We sew the ears themselves to the hat slightly from the back. For braids we take 3 threads each of purple, brown and white. The length of the threads is ~ 50 cm. We pull all the threads into the loops that we made at the ends of the ears. Divide into three parts and braid. You can separate colors in any order. I divided all the colors equally. We tie the braid tightly at the bottom, and insert the ends of the ties under the knots using a needle.

Now we knit the eyes. Using green yarn, we knit 6 sc in a magic ring and 12 sc in the second row.
We knit 24 sc with white yarn (one of the columns can be knitted by inserting a hook one row below, so it will look like a highlight). And 2 more rows, increasing the number of sc by 12 in each row. Separately, we knit circles in black (2 rows: 6 and 12 sc) or sew on buttons like pupils.

We knit the beak according to the pattern below. Leave the tip of the thread so that you can immediately sew the beak to the cap with the same thread.

We sew all the details into the right places (if you wish, you can embroider the eyelashes), hide the ends, sit and admire them, and run to show off on social networks, not forgetting to include a link to
owl cap
Size 48-50
YOU WILL NEED:
Pekhorka "Elegant" (100% merino wool, 250 m/100 g) - 100 g each, lilac and pink colors
Pekhorka "Crossbred Brazil" (50% merino wool, 50% acrylic, 500 m/100 g) - 50 g lilac color
leftover yarn in black, grey, orange, yellow and brown for the eyes and nose
hook No. 2.75 and No. 2
The base of the cap and the lining are knitted according to the same principle - single crochet stitches in the round. First, we knit the lining from "Crossbred Brazil" yarn with crochet No. 2, then the hat itself from Pekhorka "Elegant" yarn with crochet No. 2.75 - we knit the upper part of the hat with pink yarn, the lower part (about 4 cm + ears) with lilac yarn. To make the cap and lining beautiful and neat, read the advice of Marina Trikoz (LimaGi), a specialist on this issue (below are links to the main points):  HOW TO GET A PERFECTLY EVEN CIRCLE WHEN KNITTING WITH SCORE CARRIET
I have adopted a method that is much simpler for counting. I’ll also throw in a count for alternating rows of dc and sc. I don’t draw diagrams, because it’s easier to count than to look at the drawing.
1) double crochets:
1st row - 10 dc in a ring of thread
2nd row - 20 dc, 2 in each loop
3rd row - 40 dc, 2 in each loop
Row 4 - 40 dc, no increments
Row 5 - 60 dc, increase through one loop
Row 6 - 60 dc, no increments
Row 7 - 90 dc, increase through one loop (it’s better after two or three loops)
If you need less for the head, adjust it with the last row. If more, the last two are repeated with the necessary addition of columns. It's easy to knit and you don't have to count too much. However, it should be noted that on thin and white yarn, the rows without increases differ in density, holes are slightly visible compared to the neighboring ones. Colored and bulky yarn does not suffer from this. The most important thing is that the expansion wedges are absolutely not visible - a perfectly even circle.
2) alternating RLS and CH (as in Solnyshka from the first page, for example)
Row 1 - 6 sc in a ring of thread
Row 2 - 15 dc, alternating 2 and 3 dc in one loop
3rd row - 20 sc, increase in every 3rd loop
4th row - 30 dc, increase in every 2nd loop
Row 5 - 40 sc, increase in every 3rd stitch
6th row - 48 dc, increase in every 5th loop
7th row - 60 sc, increase in every 4th loop
8 row - 72 dc, increase in every 5th loop
Row 9 - 84 sc, increase in every 6th loop
Continue in the same way to the desired size. You can also navigate this alternation like this: for sc - 6 increases in a row, for dc - 12. To the edges of the circle, make fewer increases so that it lies on the head. This knitting is a little denser than just CH. You can play with colors and different thicknesses of stripes.
It should be noted that you can also start the circle not from the ring, but from the first loop of the lifting chain of the first row (i.e. knit four loops, and in the first all the columns of the first row), I do this on small circles/flowers. Quick and easy, without a hole.
LOCATION OF EARS (TIES)
If you are knitting ears/ties to cover a child's ears, their placement is very easy to calculate. Divide the number of columns along the bottom edge of the header into 5 parts. Two parts go to the front, one to the back of the head and one to the ears. I use this calculation, whatever form they are. If you want it smaller, reduce the width of the ear on both sides; if you want it larger, add it evenly on both sides. Since I always tie the bottom of my hats and the ears too, I take this into account right away so that they don’t come out big.
To place a flower or other decoration on the temple, I divide the circumference of the head into three parts. I retreat one part from the back seam in the direction where it should be and sew it on.
HOW TO CORRECTLY SEW A KNITTED LINING INTO A HAT
We sew a knitted lining into the hat!
In the example shown, the base (upper part) is knitted from half-wool thread in two folds, hook 4.5 (Merino Light Yarnart - pink, Charisma Yarnart - gray; slightly different in thickness). Lining - Summer in one thread, hook 2.5. I chose a cotton lining so that the hat would not be too hot, since the top is already quite warm. But neither the thickness nor the composition of the thread matters at all here!
First of all, I knitted the lining without the ears/ties. I put it on a ball the size of the head and measured it on top with a centimeter at the widest part. The size differed from the original by 1-1.5 cm. This means we knit the warp more by this value. Those. if the head size is 44 cm, the lining is size 44, and the top is size up to 46 cm (plus another 1 cm will not be noticeable - you can add that too).
It is not necessary to make such a measurement. If you knit both the lining and the top into one thread from half-wool of medium thickness (about 200-250 m per 100 grams), then the difference is usually about 2-2.5 cm (this is about four stitches in a row - add them at the top). If, however, the lining is noticeably thinner or thicker, it is better to play it safe this way. There is no ball/can - inflate the ball by putting it in the hat (because putting a hat on a ready-made ball is a bit difficult).
In height (from the top of the head to the bottom edge of the hat), the size in the lining was reduced by half a centimeter from the original (because it should be slightly further from the edge in order to be invisible). In the upper part - increased by 0.5 cm from the original value for a successful fit of the lining (i.e. it comes out about 1 cm deeper than the lining - most often it is knitted one more row). Since these measurements are difficult to make accurately, you put the lining in the hat while knitting the edge to see how much more is needed. The upper part should peek out a little from behind the lining.
If the upper part is smaller than the obtained value, it will tighten the lining, folds will form inside - it will put pressure on the head or will not fit at all. If it is much larger, it will not lie flat/smooth on the head, it will fidget/slide, and a hanging fold may form over the edge of the cap.
Next we knit the entire base with ears/ties like a regular hat (taking into account the extra size). I have it slightly larger than the calculated size deliberately - so that I can then tear off the lining and continue to wear the hat in the spring, since the girl is still small and her head is growing quickly. Sew all the trim onto the base at once (flowers/whiskers/eyes/ears/beads and all that) so that later you don’t catch the lining with thread - this will greatly ruin the hat. And all the sins of sewing and the ends of the threads will be hidden between the top and the lining.
We knit the ears/ties on the lining. We adhere to the same formula for calculating their placement (1/5 part per ear) in order to get to the right place. We knit according to the shape of those on the hat, reducing the edge by 0.5-1 cm. I tried to get as close to the edge as possible so that the hat would not prick.
After the second eye/tie, use the same thread to tie the lining with a row of single crochets. You can then sew it on neatly, evenly and easily! Without him it’s bad! At the end, I leave a piece of thread of the length that is enough to sew the lining around the circle (I had about 1.5 m).
Now sewing the lining
1) we have these two components - the lining and the completely finished base. The most important thing is that they must repeat each other in shape.
2) put the lining into the base. If there is a more beautiful side on the lining, then go to the head.
3) immediately prick with needles the combined top and bottom corners of the eyelet/tie, leaving half a centimeter along the edge
4) we sew a combined seam in the back and front middle (to do this, fold the cap in half along the ears/strings and find the fold point on both parts). I also add a couple of needles in front for convenience, to evenly distribute the difference in the loops
5) we begin to sew, picking up the loop of the lining and about half a centimeter from the edge of the base. Convenient with a needle with a blunt end.
6) this is how you get a rather invisible seam. After securing the end of the thread with a knot, I hide it in the middle - to do this, I stick a needle near the knot, pass its end between the lining and the base, after a few cm I bring it out, pull out the entire thread and cut it, lightly pull the knitting - the tail is hidden inside.
7) This is what it looks like when finished.
(Glamorochka Hat)
Attention! Before sewing in the lining, we knit the trim and sew everything on!
 EARS (2 parts)
We crochet No. 2.75 with “Elegant” lilac yarn.
6th row: 3 in. p., art. с1н in the same loop, 9 tbsp. s1n, 2 tbsp. с1н in the last loop (13 sts. с1н)
7th row: 13 st. s1n
8th row: 3 in. p., art. с1н in the same loop, 11 tbsp. s1n, 2 tbsp. с1н in the last loop (15 sts. с1н)
9th row: 15 st. s1n
We tie the eyelet with two rows of single crochets, knitting 2 tbsp. b/n from one on the corners of the ear. Attach a tassel of pink yarn to the upper corner of the ear. We knit the second ear in the same way.
We sew our eyes, nose and ears onto the hat, tie the hat with a row of single crochets with lilac yarn and “crawfish step” with pink yarn. We sew in the lining (also tied with one row of st. b/n), attach the braided ties to the ears. If desired, the ties can be woven or crocheted or knitted.  EYES (2 parts) (the idea of knitting eyes in this way was taken from the user Half*ina from Osinka)
Crochet number 2.75.
1st row: 2 in. p., 2 p. from the hook: 4 tbsp. b/n black, 1 tbsp. b/n gray, 5 tbsp. b/n black (10)
2nd row: 2 tbsp. s1n in each st. previous row: 6 tbsp. with 1n black, 2 tbsp. with 1n gray, 12 tbsp. with 1n black (20)
3rd row: 2 tbsp. s1n in each st. previous row: 10 tbsp. s1n black, 4 tbsp. s1n gray, 26 tbsp. s1n black (40)
4th row: 40 st. b/n orange
5th row: yellow: (st. s1n, 2 st. s1n in 1) * 20 times (60)
6th row: 60 st. b/n brown
7th row: with “Elegant” yarn of lilac color: (20 v. p., st. b/n) * 6 times, 17 tbsp. b/n, (20 ch, st. b/n) * 37 times (this is the left eye, we knit the right eye like this: (20 ch, st. b/n) * 33 times, 17 st. b /n, (20 v.p., st. b/n) *10 times)
SPOUT
Crochet No. 2.75 with brown yarn
1st row: 4 in. p., in the 4th p. from the hook: 2 tbsp. s1n
2nd row: 3 in. p. (=first double crochet), tbsp. c1n in the same loop, 1 tbsp. s1n, 2 tbsp. с1н in the last loop (5 sts. с1н)
3rd row: 3 in. p., art. c1n in the same loop, 3 tbsp. s1n, 2 tbsp. с1н in the last loop (7 sts. с1н)
4th row: 3 in. p., art. c1n in the same loop, 5 tbsp. s1n, 2 tbsp. с1н in the last loop (9 st. с1н)
5th row: 3 in. p., art. с1н in the same loop, 7 tbsp. s1n, 2 tbsp. с1н in the last loop (11 sts. с1н)
Tie the nose next to st. b/n
If you want to please your child with a new, beautiful hat, take a little time and be patient. In order to knit a little animal hat, you will need: a skein of yarn of the main color, threads of other colors, as well as a needle, beads, buttons, eyes, which can be purchased in the store, and sewing threads.
Once you have prepared everything you need, measure the circumference of your child's head to find out the size.
1. Cast on a chain of air loops and close it into a ring;
2. Knit according to the pattern.
1st row: we tie a chain of chain loops with double crochets (there will be 5-8 of them, depending on the thickness of the yarn);
2nd row: in each column of the previous row we knit 2 double crochets.
In each subsequent row, we gradually reduce the number of additions until the desired diameter of the bottom of the cap is reached.
The diameter of the product can be determined from the table if you know the age or head circumference of the child;
3. After this, you need to knit without additions: each column of the previous row corresponds to a column of the new row;
4. The same table will help determine what depth of the cap is needed.

The hat can be straight or with ears, which can be decorative or voluminous; these are created to insulate the product. To make the ears, mark their locations with bright threads (after knitting, remove the bright threads). And gradually reduce the number of loops when knitting rows.
There are two ways to reduce the number of stitches: systematically skip one of the stitches of the previous row or combine the last two stitches of each row.
You can also insulate the hat. Make a solid lining or sew fleece linings into the ears. This material is very suitable for children's products because it is soft and pleasant to the touch.

There are many ways to decorate a hat.
For example, to complete the panda look, outline the eyes and black ears. Knit according to the pattern,


but use single crochets. Knit the nose, as well as the ears, reducing the number of loops in the row. Then, carefully sew it to the hat. For the eyes, you can take ready-made eyes or buttons.
For a cat, you can knit flowers with beads and antennae.
We invite you to knit one of three animal hats, or maybe all of them at once. Choose!
You will need: yarn (100% wool; 50 g/80 m); for the "Penguin" hat: 2 skeins of black, 1 skein of white, the rest of orange; for the “Parrot” hat: 1 skein each of pink, mustard and burgundy, the remains of orange, white and black; for the “Teddy Bear” hat; 2 skeins of brown, remains of burgundy, white and black; hook number 5.
Dimensions: for age 4 (6) 8 years
Cap: knitted from top to bottom. Each circular row begins with 3 vp. lifting, replacing the 1st st. s/n, the row is closed by a connecting post into the upper lifting loop. For the initial element, make a double thread ring and knit behind it:
1st row: 10 tbsp. s/n (= 10 p.).
2nd row: 2 tbsp. s/n in each loop (= 20 sts).
3rd row: *1 tbsp. s/n and 2 tbsp. s/n in the next loop*, repeat from * to * (= 30 sts).
4th row: *2 tbsp. s/n and 2 tbsp. s/n in the next loop*, repeat from * to * (= 40 sts).
5th row: *3 tbsp. s/n and 2 tbsp. s/n in the next loop*, repeat from * to * (= 50 sts).
6th row: *4 tbsp. s/n and 2 tbsp. s/n in the next loop*, repeat from * to * (= 60 sts)
Finish here for size for age 4 years. The next row is for sizes for ages 6 and 8 years:
7th r. (for size 6 years): *11 tbsp. s/n and 2 tbsp. s/n in the next loop*, repeat from * to * (= 65 sts) 7th r. (for size 8 years): *5 tbsp. s/n and 2 tbsp. s/n in the next loop*, repeat from * to * (= 70 p.) Next knit for all sizes: another 9 (9) 10 r. - By
1 tbsp. s/n in each loop (i.e. for the entire hat, perform 15 (16) 17 r.). Do not break the thread, knit the right earpiece from it.
Right earphone:
When knitting in forward and reverse directions, turn to a new row using 2 ch. (do not count as a loop).
1st row: 2 ch, start in the same loop and knit 14 half-stitches s/n (= 14 sts).
2nd and 3rd rows: 14 half-columns s/n.
4th row: skip 1 p., 11 half-columns s/n, skip 1 p., 1 half-column s/n in the last loop (= 12 p.).
5th row: 12 half-columns s/n.
6th row: skip 1 p., 9 half-columns s/n, skip 1 p., 1 half-column s/n in the last loop (= 10 p.).
7th row: 10 half-columns s/n.
8th row: skip 1 p., 7 half-columns s/n, skip 1 p., 1 half-column in the last loop (= 8 p.).
9th row: skip 1 p., 5 half-columns s/n, skip 1 p., 1 half-column s/n in the last loop (= 6 p.).
10th row: skip 1 p., 3 half-columns s/n, skip 1 p., 1 half-column s/n in the last loop (= 4 p.).
11th row: skip 1 p., 1 half-column s/n, skip 1 p., 1 half-column s/n in the last loop. Break the thread.
Left earphone: step back from the first earphone 20 (22) 24 p. = front part of the hat, i.e. attach the thread to the 21 (23) 25th stitch from the right earpiece. Knit the left earmuff like the right one, but after the 11th row do not break the thread and tie the edge of the cap st. b/n. After this, break the thread and fasten the end.
Cap "Penguin"
Hat: knit with black thread. Eyes: make a double thread ring from black yarn and tie it: 2 ch. (count as 1 half-column s/n) and 9 half-columns s/n (= 10 p.), close the row with a connecting column. In the 2nd r. change the thread to white and perform 2 tbsp. s/n in each loop (= 20 sts), close the row. Last row: *1 tbsp. s/n and 2 tbsp. s/n in the next loop*, repeat from * to * (= 30 sts). Close the row, break the thread. Connect the second eye in the same way. Connect both eyes end-to-end and sew (joining point = 6 stitches, see photo).
Beak: use an orange thread to tie 12 chain stitches. and, starting from the 2nd stitch from the hook, perform: 1 connecting post, 1 tbsp. b/n, 1 half-column s/n, 1 tbsp. s/n, 1 tbsp. with two yarn overs, 1 tbsp. with three yarn overs, 1 tbsp. with two yarn overs, 1 tbsp. s/n, 1 half-column s/n, 1 tbsp. b/n, finish with 1 connecting column. Leave the end of the thread for gathering. Sew the beak along the upper edge to the lower edge of the eyes (see photo). Assembly: sew the eyes and beak to the hat. Make 3 tassels from black yarn and sew one tassel to the top of the hat and to the ends of the headphones.
Hat "Parrot"
Hat: knit with yarn of different colors: 1st r. -pink color, 2nd r. - mustard color. Changing pink and mustard threads alternately, knit 10 (10) 12 r. Then switch to a burgundy thread and tie the cap to the end.
Eyes: make a double thread ring from black yarn and knit for it: 2 ch. (count as 1 half-column s/n) and 9 half-columns s/n (= 10 p.), close the row with a connecting column. In the 2nd r. change the thread to mustard thread and perform 2 tbsp. s/n in each loop (= 20 sts), close the row. The last row is done with white thread: *1 tbsp. s/n and 2 tbsp.
s/n in the next loop*, repeat from * to * (= 30 sts). Close the row, break the thread. Connect the second eye in the same way.
Beak: use an orange thread to tie 6 chain stitches. and, starting from the 2nd st. from the hook, perform: 1 tbsp. b/n, 1 half-column s/n, 1 tbsp. s/n, 1 tbsp. with two yarn overs, finish 1 tbsp. with three yarn overs. Break the thread, leave the end of the thread for assembly.
Assembly: sew the eyes and beak to the hat. Make 6 tassels from pink, mustard and burgundy yarn and sew 1 tassel to the ends of the headphones and 4 tassels to the top of the cap in the form of a “comb”.
Cap "Teddy Bear"
Hat: knit a hat with brown thread. Eyes: make a double thread ring from black yarn and work 2 chain stitches for it. (count as 1 half-column s/n) and 9 half-columns s/n (= 10 p.), close the row with a connecting column, break the thread. Connect the second eye in the same way. Muzzle: make a double thread ring from black yarn and knit 2 ch for it. (count as 1 half-column s/n) and 9 half-columns s/n (= 10 p.), close the row with a connecting column. In the 2nd r. switch to a white thread and perform 2 tbsp. s/n in each loop (= 20 sts), close the row.
Last row: *1 tbsp. s/n and 2 tbsp. s/n in the next loop*, repeat from * to * (= 30 sts). Close the row, break the thread. Embroider the mouth with black thread (see photo). Ears: make a double thread ring from brown yarn and knit behind it: 3 ch, 1 half-stitch, 4 tbsp. b/n, 1 half-column s/n, 2 tbsp. s/n, 5 tbsp. with two yarn overs, 1 tbsp. s/n, close the row with a connecting column in the 3rd ch. Break the thread. Knit the second ear in the same way.
Butterfly: use a burgundy thread to tie 9 ch. and, starting from the 2nd st from the hook, knit 8 tbsp. b/n, turn with 1 ch. and knit 8 tbsp. b/n in the opposite direction. Complete 4 p.s. in total. Art. b/n. Break the thread. Tie the part with a thread in the middle to make a butterfly.
Assembly: sew eyes, muzzle, ears and a butterfly to the hat (see photo).