Bobbins – special curlers for performing perms (Picture 1). The bobbins are classic (plastic bobbins should be used for curling, as wooden bobbins absorb a large number of composition) and modified. For classic bobbins, classic chemistry is performed, for papillots - ring, for spiral - spiral, for pagoda - corrugated. The size of the bobbins can be different: from small diameter to large. The diameter of the bobbins is selected depending on the shape of the hairstyle: a small bobbin diameter creates a fairly small curl, a large bobbin diameter is used to give volume to the hair and waviness to the hairstyle. Classic bobbins are wound according to the principle of curlers (Picture 2), only in this version they use tracing paper measuring 4x5 cm or any other thin paper, which not only make winding easier, but also ensure uniform distribution of strand turns around the bobbin (Picture 3).

How to curl your hair with bobbins: picture 1 Type of bobbins: 1-classic; 2-papillotes; Z-spiral; 4-hairpin or pagoda; Picture 2 The principle of curling with curlers

Picture 3 Winding hair into bobbins using pieces of paper
To curl your hair with bobbins, you must adhere to the following rules:
- the thickness of the strand being wound should be twice as thin as the diameter of the bobbin, and the width should be slightly less length bobbins;
- When twisted, the strand is slightly pulled towards the face;
- while winding the strand, the bobbin should be slightly moved to the right and left, but not forward or backward;
- the wrapping should be even and tight.
The location of the wound classic bobbins on the head can be as follows (Picture 5):
- Classic - all bobbins are wound from the face or according to the principle of the arrangement of the classic curler.
- Taking into account the future hairstyle, the bobbins are wound either from the partings or in the direction of the future styling.
- Partial cheating – used when short haircuts. The location of the bobbins in this case can be classic or taking into account the future hairstyle. In this option, the wrapping should end at approximately the same level.
- In a checkerboard pattern - with this kind of cheating, the chemistry turns out to be more natural.
- With alternating bobbin diameters - after performing chemicals, the hairstyle turns out natural and voluminous.
- Winding on two bobbins - to create an uneven curl. A strand of hair begins to be wound onto one bobbin, then, closer to the base of the strand, a second bobbin is placed.
- Winding on three bobbins - winding is used when long hair ah to create an even curl. First, a long strand is wound from the middle to the root, then it is divided into two parts and each strand is wound from the ends to the middle.
- For a modified perm, special bobbins are used, the winding of which is different (Picture 6).

How to curl your hair with bobbins: picture 5 Location of classic bobbins on the head: 1-classic; 2- taking into account the future hairstyle (in this version, waves); 3-part wrap; 4- in a checkerboard pattern; 5-with alternating bobbin diameters; 6-winding onto two bobbins; 7-twist with three bobbins

As you know, perm is a rather labor-intensive and complex process that has several stages. In the previous article we talked about. In this article we will look at the types of curls and methods of curling curls, because the final result and how exactly the curls will turn out depend on this.
Types of curls and curling methods
Classical
This is the most common way to perm hair. His main principle is that bobbins (special non-metallic curlers for perms) are wound away from the face in a horizontal position. For this type, you can use curlers of different sizes. 
Vertical method perm
The main feature of this type of perm is that the bobbins are fixed in a vertical position. Size and shape may vary. Recently, this method has become very popular; it produces vertical waves. Looks very good on long hair. 

Prikornevoy
It differs in that not all the hair is curled, but only the upper part. This type typical for repeated or regrown “chemistry”, as well as for adding volume and fullness to thin hair.


Spiral
It is made using special bobbins in the shape of a spiral. Start from the lower occipital part. The hair is taken, rolled into strands, and tightly wound onto a bobbin. The result of such chemistry will be curls with clearly visible curl ribs. 


American
Performed using perm curlers from Olivia Garden. They have a unique shape that allows them to be attached to each other without rubber bands. Thanks to this, there is no additional pressure on the hair and no kinks. They come in several types: standard - for large curls, oval - for creating waves, spiral - for long hair. 

Perm braids
Hair, as in other cases, is divided into sectors. Loose braids are woven from each part and then wound with curlers. The braids are braided in several rows. In each subsequent row they are made wider than the previous ones. Natural curls are obtained, with large curls. More suitable for those who do not style their hair with curlers. In the same way, but from small and thin braids, a perm is made - the so-called afromane, or thin corrugation. 

Corrugated
To achieve the effect of corrugated strands, the hair is wound on a hairpin (made of non-metallic material) in the shape of a figure eight. The effect is similar to twisting it into a pigtail. This type is more suitable for middle length hair - to the shoulders. 

Ring curls
This type of curl for short hair is characterized by the fact that a curl from the selected area is wrapped in paper, twisted into a ring and secured with a clip. This chemistry will add volume and curls. short hair.

Creative
Curlers are used different forms and volumes, and alternate with each other, while different methods of wrapping them up can also be used. 

Chess way
The strands wound on curlers are arranged in a checkerboard pattern, alternating horizontal and vertical positions. 
Curling boomerangs
Special soft curlers boomerangs. Roll them up in a checkerboard pattern. The curls are very lush and in the shape of rings. 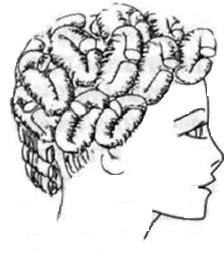

Italian eight
First, the strand is wound on curlers, and then another curler is added to it, and they are twisted together. This creates a wide wave at the base, which decreases towards the ends. They also use special figure eight curlers. 


Consult your hairdresser about performing a particular perm. Maybe your salon has more interesting ways perm, add volume to your hair and get beautiful curly locks.
Be beautiful and happy!
Choosing bobbin size
Preliminary work
· For perming, you need to prepare two non-metallic bowls (one for the composition, the second for fixer), two sponges (small for composition, large for fixer) or applicators, as well as gloves, a measuring cup, an insulating cap and bobbins.
· Before curling, the hairdresser must first comb the hair and diagnose it, i.e. determine hair condition (natural, dyed, bleached), texture (thick, medium, thin), structure (oily, normal, dry) and length.
· Next, you need to conduct a skin sensitivity test, for which you need to apply the composition to the bend of your elbow or behind the ear and leave it on for 5-10 minutes. After this, the client is covered with a peignoir and a hygienic hair wash is performed.
·Crisp haircuts geometric shape performed before perm.
· The choice of bobbin size depends on the client’s wishes and hair characteristics. The required number of waves, curls and volume of hair are determined by the master and the client in a preliminary conversation. The type of future hairstyle is determined by the size of the bobbins used, their number and placement on the head.
· When choosing the bobbin size, it is necessary to take into account the length of the hair, its elasticity and texture. Most important characteristic V in this case is the texture of the hair.
· Hair with a coarse texture and good elasticity is divided into small strands and large bobbins are used.
· Hair of medium hardness and elasticity is divided into medium strands; bobbins are also chosen in medium size.
· Thin hair those with poor elasticity are divided into small strands; bobbins are used in small and medium sizes.
· To perform curling at the back of the head, the hair is divided into very small strands and the smallest bobbins are used.
· Long hair is divided into very small strands, curled evenly and as close to the head as possible.
· Wetting is the process of impregnating the ends of the hair with a deoxidizer while curling.
· Saturation is the second cycle of impregnation of hair already curled in curlers.
· Impregnation of hair should be carried out in three steps: the first of which is wetting, and the next two are foaming.
· Fixation is the process of securing the curl using a fixer. It is the main factor determining the durability of the curl.
· Curl shape - determined by the diameter and shape of the bobbins used.
Perm technology:
· Basic methods and techniques of perming hair. Classic perm
There are two methods of performing a perm: direct and indirect.
Direct method. Each strand is moistened with a chemical composition and wound onto bobbins according to the classical scheme.
Winding according to the classical scheme (Fig. 1, a) begins from the lower occipital zone of the head. Then the hair of the middle and upper occipital zones is curled, then the temporolateral and, finally, the parietal. All hair is curled in the direction of its natural growth.
Indirect method. Wet hair is wound onto bobbins according to any pattern (Fig. 2, b, c), and then moistened with a chemical composition.
Rice. 1 Hair curling scheme for perm:
a - classical;
b - directional;
c - variable
Wetting the hair with the composition in this case is carried out in three steps:
- a small amount of the composition is applied to the hair to soften it slightly;
- a medium amount of the composition is applied to the hair to thoroughly moisten it;
- carry out control wetting of the hair.
The composition begins to be applied from the lower occipital zone.
After choosing the perm method, you begin to wind your hair with bobbins, taking into account the following:
- the width of the strand should not exceed the length of the bobbin;
- the thickness of the twisted strand should not be greater than the diameter of the bobbin;
- The strands must be pulled strictly perpendicular to the head.
- One perm requires 50g of the composition.
Put an insulating cap on the curled hair and leave the mixture on for 10 to 40 minutes. The exposure time depends on the concentration of the chemical composition and the condition of the hair. When using climazone, the exposure time is halved.
After some time, it is necessary to check the quality of the curl, for which they unwind (not completely, but only 1-2 turns) and twist 3-4 bobbins back into different zones, and also compare the diameters of the bobbin and the resulting curl. If these diameters coincide, then proceed to the next stage: the composition is washed off with hot water without unwinding the bobbins.
Then fixation is performed by laying a napkin tourniquet along the edge hairline so that the fixer does not get on the face.
Currently, two types of fixer are produced: ready-made and concentrated.
For one fixation you need 50g of fixer (3-5% concentration of hydrogen peroxide). If the fixer is ready, it is applied using a sponge or applicator to the bobbins and foamed so that a foam cap is formed. The exposure time of the composition on the hair is 10 minutes. If the fixer is concentrated, it must be diluted with water in a 1:1 ratio before application.
After the foam has settled, the bobbins are untwisted and the fixer is applied to the ends of the hair for another 5 minutes. Then the fixer is washed off with clean water.
After this, final work is performed: neutralization with a special composition, styling, cutting, drying, etc.
Perm performed using braids and bobbins
Wet hair is divided into zones, as shown in Fig. 2, a.

Rice. 2 Perm using braids and bobbins:
a - division of hair into zones;
b - braided braids with ends twisted onto bobbins;
c - the resulting hairstyle; arrows indicate the direction of hair separation
The area of the first row of braids should be 5cm wide. The number of braids depends on the thickness of the hair; the thickness of each braid is 2-2.5 cm. The hair is braided tightly; The ends are not braided, but wound onto bobbins and secured with an elastic band.
The zone of the second row of braids should be slightly wider than the zone of the first row, and the third - wider than the zone of the second row.
In this way, the hair is processed row by row up to the top of the back of the head.
Strands of hair in the temporolateral and parietal zones are braided into thicker braids (3-3.5 cm).
After all the hair is braided and the ends of the braids are twisted onto bobbins, they are impregnated on all sides with a chemical composition and left for 15-25 minutes, depending on the condition and structure of the hair. Then the braids with bobbins are washed very thoroughly with water (t = 50...60°C) and a fixer is applied, which is kept for 10 minutes. Next, the fixer is washed off with water, the bobbins are removed, the braids are undone, and the hair is washed with water again.
At the end of the perm, the hair is washed with a medicinal emulsion and combed with a large-toothed comb.
Dry hair naturally or with a hair dryer.
The hairstyle turns out natural, with large curls.
This combined method of chemical perm is recommended for those who do not curl their hair with curlers.
Root perm
To make hair look lush and thick, as well as to make it easier to style, the root method of perm is used (Fig. 3). It is recommended for sparse or excessively grown hair after perm, as well as for hairstyles in which it is necessary to create volume at the roots of the hair.

Rice. 3 Root perm (a) and the resulting hairstyle (b)
The essence of the root method of curling is that not all the hair is curled, but only part of it at the root, leaving the ends of the strands straight or maintaining the same curl on them.
You can start wrapping from any area of the head. However, it must be borne in mind that if the hair has previously been permed, then the bobbin should be wound at a distance of 2 cm from the regrown part of the hair. For example, if the hair has grown 8cm, then the bobbin is installed at a distance of 10cm from the edge of the hair.
The strand is wound around the bobbin in a figure eight. In this case, the end of the strand is in the left hand, and with the right hand they hold the part of it that is located on the bobbin. Having done required amount turns towards the roots of the hair, the bobbin is secured with an elastic band.
Having twisted all the hair in this way, proceed to the next stage of their processing: apply to each bobbin chemical composition so that it does not get on the untwisted ends of the hair.
The exposure time is 10-25 minutes (depending on the hair structure).
All subsequent stages of root perm are similar to the stages of classic perm.
Spiral perm using modified bobbins
There are two ways to perform spiral perm (Fig. 4).

Rice. 4 Spiral perm (a) and two ways to perform it (b, c)
- A strand of hair is separated in the form of a square (starting from the lower occipital area), twisted into a rope and wound in a spiral onto a bobbin. In this case, the turns of the spiral are placed close to each other. The direction of twisting the tourniquet and the direction of winding it onto the bobbin must coincide.
- A strand of hair is separated in the form of a square (starting from the lower occipital zone), while it is not twisted into a bundle, but is immediately wound in a spiral onto a bobbin, placing the turns close to each other.
Corrugated perm (Fig. 5) begins from the lower occipital zone. Select a strand of hair in the form of a square and wind it tightly onto a plastic hairpin using the figure eight principle. Next, all the stages of classic perm are performed.

Rice. 5 Corrugated perm (a) and the resulting hairstyle (b)
With a corrugated perm, you get the same curl as with a perm using braids.
Perm on boomerangs
Perm on boomerangs (Fig. 6) allows you to get a voluminous curl. In this case, the bobbins are wound in a checkerboard pattern. All other stages are the same as in a classic perm. The width of the strand should not exceed the diameter of the bobbin.

Rice. 6 Perm on boomerangs
Perm with ring curls
Perm with ring curls (Fig. 7) is used to create volume on short hair. The hair is divided into strands in the form of squares, the size of which depends on the desired effect, and arranged in a checkerboard pattern. The larger the square, the more voluminous the resulting curl will be. The end of the strand is wrapped in a special piece of paper, the strand is twisted into a ring curl and secured with a non-metallic curler.

Rice. 7 Perm with ring curls
Preparatory work
To perform perm hair, you need the following tools and devices:
1) a porcelain or enamel bowl with a volume of at least 50–60 ml, stable enough so that it does not tip over during operation;
2) a polyethylene or any other non-metallic comb with a “tail”;
3) thinning razor for cutting hair ( experienced master can cut hair with a straight razor);
4) a measuring cylinder with a capacity of 50 ml with a division value of 5 ml;
5) wooden or plastic bobbins with elastic bands for fixing a strand of hair in a twisted state;
6) cotton wool and foam sponges measuring 10x10 cm for applying fixative to hair and 3x4 cm for applying the composition;
7) rubber gloves;
8) an insulated cap made of polyethylene or any other waterproof material.
Note: If the hairdresser has a PA-1 apparatus for steaming hair, there is no need to use an insulated cap.
Preparatory work before curling hair is carried out in the following order:
– external examination of the scalp and hair;
– checking the scalp for sensitivity to the chemical composition for curling;
– checking the condition of the hair when wetting it with the preparation;
– preparation of tools and devices for curling.
An external examination of the scalp and hair before curling is necessary to identify various diseases, in which perm cannot be done. Contraindications are pronounced irritations on the skin, scratches, cuts, ulcers, etc. If diseases of this kind are detected, you should refuse to perform a perm, and the visitor should be advised to consult a doctor.
When examining your hair, you need to pay attention to its condition. If the hair has previously been heavily bleached or dyed with any other dye, it is necessary to check it for tearing: if the hair is easily torn off when dry, perming should not be done. It is also not recommended to perm hair colored with Restorer or metal-containing dyes.
After an external examination, it is necessary to check the reaction of the client’s skin to irritation (idiosyncrasy) with the product with which the perm will be performed. It is most convenient to do this behind the ear, since this is where the effect of the drug will be most noticeable. Take a piece of cotton wool moistened with the preparation and apply the composition to the skin in the indicated place. After 8-10 minutes, the skin’s reaction to the irritant is already visible. In the absence of irritation (redness), we can assume that this drug is not contraindicated for the client and, therefore, perm can be performed. If pronounced skin irritation occurs, it is necessary to wash off the applied composition with a weak solution of hydrogen peroxide and rinse the skin with water. In this case, hair perm should be abandoned. If the hairdresser has a curling product of a different composition, you also need to check the skin's reaction to irritation and, if negative, perform a curl with this composition.
At the same time as checking the skin for irritation, it is necessary to check the hair's reaction to the curling product. This will help identify contraindications to curling that were not noticed during external examination. You need to take a small strand of hair and moisten it with the curling compound. After 1-2 minutes you need to try it to break. If the hair has retained its strength, then it is suitable for curling. If they have lost it and have a tow-like appearance, they cannot be curled with a composition of this concentration. In this case, it is necessary to dilute the composition with water in a ratio of 1:1 or 1:2 and repeat the test. In this way, you can find the required concentration of the composition or make sure that curling should be abandoned.
When preparing tools and devices for curling hair, the hairdresser must first make sure that everything necessary is available. It is especially important to have a sufficient number of bobbins with elastic bands of various thicknesses, as well as the necessary compositions for curling. You should check the sharpness of the thinning razor blade and, if necessary, replace it with a new one. All tools and devices should be laid out in their places so that the master does not waste time finding them while working.
Washing your hair before perming is a necessary and important operation. The quality of the curl depends on how well it is done. When washing your hair, your hair is cleansed of fat and other contaminants that prevent the composition from penetrating into the deeper layers of the hair. That is why this type of work requires the same attention as any other when perming.
Regardless of how much time has passed since the last time you washed your hair, you should always wash your hair before perming.
For washing your hair you can use various detergents depending on the degree of hair contamination. If your hair is very oily, it is better to use liquid toilet soap, which easily removes oil. For dry and normal hair Shampoos work well. It is recommended to comb your hair after washing your hair with a non-metallic comb, since hangnails and sharp edges on metal combs can damage hair that has been softened after washing.
The haircut model is determined by the style of the future hairstyle. A haircut is the foundation of a hairstyle. The shape of the hairstyle also depends on the shape of the haircut. It is advisable to cut hair before perming with a thinning razor - with its help it is easier to obtain different lengths of hair in each strand. Naturally growing hair can be of different lengths due to its constant renewal. This natural ratio in hair length has a greater influence on the duration of the perm. When cutting your hair, you must remember that the best results with perm can be achieved on relatively short hair - up to 15–20 cm. However, you can also curl longer hair.
When thinning your hair, the ends of the strands need to be made thinner so that they fit well in the hairstyle. On the neck and temples, if necessary, you can trim the hair with scissors. In this case, cutting off a thick layer of hair is not recommended. If the haircut is done correctly, there is no need to trim the hair with scissors.
Any haircut before curling should be done in such a way that even without curling, the hair has a complete, well-defined shape.
Curling hair with bobbins
After a haircut, which is done on wet hair, it is not at all necessary to dry it, especially under a dry dryer. When drying hair under the device, the stratum corneum of the hair hardens, as a result of which the curling preparation has difficulty penetrating through the scales of the surface layer. If there is a need to dry your hair, it is better to do so naturally. To speed up this process, you need to continuously comb them with a comb in different directions. Usually 5 minutes is enough to dry your hair naturally.
There is an opinion, curl wet hair This is not possible due to the fact that in this case the composition is diluted and the curl may turn out weaker. This opinion is erroneous, although in reality such dilution does occur. However wet hair They absorb the curling preparation much faster, and the required holding time does not increase, and sometimes even decreases. The curl turns out natural, and the hair better retains its original structure, which is very important factor, considering that the master’s goal is not only to get a good perm, but also to preserve the hair.
Before winding your hair with bobbins, you need to divide your scalp into sections (strands). The width of the strand should not exceed the length of the bobbin. If a strand of hair turns out to be wider than the bobbin, then when winding it will not be possible to position it strictly perpendicular to the axis of rotation of the bobbin. The latter is very important for getting a good curl. The strand of hair should be positioned and wound around the bobbin in a similar manner to the threads on a spool.

Rice. 155
Usually, the scalp is divided for winding into bobbins as follows: horizontal partings are made on the right and left sides of the head to the back of the head, approximately at the level of the eyebrows, so that the strand of hair on the crown matches the width of the bobbin. This strand of hair must be secured with a clip so that it does not interfere with subsequent operations. Then from the horizontal partings down to the ear on both the left and the right sides The head should be parted vertically, observing the established width of the strands. These areas must also be secured with clamps. Then you need to divide the hair remaining on the back of the head into three strands. To do this, you need to continue the horizontal partings made earlier at the level of the eyebrows from the back of the head down to the neck.


Rice. 156
Thus, the width of the middle strand of hair will correspond to the width of the strands on the crown of the head. After this, they move on to processing the side strands of hair behind the ears. Typically, on a medium-sized head, these strands of width satisfy the requirements. If the width of the strand exceeds the width of the bobbin, you can, for example, move the vertical parting a little back, behind the ear, and then, since part of the hair at the temple has become wider, separate a small strand from the side of the face for curling. This strand of hair is wound onto a bobbin in a vertical position.


Rice. 157
You should wear thin rubber gloves when curling your hair to protect your hands from contact with the skin. The operation begins with the middle strand of the occipital part of the head. It is not recommended to wet the entire strand with the composition. You need to separate a small part of it - 3-4 cm - and moisten it with the composition using a foam sponge about 3/4 of its length, starting from the ends. It is not recommended to wet the hair at the very roots to avoid the harmful effects of the chemical composition on the scalp. Having moistened a strand of hair in this way, separate a small part of it - about 1 cm (depending on the thickness and length of the hair) - and wind it onto a bobbin as shown in the figure.
When winding with bobbins, you need to carefully twist the ends of the hair, otherwise the broken ends will stand out from the total mass. The combed strand is placed on the palm of the left hand, then the bobbin, which is in the right hand, is brought under the strand, and at this time the ends of the hair of the prepared strand are grabbed with the thumb and forefinger of the left hand. In this case, the bobbin is held by the end with the thumb and forefinger right hand– this position is the starting point.


Rice. 158
Then the ends of the hair are placed on the bobbin so that they protrude on one side by 1–2 cm. Using the index finger of the left hand, bend the ends of the hair inward in the direction of twisting, and with the middle finger of the same hand press them to the bobbin. Pressing your hair with your right hand, you should immediately slightly pull the strand perpendicular to the surface of your head.


Rice. 159
After this comes the most crucial moment in winding: with the index finger of your left hand, with a quick sliding movement along the plane of the bobbin in the direction of winding, you need to bend the ends of the hair under the strand, and with the middle finger of the same hand, following the index finger, repeat its movement, as if securing it and pressing the hair to bobbin. At the moment when the index finger of the left hand begins a sliding movement along the plane of the bobbin, bending the ends of the hair under the strand, the index and thumb With your right hand, slightly loosening the tension of the strand, you should quickly rotate the bobbin in the desired direction. The correct grip of the ends of the hair on the bobbins depends on the synchronization of the work of the three fingers of the left and two fingers of the right hand.
To acquire the skill in performing these techniques, from the very beginning of mastering perm, you need to try to accurately follow the proposed recommendations. The fingers of the right hand should not hold the bobbin tightly - they seem to support it, so that if the ends of the strand are broken, the fingers, encountering additional resistance, will feel it. The process of twisting the first 1.5–2 turns must be carried out easy fast movement.

Rice. 160
Then you need to release the fingers of your left hand and move them to the left end of the bobbin, and the fingers of your right hand, slightly pulling the strand captured on the bobbin, take their original position for the final twisting of the bobbin. Using the same techniques, they wind the rest of the hair around the bobbins.
The thickness of the winding bobbins should be changed depending on the thickness and length of the hair. On the neck and other parts of the head where the hair is thin or short, thinner bobbins are used.
After the hair on the back of the head is twisted into bobbins, they are moistened with a curling preparation.
The next stage is curling the hair on the temporal areas, and then on the parietal areas. It is better to curl the hair on the crown of the head towards the forehead. When twisting each strand, you must ensure that the hair is pulled strictly perpendicular to the surface of the head in the treated area. IN otherwise the hair curls unevenly, that is, the lower part of the strands curls closer to the root and its curl is steeper, and the upper part is further from the root and its curl is weaker.
Compliance with the requirements when curling hair on all parts of the head (uniform distribution of hair over the bobbin, tension of the strands) ensures a good curl.
Having twisted all your hair into bobbins, you need to moisten it with a curling preparation and cover it with an insulating cap. The exposure time of the curling preparation on the hair in each specific case must be set depending on the property of the hair, the preparation used or at the request of the client.
When using a PA-1 steam hair treatment device, the exposure time is reduced by one third. To determine the required exposure time, you need to untwist 3-4 curls on different parts of the head and check the elasticity of the curl. Special attention You should pay attention to the curls at the bottom of the head, behind the ears - they usually curl somewhat more difficult than the rest of the hair. If the curl is elastic, you can proceed with subsequent operations in accordance with the technological regime for processing hair during perm. The exposure time of the solution on the hair depends on the type of hair: for soft hair – 18–25 minutes; for normal – 16–18 minutes; for hard ones – 12–15 minutes.
Rinse with water
To ensure that there is no curling agent left on the hair, rinse the head with a copious stream of warm running water for 4–5 minutes. Considering that the hair is curled, the procedure should be performed very carefully.
Curl fixation
After rinsing your hair, you can begin fixing the curls in a twisted position. For this purpose, the master prepares a special composition - a fixer, which is hydrogen peroxide of 3-5% concentration. You need to add a certain amount of soap shampoo to the fixer for viscosity. The fixer is prepared immediately before applying it to the hair and used immediately after preparation.
Fixer composition:
1. For short hair:
– 2 tablets of 6% hydroperite,
– 20 ml warm water,
– 15 ml of shampoo.
2. For long hair:
– 4 6% hydroperite tablets,
– 40 ml warm water,
– 15 ml of shampoo.
In the absence of hydroperite, perhydrol of 30% concentration is used.
Pour into a non-metallic container:
– 40 ml warm water,
– 15 ml of shampoo,
– 8-10 ml of perhydrol 30% concentration.
The resulting solution should contain about 5% hydrogen peroxide.
Having again tied a towel twisted into a tourniquet on the head to protect the face from the fixer, the latter is foamed with a foam sponge and each bobbin is carefully treated with it, generously moistening it with the solution. It is very important to evenly distribute the fixing composition between the bobbins. Since the component of the fixer - oxygen gas - evaporates very quickly, the fixing solution must be constantly foamed and moistened with it.
After applying approximately 1/3 of the entire solution and leaving the fixer on the hair for 5-10 minutes, carefully (so as not to unnecessarily stretch the curls) remove all the bobbins. Finally, apply the remaining fixer to the hair for another 5 minutes.
After this, rinse the hair thoroughly with water without shampoo.
Hairdressing
L.G. Gutyrya
126 rub

holds volume for a long time regardless of weather conditions; the powder can be used to style almost any hair - straight and wavy, manageable and not so manageable; it has a mattifying property, therefore, unlike the situation when hairspray or gel is used, the hair does not look greasy. In addition, the powder does not stick the hair together, allows you to maintain the naturalness of its movement, and does not weigh down the hair; modeling a hairstyle with its help is not at all difficult, even novice users can easily achieve the effect of romantic carelessness, the same as that of catwalk stars or other celebrities; a hairstyle created with powder can be corrected throughout the day: if it has lost volume, it can be restored simply by tousling the curls; with this product, hair is able to maintain freshness for up to 3 days; the modeling composition does not cause dandruff, does not weigh down hair, and does not stick together curls; when styling curls with powder, no comb is required; the strands look more natural than when using strong varnish; cosmetic product has an acceptable cost, one package lasts a long time; using powder on short strands You can create a fashionable “casual” hairstyle.
229 rub

Argan oil – contains 80% unsaturated fatty acids, including oligolinoleic acids and Omega acids 6 and 9, antioxidants, vitamins A, E, F and fungicides. Actively nourishes, intensively softens the scalp, protects it from flaking and dryness, and eliminates dandruff. Increases elasticity, smoothes hair without damaging the surface layer and enveloping each hair with a protective mantle.
226 rub
Wash your hair without massaging the scalp, dry your hair with a towel. Comb. Separate the strand with a zigzag parting and comb it along its entire length. Wind the bobbins (curlers) from bottom to top, moving it slightly to the right and left so that the hair is distributed evenly when winding (Fig. 241).
Choose the size of bobbins or curlers depending on the shape of the hairstyle. Small diameter bobbins (curlers) are designed for short hair that is difficult to curl. They provide wonderful lift to short hair up to 10 cm and gorgeous curls to slightly longer hair.
Large diameter bobbins (curlers) are designed for longer hair. They provide luxurious waves to medium length hair. The width of the strand should not exceed the length of the bobbin.
If the hair is very short, it can be styled in flat curls using plastic clips (Fig. 242).
Wind the hair evenly onto the bobbins, but do not tighten it too tightly so that the chemical composition can get into the lower layers of the hair (Fig. 243).

Secure the hair twisted onto bobbins with an elastic band in parallel or by twisting it in a figure eight (Fig. 244).
The direction of twisting hair onto bobbins is determined by the direction of the strands in the hairstyle, so you can curl hair from any area.
The thickness of the twisted strand is taken equal to the thickness of the bobbin or 0.5 cm along the scalp when regular hair. If the hair is very thick, you need to do a preliminary thinning of the hair. The ends of the hair in the strands have different lengths, and in order not to miss a single hair, paper spacers are used. They are placed at the end of the strand or wrapped around the end of the strand (Fig. 245).

Rice. 245. Wrapping the ends of hair strands when winding them on bobbins
2-3 spacers can be used for long strands when different lengths hair in them. It is desirable that the size of all strands be the same. The width of the strands is determined by the length of the bobbin or curler.
Most often, it is customary to place bobbins in rows, starting from the forehead towards the occipital area. Then the lateral and temporal zones are wound (Fig. 246).

| Rice. 246. Twisting the parietal zone | Rice. 247. Winding from bottom to top |
In the second row, the bobbins can be wound from bottom to top and placed with a slight bevel (Fig. 247).
To avoid strands breaking at the roots of your hair and to give your perm a more natural look, your hair needs to be moisturized. You can simultaneously curl the hair on the temporolateral and occipital zones, placing the bobbin axes in a checkerboard pattern (Fig. 248).

Rice. 248. Checkerboard winding
An excellent effect of naturally curled strands of medium length is achieved by placing the bobbins vertically in a circle (Fig. 249).

Rice. 249. Vertical winding of hair with bobbins
In the lower occipital zone, strands of the 1st row are separated with vertical partings and wound onto bobbins.
The 2nd row starts from the temple to the middle of the occipital zone. There should be no short, uncurled hair left.
The 3rd row is placed higher in the circle, the 4th - on the top of the head, and the strands are wound onto bobbins towards each other, that is, the first bobbin is twisted to the left, and the second to the right. As a result, the curls seem to continue each other, merging together, and have the appearance of natural curls.