For those who like all things to be in their place, but there is not enough space in the apartment, you can sew an organizer with your own hands from fabric. After all, such storage of things can look great and add zest to the interior. And also an organizer is an indispensable item for any needlewoman.
The organizer is named so because it can be used to organize workplace. Especially if you need to put your cosmetics, socks, underwear, shoes, shampoos and other small things in order, you can sew an original organizer with many pockets.

What can be stored in such pockets? Yes, anything - small things like thread, scissors, notepads, toys, cutlery, shoes and clothes.
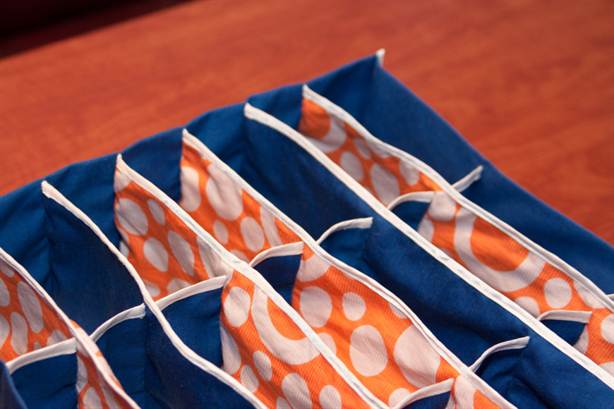
Organizing laundry
How to sew a laundry organizer with your own hands? The master class will help you do this quickly and easily.

To make such a laundry storage unit, you will need thick fabric, a wide ribbon, thick cardboard, scissors, thread and a needle.
- It is necessary to measure the width, length and height of the box where the organizer will be located. Based on the size, you need to draw it.
- After the diagram is drawn, you need to calculate how long the stripes of the internal partition will be.
- Then we draw a pattern of strips for the organizer on paper. There should be two flats, the width of the product and the same for the length.
- These strips need to be cut out and placed on the fabric, circled around them. Don't forget to allow an allowance of 1 centimeter.
- Then we draw strips of partitions. These walls must be equal in length to each other, those that will be the cell. And the second ones are the same in width, which will block the departments in the center of the organizer.

- You need to cut out the bottom of the organizer. The size depends on the size of the box where it will be placed.
- We cut everything out onto the fabric.
- Fold all the partitions in half and trim the edge with tape.
- Now they need to be sewn taking into account the pattern.
- We sew the walls between the partitions.
- Sew on the outer long walls.
- Sew the bottom of the organizer and tape the edges.
- Thick cardboard is inserted into the walls and sewn inside the walls.
- Here is the laundry organizer ready.
You can sew a shoe organizer in the same way. Only the cells should be much larger.
Convenience for the wall
An organizer that can be hung on the wall is an indispensable keeper for small items.

For the wall organizer you will need:
- Plain fabric and finishing fabric;
- Two buttons for eyelets;
- Elastic, which is needed for pockets;
- Double-sided application;
- Thick cardboard.
Pattern of a wall organizer for the nursery.

The first piece is made from the main fabric. The third one is for pockets. The next piece is for the sides of the pockets made from the main fabric.
I'm doing the organizer itself.
Having made a pattern on paper, cut it out and transfer it to fabric. We treat the pockets with bias tape to prevent the threads from fraying. Next, you need to glue the double-sided applique onto the pockets. You need to sew a side band to the pocket. To do this, place the pocket with the top part up, and apply the ribbon along the roundness of the pocket. And then we sew it on.


Need to turn it out side wall pockets and press seams. The edges of the pocket should be trimmed with bias tape made of colored fabric. You need to insert an elastic band into the binding, pull it a little to form folds, and sew it on the edges of the pocket. This is how we work through all three pockets. Sew the pockets to the main fabric. It's best to start with the bottom pocket. To make the organizer denser, you can insert cardboard.

We take another fabric and cut out two parts from it. The dimensions are shown in the diagram. On each side of the parts we leave a couple of centimeters for allowance. You need to sew a double hem seam. Sew on Velcro. The two parts need to be placed next to each other and the edges sewn together.


We apply the two edges of the organizer with the wrong side and sew them together. After the two parts are connected, you need to trim the edges with bias tape. Cover all edges of the organizer with bias tape. We make loops in the corners of the product from the binding and decorate them with a button.

Inside you need to insert cardboard, which is cut exactly to the size of the product.
Here the children's is ready wall organizer. Now you can please the kids and teach them how to maintain order in the room.
For cosmetics
This storage for cosmetics is a very convenient device that can help you save space and time on searching. necessary cosmetics. After all, it is known that women have many lipsticks and mascaras, eye shadows and various bottles. And these cells serve to organize the places for each cosmetic item.
What will you need? You can make such an organizer yourself from cardboard, fabric, wood, or metal.
Each needlewoman will choose the material for herself.


For residential premises - very comfortable and useful thing, which helps to streamline and organize not only everyday life, but also life. There are so many organizers! And for the closet, and for the hallway, and for the bathroom... Let's look at each type in more detail and maybe decide to make some of the organizers with our own hands.
Hallway organizer
To avoid clutter in the hallway from scattered small items (mittens, scarves, scarves), sew an organizer with pockets convenient for this purpose. Such an organizer, by the way, can be hung on a closet door or on the hallway door. From any thick fabric (you can use, for example, disused curtains), cut out two identical pieces measuring 40 x 80 cm (they can be cut to any size - if desired). Sew these pieces first with the wrong side up, and then, turning them right side out, stitch along the edges. Now cut four more strips from the same or another fabric that matches the color. From the strips, make four lines of pockets, each with three pockets (you can vary the number as desired). Tuck the upper edges of the stripes and trim them with beautiful braid or appliqué. Then add depth to each pocket using two folds that are not secured at the top (otherwise the filled pocket will protrude greatly). The entire stripe with folds is attached on three sides, as well as between the pockets. The bottom edge of the bottom line of the pockets is sealed with braid or finishing fabric, which will close the edge and strengthen the folds.
Phone organizer

How often do you find your pen or notebook missing when you're on the phone? This can be avoided by sewing a small organizer and placing or hanging it near the phone. The organizer is easy to sew - we sew a long and narrow pocket for a pencil or pen on a base of thick fabric. Another compartment, a little wider, is for an alphabet notebook. Or you can stitch a strip, and then use stitches to “make” pockets.
Bathroom organizer

The bathroom always has a lot of different necessary little things - brushes, creams, deodorants. In order for them to be in proper order and in a certain place, we suggest sewing a case. Depending on where it will hang, it can be made larger or smaller. It is better to make all the details of the pockets in different sizes, from fabrics with different patterns. You can also use oilcloth for the product. All parts are cut out along the grain thread with 1 cm allowances along the cuts. Each pocket is edged with bias tape. You can see how to properly edge parts in the master class. The finished width of the edging is 0.75 cm. The bottom pocket is made large, which should be carefully stitched to the base. A rail is inserted into the upper drawstring, which is attached to the wall. Don't forget the hanging loops.
Using the same principle, they make a case for storing necessary things in the kitchen (various brushes, powders, napkins) so that they are always at hand.
Organizer for small items
Pockets for storing small and small items (glasses, combs, knitting needles, scissors, etc.) can be of various sizes and shapes.

An organizer for glasses can be made from bright felt. Glasses are put away in a pocket specially designed for storing glasses. The organizer can be folded and fastened with a button, but you can also hang it on a wall or door handle near your workplace using a loop. This way, you are less likely to break or crush your glasses.

It is convenient if combs and necessary toiletries are always at hand, near the mirror that hangs on the wall. A small sachet will be useful for this.

Using the same principle, original pockets for scissors, a tape measure, crayons, and a thimble are made. Several spare buttons, pins, and small spools of thread will also be placed here. The case can be folded, in this form it will take up no more space than a wallet and will not weigh down the bag, but at the right time everything you need will be at hand. Thanks to such pockets, you can greatly increase the capacity of your wardrobe, and there is also room for many important little things.
Closet organizer

To sew the closet organizer, I used two types of fabric - flannel and chintz. I cut out 2 rectangles 40 x 80 cm from flannel and polyethylene. I stitched the edges together, leaving 10 cm for turning. I turned it right side out and sewed a finishing stitch around the edge. The base for the pockets is ready. I sewed pockets of different sizes onto the base. I made three large pockets. The lower, middle and upper pockets are rectangles approximately 25 cm high and about 50 cm long (40 cm is the width of the base and + 10 cm for folds and gathers). I gathered the top of the lower and upper pockets with elastic, and placed folds along the bottom of the pockets. The pockets turned out to be voluminous - they fit a lot of things. I sewed pockets on the top pocket - for handkerchiefs, creams, etc. The pockets are arbitrary in width and length. In order to prevent the pockets from sagging too much from an overabundance of things, I sewed and stitched loops to the base, and sewed buttons to the pockets. Buttons and loops can be replaced with Velcro tape (Velcro). I sewed such an organizer after reading the book “To Help Housewives.” I used some quotes from the book in this article.
Handicraft organizer
Organizers for handicrafts vary in purpose. A needlewoman who is interested in sewing will be interested in this one, which is easy to make with her own hands. For those who love to knit, you need a case for your knitting needles, which is made on the same principle as a case for glasses. The base is made of cardboard covered with fabric, the pocket and lintel are made of any bright patterned fabric. Height - 45 cm.
The frame of the craft box is covered with fabric. Pockets for scissors, knitting needles, glasses, etc. are sewn on before the frame is covered.

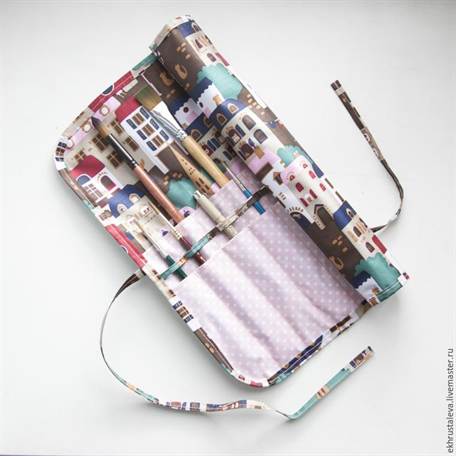
Organizer for the artist
An artist's folder can be made simply. Two rectangles of the required length and width, depending on the size of the sketches, are cut out of cardboard and covered with matting or harsh canvas. They are sewn together, wearing straps and fasteners are sewn on. You can make a beautiful applique from colored fabrics - for example, a jug for brushes and a cup for pencils. Or you don’t have to worry about appliqués and choose a beautiful outer fabric in stylish colors.

Organizer case for a child
To ensure that the toys and stationery that children usually use are always in their place and at hand, we recommend making a kind of case. For the case, you can use fabric with pockets of the same size sewn onto it. So that the case can be hung on the wall in the children's room, use a wooden ruler or strip, which is attached to the base with several straps. It is advisable to make the case and pockets from bright fabric. The entire product can be covered with thick, brightly colored fabric.

This is just a small list of organizers that you can easily sew with your own hands. However, in reality there are many more of them. You can find more ideas for sewing on the Samoshveyka website in the section.
In every apartment, many small items accumulate, which are often lost and do not have a permanent place. This situation occurs in a woman’s purse, in a needlewoman’s corner, in the hallway and in other rooms. To eliminate clutter, it's smart to make your own small items organizer. With its help you will quickly find what you are looking for. Thanks to the available compartments, you will always find keys, cosmetics, umbrellas, combs, gloves, toys and many other small things on time.
Bag organizer
A woman's handbag contains many small items that are often difficult to find. Moreover, transferring such items from one bag to another is tedious. An organizer for small items will help get rid of this problem. We will discuss in detail how to make such a product with your own hands in this article.
First, you need to draw a pattern that matches the size of the items that will be placed in the future product. We cut out a rectangle with dimensions of 24 by 65 cm and an allowance of 1 cm on each side, calculating that 2 compartments will be 14 cm wide, 3 compartments will be 10 cm wide, and one will be 7 cm wide.
Secondly, we select 2 cuts of fabric that interests you with harmoniously combined colors for the front and back sides. Using your pattern, draw a rectangle on each piece of fabric, then cut them out.
Thirdly, with a 1 cm allowance, sew two pieces on three sides, placing them right sides together. Turn the rectangle inside out through the unstitched area, straighten its corners using a ruler, sushi stick or needle, picking up small bends. Then sew the open side closed with a blind stitch.
Fourth, iron the piece and fold it widthwise so that the front of the pockets is 10 cm and the back is 14 cm. Sew the product on the sides, lay the lines to create pockets.
The resulting organizer can be rolled up and fastened with Velcro or a button. If the fabric is plain, then you can decorate the product with embroidery or appliqué. You learned how to make an organizer for small items. The master class reveals in detail the sequence of actions.
Organizer for the hallway
Things like keys, umbrellas, gloves, combs, creams and shoe brushes tend to get lost in the hallway at the most crucial moment. To avoid this and not be late for work or a meeting, you can sew an organizer for small items with your own hands. It is placed on the wall or the end of the cabinet and has several pockets of different shapes. Small compartments may contain small items, large - bigger things. In addition, the original panel will serve decorative element interior

How to sew pockets for small items with your own hands: master class
The basis of future pockets is made of dense, possibly furniture fabric. If necessary, the base can be duplicated with non-woven fabric. Pockets can be sewn from any fabric of a suitable color, which must be reinforced with a border. Pockets can be voluminous or flat. Volume is obtained by creating a fold along the bottom edge of the pocket.
The side sections of the compartments are processed with edging on the top. On the lower raw side, two opposing folds are laid. Next, you need to attach the pocket to the base at its future location, lower the top edge down, holding the cut with the folds. You will end up with an inverted pocket with the outside facing out. The part is attached to the base with the bottom cut, after which the pocket should be raised up. On the front side, the side cuts are stitched along the line of the bias tape.
Shallow pockets can be fastened with buttons or snaps. Such convenient organizer It’s not difficult to do it yourself for small things, and it will be appropriate not only in the hallway, but also in the bathroom.

Pockets for children's
To teach your child to keep the children's room clean, you need to have a lot of cabinets, chests of drawers, shelves, and drawers. A convenient option for placing small accessories, pacifiers, bottles, napkins, powders, diapers can be an organizer in the form of hanging pockets.
Every young mother is interested in learning how to sew pockets for small items with her own hands. A master class on creating a convenient device is described below.
We will need two types of fabric - the main one and for finishing, an elastic band that supports the pockets, and cardboard that strengthens the shape. The organizer can be either vertical or horizontal. Depending on the direction, the product can be hung on the wall, on the end of furniture, or on a child’s bed.
Cutting out products and sewing pockets
We cut out one part for the base for pockets 80 cm long and 35 cm wide. Next, we will need 3 parts for future compartments with dimensions of 20 x 30 cm. To make the pockets convex, we will make a wide sidewall for them, 60 cm long and 8 cm wide. Also necessary prepare bias tape 4.5 cm wide to trim the pockets and the perimeter of the product.
Then you need to round the edges of the compartments using a saucer. Finish the edges with an overlocker or use a zigzag stitch on a machine. Attach the side piece to the front side of the pocket and stitch from the wrong side. Turn inside out, iron, and edge the top of the pocket, including the side, with bias tape.
If desired, you can insert an elastic band into the binding and secure the ends at the edges. In this way we prepare 2 more pockets. Then we sew the pockets to the base, keeping the distance between them. You can strengthen the made organizer for small items with your own hands by cutting out one more piece of fabric and cardboard. Sew two parts on three sides, fold them over, process the top edge, leaving it open to insert cardboard. Edge the outer edges of the product with trim.
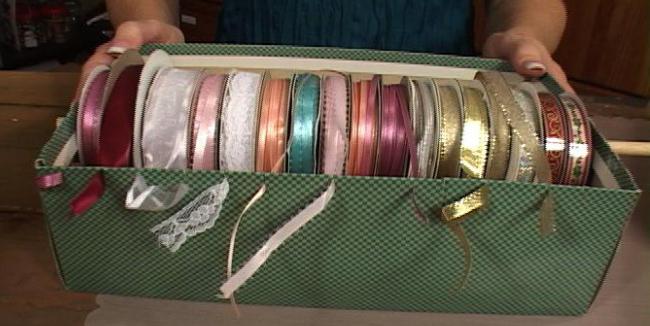
Ribbon Keeper
Any needlewoman accumulates a large number of small things, including meters of bias tape, braid and a wad of all kinds of ribbons. In order for all these items to always be quickly found, it makes sense to build How to store ribbons separately from needles, buttons, pins and other small items, we will consider in this part of the article.
To create a box for ribbons you need small box, fabric or self-adhesive paper, glue, eyelets, tools for their installation, whatman paper, colored cardboard. A suitable box with a non-removable lid can be purchased at the post office. You need to cut off the excess cardboard from the lid, leaving only the top. If the box is dark, it should be covered with either adhesive paper or white Whatman paper, and a cloth on top. The inside of the organizer is also covered with pieces of fabric. All allowances located on the inside of the lid and box are decorated with colored cardboard. Next, you need to install the eyelets on the lid and sides of the drawer using special tools. Now you can put the spools of tape in the box, and bring the ends out through the holes.
Convenient jewelry storage
Designers offer a glamorous solution for organizing space for decorations. Most often this is a panel placed on the wall near the dressing table. When making an organizer, you should take into account the interior of the room and the design of the dressing table. The panel must be correctly combined with the surrounding environment. Most often, to create an organizer, a baguette is used, on which, instead of a picture, burlap or canvas for embroidery is placed. Sometimes the fabric is replaced with wire, fishing line or colored ribbons, on which earrings and hairpins are placed. To hang beads, you can screw screws decorated with buttons or small decorations into the frame.

To summarize, we can say that organizers for small things can be made from anything. The main thing is to fantasize and not be afraid to experiment.
Organizer- an indispensable thing in the house for storing not only every little thing, but also some valuable things. Such a convenient and necessary thing can be purchased at any supermarket. Or you can use your imagination and do it yourself. And we will help you create an organizer for any occasion.
The main thing in the article
How to make an organizer with your own hands?
- Making a box for storing all sorts of things is not difficult even for a beginner. You will need material, stationery and some time.
- Organizer materials are usually created from , from things that are thrown away or, in rare cases, the necessary components are purchased.
Small organizer for hairpins and elastic bands with your own hands for beginners
Surely, more than one girl has experienced the mess in her hair accessories. There seem to be a lot of them, but they are not always in place. So, in order to put the elastic bands and hairpins in decent order, you need to put them in one place. The place should be beautiful and comfortable.
You will need:
- Frame;
- ribbons;
- hooks;
- glue;
- scissors;
- ruler;
Progress:
- Measure the photo frame and cut the ribbons according to size. Glue with reverse side with an interval of 3 cm.
- Then measure a sheet of cardboard and cut it to fit the photo frame, glue it over the ribbons on the back of the frame.
- Glue the hooks to the outside of the frame, placing them as you wish.
- Now you can hang the photo frame on the wall or place it on the table.
DIY stationery organizer
To find a pen, some people need to search the entire house and turn everything upside down. But if you have a stationery organizer, you won't have to go far to find pencils and pens.
You will need:
- pencil;
- tourniquet;
- 6 cans;
- paper;
- scissors;
- glue;
- spray paint;
- ruler.

Progress:
- Coat the jars with glue and cover them with paper.
- Make a handle as in the photo and wrap it with a tourniquet.
- Then paint the jars and set them to dry.
- Arrange the jars in pairs, insert a handle in the middle, and wrap everything with a tourniquet.
DIY underwear organizer: step-by-step instructions with photo examples

The creators of furniture for things did not think about how they would be stored there. And in most cases it suffers underwear. Few people always fold their laundry neatly. Therefore, you can use a little trick and add a linen divider to your closet.
You need:
- shoe box;
- glue;
- scissors;
- ruler;
- stationery knife;
- pencil;
- paper for design.
Progress:

DIY cosmetics organizer
Don't have time to buy a decent cosmetic bag for your beauty arsenal? Or do you have so much of it that your travel bag is bursting? Then a magnetic board for cosmetics will help you.
You need:
- large photo frame;
- magnetic sheet according to the size of the photo frame;
- small magnets for each beauty item;
- paper for registration;
- glue;
- scissors;
- ruler.

Progress:
- Measure the inside perimeter of the frame and cut the magnetic sheet along it.
- Do the same with the design sheet.
- Place a decorative sheet in the frame, then a magnet, and cover everything with the frame lid.
- Place magnets on all makeup items.
- Hang it in a convenient place.
- The organizer is ready, now you won’t lose anything and everything will always be in one place.
How to make a convenient jewelry organizer?
There is never too much jewelry, you just need to find a spacious storage for them. Various boxes take up a lot of space, and besides, the jewelry in them sometimes gets confused. Therefore we offer you Alternative option for storing jewelry.
You will need:
- frame;
- metal grid;
- pliers;
- spray paint;
- furniture stapler and staples for it;
- hooks

Master Class:
- Place the mesh on the back of the frame and secure with a stapler. Trim off any excess tails with pliers.
- Turn the frame over and paint it, wait until it dries.
- Hang hooks and you can hang decorations on them. By the way, some decorations may not require hooks.
Large shoe storage organizer
Storing shoes in boxes is not always convenient, and often it takes up a lot of space. So why not make one big shoe organizer?
You will need:
- plywood;
- electric jigsaw;
- roulette;
- pencil;
- wood glue;
- the beams are thin;
- self-tapping screws;
- sandpaper;
- iron rod;
- iron mechanisms for scrolling;
- dye;
- drill.


Progress:
- Cut circles from sheets of plywood; select the number of circles according to the number of pairs of shoes.
- Sand the edges with sandpaper.
- Cut out partitions from the beams for each section of the cabinet. Calculate that you need 6 pieces for one.
- Make a hole in the center so that the cabinet rotates.
- Assemble the cabinet: circle of plywood + crossbars + circle of plywood + iron mechanism and so on, repeating the steps.
- Thread a rod through all sections.
- Build a stand for the organizer and place the box on it.
- Paint the organizer, wait for it to dry, and place your shoes inside.
Headphone organizer
Often, headphones lie around and get tangled. This is very unpleasant and takes quite a long time to unravel. Therefore, we have prepared an interesting life hack for you so that your headphones are always in order.
Prepare:
- funny pictures 2 pcs;
- paper;
- glue;
- scissors;
- double sided tape.
Procedure:
- Cut out the pictures.
- Prepare a piece of paper measuring 5x10.
- Fold the piece of paper in half and glue a picture on each side.
- Secure on the inside at the top with double-sided tape.
- Now you can wrap your headphones around without worrying about them getting tangled.
- You can replace the paper with felt, and use buttons as a fastener.

DIY organizer for small items: ideas with photos
To organize small things in one place, it is enough to create an interesting place to store them. Then she will always be at hand. And creative boxing will fit perfectly into your .


DIY desktop organizer folder for papers and documents
Papers, like other work supplies, must be visible and in order. And so that they are always at hand and look good, build a storage folder yourself.
Required tools:
- colored paper;
- beer cardboard 2 pcs;
- glue;
- scissors;
- ruler;
- decorative paper.

Master Class:
- Cover the beer cardboard with paper for decoration.
- Cut the sheets of paper 1cm smaller on each side than the beer cardboard.
- Using 2 long pieces of paper, make an accordion out of them. Bend 1 cm at a time, and glue sheets after each span.
- Cut the paper for the crust and connect the cardboards as in the picture in step 4.
- Glue the accordion with sheets. Your folder is ready, fold the papers.
DIY organizer for handicrafts
Craftswomen have a lot of things that need to be stored somewhere. We suggest you make a box for small items.
You need:
- thick cardboard;
- glue;
- scissors;
- pencil.
Progress:
- On a sheet of paper, draw the future box in folding form. Draw a handle on top for convenience. On the second sheet, make a drawing of exactly the same box.
- Cut out the drawing, bend along the fold lines and glue.
- Place them back to back and glue them.
- Design the box the way you like and use it.
Try the option for storing ribbons and ribbons for this box you will need:
- shoe box;
- eyelets;
- paper for registration;
- scissors;
- glue;
- pencil;
- ruler.

Progress:
- Cover the lid and box with paper for decoration.
- Using a ruler and pencil, mark the points for future holes.
- Attach the grommets.
- Place the ribbons inside and thread them through the holes.
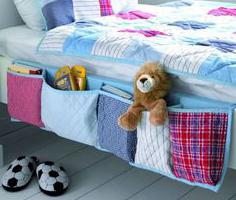
DIY crib organizer
For young mothers, we have prepared a convenient organizer that can be hung on the crib. You can put the most necessary things for your baby in it.
You need:
- textile;
- scissors;
- ruler;
- threads;
- sewing machine;
- binding;
- buttons or snaps.

Master Class:
- Decide on the dimensions and cut the fabric according to them.
- To seal the organizer, cut out exactly the same piece of fabric for the base, stuff your future organizer with a thin layer of padding polyester and sew it together.
- Make pockets of different sizes.
- Make handles for fastening.
- Sew trim around the edge, attach pockets and handles.
- Make a fastening from buttons or snaps.
- Your organizer is ready, use it to your health.
DIY kitchen organizer
For every housewife, the kitchen is her personal office, the place where masterpieces are created. Therefore, so that all the tools for creating unique things are focused in one place, we have prepared two versions of the organizer.
For the first option you need:
- adhesive wallpaper in 2 colors;
- cans of chips (Pringles);
- scissors;
- tape measure.

Progress:
- Measure the diameter and length of the can and transfer the data to the wallpaper.
- Cut out the required size and cover the jar.
- Draw a sign of the utensils that will be stored in the box on the wallpaper in a different color.
- Cut out the sign and glue it to the jar.
- Place the organizer in a convenient place. Such storages can be made for each group of items.
The second version of the organizer is designed for interesting storage of cups. For him you need:
- small boards;
- thick tourniquet;
- hooks;
- screws;
- screwdriver;
- staples;
- ruler;

Master Class:
- Connect all the boards with staples using a screwdriver.
- Make a fastening on the reverse side and tie a tourniquet.
- Screw on the hooks.
- Use chalk to write funny messages to decorate the board.
- Hang the organizer on the wall and hang cups.
DIY car seat back organizer
Some families need organizers for their car, especially those with small children. Just for such families, we have prepared a master class on making a hanging box.
You will need:
- textile;
- scissors;
- sewing machine;
- threads;
- Velcro;
- binding;
- straps;
- decorative elements.

Progress:
- Measure the seat of the front seat and transfer it to the fabric on the inside.
- Draw the pockets. Then cut out all the components.
- Sew the binding along the edge of the main fabric and onto the pockets on top.
- Sew pockets and straps for fastening.
- Add decorative elements.
- Now your child will not be bored, and things will always be in one place.
DIY car trunk organizer
Sometimes everything in the trunk is upside down. And it takes a lot of time to put things in order. But there is an alternative - make a wardrobe for things in the trunk of your car yourself.
You will need:
- soft fabric;
- plywood sheets;
- self-tapping screw;
- screws;
- screwdriver;
- pencil;
- roulette;
- glue/splitter with staples.

Progress:
- Measure the dimensions of the trunk and transfer them to a sheet of plywood to make the bottom. Then make the same lid.
- Saw the partitions according to the required height.
- Insert one at a time and secure with a screwdriver.
- Cover the lid with fabric, preferably similar to the one in the car interior.
- Secure it with a stapler or glue.
- Place an organizer in the trunk and put things away.
How to make a hanging bath organizer with your own hands?
An interesting organizer for the bathroom can be made from jars for storing cereals. To create such a thing you will need:

- board;
- jars for storing cereals;
- screws;
- screwdriver;
- round iron fasteners;
- ruler;
- pencil.
Work process:

DIY organizer made of cardboard with photo examples
Cardboard is a fairly dense material, so it is great for creating storage boxes. Moreover, the budget version of the organizer is suitable even for a beginner.


DIY organizer from boxes: step-by-step master class
There are boxes in every person's home. Only some people get rid of them as unnecessary trash, while others carefully keep them for a creative impulse. If you have accumulated a sufficient number of boxes of approximately the same size, then you can build a mini chest of drawers for storing small items. You will need:
- boxes 5 pcs, one high and 4 low;
- ribbons;
- paper for registration;
- glue;
- scissors;
- pencil;
- ruler.
Work process:
- Make three inner boxes of the same size so that they fit into one larger one.
- Place the fourth box up and glue it.
- Cover the boxes with paper and make handles for the drawers.
- Insert the drawers and your dresser organizer is ready.
Sew an organizer with your own hands from fabric: patterns and photo ideas
The organizer can be made not only from scrap materials, but also sewn from any fabric. This could be an old towel, jeans, tablecloth, or new fabric purchased.


DIY jeans organizer
Are your old jeans worn out? But this is not a reason to get rid of them forever. Give them a second life and they will pleasantly surprise you. You will need:
- jeans, several pairs;
- sewing machine;
- threads;
- measuring tape;
- scissors;
- pen.

Master Class:
- Open the pockets on all jeans;
- Cut the pant leg on one side and then mark a rectangle;
- Cut out a rectangular piece and sew pockets on it.
- Make a hanging handle from the remaining material.
Video: DIY organizers - little tricks
Making a box to store your favorite things is very simple, just use your imagination. And our magazine will help you with photo ideas and job descriptions. Store your stuff in cool designer pieces that you made with love.
To make the organizer you will need (the first number is the width):
Upper front part - 38*30 cm
Lower front part - 38*26 cm
Back -38*52 cm
Ties - 90*4 cm (for 6 ties 2 by 15 cm)
Pockets - 50*40 cm (2 pieces)
Elastic band - 38*2 cm
Sealant - 40*54 cm (I recommend making the sealant 1-2 cm wider than the fabric, so that if the fabric stretches, the sealant part does not end up being too small)
Seal - 40*5 cm
Fabric adhesive tape or non-woven fabric 20*3 cm.
After cutting the parts onto the ties, we glue them with non-woven material:
And iron it over a paper stencil 2 cm wide (photo from another MK):
Then in half again:
Then we bend the parts on the pockets in half so that we get parts 50*20 cm. And we sew the fold:
I pin paper with dimensions to the parts so as not to get confused. This is useful when you sew several identical products at once or the details of the product are similar.
Elastic bands can be inserted into pockets in different ways. IN in this case, I put the elastic inside the pocket parallel to the edge, align the center of the edge of the pocket and the elastic, mark the center with a pencil:
Then we pin, determining the center using a ruler:
And we sew in the center to fix the elastic:
Then we pin pins to the ends of the elastic or stitch it several times with thread to make it easier to pull out. I didn't do this, so there are no photos.
Next step: sew the pockets to the top and bottom front pieces. This is done the same way for both parts.
On the wrong side, we glue from the center of the bottom edge perpendicularly upwards with fabric tape or non-woven fabric in advance, so that the central seam is more secure:
Align the center of the pocket with the center of the part and pin it:
Then we sew along the center. I sewed the pocket with 3 seams: one in the center and two with an indent of a few mm to the right and left.
After this, we make folds 1.5 cm wide in the center:
And from the side (distance from the edge - 4cm):
We sew folds with an indentation of 0.5 cm from the edge:
Leave the pins used to pin the folds in the fabric for now.
We take out the elastic and pin it to the edge. Then we sew the pocket on the side:
Sew with an indentation of 1 cm from the edge.
Now it's time to sew on the seal. We start from the middle, pin the middle to the seal with pins:
And we sew two seams:
Then we pin the seal to the top edge and sew it with a regular stitch with an indent of 0.5 cm from the edge:
Then we baste the ties, 2 pieces at a time, to the top edge so that they are to the right and left of the fold line, if it is drawn up:
Sew it on.
Now we sew the seal to the front of the organizer. First we pin it down:
Then we add an indentation of 0.5 cm and trim the edges:
Then pin the back to the front along the top edge:
We also pin a narrow part of the seal there and stitch it with an indentation of 1 cm:
An additional sealing part is needed to make the edge more reliable and less deformable.
Then we chop and sew the front and back parts of the organizer, leaving a free section of about 20 cm at the bottom center:
Through it we will turn the organizer inside out. The margin when stitching the front and back is 1 cm.
We turn it inside out and pin the edges or baste them; the hole at the bottom is easier to baste:
Sew with an indentation of 0.5 cm from the edge.
The organizer is ready!


