Our review contains many ideas plus three detailed master classes.
Textile organizer with pockets
Based step-by-step master class to make the simplest basic model of a wall organizer, you can make any organizer - with more or fewer compartments, a wider or longer organizer, a bathroom organizer made of waterproof material.
You will need:
- A large piece of fabric for the double-sided base of the organizer;
- Smaller cuts are for pockets;
- Thin, durable plastic material to reinforce the base and pockets (if desired, you can use dublerin and glue it to the fabric with an iron);
- Ribbon or finished bias tape of sufficient length to cover pockets and the base of the organizer;
- Eyelets
Step 1
First, decide on the size of the organizer and pockets. For example, in this case we start from the dimensions of a standard A4 sheet - you can use it as a template. Cut out rectangles of appropriate sizes from plastic, and pieces of fabric twice the size, not forgetting a few centimeters for the volume of each pocket and good seam allowances.Step 2


photo: blog.spoonflower.com
Fold each pocket piece in half with the wrong side inward, place the plastic piece inside and topstitch.
Step 3


photo: blog.spoonflower.com
Iron the fabric on the sides inward like an accordion so that there are allowances on the sides.
Step 4

photo: blog.spoonflower.com
Topstitch the folded edges of the pocket. Do this for each of the pockets.
Step 5

photo: blog.spoonflower.com
Now let's get to work on the base of the organizer. Place the plastic part between layers of double fabric part.
Step 6

photo blog.spoonflower.com
Place the pocket pieces on the base and pin them in place.
Step 7


photo: blog.spoonflower.com
Sew the pockets to the base.
Step 8

photo: blog.spoonflower.com
Using a round object as a template, round the corners of the base.
Step 9

photo: blog.spoonflower.com
Finish the organizer in a circle with bias tape or ribbon.
Step 10


photo: blog.spoonflower.com
Mark the location of the eyelets and install them. Ready.
Options for textile organizers with pockets

photo: apartmenttherapy.com

photo: handmadepride.tumblr.com
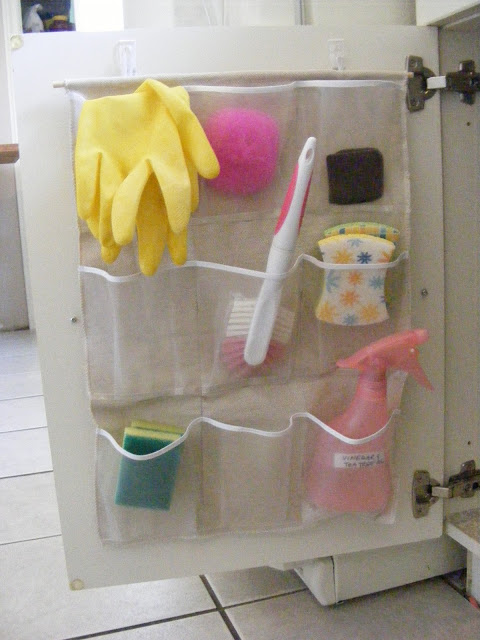
photo: imperfecthomemaking.com

photo: livesimplybyannie.com
A similar organizer can also be adapted for a bed.

photo: static1.squarespace.com
with your own hands
Organizer “plates” for the closet

photo: blog.spoonflower.com
If your closet does not have enough compartments with shelves, you can add them by sewing a similar organizer. It is useful in the bathroom, for example, for towels, and in the nursery - for toys, and in the hallway - for hats and scarves.
You will need:
- The same amount of fabric for the outer and inner sides (take dense, strong fabric);
- A piece of Velcro tape (Velcro) 10+ cm long;
- Thick cardboard or plastic to strengthen the organizer;
- Hanger
Step 1


photo: blog.spoonflower.com
Cut out the fabric and cardboard according to the diagram in the picture (the number is the number of parts).
12 pieces 23x23 cm (lining fabric);
2 pieces 23x32 cm (main fabric);
2 parts 20x23 cm (main fabric);
2 pieces 32x69 cm (main fabric).
Don't forget to add 0.5 cm allowances.
Step 2


photo: blog.spoonflower.com
Sew 20x23 cm pieces as shown in the picture. Turn them inside out, iron them, and sew on Velcro.
Step 3
photo: blog.spoonflower.com
Mark the middle of this part and sew two lines to the middle of one of the parts of the main fabric 23x32 cm.
Step 4


photo: blog.spoonflower.com
Connect this piece to one of the lining pieces. Sew the parts together as shown in the photo. Insert cardboard between the shelf parts.
Step 5


photo: blog.spoonflower.com
Lay out the finished back part of the organizer on the table and baste, and then stitch the outer fabric parts 32x69 cm. On one side, leave an unstitched section for turning.
Step 6
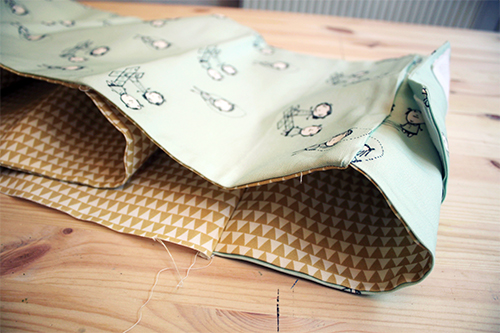
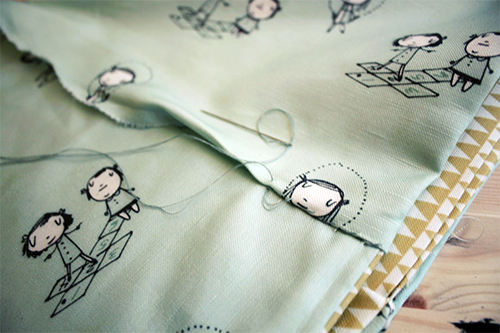
photo: blog.spoonflower.com
Turn it right side out and sew up the open section.
Step 7

photo: blog.spoonflower.com
All that remains is to attach the hanger with Velcro.
with your own hands
Wardrobe organizer options

photo: ebootcamp.org

photo: ebootcamp.org

photo: diyjoy.com
Options for organizing closet storage using homemade organizers
Storing shoes and bags:

photo: s-media-cache-ak0.pinimg.com
Shoe storage plus a “shelf” organizer option, supplemented with boxes:

photo: simplesdecoracao.com
Bag storage:

photo: cheapbuynsave.com
Shoe storage:

photo: casatemperada.blogspot.com
Homemade covers for clothes:

photo: amazinginterior-design.com
Bag organizer
Such an organizer will help, on the one hand, make a large bag that has no pockets more convenient, and on the other hand, it will make it easier to transfer everything you need from one bag to another. Very convenient for those who choose a new handbag for every outfit.This organizer is sewn from thin felt. We recommend this particular material: it holds its shape well and does not require processing of the edges.
You will need felt sewing machine, threads, scissors.
To sew an organizer, follow the instructions in the video:
Organizer options for small items:

photo: 1.bp.blogspot.com

photo: coupons.com

photo: craftbnb.com

photo: pdc2011.org
Today, when in family life there are quite a lot small items, organizing your home space is quite difficult. This problem can be solved if you make a wall organizer - of course, you can buy it, but a truly beautiful and unique accessory is obtained only when you put your own imagination and creative passion into it. By the way, such a thing can also be an excellent holiday gift for loved ones.
Making a wall organizer with your own hands: necessary materials
There are many cute organizers and from different materials, however, the easiest way is to show your Creative skills, sewing a pendant for storing small items from fabric. In order to make such an interior decoration you will need:
- piece of fabric minimum size which should be 50 by 50 cm - from a smaller piece it will simply be difficult to cut out pockets and the base;
- Scissors and needles for stitching material;
- Loops and hooks for hanging;
- Decoration elements. It is difficult to name any specific element - there are a great many of them, for example, in the photo below these are torn pockets from old jeans.

The process of making a craft comes down in general terms to preparing a fabric base for a wall organizer, cutting out the necessary pieces of fabric for pockets with your own hands according to the markings, determining how to attach the product to the wall and decorating the finished souvenir. On average, such work takes 3-4 hours and is quite accessible to beginning needlewomen. By the way, you can even involve children in it!
Let's look at the types of wall organizers and the nuances of their manufacture.
So, having decided for yourself that the organizer will be made of fabric or leather, you need to decide on the room for which this thing will be made. The hallway is the place where they are most often located. One of the simplest “stitched” organizer options is shown in the following photo:

This craft is not too bright, but it has a huge advantage: it is not easily soiled, and convenient pockets will allow you to place in the craft a lot of things lying around the entrance to the apartment - from keys to mittens and scarves.
Another convenience: this organizer can be hung on the door of a closet or hallway, or on the wall.
Take any thick fabric (for example, from old curtains), cut two pieces of the same size (the ideal option is 45 by 75 cm, but if you need other sizes, this is not forbidden). Then you need to sew these pieces with the wrong side up, and then, turning them right side out, stitch them along the edges. Next, cut 3 more strips of fabric of the same density and make three lines of pockets, each of which can have three (or more) pockets. The upper edges of the stripes need to be tucked in, decorating them with a cute ribbon or appliqué that suits the style.
The final stage of work is to give each pocket depth by artificially forming two folds along the edges. The stripes must be stitched on three sides, and it is also necessary to make a line separating the pockets.
The simplest organizer can be sewn so that there is order around the phone - no matter what room it is in. It looks something like this:

This DIY organizer can be not only wall-mounted, but also, if convenient, desktop-mounted. Taking a base of thick, brightly colored fabric, you should sew on it a rather long, narrow pocket for a fountain pen. In the adjacent, wider compartment you can store a notebook, and in an even wider compartment - a phone or smartphone.
The organizer is also very practical for the bathroom. If you plan to place it above the bathtub, you can make it small (30 by 45-50 cm). The best option would be when all the pockets are of different sizes, and to give the product “fun”, you can use pieces of fabric with different patterns from each other. Since we are talking about a bathroom, you can think about using oilcloth as a material.
A manufacturing feature is the need for edging of each pocket. A wooden rod needs to be inserted into the upper drawstring, with the help of which the storage of small items will be attached to the wall. It might look like this:

An organizer for small items can be placed in any room: in the kitchen, in the bedroom, sometimes in the living room. A special feature of the model under consideration is the asymmetrical arrangement of pockets and a random selection of fabric colors for them. This gives finished product a touch of recklessness and futurism.
For ladies, an organizer located on a nail near a mirror or dressing table will not be superfluous. There is no point in having pockets that are too large, since they are supposed to store miniature items. This means that ready-made pockets, torn from old jeans or women's trousers.
Finally, you can’t ignore the children’s room:

It is better to sew an organizer for storing small toys and office supplies from the thickest fabric in bright colors. It is better to make the pockets the same size and decorate them with cute appliqués. The craft is attached to the wall using a wooden strip, secured in several places with ribbons. On free space The organizer can contain information useful for the child, for example, the alphabet or multiplication table.
Video on the topic of the article
In this article we examined only the easiest crafts to make. For those who want to make a beautiful wall organizer from wood or plastic with their own hands or try to “complicate” the fabric version of the homemade product, the following videos are intended:
Greetings to everyone who has visited my page. Time is rapidly moving forward, and if just recently a mobile phone was a luxury, today it is no longer possible to imagine a person who does not have such a phone. Technical progress does not stand still and more and more programs related to work improvement are appearing mobile phones. Today I want to offer you. This can be done using the site hit-tool.com, which will help you anonymously gain access to blocked resources. The site has a huge variety of different applications, programs not only for Android. I think that by looking at the site everyone will find a lot of useful things for themselves, I advise you to use it.
And I also want to offer some interesting organizers for charging phones. There is not always a free shelf in the house next to the socket where you can put your phone. And these options, I think, will suit many. Craftswomen will be especially interested in them, because such things can be made with your own hands. I wish everyone great spring mood and creative success!


For residential premises - very comfortable and useful thing, which helps to streamline and organize not only everyday life, but also life. There are so many organizers! And for the closet, and for the hallway, and for the bathroom... Let's look at each type in more detail and maybe decide to make some of the organizers with our own hands.
Hallway organizer
To avoid clutter in the hallway from scattered small items (mittens, scarves, scarves), sew an organizer with pockets convenient for this purpose. Such an organizer, by the way, can be hung on a closet door or on the hallway door. From any thick fabric (you can use, for example, out-of-use curtains), cut out two identical pieces measuring 40 x 80 cm (they can be cut to any size - if desired). Sew these pieces first with the wrong side up, and then, turning them right side out, stitch along the edges. Now cut four more strips from the same or another fabric that matches the color. From the strips, make four lines of pockets, each with three pockets (you can vary the number as desired). Tuck the upper edges of the stripes and trim them with beautiful braid or appliqué. Then add depth to each pocket using two folds that are not secured at the top (otherwise the filled pocket will protrude greatly). The entire strip with folds is attached on three sides, as well as between the pockets. The bottom edge of the bottom line of the pockets is sealed with braid or finishing fabric, which will close the edge and strengthen the folds.
Phone organizer

How often do you find your pen or notebook missing when you're on the phone? This can be avoided by sewing a small organizer and placing or hanging it near the phone. The organizer is easy to sew - we sew a long and narrow pocket for a pencil or pen on a base of thick fabric. Another compartment, a little wider, is for an alphabet notebook. Or you can stitch a strip, and then use stitches to “make” pockets.
Bathroom organizer

There are always a lot of different necessary little things in the bathroom - brushes, creams, deodorants. In order for them to be in proper order and in a certain place, we suggest sewing a case. Depending on where it will hang, it can be made larger or smaller. It is better to make all the details of the pockets in different sizes, from fabrics with different patterns. You can also use oilcloth for the product. All parts are cut out along the grain thread with 1 cm allowances along the cuts. Each pocket is edged with bias tape. You can see how to properly edge parts in the master class. The finished width of the edging is 0.75 cm. The bottom pocket is made large, which should be carefully stitched to the base. A rail is inserted into the upper drawstring, which is attached to the wall. Don't forget the hanging loops.
Using the same principle, they make a case for storing necessary things in the kitchen (various brushes, powders, napkins) so that they are always at hand.
Organizer for small items
Pockets for storing small and small items (glasses, combs, knitting needles, scissors, etc.) can be of various sizes and shapes.

An organizer for glasses can be made from bright felt. Glasses are put away in a pocket specially designed for storing glasses. The organizer can be folded and fastened with a button, but you can also hang it on a wall or door handle near your workplace using a loop. In this case, there is less chance of breaking or crushing your glasses.

It is convenient if combs and necessary toiletries are always at hand, near the mirror that hangs on the wall. A small sachet will be useful for this.

Using the same principle, unique pockets for scissors, measuring tape, crayons, and a thimble are made. Several spare buttons, pins, and small spools of thread will also be placed here. The case can be folded, in this form it will take up no more space than a wallet and will not weigh down the bag, but at the right time everything you need will be at hand. Thanks to such pockets, you can greatly increase the capacity of your wardrobe, and there is also room for many important little things.
Closet organizer

To sew the closet organizer, I used two types of fabric - flannel and chintz. I cut out 2 rectangles 40 x 80 cm from flannel and polyethylene. I stitched the edges together, leaving 10cm for turning. I turned it right side out and sewed a finishing stitch around the edge. The base for the pockets is ready. I sewed pockets of different sizes onto the base. I made three large pockets. The lower, middle and upper pockets are rectangles approximately 25 cm high and about 50 cm long (40 cm is the width of the base and + 10 cm for folds and gathers). I gathered the top of the lower and upper pockets with elastic, and placed folds along the bottom of the pockets. The pockets turned out to be voluminous - they fit a lot of things. I sewed pockets onto the top pocket - for handkerchiefs, creams, etc. The pockets are arbitrary in width and length. In order to prevent the pockets from sagging too much due to an overabundance of things, I sewed and stitched loops to the base, and sewed buttons to the pockets. Buttons and loops can be replaced with Velcro tape (Velcro). I sewed such an organizer after reading the book “To Help Housewives.” I used some quotes from the book in this article.
Handicraft organizer
Organizers for handicrafts vary in purpose. A needlewoman who is interested in sewing will be interested in this one, which is easy to make with her own hands. For those who love to knit, you need a case for your knitting needles, which is made on the same principle as a case for glasses. The base is made of cardboard covered with fabric, the pocket and lintel are made of any bright patterned fabric. Height - 45 cm.
The frame of the craft box is covered with fabric. Pockets for scissors, knitting needles, glasses, etc. are sewn on before the frame is covered.

Organizer for the artist
An artist's folder can be made simply. Two rectangles of the required length and width, depending on the size of the sketches, are cut out of cardboard and covered with matting or harsh canvas. They are sewn together, wearing straps and fasteners are sewn on. You can make a beautiful applique from colored fabrics - for example, a jug for brushes and a cup for pencils. Or you don’t have to worry about appliqués and choose a beautiful outer fabric in stylish colors.

Organizer case for a child
To ensure that the toys and stationery that children usually use are always in their place and at hand, we recommend making a kind of case. For the case, you can use fabric with pockets of the same size sewn onto it. So that the case can be hung on the wall in the children's room, use a wooden ruler or strip, which is attached to the base with several straps. It is advisable to make the case and pockets from bright fabric. The entire product can be covered with thick, brightly colored fabric.

This is just a small list of organizers that you can easily sew with your own hands. However, in reality there are many more of them. You can find more ideas for sewing on the Samoshveyka website in the section.
Housewives come up with everything they can to organize the storage of things, because the comfort in the house depends on how skillfully they are placed. Hairpins and hair ties scattered everywhere, jars of cream and mascara, various tools, brushes and other little things create chaos and need their own home. To store them, let's make a beautiful and practical organizer from natural fabric with our own hands.
It can be sewn to store linen, for shoes that are not yet in season, for cosmetics, tools and other small items. In any case, the time spent on making it will pay off in comfort and order in the house.

If you still doubt whether you need such an organizer, let’s consider where and how it can be used.
We create a homemade organizer with our own hands from fabric
The organizer is called so largely because it allows you to organize space in the most effective way. If your closet contains socks or underwear There is chaos and it can be difficult to figure out where everything is, which means you don’t have an organizer. If cosmetics are piled up in a cosmetic bag, and there are countless jars in the bathroom, and it’s hard to figure out what they’re for, an organizer can help. Thus, it is indispensable:
- For storing underwear (socks, panties, tights, bra);
- For placing cosmetics and creams;
- For sorting spices and various kitchen items;
- In the hallway for storing keys, mail, leaving notes for family, for shoes;
- In the children's room, to keep the children's table and toys tidy and clean;
- For tools, be it the husband's hammers and files or the wife's sewing and knitting tools.

This is only a small part, and the organizer’s capabilities for optimizing space and making life easier for the housewife are limited by one thing – your imagination.
It is most convenient to place the organizer on the wall if it is a hallway or a children's room. It will also fit perfectly on a door or in a closet on a hanger. The linen organizer can be placed directly in the linen closet.

Now the question of whether an organizer is needed has disappeared by itself.
The simplest type of organizer that even a beginner can create is a wall organizer with pockets. To make it you will need:
- Fabric for base;
- Fabric for pockets;
- Sewing supplies;
- Cardboard;
- Sewing machine;
- Decorative elements.
You can easily sew an organizer on the wall by reading our master class. Before you start sewing, you need to determine what items require an organizer. Let's make a wall-mounted one for storing children's toys and stationery.
- Cut a rectangle from thick bright fabric the right size. The more things you have to store, the larger the organizer will be.
- Finish the edges of the rectangle by folding them 0.5 cm and stitching them on a sewing machine.
- Sew a loop in the center of the top edge, using which the organizer will be attached to a wall or door.
- Now it's the turn of the pockets. For children's stationery, as a rule, both small and large ones are needed. In the large ones you can store felt-tip pens, pencils, paints, and in the small ones you can store scissors, rulers and other things. We draw patterns on thick cardboard. These can be ordinary rectangles, semicircular pockets, triangular ones, or small strip holders for small items. Experiment with sizes and placement, because during use, not a single pocket will be left idle.
- From the fabric you have chosen for the pockets, we cut out blanks, not forgetting to add 0.5 cm on each side for seams.
- We determine where which pocket will be located and using sewing machine or a regular needle - whichever is more convenient, we sew them to the fabric.
- Now the most interesting part, in which the children for whom this organizer is intended will take part with great pleasure - decorating.

You can decorate the resulting product in a variety of ways:
- Give your child felt-tip pens, paints and markers and let him paint. Or let the child draw an object on each pocket that will lie there;
- Cut out pictures from fabric with a pattern and sew them onto pockets;
- Stick on the appliques;
- Sew buttons, ribbons, bows, flowers from fabric;
- Craftsmen who do embroidery can embroider a variety of pictures on canvas and sew them onto the organizer.
There are a huge number of decor options. Depending on the interior, resources, time and capabilities, you can create a wide variety of interior items.

Video on the topic of the article
There are many ways to create fabric organizers. In the video you can watch how other needlewomen do it and get inspired by ideas.


