On October 1, a wonderful holiday is celebrated all over the world, dedicated to the kindest and most caring people on the entire planet, our grandparents. It has been celebrated since 1991. As a rule, people who have reached retirement age are called elderly. They are so pleased to receive gifts from their children and grandchildren on such a significant day, especially if they are made with their own hands. In our master class we will tell you how to make cards for the Day dedicated to every elderly person, step by step and with high quality, with your own hands. And we will start, perhaps, with one not at all complicated postcard with a step-by-step explanation of the actions, as well as an attached photo.
Of course, this postcard is not at all like the masterpieces that are produced in printing companies and created on expensive machines, but it is the most beautiful and expensive, because it will be made by the hands of children for their beloved grandparents.
We make beautiful cards for the Day of the Elderly with our own hands
To make this card you will need the following materials and tools:
- colored paper, sheet of colored cardboard, A4 size;
- scissors;
- glue stick;
- a simple pencil;
- ruler.
- First we need to decide what size our postcard will be, what color, what text we will write, and only after thinking through all these little things can we start making it. First, let's prepare the elements for decorating the postcard. To do this, you will need to cut 9 circles, but you need them to have different diameters.
- The next step is to make cuts in them, dividing it into 16 equal parts.
- Then we begin to round the edges of the circle so that they remind us of the petals of a flower.
- Now we need to give them volume and to do this we begin to fold each petal in half.
- The result was such wonderful preparations for future flowers. Now we start collecting our flowers. We do it as follows: take the largest circle in size, add a medium-sized circle to it and then the smallest circle. We do this with three flowers. In the end they should look like in the picture.
- We take green paper and start cutting leaves to decorate our flowers.
- Having prepared all the decorative elements, we can begin assembling our postcard. We take the prepared sheet of cardboard and begin to attach all the elements one by one. First we attach the flowers, and then the leaves. We arrange them according to your imagination.
- Then we cut several thin strips and, using scissors, try to make a spiral, and then attach it to the card, again to your taste.
- The result is such a colorful and autumnal postcard, now all that’s left to do is to sign it.
- You can also, on the other hand, write some beautiful poem dedicated to our elderly people, or simply beautiful and very sincere words that will not only touch them, but also warm their hearts.
You can easily make such a card with your child at home, or you can offer to make it at school. It is suitable for children in grades 1-2.

Let's look at another master class on creating a postcard, but a little more complicated. It is suitable for older children, approximately 3-4th grade. This card will be made using the scrapbooking technique. For this we will need the following materials and tools:
- Sheets of colored paper;
- Pictures on the topic;
- Various figured hole punches;
- Scissors, either simple or curly;
- Glue.
Now let's start making the postcard itself:
- First, take a piece of paper, fold it in half, measure 5 cm from the edge of the sheet. Draw a line, then use scissors to cut the sheet exactly along the line.
- Then we take a sheet of a different color and, using curly scissors, cut off a one-centimeter strip from it.
- After we have prepared the base of the card, we proceed to the decoration. Using shaped hole punches we cut out flowers, twigs and butterflies. We bend the petals of the resulting flowers in half, and do the same with the leaves.
- Now we take a sheet of white paper and also use a hole punch to make strips, but 1.5 centimeters wide. We will decorate the card around the edges with them.
- After all the decorative elements are ready, you can begin to attach them to the card. You can stir it to your liking. You can first glue a postcard from your grandparents onto this postcard, and then decorate it with flowers, twigs, stripes and butterflies.

I present to your attention another fairly easy master class. For this we need:
- a sheet of cardboard, preferably white;
- sheets of colored paper;
- pieces of fabric;
- scissors;
- glue.
- First, you need to fold a sheet of cardboard in half, mark a window in one half and cut it out using scissors.
- The next step is to create a spread. Here we can paste a thematic picture or draw something. We can immediately write a congratulation, be it a poem or just words - wishes. Now you need to decorate the window on the back side. Take pieces of fabric and attach them on top so that they look like curtains. They also need to be secured at the bottom with strips of paper.
- Now you can start decorating the title page. To do this, you can embed various flowers, leaves, twigs and decorate it to your liking. The main thing is to do it with your soul.

Video selection on the topic of the article
In addition to our master classes, we will add a video on creating cards for the Day of Elderly People. Which will be useful and interesting in creating postcards on this topic. Happy creative success! And give pleasant emotions to your most beloved and dear grandparents!
On October 1, a wonderful holiday is celebrated all over the world, dedicated to the kindest and most caring people on the entire planet, our grandparents. It has been celebrated since 1991. As a rule, people who have reached retirement age are called elderly. They are so pleased to receive gifts from their children and grandchildren on such a significant day, especially if they are made with their own hands. In our master class we will tell you how to make cards for the Day dedicated to every elderly person, step by step and with high quality, with your own hands. And we will start, perhaps, with one not at all complicated postcard with a step-by-step explanation of the actions, as well as an attached photo.
Of course, this postcard is not at all like the masterpieces that are produced in printing companies and created on expensive machines, but it is the most beautiful and expensive, because it will be made by the hands of children for their beloved grandparents.
We make beautiful cards for the Day of the Elderly with our own hands
To make this card you will need the following materials and tools:
- colored paper, sheet of colored cardboard, A4 size;
- scissors;
- glue stick;
- a simple pencil;
- ruler.
- First we need to decide what size our postcard will be, what color, what text we will write, and only after thinking through all these little things can we start making it. First, let's prepare the elements for decorating the postcard. To do this, you will need to cut 9 circles, but you need them to have different diameters.
- The next step is to make cuts in them, dividing it into 16 equal parts.
- Then we begin to round the edges of the circle so that they remind us of the petals of a flower.
- Now we need to give them volume and to do this we begin to fold each petal in half.
- The result was such wonderful preparations for future flowers. Now we start collecting our flowers. We do it as follows: take the largest circle in size, add a medium-sized circle to it and then the smallest circle. We do this with three flowers. In the end they should look like in the picture.
- We take green paper and start cutting leaves to decorate our flowers.
- Having prepared all the decorative elements, we can begin assembling our postcard. We take the prepared sheet of cardboard and begin to attach all the elements one by one. First we attach the flowers, and then the leaves. We arrange them according to your imagination.
- Then we cut several thin strips and, using scissors, try to make a spiral, and then attach it to the card, again to your taste.
- The result is such a colorful and autumnal postcard, now all that’s left to do is to sign it.
- You can also, on the other hand, write some beautiful poem dedicated to our elderly people, or simply beautiful and very sincere words that will not only touch them, but also warm their hearts.
You can easily make such a card with your child at home, or you can offer to make it at school. It is suitable for children in grades 1-2.
Let's look at another master class on creating a postcard, but a little more complicated. It is suitable for older children, approximately 3-4th grade. This card will be made using the scrapbooking technique. For this we will need the following materials and tools:
- Sheets of colored paper;
- Pictures on the topic;
- Various figured hole punches;
- Scissors, either simple or curly;
- Glue.
Now let's start making the postcard itself:
- First, take a piece of paper, fold it in half, measure 5 cm from the edge of the sheet. Draw a line, then use scissors to cut the sheet exactly along the line.
- Then we take a sheet of a different color and, using curly scissors, cut off a one-centimeter strip from it.
- After we have prepared the base of the card, we proceed to the decoration. Using shaped hole punches we cut out flowers, twigs and butterflies. We bend the petals of the resulting flowers in half, and do the same with the leaves.
- Now we take a sheet of white paper and also use a hole punch to make strips, but 1.5 centimeters wide. We will decorate the card around the edges with them.
- After all the decorative elements are ready, you can begin to attach them to the card. You can stir it to your liking. You can first glue a postcard from your grandparents onto this postcard, and then decorate it with flowers, twigs, stripes and butterflies.
I present to your attention another fairly easy master class. For this we need:
- a sheet of cardboard, preferably white;
- sheets of colored paper;
- pieces of fabric;
- scissors;
- glue.
- First, you need to fold a sheet of cardboard in half, mark a window in one half and cut it out using scissors.
- The next step is to create a spread. Here we can paste a thematic picture or draw something. We can immediately write a congratulation, be it a poem or just words - wishes. Now you need to decorate the window on the back side. Take pieces of fabric and attach them on top so that they look like curtains. They also need to be secured at the bottom with strips of paper.
- Now you can start decorating the title page. To do this, you can embed various flowers, leaves, twigs and decorate it to your liking. The main thing is to do it with your soul.

Video selection on the topic of the article
In addition to our master classes, we will add a video on creating cards for the Day of Elderly People. Which will be useful and interesting in creating postcards on this topic. Happy creative success! And give pleasant emotions to your most beloved and dear grandparents!
In the Russian Federation, October 1, 2018 marks the Day of the Elderly. On this day, you can congratulate representatives of the older generation using postcards or crafts made with your own hands. Currently, there is a large selection of gifts on this day. It would be appropriate to congratulate an elderly person in prose. The main thing is that warm words in honor of the celebration are spoken sincerely and with all your heart.
With the help of a greeting card, you can show the importance of an elderly person for the modern generation.
It is worth expressing words of gratitude for the life experience that the older generation passes on to the younger generation.
The elderly should be congratulated on their triumph.
On this day, we should wish the heroes of the holiday long life and good health.
We need to show older people that they are very important in the modern world.
Crafts for Older Persons Day October 1, 2018
You can draw a picture of your grandparents. For example, the background of the image will consist of a house yard, with trees and a garden nearby. Grandchildren play near their grandparents and livestock roam. Flowers and other plants grow in the clearing. This image charges with positivity and the spirit of childhood.
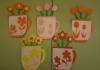
On the Day of the Elderly, you can make crafts in the shape of a human hand. You can attach images of a heart to your fingers. For this craft, you should take multi-colored paper. You should not use cardboard as it will be very difficult to hold its shape. This craft can symbolize the love that the younger generation gives to the older generation.
A handmade postcard would be appropriate for a gift on Elderly Person's Day. To do this, you can choose cardboard or regular colored paper. There are many variations of postcards. An interesting option would be a craft in which the edges are not smooth, but, for example, in the form of a wave. Inside the card you can attach a congratulatory photo or write warm words by hand.
On the Day of the Elderly, you can draw a poster for the older generation. You can also depict grandparents on it. A tree with autumn leaves will be drawn next to them. And in the middle there is a hand with a heart, which symbolizes boundless love for the older generation.
You can make a voluminous craft on Elderly Person’s Day. To do this, cut out flower heads from colored paper and bend the edges of the petals using scissors. The basis of the congratulatory craft will be in the shape of a heart. Flowers should be placed around the edges, and warm words of congratulations should be written inside the card.
Congratulations in prose on the Day of the Elderly, October 1, 2018
On this day, attention should be paid to the main heroes of the occasion.
The whole country celebrates the Day of the Elderly on October 1, 2018! I would like to wish you to always remain in a great mood. Have as many warm and sunny days as possible. May your health be strong all year round, and may the younger generation be always ready to come to your aid.
On this wonderful holiday, I sincerely congratulate the main hero of the occasion! I would like to wish you human happiness, more smiles and kindness. Let your family and friends always surround you with their support. You deserve the warmest words and admiration.
Happy Elderly Person's Day! Let kindness and care become your faithful companions in life. Have harmony and comfort within yourself. Let the nightingales sing in your heart, reminding you of the wonderful moments in life. Have a lot of friends and attention from loved ones.
Happy wonderful autumn holiday to you! I wish you to wake up with a smile on your face and have a wonderful time every day. Let your heart rejoice and laugh, as in your youth, and let your soul be filled with happiness. Have many pleasant meetings with interesting people, as well as good health.
Happy Senior Day! Let age not be an obstacle to the fulfillment of your most cherished desires. Have many joyful moments in life. May every day you live be filled with special love and happiness. Always remain a healthy and cheerful person.
Happy Elderly Person's Day! Let interesting moments from your youth warm your heart on cold autumn evenings. Continue your life path, discovering unknown events every day. Let the love of your loved ones inspire you to new discoveries and achievements.
What could it be DIY postcard for an elderly person? Firstly, it should be modest, without frills, and secondly, if you make any inscriptions on it, then choose a large font, and in general it is better not to use small details, since it will be difficult for an older person to see them and appreciate it.
Handmade gifts are now in great demand, and we decided to tell you some interesting options for what it will be DIY postcard for an elderly person, ideas their creation involves the use of various scrapbooking techniques. But don’t forget about the gift itself or a cute present, for example, it could be.
DIY postcard for an elderly person
So, first you need to think about what event it could be timed DIY postcard for an elderly person, photo ideas will help you choose suitable options.
For every veteran, the most precious holiday is Victory Day, and grandchildren should not forget to congratulate our grandparents on this memorable day. We invite you to make your own postcard dedicated to this day.
To complete it, you will need two sheets of red double-sided A4 cardboard, special scrap paper, 90 cm of pink satin ribbon (width 2.5 cm), 50 cm of green satin ribbon, regular and foam double-sided tape, 20 cm of St. George ribbon, three beads, “ Moment" transparent, pink and white sewing threads, stamp and ink pad.
One sheet of cardboard needs to be bent in half, and from the second, cut out a part whose size is 17 by 12 cm. Next, you need to cut out parts measuring 14 by 20 cm and 8 by 11 cm from scrap paper. You also need to take a photo of a military theme, image size 6.5 by 10.5 cm. You can print any photo you like on a printer.

Along the edge of the cut-out picture and the details of the scrap paper, you need to draw a stamp pad. Attach the St. George ribbon to a sheet of red cardboard using regular tape. Next, using regular tape, you need to secure the scrap paper, then the cardboard with a St. George bow. You can also buy black and yellow striped ribbon at a fabric and hardware store.
Next, you need to attach the picture to scrap paper using foam tape. Now we have the paper elements secured, and we can start making flowers that will serve as the main decorative decoration for the card.
First you need to take a pink ribbon and burn its edges with a lighter. It will take us 30 cm for one flower, so the piece must be cut into three parts. Next, bend the segment every five centimeters. Baste along the edge on one side, as well as along the fold, but on both sides, making small stitches. Pull and tie the threads, cutting off the excess.

The center of the flower should be decorated with a bead, placing it on Moment glue. Next, you need to make the leaves: cut the green ribbon into 10 cm pieces. Bend them in half lengthwise, then connect the ends of the ribbon, placing them on top of each other. The ends must also be scorched with a lighter.
Glue the leaves to the flowers using glue. Then the flowers and petals must be secured to the bottom of the card, again using “Moment”. Below, attach the inscription “Congratulations.”
Every modern child who attends kindergarten or school has grandparents. And, probably, many people know that a special holiday has been created for such people called the Day of the Elderly. Of course, this celebration involves a fun time with songs and dances for older people. Of course, the celebration is not complete without gifts that the children make on their own. In this article, we decided to present for you crafts for the Day of the Elderly so that you can make them with your own hands.
Best craft ideas
Presentation candy.
Everyone loves sweets without exception. Therefore, absolutely all people will be happy to accept this gift. To make this gift you should use:
- Small size candies
- Cardboard sleeve and chewing gum,
- Tape and wrapping paper,
- Paper, scissors and tape.
Progress:
- The cardboard cylinder is first wrapped in wrapping paper.
- On the left side the paper is secured with tape.
- The packing tape is tied beautifully in the next step. You can even make curls.
- Place sweets and gum into the right side of the cylinder.
- Now all that remains is to sign this gift and give it to the elderly person.

Chandelier made of pine cones.
If you decide to make a craft on the day of an elderly person, then you will probably be interested in many of the crafts that are offered here. Crafts for this holiday can also be created from natural materials. For another craft use:
- Screws half ring,
- Cones and sparkles
- PVA glue.
Progress:
- First of all, a screw is screwed into each cone.
- Glue is applied to the ends of the tops of the cones.
- Sprinkle glitter on the glue.
- Then, when the cones are dry, you can screw the cones to the chandelier.
- Such a useful gift will definitely prove useful to everyone.

Mosaic for a flower pot.
Another gift would look interesting and great. And if you are looking for children's crafts for an elderly person's day, then you can take a closer look at the next option. To make it, you should use the following materials:
- Several CDs
- Plastic pot and acrylic paint,
- PVA glue and scissors.
On a note! To create a craft you need pieces of disks. Therefore, the disc is cut using scissors. And it is recommended to do this with glasses.
Progress:
- The disk is cut into pieces that have different shapes and sizes.
- Glue is applied to the flower pot. Then pieces of the disk are gradually glued to the pot. In this case, space must be left between the parts.
- Cover the pot and let it dry.
- After the craft has dried, the space between the pieces of disks is painted with acrylic paint.

Original flowers.
An exhibition of crafts for the Day of the Elderly cannot be complete without something beautiful. Flowers are a traditional gift option. But it is best to give those flowers that will retain their beauty for a long time. The following materials are already used here:
- Flower wire and coffee filters.
- Watercolor and pliers.
- On a note! Instead of filters, thin paper is used, which can be corrugated.
Progress:
- For this craft, use 4 coffee filters.
- The filters are stacked in a pile, and then in half.
- In order for the petals to take on a beautiful shape, their edges are cut with a wavy line.
- The first half of the filters is set aside, and the other is cut off a few more cm.
- After that, the filters are unfolded and laid out on a flat surface. In this case, small forms are laid out on top of large ones. Then, the middle of the filters is pierced with wire. First, the wire is pierced in half and bent. Space is left between the holes.
- Use your fingers to squeeze the paper. Lifting it up and twisting it slightly. This is done with each filter.
- The base of the bud is then wrapped with wire.
- Green adhesive tape is wrapped around the stem of the flower right down to the base of the bud.
- If desired, the filters can be painted in the colors you like.

Flowers in a cone.
On the eve of this wonderful holiday, you can create a lot. For example, you can make a lot of beautiful crafts that children can also create. For the next product, take:
- Waffle cone and stationery knife.
- PVA glue, colored paper and scissors.
Progress:
- A quarter circle is cut out of a sheet of colored paper, through which a cone is wrapped.
- The same paper is wrapped around the cone, and then the ends are secured with glue.
- Now the petals are glued in a checkerboard pattern. This is done around the skewer. After that, glue is applied to the tip of the cone and the bud is glued to it.
- Leaves are cut out of green paper and then glued to the cone.

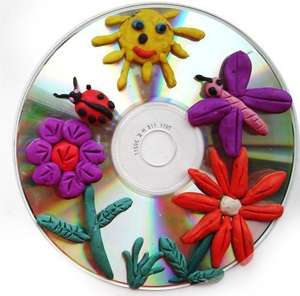
Gift panel.
We continue to list crafts for the Day of the Elderly that you will make with your own hands. Almost every home has old CDs. And just this item can be the basis for your craft. You will create this one from plasticine. From this material you can create completely different objects that will be glued to the disk. Using plasticine you can also create an inscription, for example, for your beloved grandmother or grandfather.
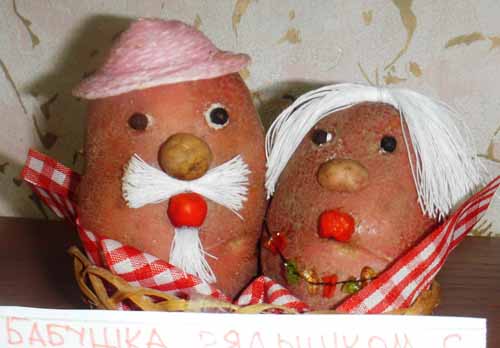
Unusual craft.
You've probably noticed that the next garden craft for Elderly's Day looks interesting. And indeed it is. To create it, vegetables were used, namely potatoes. Facial features are also created from berries and small tomatoes. And hair and beard can be made from threads.
Potatoes can be placed in some beautiful basket.
Felt craft.
An older child can always please his grandmother with something very beautiful. For example, her portrait can be made from felt. Everything is simple here. Pink and gray felt is used. The same material is used to cut out facial features and glasses for the grandmother.

Finally
Use these tips to create very beautiful products for your beloved grandparents.