The shirt is considered a fashion classic. It looks great in both formal and non-work settings and is an indicator of good taste and elegance. A hand-sewn shirt can add to a woman’s wardrobe or be an excellent gift for her beloved man.
Buy fabric. It is advisable to take material that is not too thick and not too thin. Then the shirt will be easy to sew, and the finished product will fit well on the figure. Fabric consumption with a width of 150 cm is equal to one back length and one sleeve length + 0.4 m, with a width of 110 cm it is two back lengths + one sleeve length + 0.5 m. You will also need non-woven fabric, which will be used to glue cuffs, pocket flaps, placket, stand-up collar. Make a paper shirt pattern. It can be copied from magazines or downloaded from the Internet and printed using a printer. There is another way. Open up the old shirt, iron the parts and trace their outlines on paper. Cut out the paper pattern pieces with scissors. Transfer the pattern onto the fabric. To do this, fold the material in half and pin the paper parts along the grain of the thread. Place the front piece at a distance of 1.5 cm from the hem, or 6 cm if the shirt has a one-piece placket. Place the middle of the back, collar and collar stand on the fold of the fabric. Pockets and flaps do not have to be cut out along the length. The plank can be one-piece or consist of two parts. Its details are also cut out in any direction. If the fabric is checkered or striped, be sure to match the pattern. After adding 1.5 cm (seam allowance) along all edges, cut out the pieces with scissors. To avoid ruining the shirt, first sew the seams with a needle and thread and try on the product. If everything is satisfactory, sew the seam using a machine. If there are yokes, sew them to the main parts. Sew the darts. Treat the middle section of the front with a strip, having previously reinforced it with non-woven fabric. Sew the shoulder seams.
By following our instructions, you can easily sew a shirt for yourself or someone close to you. It just takes a little time, patience and accuracy.
And then you can take on a more complex option - a shirt with a tie. They differ in that a summer shirt has a softer collar and you can use a brighter fabric for it, on which sewing errors are not so visible. For a classic shirt, the seams are made without overlocking, with closed edges, the so-called. closed seam. But you and I are learning, so we’ll start with simple seams. At the end of the master class I will show you the execution of sewing seams.))
The men's shirt for this master class was based on model 133 from Burda magazine 04/2006 and slightly changed, namely: the sleeve was lengthened, a cuff was added, for the collar with bones the shape of its corners was changed to accommodate a wide tie knot.
The cuff can be removed from a finished shirt, as can the sleeve length. The short sleeve lines of the pattern were extended downwards. On the back half of the sleeve, about a third, a cut line for the cuff is drawn along the bottom. The length of the cut is 12-15 cm. The excess width of the sleeve is folded before sewing the cuff.
Later issues of the magazine have both fitted and long sleeve shirts, so you can simply use a different pattern to avoid alterations.
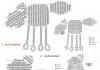
Here are more options for shirts made using this pattern: 


Decatation of fabric
First you need to choose a fabric and decorate it. Since the shirt is washed often, the fabric should be soaked in warm water, wrung out and dried. Then the wet cut needs to be ironed from the inside out to dryness. The main thing is not to iron the fold of the fabric, otherwise you won’t be able to get rid of it! Since to strengthen the collar we take adhesive calico of various densities, it also needs to be soaked in warm water and dried, because calico can shrink significantly when gluing.
Uncover
When cutting fabric into stripes, the fabric must be folded so that the strip matches the cross section of the cut, even if the edges of the fabric do not match!

The details of the yokes, collar, stands and cuffs need to be laid out not along the lobar, but along the transverse in order to change the direction of the strip. For convenient cutting, it is better to make the patterns of these parts as a whole, and not in half the parts, as in the magazine.
Cut out the shirt pieces with 1.5 cm allowances along all edges. Do not give a seam allowance along the long cut of the double one-piece strip at the front!
Small details (collars, stand-ups, pockets, cuffs, trims and facings of sleeve cuts) should be cut out with allowances of 1 cm.
Strengthening parts
Strengthen the collar, stand and cuff parts with an adhesive pad. Glue calico is best suited for this purpose. It is sold in various hardnesses.
Depending on which collar is needed - hard or soft, choose the degree of rigidity of the adhesive pad.
For a soft collar, the gasket is glued in one layer along with the allowances on the part.
For an office shirt with a tie, you need a stiff collar.

For a rigid collar, the gasket is glued in two layers. The first layer of gasket is glued to the part of the upper collar with allowances, and the second layer is glued on top of the first layer of gasket, but without allowances. You can glue the second time not the entire collar, but only the corners of the collar. This depends on the thickness of the adhesive pad. The thicker it is, the fewer layers are required.
Instead of a second hard layer of gasket, you can strengthen the ends of the collar with plastic bones - plates. In this case, you need to make drawstrings for the underwires on the lower collar. In a commercially made shirt, the pits may be hidden inside the collar.
Tip: since the collar is subject to heavy loads when worn and washed, you need to take a high-quality adhesive pad and iron it carefully, otherwise after several washes it will begin to partially come off or, as they say, bubble.
Sewing: shirt placket
Process the strips on the shelf parts. Most often in men's shirts there is a placket with two lapels, the so-called “double” placket and “men's” placket.
Double plank
When cutting along the edge of a double strip, no seam allowance is given. The width of the strip is from 2 to 4 cm. 
Iron the strip twice onto the wrong side of the front and stitch to the edge (at a distance of 1 mm from the fold).
But you don’t have to adjust the bar.
In this case, it needs to be basted in the middle after ironing. In the future, the loops and buttons will fix the bar and prevent it from turning away.
Men's plank
The “male” bar is made only on the left shelf for hinges. In this case, a regular double placket is made under the buttons. The width of the strip in the cut is 3-4 cm + 1 cm. Iron the strip 3-4 cm wide twice onto the wrong side of the front, sew a line at a distance of 5 mm from the fold, then turn the strip back and iron it. The cut of the strap was stitched in its fold. It remains to stitch the second fold of the strip at a distance of 5 mm.
Barrel shelf
Shown here are regular seams with overlocked edges. I will show you the sewing seams at the end of the master class. They are more complex and require more accuracy and sewing experience.) 
Sew the side of the shelf to the shelf from the side of the barrel, overcast the seam allowances together and iron to the middle of the shelf.

Sew the flange along the seam of the barrel stitching.
Double yoke
The yoke can be either single (consisting of one piece) or double. When sewing a shirt with a single yoke, the seam allowances for the front and back stitching are pressed onto the yoke. Finishing lines are laid along the yoke.
When sewing a double yoke, there is a little trick with which the seam allowances appear to be inside the yokes. How to do this? It’s very simple - you just need to roll up the parts of the shelves and back, then everything will work out! Since the cuts in this case are not processed with an overlocker, they need to be equalized, that is, trimmed to 5-7 mm so that they look more neat.

Place on one piece of the yoke and pin the details of the shelves and back.

Roll up the shelves and back onto the yoke.

Place the second yoke on top of the rolled parts, wrong side up.
Sew the details of the yokes, grabbing the shelves and backs lying between them. Trim allowances to 5-7mm.

Pull the shelves and back through the neck of the yoke.

Press the yokes and seams.
Sew the yokes along the stitching seams of the shelves and back, if provided for by the model. Stitch the neck edges of the yokes together.
Sleeve
The sleeves in a men's shirt are sewn into the armholes before sewing down the side seams of the shirt and the sleeve seams.

Pin the sleeve into the armhole, aligning the marks on the sleeve and the armhole.

Sew the sleeve into the armhole from the sleeve side. Overcast the seam allowance and press it onto the armhole (fronts, yoke and back).

Topstitch the shirt at the armhole along the seam.

Place the sleeve sections and the side sections of the front and back together, sew with one line, overcast the seam allowances together and iron onto the back.
Cuff and sleeve cut 
There are several ways to process a sleeve trim. We chose the simplest one (a description of other methods of processing a man's strap can be found in specialized literature).
Cuffs can vary in shape - rounded, straight or with a beveled corner, like ours, as well as in height - one or two buttons. Despite this, their processing does not change.
Sleeve cut 
Mark a 14 cm long slit on the back of the sleeve. Sew a placket from most of the sleeve along the slit. The plank should be 4 cm longer than the cut. The width of the plank is 7 cm (finished 2.5 cm).


Cut the cut, not reaching the edge of the line 1-1.5 cm. At the end of the cut, cut a triangle towards the end of the line and in the other direction from the cut.

Iron the long allowance of the placket onto the placket, and fold the other edge of the cut twice by 5 mm and stitch. Iron the resulting triangle at the end of the cut upward. 
Iron the placket onto the cut.
Iron the placket in half, overlapping the stitching line of the placket with the fold. 
Stitch the fold of the strip next to the stitching seam (at a distance of 1 mm from the seam). 
Fold the top edge of the plank into a corner. 
Sew the corner of the placket onto the sleeve. The distance from the corner to the transverse stitch is 3-4 cm. From the inside of the sleeve, this stitch grabs the fold of the small corner at the top of the cut.
Cuff
Reinforce the outer part of the cuff with padding along with seam allowances. Iron the bottom edge of the reinforced part of the cuff inside out. 
Stitch the pressed seam allowance to the cuff. 
Fold the cuff pieces face to face and stitch. 
Cut seam allowances in the corners and trim to 5 mm. 
Turn the cuff inside out and iron it. 
Place pleats along the bottom of the sleeve. The rule is this: the fold of the fold on the front side faces the cut. There can be several folds - two along the front (largest from the seam) part of the sleeve, and sometimes, if the sleeve is wide, another fold is added along the back of the sleeve. 
Place the cuff on the sleeve with the non-reinforced side from the wrong side!. Sew the cuff to the sleeve. Iron allowances onto cuff. 
Cover the stitching line with the fold of the outer cuff and stitch it to the edge (1mm).
Topstitch the cuff.
Collar without braids
Cut out the parts from the adhesive gasket: - along the upper collar and along the stand together with allowances - according to the pattern (pattern) of the upper collar and stand without allowances or only along the corners of the upper collar without allowances. 
First, iron the lining piece with allowances onto the upper collar from the inside out. On top of it there is a piece without allowances and (or) on the corners of the collar there is a piece of gasket without allowances. Carefully iron the gasket, hold the iron in one place for 20-30 seconds, then iron the part with steam. The part should lie flat until it dries and cools completely. In the same way, strengthen the part of the inner stand (the one that will be adjacent to the neck) with a gasket. 
Trim the lower, loose part of the collar along the top and side edges by 2-3 mm. Mark the middles of the upper and lower collars.
The collars must be absolutely identical before trimming! If they are not, equalize them first. 
Place the collars face to face and pin, aligning the cuts, thereby positioning the upper collar relative to the lower one.
Stitch the collars from the side of the lower (not reinforced and trimmed) collar. 
In the corner of the collar you need to make 1 transverse stitch, blunting it. When sewing collars, you need to set the stitch frequency to a minimum so that the trimmed allowances do not come out in the corners. 
Cut out allowances in the corners of the collar in three steps at a distance of 1 mm from the stitching. Step 1. 
step 2 and 3. Then trim the straight allowances at a distance of 5 mm from the stitching. 
Iron the seams of the top collar onto the bottom. 
Turn the collar inside out, straighten the corners and iron with a transition edge 1 mm wide on the side of the lower collar.
The transition edge is the transition of the upper collar to the lower one: it is made so that the stitching seam is not visible. Iron to a flat edge using a wooden ironing press.

Sew the lower edges of the collar to the width of the foot (5-7 mm). Fold the collar in half, check the symmetry of the corners of the collar and trim the lower edges so that they are even along the entire length. 
To stitch the collar evenly in the corners (this is where the stitching most often gets lost due to thickness), you need to pull an auxiliary thread through them. When turning the needle in the corner, you need to lightly pull the thread, then the machine will not slip and the stitching will turn out neat. For topstitching, the stitch width is slightly increased. 
Topstitch the collar to the desired width from the top collar side. 
For a more even distribution of rigidity, you can strengthen both parts of the stand with a gasket: The inner one (which is adjacent to the neck) - completely along with allowances, and the outer one - without seam allowances. 
At the inner stand, iron the stitching allowances into the neckline inside out. 
Topstitch the bottom edge of the inner stand at a distance of 7-10 mm from the fold, taking the edge of the ironed seam allowance. 
Place the collar on the outer stand (with the reinforced side up), place the inner stand on the collar, align the parts along the cuts, pin and stitch along the top cut of the stands. Please note: the bottom edges of the posts do not match, as the cut of one post is folded in! 
Tip: Before sewing the post pieces, fold them in half and check the symmetry of the ends of the collar and posts! 
Trim the allowances in the curves of the stand to 1 mm. Trim seam allowances to 5 mm.
Turn out the parts of the stand and iron them without a transition edge. 
Draw a line on the outer post along the fold of the top post. This will mark the seam for stitching the stand into the neck.
Sewing the collar
Pin the collar and thread it into the neck. Sew the collar into the neckline along the marked seam markings. 
Press the seam allowances for attaching the collar onto the stand. 
Pin and baste the folded edge of the stand, overlapping the stitching line for the collar with the fold. 
Sew the stand along the contour to the edge (at a distance of 1 mm from the edge). It’s better to start stitching from the middle of the top edge of the stand, so you will avoid bartacks in the corners of the stand, where it is thickest.
Collar with bones for office shirts
A collar with bones in manufacturing differs from a regular one only in that a part with a drawstring is first fitted onto the part of the lower collar (not reinforced with a gasket), into which the bones are then inserted. In this case, the upper collar is not glued at the corners. 
Cut out two corner pieces with the same allowances as the collar pieces. The width of these parts should be such that the collar bones fit on them along the bisector of the angle. 
Iron the inner cut of the parts inside out. 
Place the parts on the corners of the lower collar, matching the cuts, pin and place the bones along the bisector of the corners of the collar.
Draw the width of the seeds. 
Stitch the details along the folded edge and bone lines. These are the drawstrings for the bones.
Next, process the collar in the same way as described above for a hard collar. Insert the bones after sewing the shirt. Don't forget to take them out before washing and ironing your shirt!
Soft collar for summer shirts
They sew it in the same way as the hard one, only to strengthen it they take the thinnest adhesive pad. The parts of the collar, stand and cuffs are glued with a gasket in one layer. Tip: you can also use non-adhesive pads; they strengthen the collar more gently. In this case, the gasket is basted to the parts before grinding them down.
Shirt Bottom
Before processing the bottom, fold the sides of the shelves together and check their length, trim uneven cuts!
Fold the bottom allowance once by 7 mm, baste 1 mm from the fold and iron.
After this, turn the seam allowance up again by 7 mm, baste and iron. Only then will the hem of the bottom not worry and gather in curves. Stitch the hem to the edge (1 mm from the edge of the fold).
Loops and buttons
Mark the loops with an aqua marker (traces of such markings can be washed off with water).
The loops are marked in the middle of the front and sleeve strip and along it and along the cuff.
The loop should be 2-3mm longer than the diameter of the button.
Punch the loops, cut them, mark and sew buttons. You can cut the loops with a seam ripper. In order not to cut the loop further than it should be, a needle is inserted into the end of the loop across the loop.))
All! All that remains is to finally iron the shirt. Ready! 
Hello.
In this article we will learn how to build a shirt design.
Shirt-cut clothing is primarily distinguished by the parameters and configuration of the armhole. The dimensions of the shirt armhole are larger than the armhole dimensions of the basic dress design, and the configuration of the shirt armhole is wider and deeper. Therefore, the details of the shirt pattern - the back and the front - also differ in their parameters and configuration.
There are two ways to construct a shirt design: use constructive modeling of the basic dress pattern, or use the developed methodology for constructing a shirt design. In this article we will look at the second option.
To create a shirt pattern we will need the following measurements:
Name of measurements and symbols | cm |
|---|---|
Half neck circumference (Ssh) | |
Half chest circumference (Сг) | 40,5 |
Half waist (St) | |
Half hip circumference (Sb) | 44,8 |
Back length to waist (Lts) | |
Chest Height (Vg) | |
Shoulder Length (Dp) | |
Product length (Di) |
In this cutting technique we will consider two shirt silhouettes: semi-adjacent And direct. The shirt has a semi-fitting silhouette and suggests the presence of chest and waist darts, while the product is quite loose and dynamic. The shirt has a straight silhouette and has no darts, and the product itself is looser. As a result, the cut of these two silhouettes differs not only in the allowances for a loose fit, but also in some construction structures. To create a shirt pattern with a straight and semi-fitting silhouette, we will use the following allowances for a loose fit:
The increase along the chest line between the design details is distributed as follows:
Let's prepare a blank sheet of paper, the length of which is 5-10 cm longer than the measurement of the length of the product.
Drawing grid
Product length and width. Stepping back 5 cm from the top edge of a sheet of paper, draw a rectangle AA 1 H 1 H, where sides AN and A 1 H 1 are equal to the measurement of the length of the product, and sides AA 1 and HH 1 are equal to the measurement of the half-circumference of the chest with an increase for a loose fit (AN = A 1 H 1 =Di=68cm; AA 1 =NN 1 =Cr+CO=40.5+5.5=46cm). Please note, in this example I used an increase for a semi-fitting silhouette; if you are drawing a straight silhouette, then do not forget to substitute the corresponding allowances for a loose fit into the formulas (see the table above).
Armhole depth. From point A downwards in a straight line we put aside 1/3 of the measurement of the half-circumference of the chest + CO (see the table of increases) and put point D (segment AG = 1/3Cr + CO = 40.5: 3 + 9 = 22.5 cm). From point G to the right we draw a horizontal line until it intersects with the segment A 1 H 1, denoting the intersection point as G 1.

Back width. From point G we set aside 1/3 of the measurement of the half-circumference of the chest + CO (see the table for the distribution of the increase along the chest line) and we get point G 2 (segment GG 2 = 1/3Cr + CO = 40.5: 3 + 3 cm = 16.5 cm) . From point G 2 upward we will construct a perpendicular to the intersection with side AA 1, we will denote the intersection point as P.

Armhole width. From G 2 to the right, we will set aside 1/4 of the half-chest girth measurement + CO (see the table for the distribution of the increase along the chest line) and mark the point G 3 (G 2 G 3 = 1/4Cr + CO = 40.5/4 + 0.5 = 10.6 cm). From point G 3 upward we draw a perpendicular to the intersection with side AA 1, and denote the intersection point as P 1.

Waistline. From point A downwards, take the measurement of the length of the back to the waist and place point T (AT=Dts=40cm). From point T we draw a horizontal line to the intersection with side A 1 H 1 and denote the point of intersection T 1.

Hip line. From point T downwards, put half the measurement of the length of the back to the waist and put point B (TB=1/2Dts=40:2=20cm). From point B we draw a horizontal line to the intersection with the segment A 1 H 1, mark the intersection point B 1.

Side line. Divide the segment G 2 G 3 in half, denote the intersection point G 4 (G 2 G 4 = G 4 G 3), and lower the perpendicular from this point to the intersection with the bottom lines, denote the intersection point H 2, and the intersection points with the waist lines and hips - T 2 and B 2.

Auxiliary armhole points. Let us divide the segments G 2 P and G 3 P 1 into three equal parts, denoting the lower division points as P 2 and P 3 (see figure).

Building the back
Back neck cut. From point A to the right, we will set aside 1/3 of the neck half-girth measurement + 0.5 cm (for all silhouettes) and get point A 2 (AA 2 = 1/3Сш+СО=15:3+0.5=5.5 cm). Up from point A 2 we will set aside 3 cm (for all silhouettes) and mark point A 3 (A 2 A 3 = 3 cm). Let's draw the neck line with a smooth line, maintaining a right angle at point A.

Shoulder section of the back. From point P downwards we will set aside 3 cm (for all silhouettes) and place point P 4 (PP 4 = 3 cm). Now let’s connect points A 3 and P4, and on the resulting straight line from point A 3 we will set aside the measure of shoulder length + CO (see the table of increases) and put point P 5 (A 3 P 5 = Dp + CO = 13 + 1.5 = 14 .5cm).

Back armhole cut. Let's connect points P 2 and G 4 with a dotted line and divide this segment in half, and from the division point downward we will put 2 cm at a right angle and place point P 6.

Let's form a smooth concave line to cut the armhole, connecting points P 5, P 2, P 6 and G 4.

Back yoke. Let's put 8 cm down from point A and put point K (AK = 8 cm). From point K to the right we draw a horizontal line until it intersects with the back armhole line, and we denote the intersection point as K 1.

Down from point K 1 along the armhole line, set aside 1 cm and place point K 2 (K 1 K 2 = 1 cm). Connect point K 2 with a smooth line to the yoke line.

Constructing the front of a shirt with a straight silhouette
Shelf neck cut. From point G 1 up, we will set aside half the measurement of the half-circumference of the chest and place point P (G 1 P = 1/2Сг = 40.5:2 = 20.3 cm). From point P to the left we draw a horizontal line of arbitrary length.

Now from point P to the left and down we will set aside 1/3 of the neck half-girth measurement + 0.5 cm and mark points P 1 and P 2 (PP 1 = PP 2 = 1/3Сш+СО = 15:5 + 0.5 = 5.5 cm ). We connect points P 1 and P 2 with a dotted line, which we divide in half and from point P through this division point we set aside 1/3 of the half-girth of the neck measurement + 0.5 cm and get point P 3 (PP 3 = 1/3Сш+СО = 15:5 +0.5=5.5cm).
Let's draw a smooth line to cut the neck through points P 1, P 3 and P 2, maintaining a right angle at point P 2.

Shoulder section of the shelf. Let's build an auxiliary line by connecting point P 1 with the upper dividing point of the segment PG 2 (see figure), on this line from point P 1 to the left we will set aside the measure of shoulder length + CO and place point P 7 (P 1 P 7 = Dp + CO =13+2=15cm). Please note that now we are considering the construction of the front of a shirt with a straight silhouette, so the increase in the formula corresponds to the increase for a straight silhouette.

Front armhole cut. Let's connect points P 3 and G 4 with a dotted line, divide this segment in half, lower a perpendicular of 2 cm from the division point and mark point P 8.

Let's draw a smooth line to cut the armhole, connecting points P 7, P 3, P 8 and G 4.

This completes the construction of a straight silhouette shirt.

Our pattern is ready!

Construction of a shirt front with a semi-adjacent silhouette
Shelf neck cut. From point G 1 up, we will set aside half the measurement of the half-circumference of the chest + 0.5 cm and place point P (G 1 P = 1/2Cr + CO = 40.5: 2 + 0.5 = 20.8 cm). From point P to the left we draw a horizontal line of arbitrary length.

Down and to the left of point P, set aside 1/3 of the neck half-girth measurement + 0.5 cm and mark points P 1 and P 2 (PP 1 = PP 2 = 1/3Csh + CO = 15:5 + 0.5 = 5.5 cm) . We connect points P 1 and P 2 with a dotted line, which we divide in half and from point P through this division point we set aside 1/3 of the half-girth of the neck measurement + 0.5 cm and get point P 3 (PP 3 = 13/Сш+СО=15:5 +0.5=5.5cm). Let's draw a smooth line to cut the neck through points P 1, P 3 and P 2, maintaining a right angle at point P 2.

Shoulder cut and chest dart. To the left of point P 1 we put 4 cm and put point B (P 1 B = 4 cm), down from point B we put 1 cm, we get point B 1 (BB 1 = 1 cm). Let's connect points P 1 and B 1.

Let's add the lengths of the segments PP 1 and P 1 B (5.5 + 4 = 9.5 cm), subtract 1 cm from this sum (9.5-1 = 8.5 cm), put the resulting value to the left of point G 1 and place point G 5 (G 1 G 5 = PP 1 + P 1 V-1 = 8.5 cm). Let's connect the points G 5 and B 1, the segment G 5 B 1 is the right side of the chest dart.

Now let's build an auxiliary line by connecting point B with the upper dividing point of the segment PG 2. Draw a vertical line upward from point G 4 until it intersects with the auxiliary line; we denote the intersection point as O.

To the right of point O, on the auxiliary line we plot the length of the shoulder with an increase for loose fit minus the length of the segment P 1 B and place point B 2 (OB 2 = Dp + SO-P 1 B = 13 + 1.5-4 = 10.5 cm) . Next, from point G 5 up through point B 2, we draw a segment whose length is equal to the right side of the dart and we get point B 3 (G 5 B 3 = G 5 B 1).

Down from point O we will set aside 3 cm and place point O 1 (OO 1 = 3 cm). Let's connect points O 1 and B 3 with a thin line.

From point B 3 to the left along a thin line, set aside the length of the shoulder with an increase for loose fit minus the length of the segment P 1 B and put point P 7 (B 3 P 7 = Dp + SO-P 1 B = 13 + 1.5-4 = 10 .5cm).

Front armhole cut. Let's connect points P 3 and G 4 with a dotted line, divide this segment in half, lower a perpendicular of 2 cm from the division point and mark point P 8. Let's draw a smooth line to cut the armhole, connecting points P 7, P 3, P 8 and G 4.

Calculation of the solution of darts along the waist line. From the width of the product, we subtract the measurement of the semi-circumference of the waist with an increase for a loose fit (AA 1 - (St + CO) = 46 - (30 + 3) = 13 cm), the resulting result is the sum of the solution of all darts along the waist line, where
the size of the front dart opening = 0.25 of the total dart opening (13 x 0.25 = 3.3 cm),
side dart opening size = 0.45 of the total opening (13 x 0.45 = 5.8 cm),
back dart opening size = 0.3 of the total opening (13 x 0.3 = 3.9 cm).
Determining the width of a shirt along the hips. Now, from the measurement of the half-girth of the hips with an increase for a loose fit, we subtract the width of our product (Sb + CO-AA 1 = 44.8 + 4-46 = 2.8 cm), the resulting result is the amount of expansion of the product along the hip line.
Side cut. From point T2 along the waistline to the right and left, we will set aside half of the side dart solution (we calculated its value a little higher) and mark the points that we will connect with straight lines to point G4.

From point B 2 along the hip line to the right and left, we will set aside half the amount of expansion of the product along the hip line and put points that we will connect with smooth convex lines to the opening points of the side dart at the waist and extend these lines until they intersect with the bottom line.

Construction of a waist dart on the back. To the right of point T, set aside 1/3 of the neck half-girth measurement + 0.5 cm and place point T 3 (TT 3 = 1/3Сш+СО=15:3+0.5=5.5). From point T 3 to the right, we plot the value of the entire back dart opening and get point T 4 (T 3 T 4 = 3.9 cm).

We divide the segment T 3 T 4 in half, and through the division point we draw a perpendicular, not reaching 6 cm to the chest line, and 12 cm to the hip line, this perpendicular is the midline of the dart. Let's connect points 6 and 12 with the tuck solution points T 3 and T 4.

Clarification of the waist line and the bottom line of the shelf. From point T 1 we will set aside 1 cm downwards, connect the resulting point with the notch along the waist line along the side cut, maintaining a right angle at the point 1 cm. We will also set aside 1 cm down from point H 1 and connect it with a smooth line to the bottom line point along the side cut, while the angle at the 1 cm point should be straight.

Construction of a waist dart on a shelf. From the value of the segment G 1 G 5, subtract 1.5 cm, put the resulting value to the left of the 1 cm point along the new waist line and place point T 5 (1T 5 = G 1 G 5 -1.5 = 8.5-1.5 = 7 cm ). Let's connect points T 5 and G 5.

Along the new waist line to the left of point T 5, we will set aside the size of the front dart opening and place point T 6 (T 5 T 6 = 3.3 cm). Along the line G 5 T 5 down from the point G 5 we will set aside 6 cm, and connect the resulting point to T 6.

Divide the segment T 5 T 6 in half, and from the division point we lower the perpendicular, not reaching the waist line 12 cm. Now connect point 12 with points T 5 and T 6.

This completes the construction of the shirt.

If the shirt model has a button fastener, then the front must be extended along the neckline and hem line by the same distance - 1.5-2 cm and a new cut line for the front must be drawn. The resulting line is a half-skid line, and on the middle line there are buttons on one part of the shelf and buttonholes on the second part.
Fastener cuts can be processed in several ways:
Stitched strip ,

The width of which is twice the width of the half-skid, the length of the strip is equal to the length of the shelf along the half-skid line, while the upper cut of the strip repeats the cut of the neck of the shelf along the entire width of the strip.

One-piece plank ,

Its configuration is completed by extending the line of the bottom of the shelf by twice the width of the half-skid, and then a vertical straight line is drawn upward from the resulting point. The neck line on the bar is drawn symmetrically to the neck of the shelf relative to the half-skid line. When sewing a shirt with a one-piece placket, the placket itself is folded along the half-skid line to the wrong side of the product.

Supat clasp

It is a secret fastener; the buttons in such a fastener are hidden and are not visible from the front side of the product. The configuration of such a fastener is completed from a one-piece strip, extending the bottom line of the product to a length equal to twice the width of the strip. As a result, three widths of the strip are obtained along the bottom line; a vertical straight line is drawn upward from each width. The line of the neck of the fastener is drawn symmetrically relative to the line of the first strap. Along the half-skid line of the shirt, the fastener is bent to the wrong side, along the next vertical line the fastener is bent, and along the next vertical line the fastener is folded back to the wrong side and the cut line of the front (on the fastener) is stitched on the wrong side of the product. The fastener is built on only one part of the shelf, on which the buttonholes are located, and on the part with buttons only a one-piece placket is built.

A classic shirt is a universal item of clothing and you can always find a pair of such shirts in every man's wardrobe. It’s not difficult to sew them yourself, but it’s much more interesting and economical to use ready-made clothes to remake and create unusual and stylish models.
Knowing how to sew a baptismal shirt or dress for a girl with your own hands, you can significantly diversify your wardrobe. By giving old clothes a new life, you can emphasize your own taste and, by showing your creative ability to complement your own image, make designer clothing models.

Fashionable and stylish: sewing a shirt dress for summer
In the hot summer, you can look stylish and fashionable by adding hand-sewn, attractive and original items to your wardrobe. To sew a dress shirt, you need to pick up an old shirt, and to decorate the model, choose additional elements, decorative flounces and bows, straps and appliqués.

The sleeves and collar of the shirt are cut off, and additional bust darts can be used for an elegant look. Lush flounces sewn at shoulder level will give the model an exclusive look of a designer item, and patch pockets and appliqués will complement the overall style, helping to hide damaged areas of the material.

DIY sleeveless vest from an old shirt
A long-sleeve linen shirt will become a sleeveless vest that can be easily sewn yourself using the following sequence of steps:
- taking measurements for a future sleeveless vest and matching sizes;
- the sleeves and collar are repelled; they can be saved for other elements;
- marking the neckline and shoulder seams with the marking of horizontal darts;
- machine fastening of seams and choice of decor for the sleeveless vest.
By shortening the front length of the sleeveless vest, the back can be slit or the bottom can be finished off, rounded to the side seams, creating a truly stylish model.
 Shirt for girls: simple pattern
To sew a shirt for a girl with your own hands, just take all the necessary measurements and make a pattern similar to a man’s shirt. The only sewing nuance will be the obligatory addition of waist darts to the pattern, which will make the model more graceful and elegant, which will appeal to the little fashionista.

To decorate a shirt, you can use purchased decorative elements that you can make yourself. This can be embroidery, beads and beads, applique in the form of flowers or animals, patch pockets with decorative patterns, trimmed with grosgrain ribbons or lace.


How to use shirts and update your wardrobe
Having collected clothes that have gone out of fashion, it is better to think of what you can sew from a shirt with your own hands; the following ideas will be useful for this:
- a stylish top with or without sleeves, featuring a loose fit;
- beach tunic with short sleeves and cropped hem;
- beautiful and practical A-line skirt with buttons;
- original denim top with wide elastic for summer;
- vest with buttons or buttons with a partially open back;
- elegant blouse with airy sleeves in the form of lanterns.
You can combine several shirts in one product, creating stylish dresses and tunics, original and unusual blouses with decorations.

Original blouse from an old shirt
It’s not difficult to sew a blouse from a men’s shirt yourself; to do this you need to shorten the sleeves and reshape the collar. The turn-down collar easily turns into a stand-up collar, which can be decorated with original embroidery or complemented with a wide ribbon from the remaining fabric to imitate a tie.

The blouse pattern is complemented by horizontal and vertical darts corresponding to the measurements taken. Proper tailoring will allow you to highlight your elegant silhouette and diversify your wardrobe with an inexpensive but stylish item that is perfect for a party or going to work.


Dress for girls and original applique
When thinking about what to sew from old shirts, it’s easy to make a choice by coming up with an image for your child; a dress for a girl is sewn like this:

- on a large shirt you need to draw the pattern of the future dress, leaving the buttons and the bottom seam intact;
- the top of the cut out pattern is folded and stitched with a basting seam, like the rest of the joints;
- basting seams are sewn on a machine, excess threads are removed and decor or pockets are sewn onto the dress;
- Narrow grosgrain ribbons are inserted into the upper part and sleeves and gathered to create volume.
This unusual dress is perfect for summer walks, and is perfect for active children.

From identical shirts of the same color, you can sew a dress for a mother and daughter, or two sisters, paying tribute to modern fashion. This addition to your wardrobe will be a great option for saving your budget and an opportunity to highlight your own style by showing your creativity.

Photo instructions on how to sew a shirt with your own hands