The smart nails puzzle is a classic one, consisting of two identical nails.
The gap where the nails intersect is wider than the thickness of the nails themselves, so the nails can be connected to each other as well as separated without the use of force.
The apparent simplicity of this puzzle is what makes it great, and the solution to the puzzle is not as obvious as it seems at first glance.
This tutorial will show you how to set nails correct form and, of course, how to solve the puzzle itself.

Step 1: Bending Machine


The secret to creating this puzzle is understanding how to make 2 nails in the correct shape.
The simplest way is to create a bending device, which consists of two 7.5 centimeter metal rods and a wooden block. The rods can be made from two bolts by tightening them in a vice and cutting off the heads and threaded parts. The sharp edges remaining after the cut must be carefully sanded.
Using a 0.8cm bit, I drilled two holes in the piece of wood about 2.5cm apart. One hole was about 2.5cm deeper than the other - this is important.
Step 2: Clamp the bending machine in a vice


Metal rods need to be driven into the holes, and a wooden block must be tightened in a vice.
You can create a similar device using different materials and fixtures - the idea is that you need two strong posts mounted close together on a fixed base.
Step 3: Nails


I tried different nails, but the ones I liked the most were the 16D 3 1/2″ standard nails. Try making puzzles using several types of nails, or you can also make them with wire, to find the perfect one.
If the nails are coated with anti-corrosion grease, it is better to wipe them off, otherwise, by the time you finish the job, all this grease will end up on your hands.
Step 4: Bend the nails


Holding the nail firmly in the pliers, place it between the rods as shown in the picture and bend the nail around the longer rod.
It may take a few tries to get good results, but after a couple of bent nails you'll get the hang of it.
Step 5: Almost done

The nails should look like this.
Step 6: Clearance


The key is to get the correct gap where the nail crosses itself.
The gap should be slightly wider than the thickness of the nail itself.
If necessary, carefully tap the bent nail with a hammer until an identical nail cannot fit through the gap.
Step 7: Do more and more...

Obviously, you need two nails for one puzzle. But I recommend making a lot of puzzles simply because it will be a great gift for the people you come into contact with.
Step 8: How to Solve the Puzzle

First you need to put the nails together. The process is the reverse of how to separate them. The solution is in the second and third pictures - the movement requires a lot of rotation. The two nails should wrap around the midpoint where they touch.
Just play with them and apply a little force at different angles and you'll get the hang of it.
But, everything is not as simple as it seems, and for the joy of solving, I highly recommend following the photos just to collect the nails. And try to disconnect without peeking.
Bent Nails is a classic DIY puzzle that should delight you and anyone you give it to.
But first, a few words about what is best to make them from. Wire puzzles are usually made from medium-hard steel wire with a diameter of 2.5-3 mm.
Copper or aluminum wire is not suitable: it is too soft and does not spring well.
The wire intended for puzzles must first be straightened. Hold it tightly with your hands and pull it several times along a wooden cylindrical rod held vertically in a vice. Then sand until shiny with sandpaper.
Now determine the lengths of the individual pieces of the selected puzzle and cut off the corresponding sections with wire cutters. It is more convenient to bend the wire using a simple device - a piece of thick board into which thick nails are hammered at the places where the wire is bent.
Bend small rings and ears using pliers. To make large rings, you should prepare several wooden cylinders of different diameters in advance.
The finished parts of wire puzzles must be coated with 2-3 layers of colorless varnish. The parts (rings or staples) that are to be removed are blackened out in the drawings.
They should be filmed completely freely, you just need to figure out how to do it. Under the main picture of each puzzle there is an additional one that suggests the solution.
Star with a ring.
Diameter of a circle describing five-pointed star, — 100 mm. Ring diameter 1 - 30 mm. It is 10 mm smaller than the diameter of the ring of figured earring 2. The elongated part of the earring should fit freely into ring 1 and into the eye of the sprocket 3. (Fig. 1)
Anchor.
The anchor height is 120 mm and the width is 100 mm. The diameter of ring 3 is 30 mm, and the diameter of ring 1 is 40 mm. Part 2 should move freely at the base of the anchor. (Fig. 2)
Figured links.
The dimensions of each link formed by parts 2, 4 and 5 are chosen such that ring 1 can pass freely only in the position indicated in the lower figure. The diameter of ring 1 is approximately 30 mm, and ring 3 is 40 mm. (Fig. 3)
Zigzag staples.
The dimensions of these staples should be made as follows: staples 2 and 3 - 40X50 mm, and the middle staple 4 - .25X X50 mm. The diameter of ring 1 is no more than 35 mm. (Fig. 4)
And again brain hello! In this master class you will learn not only how to make it yourself a fun engineering toy to entertain guests or as a gift, but also a solution!
This simple puzzle is based on the laws of gravity and center of gravity. The solution to this brain toys seems simple, but most people still can't do it.
So, you need to install 14 nails on one nail, and the nails can only touch each other and must balance.
Step 1: Watch the video!

To get started, check out the presentation video of this puzzle:
Step 2: Template


For this homemade products you will need only 15 nails (800mm are quite suitable), one of which needs to be driven into the wooden base. It's simple!
If not, then draw it yourself
Step 3: Wooden Base


Attach the template to the wooden board and mark the holes for the nails. Next, using a drill slightly larger in diameter than the diameter of the nails, drill holes. The holes are not through, but only of the depth that will allow the nails to stand in the base. And cut the base from the board according to the selected dimensions.


On a router table, process the edges of the base, sand it with sandpaper, and then paint it with wood paint and strengthen everything with varnish. Leave the base to dry for several hours.
The work looks long, but in reality everything happens quickly. After drying craft almost ready!
Step 4: Center Nail


Simply, yes again simply, drive a nail into the base. Go ahead and try to solve the puzzle!
Remember the rules: all 14 nails must balance on the 15th, while touching only each other.
Step 5: Solution


First, place one nail on the table, place 13 more nails on it alternately on both sides, fasten the structure with the 14th nail, placing it on top, parallel to the lower, first nail. And then carefully, maintaining balance, place the resulting structure on the 15th nail, which is driven into the base. That's it!
Step 6: Another Challenge


I found that when the thing is balanced, the nails can be moved closer friend to a friend, and added more nails. I ended up with a design made from 23 nails! But you will be inquisitive, and maybe you will succeed
Tools/Materials
1. Hand drill
2. 3.5 cm drill
3. Compass
4. Grinding disc
5. Hacksaw
6. Two pieces from the board
7. 3.5 cm metal rod (4 pieces)
8. 6mm neodymium magnets
9. 3.5cm brass ring
10. Epoxy resin
11. Furniture varnish
Step 1: Forming the wooden part


The author cuts a circle from pieces of wood that are 1.2 cm thick. He used a band saw, you can use a simple saw. Having marked the center, he drew a circle with a diameter of 9 cm using a compass. Using a band saw, I cut out a circle that is larger than the mark made with the compass (about 0.3 cm). Then I rounded the edges, removing excess material with a disc or belt sander.
Step 2: Drill three holes


Using a compass, he drew new circle with a radius of 7.5-8 cm and divided the circle into 3 parts and drilled them. Drill the holes as deep as possible, but not all the way through.
Step 3: Cutting the rods


Using a hacksaw or angle grinder, he cuts the rod so that there are three pieces 5 cm long (3 rods) and one 4.5 cm long (this is the central rod, it should be shorter than the others). Using a sander or disc sander, the author removes the squiggles caused by cutting the rod.
Step 4: Drill the Center Hole


The central pin is the core of this puzzle. The author drilled one hole deep enough to align the magnet. This will be what holds the center rod, making it more stable. Then he drills another center hole as deep as possible without going all the way through. Then with a 3.5 cm straight bit, it will line the bottom of this hole. This will allow the center rod to slide as far as possible and allow clearance for the brass ring.
Step 5: Round the Edges


Using a router, the author adds small roundness to the edges of each circle. You can do anything to make them more beautiful view. You can draw something, cut, paste, etc.
Step 6: Sand and varnish


The author polished the discs well and smoothed out all the irregularities. Then he put the discs on the nails (he didn't drive them in) and applied furniture varnish
Step 7: Final Assembly


Wire puzzles.
I found several variants of puzzles on the Internet.
Making them is not at all difficult!!!
But first, a few words about what is best to make them from. Wire puzzles are usually made from steel wire medium hardness with a diameter of 2.5-3 mm.
Copper or aluminum wire is not suitable: it is too soft and does not spring well.
The wire intended for puzzles must first be straightened. Hold it tightly with your hands and pull it several times along a wooden cylindrical rod held vertically in a vice. Then sand until shiny with sandpaper.
Now determine the lengths of the individual pieces of the selected puzzle and cut off the corresponding sections with wire cutters. It is more convenient to bend the wire using a simple device - a piece of thick board into which thick nails are hammered at the places where the wire is bent.
Bend small rings and ears using pliers. To make large rings, you should prepare several wooden cylinders of different diameters in advance.
The finished parts of wire puzzles must be coated with 2-3 layers of colorless varnish. The parts (rings or staples) that are to be removed are blackened out in the drawings.
They should be filmed completely freely, you just need to figure out how to do it. Under the main picture of each puzzle there is an additional one that suggests the solution.
Star with a ring.
The diameter of the circle describing the five-pointed star is 100 mm. Ring diameter 1 - 30 mm. It is 10 mm smaller than the diameter of the ring of figured earring 2. The elongated part of the earring should fit freely into ring 1 and into the eye of the sprocket 3. (Fig. 1)
Anchor.
The anchor height is 120 mm and the width is 100 mm. The diameter of ring 3 is 30 mm, and the diameter of ring 1 is 40 mm. Part 2 should move freely at the base of the anchor. (Fig. 2)
Figured links.
The dimensions of each link formed by parts 2, 4 and 5 are chosen such that ring 1 can pass freely only in the position indicated in the lower figure. The diameter of ring 1 is approximately 30 mm, and ring 3 is 40 mm. (Fig. 3)
Zigzag staples.
The dimensions of these staples should be made as follows: staples 2 and 3 - 40X50 mm, and the middle staple 4 - .25X X50 mm. The diameter of ring 1 is no more than 35 mm. (Fig. 4)

The wire intended for puzzles must first be straightened. Hold it firmly with your hands and pull it several times along a wooden cylindrical rod held vertically in a vice (see Fig. A). If you cannot straighten the wire in this way; straighten it with a wooden hammer on a thick board, then sand it with sandpaper to a mirror shine.
Now you need to determine the length of the individual parts of the selected puzzle. To do this, each of them needs to be drawn on whatman paper in full size. Applying thin soft wire to the drawing, repeat the contours of the part. Then straighten the wire - you get the exact length of the desired part in unfolded form. Use it and cut off the corresponding sections from the steel wire with wire cutters.

It is more convenient to bend the wire using a simple device - a piece of thick board, into which in the places where the wire is bent (according to given dimensions) thick nails are driven in (see Fig. B). Bend small rings and ears using pliers. To make large rings, you should prepare several wooden cylinders of different diameters in advance. On them, as in the manufacture of a spring, wind several turns (see Fig. B). Then clamp it in a vice and carefully cut along the axis with a hacksaw - you will get rings. They must be carefully straightened, and the joints must be aligned so that the parting planes are almost invisible.
Cover the finished wire puzzle parts with 2 - 3 layers of colorless varnish - this will protect them from rust.
The parts (rings or staples) that are to be removed are blackened out in the drawings. They must be removed completely freely, without the use of force. You just need to figure out how to do it. Under the main picture of each puzzle there is an additional one that suggests the solution.
Please note that the description of the first two puzzles is given in more detail. Having mastered their manufacture, it will not be difficult to perform others.

1. STAR WITH RING. On the front surface of a thick board, use a compass to draw two circles with a diameter of 40 and 95 mm. Using a protractor, divide the circles into ten equal parts - on each, get centers, into which hammer nails with a diameter of 3-4 mm so that they form a five-pointed star pattern.
Cut off the head of the nails with nippers, and remove the burrs with a file. Use a soft wire to go around the contour - this is how the required length of the workpiece is determined. True, add to it an allowance for making two ears with a diameter of 20 and 10 mm. Now straighten the wire - get the length for the original workpiece.
Cut a piece from the steel wire, make ears at the ends and go around the outline again. The result is star 3 - the main piece of this wire puzzle. Make earring 2 and ring 1 from the same wire. The diameter of the ring is 25 mm, the earrings are 30 mm. The elongated part of the earring should fit freely into the ring and into the large eye of the star.
2. ANCHOR. The technology for making this puzzle should be divided into two parts. In the first part it is different from the one used in the previous puzzle. Determining the length of the workpiece will be quite difficult.
Therefore, you will not need soft wire. Cut a piece 300 mm long from the prepared steel wire.
On a cylindrical blank with a diameter of 20 mm, bend the ring exactly in the middle of the piece - an Anchor bracket is formed. Without removing it from the blank, twist the wire two turns.
Using pliers, bend the ends to form the “shoulders” of the anchor spindle. Using an additional piece of the same steel wire as a mandrel, bend a pair of loops on it for the rod. The horns and claws of the anchor can then be made using a board and nails, as in the Star and Ring puzzle.
In the figure, the width of the anchor can be taken as 85 - 90 mm, and the height as 95 - 100 mm. Take the diameter of ring 3 within 25 - 30 mm, and the diameter of ring 1 is 5 mm larger. Rod 2 should not be tightly secured in the anchor spindle - it should move with little resistance.
3. LOCK. Take the diameter of circle 2 within 110 - 120 mm. The diameter of its large ear is 15 - 18 mm, the small one is 10 - 12 mm. The diameter of key 1 is about 20 mm. His beard should fit freely into the ear of the circle.
4. BRACKET ON THE ARROW. Boom length 3 - 140 mm. At its ends there is a diamond-shaped tip with a transverse diagonal of 30 mm and a ring-shaped shank with a diameter of 10 mm. U-shaped bracket 2 has following sizes: shelf - 35 mm, sides - 30 mm. At the ends of the bracket there are loops with a diameter of 10 mm - they are connected to 4 rings with a diameter of 10 mm, put on the boom. Ring diameter 1 -25 mm.
5. TRIANGULAR SPIRAL. The contours of spiral 2 fit into a parallelogram measuring 140X80 mm. The diameter of its ears is 20 mm. Earring 1 should fit freely through the ear.
6. FIGURED LINKS. Ring diameter 1 - 30 mm. The diameter of the ring is 3 by 5 mm larger. Select sizes, parts 2, 4 and 5 at your discretion. The only condition: in the position shown in the figure, parts 4 and 5 must pass ring 1.
7. SNAKE. And this figure is " homework" to the reader: design and make it yourself, using the techniques for the previous puzzles, and also find out how to put the ring on the snake and remove it from the other end.
Each puzzle is assembled from two to four pieces made of steel wire. Among them there are triangles, trapezoids, spirals, stars, rings, pins, even animal figures.
Today we offer you eight wire puzzles from Davydov's collection. Let's tell you how they are made.
For puzzles you need steel, not very hard wire with a diameter of 2-3 mm. Download and draw each detail in full size (we show the most important dimensions in the figure). Then fine soft wire- copper or aluminum - measure the length of the part. From it you will find out the size of the workpiece for it.
It is most convenient to bend parts in a fixture. This is a not very thick board into which steel pins or nails are driven in where the wire puzzle piece has a radius of curvature. Small rings and ears are bent with round nose pliers. Large diameter rings are best bent on cylinders: wooden, plastic or any other.
Coat the finished wire parts clear varnish- then they will not rust.
Two triangles (Fig. A). The dimensions of the main figure 2 are 80x130 mm. The internal size of the diamond lug is 20 mm. Earring 1 should not go through the ear.
Curved axis (Fig. B). Axle length 3 - 130 mm, bracket dimensions 2 - 30x35 mm, ring diameter 1 - 20 mm. This ring should not go through right ring details 3.
Triangular spiral (Fig. B). The dimensions of the spiral 2 are 80x140 mm, the internal size of the eye is 20 mm. Earring 1 should go through the eyelet.
Triangles (Fig. D). The length of each side of an equilateral triangle is 2 - 40 mm. The dimensions of the legs of the right triangle formed by parts 3 and 4 are 40x110 mm, the diameter of ring 1 is 35 mm.
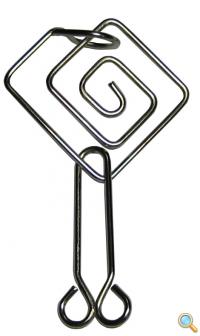
Square spiral (Fig. D). Spiral dimensions 2 - 70x80 mm. There is no need to solder the pin 1 to the ring - it should spring back.
Semicircle and bracket (Fig. E). The diameter of the semicircle is 2 - 70 mm. Bracket dimensions 3 - 40x35 mm. Pin 1 should pass freely through the eye of bracket 3, and its ring should be put on the curved protrusion of base 2.
Asterisk (Fig. G). The distance between the opposite ends of the sprocket is 3 - 70 mm. Ring diameter 1 - 30 mm. The height of triangle 2 is selected so that it passes through ring 1.
Two staples (Fig. 3). Ring diameter 1 is 50 mm, bracket sizes 2 and 3 are 60x120 mm, eye diameter is about 12 mm.


Puzzle "Elephant"
The point of the elephant puzzle, like many similar ones, is to remove the movable part from the main figure without bending or separating parts of the puzzle. And tangled nails must be learned to untangle and then tangled again.
So, to create a wire puzzle " Elephant" you will need (see Fig. 1):
- Wire. Steel is ideal, but it is difficult to bend, so we used aluminum to simplify and speed things up. For this purpose we bought it at the household. store aluminum wire with a cross-section of 4 mm and stripped it of insulation. In total, for one elephant, for example, you will need 90 cm of wire.
- Wooden plank.
- Small nails for filling the outline of the puzzle (about 30 pieces).
- An iron blank about 12 mm in diameter (a thick rod, for example) for making even rings.
- Printable puzzle template.
- Pliers, wire cutters
Progress:
I want to say right away that if you are going to make just one elephant, then you won’t need any boards with nails. The wire can simply be bent according to the drawn template. But if you need several such puzzles, then it makes sense to simplify this process.
Here are printable templates for two puzzles: "Elephant" and "Snail".
Glue the puzzle template onto the board (Fig. 2).
We hammer the nails along the contour. The main thing is that they are at all turns of the contour (Fig. 3).
We lay the wire along the contour of the puzzle (Fig. 4).
We secure the ends. The elephant is ready (Fig. 5).
Now let's move on to the removable part. To do this, cut two pieces of wire 14 and 15.5 cm.
At the ends of both pieces, we bend the rings around the iron blank (Fig. 6).
We bend the longer part in the form of the letter “P” (Fig. 7).
We insert one part into another (Fig. 8).
And now the task of the puzzle is to put (and if you’ve already put it on, take it off) the resulting piece onto the elephant (Fig. 9, 10).
After that, we persuaded Vitya to make a few more puzzles from this site. Katya can’t handle them, but when you show her the principle of solving them, she will happily assemble and disassemble the toy again and again :)
But these are store-bought wire puzzles next to an elephant and homemade nails.
You can make many similar puzzles using this principle.
Another type of wire puzzle is " Tangled nails ".
To create it you will need (see Fig. 1):
- Two nails 10 cm long.
- A steel rod of the same diameter as the nails (we used confirmat).
- Vice, pliers


