Stars have always occupied our lives important. Stars give light, warmth, show direction. Some are born under a lucky star, some make a wish when the star falls, some worship them, and some simply admire them on dark nights. We are all, in fact, children of the stars, because without them we would not exist... This symbol can be found everywhere on Earth. That is why, and also because it is simply beautiful, we will make stars of happiness out of paper.
For this we need strips of paper and a little time. The size of the strips is 1 cm x 23 cm or other sizes with a similar width to length ratio (1:23). Of course, the width can be greater, for example, if you use A4 paper, then with a strip length of 297 mm, its width can be made 11-12 mm.
To determine the size future star, you need to multiply the width of the strip of paper by 1.67.
Here are some ready-made calculations (width | length | star size):
- 1,0 | 23,0 | 1,67
- 1,1 | 25,3 | 1,84
- 1,2 | 27,6 | 2,00
- 1,5 | 34,5 | 2,50
Making a star
1-4. Bend a strip of paper around your finger and thread the tip of the paper into the resulting loop. We carefully tighten the resulting knot so that we get a neat pentagon.

5. It is desirable that the tip does not extend beyond the pentagon at all, but if this happens, then simply bend it in the opposite direction (step 5). And it’s even easier - cut off the excess)))
6-8. With the free end of the strip we begin to wrap the pentagon in a circle, in total you should wrap it 10 times in this way.

9-11. If the tip remains, you need to bend it (or cut off the excess) and hide it.
12. Here we have a blank star.

13, 14. Holding the workpiece, press the edge of the star with your fingernail, pressing it inward.

We repeat similarly with the remaining faces. Here you need to act especially carefully so as not to spoil the star.
And now our star of happiness is ready!
To decorate your interior, you don’t need to buy expensive interior decorations. You can do many of them yourself. For example, flowers and butterflies, pillows and paintings. As for the decoration of the festive interior, a star made with your own hands will look great both on the Christmas tree for New Year and Christmas, and on any other holiday. It can be hung from the ceiling, placed on a table, window sill, or placed on a shelf above the fireplace.
A star can be made from paper, you can sew a pillow in the shape of a star, and having cut it out enough big size, it will work out. We offer you several options for completing and collecting the star.
 You need a little experience or a man's help.
We will need:
- plywood or fiberboard: square with a side of 40 cm;
- round bar d=15 mm, L=1.5 m;
- three screws or screws;
- tinsel, rain or shiny serpentine;
- glitter spray paint;
- scissors, ruler, sandpaper, pencil;
- screwdriver, glue or glue gun, sharp knife, saw or jigsaw.
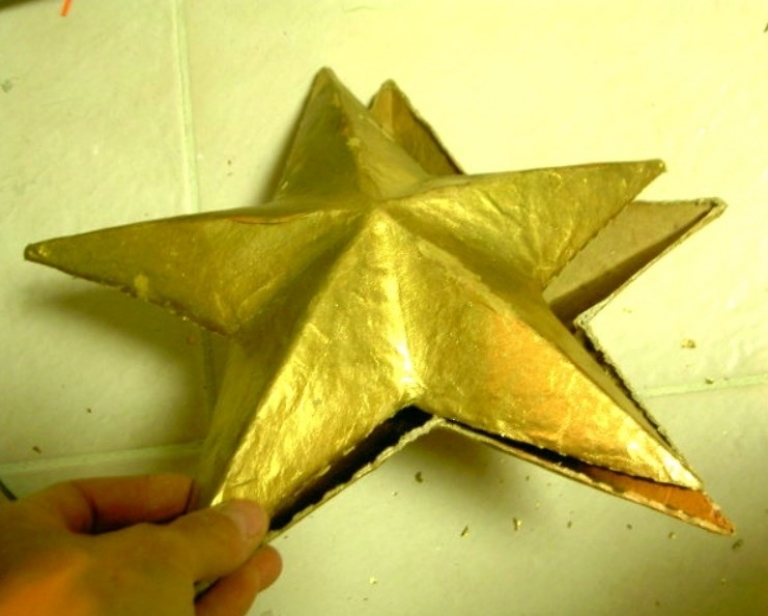
To make a star with your own hands, you need to draw an eight-pointed star on a piece of plywood or fiberboard. You can directly paint it on plywood or redraw it from a stencil. Cut it out with a jigsaw or file. Sand the edges.
Cover the star with spray paint. This should be done outside or on the balcony. Glue glittery tinsel to the star. You can paste over only the tips or the entire star.


We take the bar and screw the star to it with screws. We hang it or place it anywhere.
 This DIY paper star has a simple shape and is easy to make. You will need thick paper or cardboard in two colors.
In addition to paper, we need scissors, a pencil and a ruler. Draw a five-pointed star on paper. 
You can see how to draw it in the video.
You can leave it as is, or decorate it with a pattern, applique or tinsel. We cut out our blanks and make an incision, as in the photo. We insert one star into another. The star is ready.

Materials:
- colored paper;
- Printer;
- glue, scissors.
Using the template, we print out the star blank. The first template is for a small star. By printing the second template 2 times and the third 1 time, you will get a large star.
We cut out the blanks and bend them along the dotted lines. Glue one part to the other. Let the glue dry. The star is ready.


Very beautiful star made with your own hands from cardboard and glitter.
- cardboard from the box;
- scissors;
- glue;
- Polish for hair;
- dry glitter;
- tinsel;
- wire;
- pliers;
- scotch.
Cut out two identical five-pointed stars from cardboard. We have already told you how to do this.
Bend the star to make it voluminous. Glue with tape. Place crumpled paper or fabric inside for volume.
So that the star can be installed as a top on the Christmas tree, we place a wire spiral inside the star. To do this, a wire is tightly wound around a stick. Cut off the tip. Compare the length of the wire and the diameter of the skeins with the size of the star.
Lubricate the resulting star with glue and sprinkle generously with glitter. When the glue dries, spray the star with hairspray to prevent the glitter from scattering. The edge of the star can be decorated with tinsel. The star for the Christmas tree is ready.

It's easy and simple to make a star out of regular bottle with grooved bottom.
- We take 2 bottles with a star-shaped bottom as in the photo.
- Cut off the bottom so that there are no side parts left. That is, only the bottom.
- We cut the plastic between the bulges into a triangle. Try to do the same for both pieces.
- Glue the resulting stars together and attach a thread to them. You can put tinsel, glitter, beads, ribbons or sequins inside the star.


The star is ready.
 The star is not just a temporary decoration. It can also be practical if it is.
So let's take:
- fabric in two colors;
- any filler;
- needles, scissors, threads;
- large button;
- pencil, ruler, tailor's pins.

Step 1. Cut out identical triangles from the fabric with a side of, for example, 20 or 30 cm.

Step 2. Sew the triangles together, alternating colors (see assembly diagram). We sew both top and bottom.


Step 3. Sew the top and bottom, leaving a section for turning and filling.
Step 4. Turn it inside out, stuff it with filling, and sew up the remaining area.
Step 5. Wrap the button in fabric and sew it all the way through to the center of the pillow. So that it is sewn to both the top and the bottom.


Fluff the pillow. If you cut out larger triangles, you will get a floor pillow.
 Such a star can decorate not only the Christmas tree, but also any door in the room.
Materials:
- tinsel;
- wire or hanger;
- pliers.
We take a regular aluminum hanger and straighten it. We leave the hook - we need it.
We apply markings with a marker every 5 cm, starting from the place where the hook is twisted. Based on the size of the hanger. You can divide the length of the wire by the number of segments.
Following the marks, bend the wire in the shape of a star inward or outward.
We connect the beginning and end of the wire, forming a star. Call your husband for help - you will need strength. We bite off what is unnecessary and wrap the attachment point with tape. We wrap the star with tinsel. Glue the ends together so they don't fall apart.
For Victory Day, you can make a paper craft with your child in the shape of a three-dimensional star. It should be made using the origami technique from a simple red square sheet. The finished element can be attached to the front of the card, where red carnations and a St. George’s ribbon should be drawn in advance. Also an integral part of the postcard for May 9 is congratulatory inscription.
The star that we propose to learn how to make in this master class is not at all difficult to make; you will need to make several simple actions according to our step-by-step guide.
Necessary materials:
- scissors;
- pencil;
- ruler;
- square sheet of red paper.

Star folding steps:
We take a blank in the form of a square sheet of red paper. Bend the bottom part up in half.  Then you should bend the lower right corner up towards the center of the workpiece.
 We open it and then bend the upper right corner down towards the center.
 Open the bent corner. We get two diagonal fold lines on the right side.

Then we'll work on the left side. To do this, bend the lower left corner directly to the center of the intersection of the two diagonal lines on the right side.

We return the corner to the left side, creating a fold.

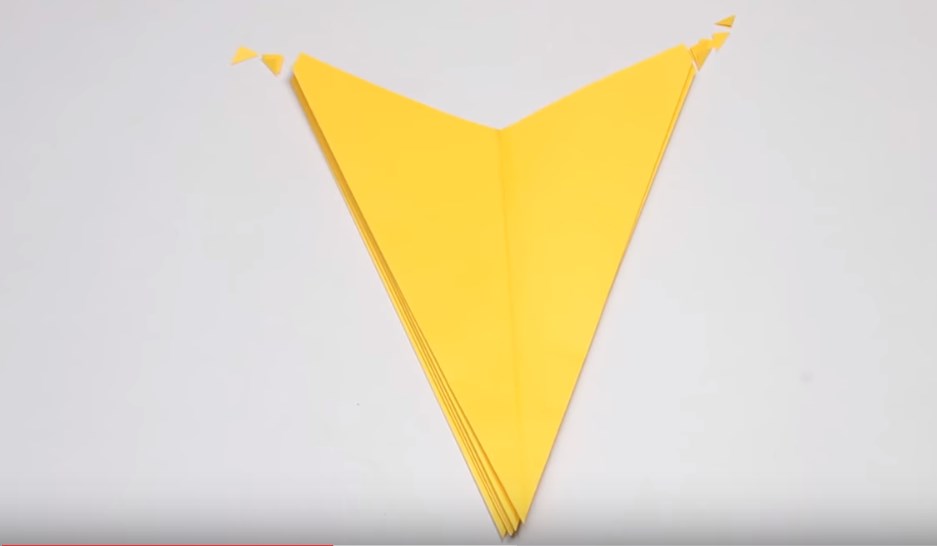
Bend the bottom right side up. Between the right and left parts of the workpiece you can see a line that runs at an angle.  It is along this that we bend the sides.
  We turn the left side into the upper part of the craft.
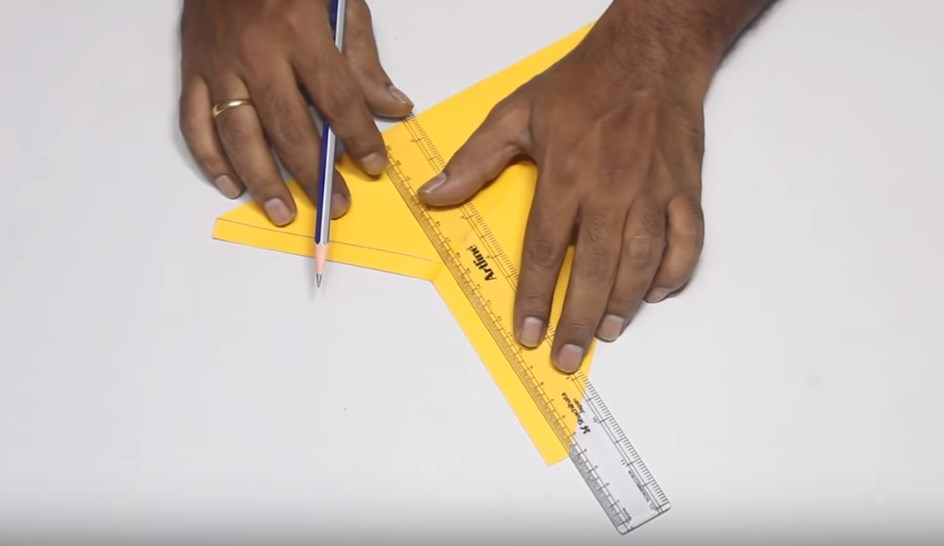
Using a ruler and pencil, draw a diagonal line that will go from right side down to the left. 
Using scissors, we cut the workpiece along the marked line. 
Turn it over. Check the sides to make sure they are equal to each other. Then the star will have all the same sides. If the dimensions of one of the sides are incorrect, you should immediately correct the length and shape with scissors. 
We open the workpiece. 
To get the beautiful sides of the star, you should bend the corners. 
If you want to decorate your home for a holiday or just like that, and you want to do it yourself, then a star is one of the elements that will always look beautiful in a room, on a stele, on a chandelier or Christmas tree.
In this master class you will learn how to make stars with your own hands using a huge number of different methods.
All the methods are quite simple, so everyone can choose what they like best.
The main material from which you can make a star with your own hands is paper. You can use cardboard, plain paper, thick paper, magazines, old books, newspapers.
How to make a three-dimensional star out of paper?
Five-pointed star.
You will need:
- Printer
- thick colored paper
- scissors
1. First you need to print the blank.
2. Cut out the templates and bend them in the places indicated by the dotted line.
3. Glue all the parts together and you will have a three-dimensional five-pointed star!
Scheme on how to make a star
2. Using scissors, make cuts along the perpendicular fold lines. The cut should be approximately half a line or slightly less. In total you need to make four such cuts.
3. Fold the edges as shown in the image.


4. Now prepare the glue and lubricate one of the sides of each ray of the future volumetric star and glue it together (see picture).
5. Make the other half, following the same instructions.
6. Finally, glue the two halves together and decorate to taste.
How to make a star out of paper?
Making such a star is very simple. It is made of just two stars cut out of cardboard or thick paper.
You will need:
- pencil
- ruler
- thick colored paper or cardboard
- scissors
1. Draw a star on thick paper or cardboard.

2. You can decorate the stars as you like and cut them out.
3. Now you need to make a cut on each star - on one it should go from top to bottom (from the outer corner to the center of the star), and on the other, vice versa, i.e. from bottom to top (from the inner corner to the middle of the star).
4. Using the cuts, connect the two stars by inserting one into the other.
How to make a paper star? Convex star.

These beautiful little paper stars will be an excellent decoration for your interior, postcard or gift.
You will need:
- colored paper (you can use pages from an old magazine)
- scissors (stationery knife)
* The key point in this master class is the correct cutting of paper strips.
* Stripes must be even. In this example, their width is 9mm and length 221mm.
4. Let's move on to the most interesting and at the same time simple process - making an asterisk.
Wrap a long strip around each side of the pentagon. You need to do 12 to 15 wraps. This means that each edge needs to be wrapped at least twice.
5. Tuck the remaining tip of the paper inside your star.
Hold your pentagon with two fingers of one hand. At this time, use the fingertip of your other hand to lightly press on one edge. You need to get to the middle of the edge.
This process needs to be done with all the edges and you will get a beautiful star.

How to make an origami star?
You will need: paper, scissors. Cut the paper into squares and fold according to the pattern.


We've talked a lot lately about preparing for the new year. It's time to find out how to make a big star out of paper. Today I will demonstrate several techniques.

I'll show you how to make individual parts, and then how to combine them into one design:

This - separate fragment designs. And our craft consists of 5 parts. Let's make them.
- Cut off the bottom. To do this, measure 4 cm from the bottom of the glued triangle in each part.

- Connect this point with the corners of the base of the triangle. Cut off all excess


- Cut off the bottom corners diagonally.
-
Measure 1 cm from the bottom, draw a line parallel to the bottom edge.
- We make small cuts in the middle.


- We bend along the lines. On one side of the figure we cut off the curved edges.


- Fold over the remaining allowances. On the remaining curved sections we cut off the triangles that protrude.


We assemble the structure as in the video
- We lubricate the bent fragments of the module with glue from the inside and fix them to the second module. In this case, these small sectors should be glued not to the outside, but to the inside of the section. This is how we unite all the factions.
- Until the first sector is connected to the last, you can make a small star decoration.
- Before straightening all the parts and connecting them, we strengthen the puncture site with a small circle.
- We stretch a thin rope through the punctures. We straighten the structure by tightening the ropes.
This design can be folded and stored assembled. And on New Year get out.
Using the diagram

This work is similar to the previous one, with only one difference. That we are using a scheme according to which we will carve out factions that we gradually created in the past MK. You can simply print the template

Only as long as each of these fractions is flat. To prepare for collecting stars, you need: 
- Fold all the fragments along the lines. Glue along the seam. This results in a volume fraction.
- We bend the lower sides.
- We glue the sides of module 1 into module 2. So all 5 parts.
- More details in the video
It is advisable to choose thick cardboard for this model. Then the structure will be strong.
From packages

Again a model that can be folded. It will require paper bags.


Making:

This craft can be easily rolled up for easy storage. Video master class
Another option
Five-pointed

It is very simple to make such a craft with your own hands. Depending on the size of the sheet, you will get a different size star. If you take whatman paper, you will get a star the size of a man. You can wrap it in brown paper or even make it out of wrapping paper without a frame, if it is dense. 

It is best to choose dense material. And cover it with beautiful wrapping paper on top.
Book pages

Looks very elegant!
Master Class:
- For the base you need 2 volumetric models stars. Draw a star on cardboard and cut it out. To draw a star, you need to trace a circle, then you need to divide the circle into five even parts. To do this, measure the circumference with a centimeter, divide by “5” and lay out segments of the resulting length around the circle. Now we connect the dots as in the picture.

Drawing a circle

Divide into 5 parts

Drawing lines
- Using a ruler and scissors, make partial cuts (scratches) from the center of the star to its inner and outer corners. Bend the star in the places where the lines were drawn with scissors. The edges of the star should go down, and the lines drawn with scissors should go up.

Draw a star

Use a ruler and scissors to draw lines

Fold along the lines
- We connect 2 sections for the base.
- Cut each page of the book into 4 pieces. Make small bags out of quarters. You can age these pages by dipping them in tea and drying them.

- We fix the bags with sharp edges in the first layer: 5 pieces in the “folds” of the star, another 5 pieces on the rays.
- Glue the bottom layer.
- On top we make another layer of small bags.
- Decorate the edges with sparkles. To do this, apply PVA glue, sprinkle with glitter and fix with hairspray (optional)
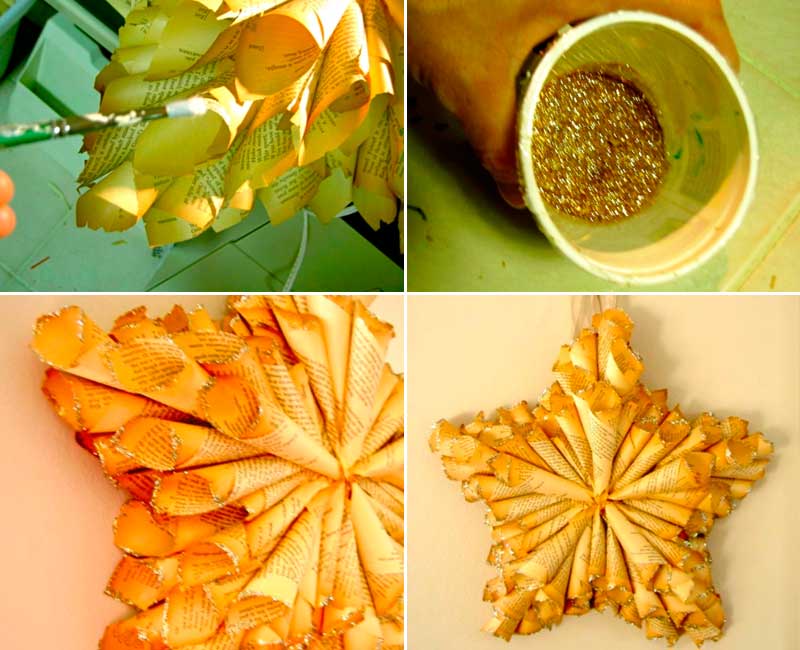
All that remains is to make a loop to hang the star.
This decoration is special. This is part of the symbolism of the New Year. It’s very nice to make things yourself and come up with ornaments for such decor.
If you liked the collection, share it with your friends. Leave a comment and tell us what you came up with for your holiday decor!


