Handicraft is a unique way to create beautiful things and objects with your own hands. For example, wire weaving, which will be discussed further, allows you to create beautiful jewelry, decorative items, and makes it possible to decorate your clothes, accessories, home and garden. What can be made from a material such as wire? Where is the best place for beginners to start?
A little history about wire weaving
Wire products are valuable accessories and items that have always been very popular among both traders and the fair sex. This is confirmed by artifacts found by archaeologists and lovers of antiquities during excavations on ancient Russian burial mounds. In particular, the following decorations and objects were found from wire products:
- chain mail;
- bracelets;
- rings;
- pendants;
- chains;
- temporal rings.
It is interesting that each of the finds had its own individual wire weaving, which made the exhibit stand out among other household items and other utensils. Among the above-mentioned items, some were found that were made of thick forged wire.
Let us recall that the production of such material was previously considered very complex and long process. That is why the value of such items was equal to the price of products made from cast precious metals.
In the process of creating accessories, for example, one ring for a chain, blacksmiths first forged a kind of metal rope, then beat it with a hammer until it took the shape of a cylinder. Accordingly, to create a complete chain it was necessary to make many such rings and only then weave with wire. Today, the process of making products has been greatly simplified, so with sufficient skills and some help, any Internet user can make a beautiful ring or earrings.
What tools are needed for the job?
If you decide to make any product from wire, pay attention to the standard set of auxiliary tools required for the job. So, you will need:
- pliers;
- wire cutters;
- round nose pliers;
- metal file;
- hand or bench vise;
- portable anvil.

What types of weaving are there?
Currently, there are several weaving techniques that are used by craftsmen all over the world. For example, one of the most popular is the Wire Wrap technique. It helps to beautifully weave a variety of beads, stones, accessories, and create original earrings, cuffs, brooches, earrings and other jewelry. There is also a weaving technique that visually resembles similar handicrafts made from ordinary yarn and threads. The simplest technique is considered to be the “chain mail” technique, as well as Viking Knit. What kind of wire weaving is suitable for beginners?
How to choose a weaving technique?
It is very difficult to be a beginner in any field of activity, including needlework and hobbies. There is always a risk of making the wrong choice, jumping to conclusions or making the wrong decision. Therefore, it is best to start with the simplest and easiest to understand technique for a beginner. Let's do this together.
Making a Viking Knit Bracelet: Tools
“Viking Knit” is a simple wire weaving that does not require soldering each link individually and allows for work with big piece wire. In this case, each link is artificially “increased” until the entire chain is closed. For this we will need the following materials and tools:
- thin copper wire;
- a simple pencil;
- scissors;
- ruler (preferably metal).
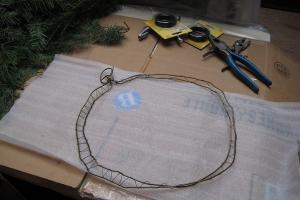
We create the basis for the product
Before you start weaving with wire (diagrams and photos can be found in our article), you need to prepare a base. To do this, take a ruler, cut a wire 40 cm long and wrap it around your ruler exactly 6 times. Next, remove the resulting loops and secure them using the free end of the wire. Then move part of the fastening down a little, and make a flower from the freed loops.

Loop by loop: let's start weaving
At the next stage, we take a pencil, put it on top (on the unsharpened side), cut off more wire with a length of about 70 cm, insert its free end into one of the first “petals” of our “flower”. Next we move to another “petal” and make the second, third and fourth loop. We move to the second row, now clinging to the received loops of the previous one. We do this for a few more rows until the length of your working wire is reduced to 10-12 cm. This is exactly how weaving wire with your own hands is done.

We build up the wire and move on
To prolong the weaving, it is necessary to artificially increase the wire. To do this, to small tip We fasten the new “working thread” to the previous one, and hide its end under other links and loops. We cut off the excess and continue to create new rows and loops.

Once you feel that the resulting loops are sufficient, remove the weave from the pencil and gently stretch it. It turns out to be a whole bracelet. Next, disconnect the excess, cut and fix. This product can be complemented with beads and a clasp. The bracelet is ready. You can also make this kind of weaving from colored wire.
How to make a bracelet using colored wire?
In addition to jewelry, you can make from colored wire beautiful bracelets. For this you will need:
- scissors;
- pen rod;
- two- or four-color wire with a polymer layer;
- large and small beads.
Making the base for the bracelet
Take a small piece of wire (about 15-20 cm) and bend it so that you get a kind of cross. Next, take a new piece of wire and begin wrapping it in a zigzag motion. After 1-2 rows have been “knitted”, transfer the resulting workpiece to the handle shaft (fasten it to the back of it). Start weaving step by step new wire, making loops as in the first example.
Once your bracelet is the right length, you can remove it from the bar, fasten it, trim off the excess, and add beads and a clasp for added beauty. The bracelet is ready. The main thing is that it is easy and quick to do, and also has bright color, so even children will like it.

Wire weaving (bracelets): what to consider when working?
When working with wire, you must follow safety precautions. For this purpose, it is best to wear gloves on your hands and protect your eyes with glasses. When calculating the length of the product, remember that with tight weaving, the figure will double if the wire is removed from the frame.
You should work with scissors, pliers and side cutters carefully, as there is a possibility of injury.
In a word, when working with wire, do not rush anywhere. Do everything without rushing. And then you will get the most beautiful wire products.
Wire is a thin metal thread. Wires for electrical appliances are made from it. But craftsmen have also found use for this wonderful material. In mastering the technique of weaving wire with your own hands, patterns play an important role. This article will provide several master classes, accompanied by patterns for weaving and detailed description with photo.
Types of wire
Making hand-made items requires a lot of concentration from needlewomen. It is not without reason that they say that the master puts part of his soul into the created product. And this means that any thing self made can be considered a talisman for the person for whom it is intended.
The first jewelry from metal wire worn by Egyptian women. And this material was made by drawing, that is, dragged between two heavy flat surfaces. This made the wire smooth.
The original purpose of the wire is to participate in electrical appliances as a conductor. Craftswomen saw many advantages in this rough material, for example, its flexibility.
The following types of wire are best for making jewelry:
- Copper;
- Brass;
- Aluminum;
- Made of galvanized iron.
Copper wire is most often used; it can be coated with various paints, which will help make your decoration very original. The advantage of copper is that it does not undergo oxidation; the product will serve you for a long time in its original form. And by combining this rough material with stones or beads, you can get an elegant and beautiful decoration.
Wireworking
Wireworking literally translated from in English like the art of wire winding. This is precisely the technique of making jewelry using this method.
Let's look at creating wire jewelry using the wireworking technique using the example of a ring and pendant.
small ring
To make a ring you will need:
- Copper wire;
- Large bead;
- Pliers;
- Round nose pliers with curved ends;
- A cylindrical object with a diameter equal to your finger.
In the photo for the master class, a special jewelry tool is used that allows you to make rings of a certain size. To begin, bite off a piece of wire 15-20 cm in length. Place the bead in its central part. Wind the wire onto the cylinder in three turns so that its tails stick out in different sides. Grasp the tail and, pulling the wire tightly, make three circular turns around the bead. Each subsequent row should be located slightly lower than the previous one.

Pull the wire tightly and make turns on each side of the ring. Using pliers, flatten the tip of the wire and press it tightly against the ring.
This should only be done from the top side, otherwise the decoration may injure your finger.
Press the loops as tightly together as possible. The elegant ring is ready.

By twisting different pieces of wire together and combining them with stones or beads, you can get products that are not much different from jewelry.


Elegant pendant
This step-by-step instruction is perfect for beginners.
To make jewelry you will need:
- 30 cm of copper wire with a cross section of 2 mm;
- 60 cm copper wire with a cross section of 0.7 mm;
- 12 small beads;
- Pliers;
- Hammer;
- Round nose pliers;
- Ruler.
Use pliers to grab the thick wire by the very tip. Wind it in a spiral in increments of 2-3 mm, the width of the last turn is 5 mm. Bend the end of the wire into a loop. Flatten the resulting spiral using a hammer. Be careful not to damage the special coating applied to the surface of the wire. Attach a thin wire to the loop and apply turns with beads in the center of each on the last row of the spiral. Bite off the tip of the wire and flatten it with round nose pliers, press tightly to the product. A beautiful wire pendant is ready.
Wireworking techniques can also be used to make earrings and bracelets.


Beautiful combinations
Wire combined with beads and beads can make stunning pieces. A thin metal thread is used in beading technique. Products created with its help keep their shape well.


For example, these beaded trees are made using the needle technique. It consists of putting several beads on a piece of wire, and then the wire passes through the entire chain, bypassing the top bead. It is shown in detail in this diagram.

Flowers made from beads and wire look very realistic.


Weave them using various techniques. Most often this is a French technique in which products are made in small semicircular sectors.

Or using the parallel weaving technique, which is shown in the diagram.

We invite you to watch a detailed video tutorial on how to make a rose from beads.
Video on the topic of the article
In this video collection you can see various master classes on creating crafts and jewelry woven from wire.
Wire has long been considered one of the most suitable materials for creating DIY crafts. Different types Wires are preferred by many craftsmen for their creative achievements. different ages, often combining it with other materials, such as beads, plasticine, colorful shreds or natural materials like dry roots and branches. A completely different direction is crafts made from chenille (or fluffy) wire, which provides amazing opportunities for creativity. In this article we will analyze the most interesting techniques for making wire crafts and show with examples how convenient and multifunctional this material is.


Before you start
Before you start learning something new to you handicraft equipment and materials, you should first stock up on a sufficient amount of materials:
- copper and aluminum wire of different thicknesses;
- colored threads, paper, foil, shreds;
- multi-colored beads, beads, sequins;
- plasticine of different colors;
- dry twigs and roots of interesting shapes;
- chenille (fluffy) wire of different colors.
Of course, making wire crafts without tools is, if not a pointless undertaking, then certainly unpromising: once you pick up this material, you will soon realize that you can’t do much with your fingers alone. What tool do you need?

These are just the most necessary tools, which in any case will be useful when creating most crafts. As creativity progresses, the need may arise for other, special tools.
Crafts made from copper wire
Copper wire is considered the recognized leader among all materials for “wire” needlework. Wire of different thicknesses is used, which depends on the element of the composition being created. For example, it is advisable to make the frame parts from thicker wire, while the connections and windings are made from thinner material.

We used “copper wire” in the name, but wire also has all the advantages of this material aluminum, the work with which is identical to working with copper, with the exception, perhaps, of the impossibility of soldering connections. Aluminum wire has a brilliant gray tint, which outwardly makes it similar to noble silver: because of this similarity, many DIY wire jewelry people prefer to make from aluminum wire; this is worth taking into account in your creativity.

If you have never made wire crafts before, we recommend starting with copper material, since, firstly, it is soft and pliable, even for children and female hands, and, secondly, unlike aluminum wire, it can be bent many times in different directions without breaking after two or three bends, like aluminum, which provides more opportunities for correcting mistakes.
Contour (flat) crafts
Copper wire contour crafts are available even for children's creativity: children like to tinker with such a favorite “wire”, while their imagination and spatial thinking develop very well, as well as fine motor skills hands, which, among other things, perfectly develops intelligence and strengthens mental health. And how much joy there is from the first successes!

When starting to assemble a flat craft, they adhere to a simple algorithm: starting from the outline, move on to the internal parts, which are made separately, and then carefully screwed to the outline and to each other with thin wire; in the right places they make (if necessary) a tight winding, filling the space.


Typically, children strive to complicate the design of their crafts, and there is no need to interfere with this by artificially restraining the creative impulse. Having felt the creative powers within himself, the child, looking at pictures with examples of crafts, wants to do something more complex, and often these are three-dimensional figures.
Volumetric crafts
Three-dimensional structures are called three-dimensional, which usually have a more complex structure. In addition to purely decorative ones, there are many examples of crafts for applied purposes such as baskets, lanterns, various stands, etc. Often the objects of attention are figures of people, animals, cars, and flowers.


When composing complex compositions, you most likely cannot do without a soldering iron. In principle, any one will do - a regular 25-watt one will suffice. The main thing is to pre-clean the soldering areas from insulating material. varnish coating(if any), clean and carefully tin with tin and rosin: the areas thus prepared are then easily and reliably soldered, creating a strong connection.


This is perhaps the most common technique today and is extremely popular. Of course: multi-colored beads placed on a wire frame allow you to create incredible crafts for a variety of purposes and levels of complexity.


As a rule, one begins to get acquainted with this technique with simple ones (by the way, not always) flat crafts- bracelets, pendants, pendants, earrings, various butterflies and flowers. Even at this level, a huge number of crafts have been created, repeating which is the best practice for independent creativity in the future. And if, repeating someone’s model, you use beads of other colors, you can get a completely unique thing!


Volumetric wire-beaded crafts are, for the most part, prefabricated models from pre-assembled elements that are attached to each other either by twisting or soldering.


Very often, completely foreign objects are used as an additional element, for example, dry twigs of an interesting shape: you can often find “bonsai” made of wire and beads, where a piece of a branch directly with the bark, stuck into the trunk, is used as the trunk of a miniature tree. flower pot. To prevent the branch from standing out against the background of shiny beaded parts, it is advised to first open it with varnish, which will give it a certain shine and keep the bark from peeling when it dries out.


The undoubted advantages of crafts made from wire in combination with beads and beads include their colorfulness, attractiveness and the ability to quickly build something worthwhile: this will primarily interest children who, due to their personal characteristics of perception, may not appreciate abstract crafts from ordinary wire.
Crafts made from wire and thread
In our opinion, interesting crafts are made when using ordinary copper or aluminum wire and colored floss. The most common are all kinds of flowers and funny little animals made using this technique.


Most of these crafts are voluminous: as can be seen in the photos presented, the threads play the role of winding on wire frame the desired shape. For example, a flower petal is made from wire twisted into a spring on a rod of a suitable diameter (from a fountain pen, a long nail, a knitting needle, an even piece of solid steel wire, etc.), then a thread of the desired color is pulled between the wire coils, laid in a dense layer .


The body of the animal, its legs and tail, as well as the head are formed from multi-layered thread wound around the frame. Eyes, nose - made of beads or suitable beads, small buttons; whiskers (for a cat) - from pieces of fishing line or thin elastic wire.


Crafts made from wire and colored paper, scraps
In essence, there is nothing unusual in this type of “wire” crafts. The main task of paper and flaps is to fill the frame space, the outer lining of the frame, additional elements like sails, flags, leaves. For example, soft green paper is used to cover the stem of a wire flower. There are many uses for colored paper tape.


Crafts made from chenille (fluffy) wire
So we have reached perhaps the most modern subspecies of wire crafts - chenille wire, which has received the common name “fluffy”. Which is not surprising considering her appearance.

This type of wire is a flexible twisted wire, wrapped in a special way with fluffy pile of a certain color and is produced specifically for creativity. However, as often happens, it was invented for purposes very far from children's handicrafts: Chenille wire was originally developed for cleaning smoking pipes and mouthpieces. One day, someone had the idea to roll it into something like an animal, and an idea for a business was born: the pile began to be made in different colors, and the wire itself was longer. It is not difficult to buy chenille wire in specialized online and regular stores of creative materials.


In the presented pictures it is noticeable that crafts made from fluffy wire are largely freed from the need to use threads and scraps of fabric, since the material itself provides the figurine with “filling” or, in other words, “body”.
Making fluffy wire figures is not at all difficult, you can learn it very quickly, the main thing is to practice a lot. There are also flat and volumetric models, and the manufacturing process is not particularly different from ordinary copper (aluminum) wire.


Good models are obtained by combining chenille wire with ordinary copper wire, as well as with the technique of thread winding and beads. Decorative adhesive eyes have become widespread.


From the examples presented ready-made crafts It’s easy to understand their structure. The main method of connecting parts is mutual twisting, but some craftsmen use hot-melt adhesive, which is applied in an inconspicuous place and thus the parts are connected. There is an ambiguous attitude towards the glue method of joining in wire crafts, but whether to use glue or not is only your choice, the main thing is that everything is neat.


Wire is a material that is often used to create crafts. It is worth saying that from such material interesting crafts Even schoolchildren can do it. And all because this material is flexible. Wire today has several varieties. And each type of wire is suitable for creating certain things. Therefore, in this article we will tell you about which wire crafts are suitable for beginners. These ideas can also be suitable for schoolchildren.
Chenille wire and crafts made from it
The most a good option To create crafts, use chenille or fluffy wire. This wire bends well and does not break, so it can easily take absolutely any shape. In addition, in order to cut a piece of chenille wire, you should only use scissors.

Chenille wire has one more quality. It turns out that your crafts from it will turn out incredibly beautiful. Primary schoolchildren today make various animal figures from this material. And if you also want to make crafts from this material, then you should study a simple master class.
Progress:
- First, cut a small piece of wire from which to form a loop.
- Then form a small ball on one side, as in the photo.
- Wrap the remaining part of the wire around a felt-tip pen or pencil.
- Then, we remove the craft and form a tail on it.
- Cut a couple more pieces from the wire, which should be formed as shown in the photo.
- From these pieces you must now make legs for the animal. In this case, the paws should be folded so that the chameleon can stand steadily on them.
- To complete the craft, the chameleon should be given large eyes and a long tongue.
Pay attention to the diagram with which you can make funny people or interesting animals.


What crafts to make from copper wire
Copper wire is often used to create crafts. Basically, the guys make a frame from this material, which is highly durable. And it is on this frame that it is mounted various material, for example, it could be beads, some beads and other elements for decoration.
Below in this article you will find diagrams that will help you see how you need to fold the wire in order to make interesting crafts with your own hands.


Craft wire flower
If you have patience and have at least a little experience in creating crafts from wire, then you should try to take on more complex crafts, the production of which should also give you maximum positivity. This flower can be made by schoolchildren older than elementary school students. To create this craft you must prepare:
- gouache,
- the cotton pads themselves,
- glass of water,
- starch, PVA glue,
- brush,
- wire,
- tape
This craft is best done at home. And first the paste is cooked. And to cook this composition, you need to dilute one tablespoon in a small amount of water. Then pour this solution in a thin stream into a glass of boiling water. In this case, you should stir everything constantly. As soon as you get a homogeneous mass, you should take cotton pads and soak them well in this composition.

Progress:
- After this procedure, the discs should be dried and then painted with paints, that is, gouache.
- Once the paint has dried, cut out flower petals from the disks. It is worth gluing 5 parts together. After which the middle is highlighted with orange paint.
- The core should be made from a small piece of cotton wool. The core is usually painted white.
- A piece of wire for the stem should be wrapped with green tape. It’s worth making a couple of sheets from the same tape. The resulting stem should be attached to the flower.
Finally
Now you know what kind of wire crafts you can make at home with your own hands. And here we have collected the best for beginners who decide to engage in such creativity.
If you want to diversify home environment, it’s interesting to decorate a child’s room and create something truly original; DIY wire crafts will help solve these problems.
Why wire?
This type of rolled metal can become a universal material for the manufacture of interior items, toys, souvenirs and decorations. The convenience of working with this material is that it can take any shape and at the same time hold it securely.
The range of products made from it is incredibly wide:
- Exquisite and attractive massive jewelry, touched by the hand of a true master, can often cost no less than the vintage jewelry that is so popular today;
- A variety of decor - wall decor (paintings and figures), household items (vases, sculptures) in the interior look harmonious. And depending on the chosen plot, wire objects can add comfort and completeness to the atmosphere;
- Massive furniture and fences. This direction is not recommended for beginners. But with the acquisition of basic skills, you can make high-quality and durable chairs, dish holders, stands for books or wine bottles;
- Original wire crafts for beginners and children to practice to develop artistic skills.
Wire: history of creation
Several thousand years ago, this material was obtained by cutting metal sheets into narrow strips. To get rid of sharp edges, the strips were twisted in a special way or rolled between flat surfaces.
Modern methods of making wire come down to the drawing method. This technique involves threading metal rods through conical shaped holes. This method was used in Persia in the 6th century BC. e. However, the method of metal processing came to the territory of Central Europe in the 10th century AD. e. It was from this period that the industrial production of wire began. It became most widespread among artisans who repaired shoes, equipment and baskets.
The use of steel analogues has become widespread. It was used to weave chain mail, make brushes for combing wool, and used it in the manufacture of horse harnesses and chains, fishing tackle and sewing accessories - needles. At the same time, the drawing method was also mastered to create wire from precious metals.
In the Middle Ages, flexible thread-like wires made of gold and silver were used by needlewomen in France and England for rich embroidery. This lasted until the middle of the 16th century. Gradually, the popularity of art began to decline. And not everyone could afford to engage in such a craft or hobby.
Wire was also made from iron. For a long time, metal was not held in high esteem due to its tendency to corrosion, but at the end of the 18th century, people still learned to protect such products from rust by tinning and treating with black varnish.
Wire arrived in America (first North) from England and Germany. But in 1812, when supplies ceased as a result of a military conflict with Great Britain, the Americans began to develop own production and build drawing factories. By the middle of the 19th century, thanks to the advent of the steam engine, mass production of wire, fences and wire mesh was launched at full capacity.
The material became available, and since then the mass production of a wide variety of products by artisans began - from the simplest table accessories, jewelry and to furniture. The tradition of working with this material stopped with the advent of plastic. But today he is experiencing a rebirth.
Wire techniques
With the fashion for an eco-conscious lifestyle, people began to remember simple ways make great things without expensive technology. And today we are learning about more and more original methods of creating beautiful and unusual, piece-made, rather than assembly-line interior items. Among the variety of working with wire, three main methods stand out.
Depending on the type of product chosen, these methods can be combined with other types of needlework:
- Wire wrapping - weaving and twisting. Most often the spiral shape is chosen. Fantasy curls that gave rise to jewelry technicians making jewelry that looks wonderful with any look;
- Beading is the creation of interior accessories and beautiful things from beads on a wire frame. The schemes are very diverse. Start with simple stringing and forming air loops;
- Ganutel is the art of creating flowers for decoration and stylish accessories (usually wedding ones) from thin spiral wire and silk threads. Such wire crafts are decorated with beads, beads and pearls.
Types of wire for artistic work
Before you buy the right wire for your crafts, learn about some of the features of the wire types.
Brass. The most popular material for creation beautiful jewelry. This species makes excellent brooches and hairpins. The material does not fade. That is why it is valued by handicraft lovers. This metal practically does not cause allergies. But please note that sometimes it may contain a small amount of lead - heavy metal, harmful to health.
Copper. Her best use– creation of a “tree of life”, bonsai and other plant objects, including beaded flowers. This variety is very easy to work with. It is recommended to start with this when your child shows interest in this exciting form of creativity.
Silver. With its help you can create Jewelry premium segment. Framed with such wire, a variety of large semi-precious stones – malachite, obsidian, amethyst and others – look very stylish. You can create a magnificent gift - a luxurious painting. Use this wire ready-made diagrams and beads.
Chenille or overcoat is the name of fluffy wire, which is still little known in our open spaces. This plush fabric-covered caterpillar is a children's favorite. It’s good to make numbers, letters and other interesting things from such furry material. And the whole process will be full of notes of joy and fun. It bends well and cuts well with scissors. Products made from it keep their shape perfectly.
What children enjoy most is creating with chenille Christmas decorations and snowflakes, bouquets, funny animals and a lot of other things. Non-standard way The girls found applications. They weave wire into the hair, thus creating amazing hairstyles that look like crowns.
There shouldn’t be any problems with where to find simple and not so simple diagrams for creating crafts for any objects made from wire. The possibilities of the World Wide Web are simply endless. And you can get it without much difficulty simple circuits With step by step instructions, in the public domain or buy author’s drawings, and also watch a thematic video.