Some people think that it is impossible to look fashionable and bright without large financial investments. It's not like that at all. Create a modern and stylish look possible without extra cost and effort. For example, at home, make brooches with your own hands from fabric, leather and other most affordable materials that you will probably have on hand.
Handmade fashion accessory
 A stylish brooch is a universal accessory whose main function is to decorate and attract attention. He will add to female image a touch of charm and romance.
Using it you can easily highlight the advantages: thin waist, magnificent bust or beautiful hairstyle. It all depends on where the woman prefers to attach it. The decoration will look even more impressive if it is correctly combined with a dress, bag, shoes or any other accessory.
That is why an exclusive brooch should be present in every girl’s wardrobe. Jewelry looks especially good this season self made. Making them yourself is not at all difficult. Even novice craftswomen can make an exclusive brooch from fabric with their own hands. Master class on creating jewelry will help prevent mistakes during the work process.
Making decorations from pieces of fabric
 From ordinary little things that are always at hand, you can make a very unusual and elegant decoration. At the same time, you don’t need to have any special skills or abilities. All you need to purchase in the store are special fasteners-pins.
The principle of operation is very simple: all the necessary parts are attached to a dense base using threads or glue. The final step is to decorate the jewelry with beads, wood, lace, rhinestones and other little things. The main thing is to correctly combine textures, colors and sizes.
A clasp is attached to the back of the accessory on a thick base. Unnecessary pieces of natural fabrics, for example, knitwear or cotton, can be used as decorative details. Since they hold their shape well, it will be very convenient to fold various figures from them according to the origami principle, and attach the edges in such a way that they do not unfold. Fabric details also look no less impressive., the edges of which are crocheted.
Soft felt brooch
Felt is a very soft and pliable fabric. The material holds its shape perfectly and does not crumble. Therefore, working with him is very comfortable even for beginner craftswomen. A felt flower brooch will look very gentle and expressive on any clothing. Before making a brooch with your own hands, you need to prepare the following materials:
- Felt fabric in beige and light green colors.
- Threads golden color and a needle.
- Scissors.
- A large bead or button for the center of the flower.
- Special fastener for brooches.
The first step is to transfer the pattern below onto the fabric. And then carefully cut out the details along the contour, respecting the difference in size, so that the flowers look more realistic.

In beige flowers, cut a hole with a diameter of 0.5 cm. The petals are stitched with gold thread. You can take threads of a different color, the main thing is that they match well with the fabric. Leaves are cut out from green felt. Fasteners will be sewn onto them, with the help of which the decoration will then be fastened to the fabric of the clothing.
Now the details of the petals can be connected with the leaves using threads or glue. A large bead matching the threads is used as the center. An elegant felt flower brooch is ready.
It is worth taking note that if the brooch is made of felt, then as a decor it is very Details made from natural materials: burlap, wood or leather.
Denim flowers
If you have a pair of old jeans lying around in your closet, don’t rush to take them to the trash heap. DIY denim brooches are perfect for any outfit and add a little femininity and piquancy to your look. Step-by-step master class on making brooches from denim will help you sort out difficult moments and make the accessory truly original. To create this craft you will need the following tools:

 The first step is to cut out a piece 90 cm long and 6 cm wide from old jeans. One edge of the workpiece is left straight, and the second is cut off in a wave-like manner. Pieces of excess fabric can be torn off. There is no need to worry if the workpiece is not very neat. A little carelessness will make the brooch even more unusual and exclusive.
The second edge, the one that remained untouched, is stitched with small stitches. It is recommended to tighten the thread a little. Now you can form a flower in a circle.
The resulting workpiece must be carefully stitched from the inside out. The next step is to make the center for the brooch. To do this, a piece measuring 22 by 3 cm is cut out from a piece of calico fabric. A small knot is tied at the end of this blank, which is wrapped in fabric around its axis. The free tip can be secured with a bobby pin. Using small stitches, the middle is sewn from the wrong side. The finished part is sewn into the very center of the flower.

The denim brooch is almost ready, all that remains is to make the base. To do this, a circle is cut out of jeans, the edges of which are processed using sewing machine. A fastening pin is sewn to the workpiece. This circle is then very carefully glued to the denim flower.
At the final stage, you can add lace to the finished brooch or sew several beads for decoration, or trim the flower with decorative braid. It is enough to use your imagination and a brooch from scrap materials will turn into a masterpiece of handicraft.
Unusual craft made from satin
A rose brooch made of satin will serve as a spectacular decoration in summer look. This accessory will look great in your hair, hinting at Hawaiian style, and on a dress or jacket. To work you will need the following:

 The first step is to process the material yellow color with a special solution to make the fabric very flexible and pliable. To do this, mix a bag of gelatin and 250 ml of water. Mix the solution thoroughly and put it in a dark and cool place for about an hour. After this time, place the container with the solution on medium heat and bring it to a hot state. There is no need to boil it under any circumstances. Now the resulting mass needs to be given time to cool.
The next step is to lower the material into the solution, thoroughly soak it in it and remove it from the container. The fabric is carefully straightened and laid to dry. When the material is completely dry, you can begin work.
According to the pattern below, the pieces are cut from fabric. The result should be:
- Parts A - 10 pcs.
- Parts B - 12 pcs.
- Parts C - 14 pcs.
- Leaves - 2 pcs.
 Ten leaf pieces are cut out of lace. Now yellow parts - petals - can be sold desired shape. After this, the tip of the tweezers needs to be slightly warmed over the flame of a match. Using a heated tool, curl the edges of each yellow petal. The resulting blanks are put aside for a while.
Now we should move on to the leaves. A thin wire divides it into seven equal parts. Each part of the wire is wrapped in a strip corrugated paper and then covered with red paint. You can use any paint, however, experienced craftswomen advise using gouache. The parts are left to dry for about two hours. After this, each painted workpiece is covered with a thin layer of glue and again left to dry.
A piece of cotton fabric is laid on the table. Blanks of yellow petals are laid out face down on top. A painted wire is placed on the petal in the center. The glue web is cut into equal parts six centimeters long. A cobweb is laid on top of the wire. The next layer is the lace details of the leaves. Everything is covered with cotton cloth on top. Using an iron, the entire structure is gently heated for 40 seconds.
The leaves are removed from the fabric, and the resulting parts are given beautiful shape. Now all the leaf parts are collected into twigs.
You can move on to making the middle. To do this, the button must be tightly wrapped with wire. Then bring the ends of the wire through the eye of the button, and then twist them together.
 The button cap is wrapped with holofiber or any other soft material. Secure the result with thread. The workpiece is covered with satin on top of the holofiber and secured again with thread. The middle is optionally decorated with rhinestones and beads.
Using a glue gun, the blanks are assembled into a single whole. To do this, the petals are collected in pairs. After this, the resulting pairs of petals are fixed in the middle with glue. When the entire flower is assembled, branches are glued to its underside. The brooch is ready, all that remains is to make the base.
A circle with a diameter of 6 cm is cut out of satin. The part is coated with glue and secured to the back of the flower. The brooch is ready.
Thus, creating a stylish accessory with your own hands is not difficult at all. It is enough to show a little patience and hard work, and then the original brooch will certainly decorate and highlight the image of its owner.
Attention, TODAY only!
Time does not stand still and fashion trends change along with it. Some things change radically, and some things, on the contrary, return to the past. It is precisely because modern fashionistas are looking for a twist in the fashion of bygone times that interest in brooches has returned again. More before women They wore such jewelry on special days, and grandmothers hid such brooches in boxes and pinned the brooch on holidays. That's why modern world fashion now offers many such decorative ornaments. A DIY fabric brooch is a very popular trend last season and this season. Due to the fact that the decoration is made by hand, you can find many original jewelry. But such brooches are more often found in the form of a flower.
But for today modern girls they wear a brooch not only on special occasions, but also on Everyday life. Such jewelry can be hung on a scarf, on a headdress, on a headband, even on a bag it will look original. You can make this type of gift for your mother or grandmother.
The brooch can be made using any technique.
Such techniques include a brooch made with embroidery, a flower, on felt, with lace, and more.

Original and beautiful
In this tutorial you can learn how to make a beautiful and original brooch with your own hands.
In order to make interesting decoration, can be used various materials that are at home. It can be beads, any ribbons, plastic, beads, lace, yarn and more.
You can use everything your imagination suggests.
- In order to make such a decoration with your own hands, you must first decide what kind of brooch you will make. After the decision has been made, you need to find a pattern or draw it yourself, then decide on the color and fabric of the future brooch. The brooch can be one color or choose several colors.
- Next, you need to cut the material into circles. It should be remembered that each subsequent detail must be smaller than the previous one. After the future petals are ready, you need to make cuts on each of them - they should not be close to each other. This is necessary in order to give correct form petal
- When the petals are ready, you need to singe the edges with candles or matches and stack one on top of the other in ascending order, from small to large. Next, use a thread and a needle to fasten these petals together.
- You can sew any beads, stones, or make a design from beads or ribbons into the middle of the flower. The base must be attached with glue. And now the first brooch will be made.

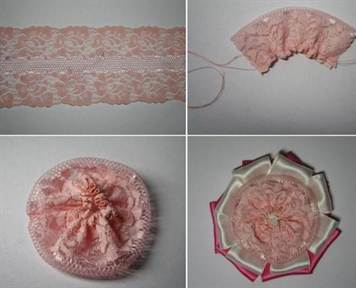
Product made from tape
A ribbon brooch that can be made for a prom dress or any other event. A very simple and popular way to make a brooch with my own hands- this is to make such a decoration from ribbons. After all, in every home you can find a beautiful ribbon or even buy it in a store. This brooch looks attractive and elegant on every outfit. And if you use this brooch to decorate Evening Dress, then the image will be memorable.
In order to make such a decoration, you need to take scissors, several ribbons of different or the same color, a thread with a needle, a base, beads or beads, and lace.
The ribbons need to be divided into small strips, then the edges should be burned. Fold the resulting strips into petals and connect them together with a thread and a needle. Short ribbons are used for the first row of petals, and longer ones for the second. The color of the first row may differ from the second. We attach lace to the center of the flower, use stitches to make a drapery of a lace ribbon and form a ring, and glue beads, seed beads or decorative stones into the center.
Denim accessory
Brooches made from denim are very popular. This can be explained by the fact that most people choose to wear denim clothes. And why not decorate such a robe with a brooch made of the same fabric.
Making jewelry from jeans is easier than from other materials, because it does not need to be singed. This material lends itself well to twisting, folding and cutting. In order to make a denim rose, you need to take old clothes from jeans and cut into strips. Then twist this strip into a roll, and fasten the lower part with thread, so you get a flower bud. And for a blossomed flower, you need to cut out the petals. A fuller rose comes out when more petals are used.
You need to take a base for a rose - a circle of cardboard and glue flower petals on it in a circle. First the small petals, and then the larger ones. The edges need not be processed, but even fluffed up more.

In the form of an insect
Not only flowers are popular in making jewelry, but also various insects. One of these is the butterfly.
Making a brooch in the shape of a butterfly, a master class will help you with this, is easy. You need to take a 10 centimeter tape. Then put this piece in half. Fold the edges into a triangle. Attach a bead or pebble to the base of the triangles. The corners need to be connected to each other, cut off the unnecessary edge. The ends need to be singed. The result will be a blank in the shape of a boat.
A beaded brooch is an original and very beautiful accessory that invariably emphasizes the charm and grace of its owner. Today we will tell you how to weave such decorations. We have collected for you best ideas for inspiration and step-by-step master classes, which even novice masters can handle.
Beads can be ordered profitably on AliExpress. Big choice flowers, excellent quality, good feedback, low price - check for yourself on the store page using this link.
In this article you will find all the necessary information on how to make a beaded brooch with your own hands, as well as several valuable advice and interesting templates. Some (more complex) accessories come with weaving patterns, while others come with an accessible description. In our selections you will find brooches embroidered on felt, as well as wicker jewelry. Flowers, birds, leaves, dragonflies and other most popular bead crafts - you can make all this and much more yourself.
Before starting work
If you have never worked with beads before or your familiarity with weaving techniques is superficial, you should pay attention to beadwork master classes for beginners. Brooches are quite simple accessories, but each of them has its own nuances. For beginners, it is best to look not at wicker jewelry, but at those embroidered with beads on felt.
The simplest brooches are petals, embroidered flowers, birds and other decorations that do not require small details. So, for example, to make a beaded brooch in the shape of a woven flower bud, you will need to weave several petals separately and then carefully fasten them together - this is not too easy. For an embroidered flower, all you need to do is draw an image and attach beads to it.
In a word, it is better for beginners not to take on bulky brooches. However, you should not take this as a rule - it is quite possible that you will be able to do something complex with your own hands the first time.

Which beads to choose?
The choice of beads for a homemade brooch depends on its style. In some cases, you will need not only standard round beads, but also several other types of beads.
The following usually works:
- small beads with a large hole for a needle;
- standard glossy or matte beads;
- beads in the form of grains of rice;
- bugles;
- small and medium size beads;
- half beads;
- rhinestones;
- ornamental stones.
Other accessories for creating a brooch:
- felt;
- fabric base (for example, denim or wool);
- threads (preferably silk);
- fishing line;
- needles of various sizes;
- glue gun;
- tweezers.

You won't need all of these materials, but usually many of them go into the work at the same time.
Master class: brooch in the form of an owl
This step-by-step instruction will appeal to beginners, because you can make such a brooch with your own hands in literally half an hour, and to “assemble” it you will need the most simple materials. The master class should not be neglected by those who have been working with beads for a long time, because owls are very popular today. This means that you will get a fashionable exclusive brooch that even the most advanced fashionistas will envy.

What do we need?
- large beads of several colors;
- beads in the form of grains of rice;
- two large rhinestones of the same size;
- thin fabric base;
- cardboard;
- thick leather base (can be replaced with thick material);
- thread or fishing line;
- Super glue.

How to do it?
First of all, we design the owl's eyes. To do this, we string small beads onto a fishing line or thread and close it into a circle slightly larger than a rhinestone. Connect the circle and place a rhinestone pupil in the center. Glue it. We fix the eyes on a fabric base using thread or glue.

We sew a beak made of oblong dark beads and a bang made of light beads to the base. The owl's head is almost ready, and this is already half of the brooch.

Draw the owl's body and add a few more elongated beads to the head. We sew another row of beads around the eyes - we use the same small beads.

We lay out beads in a continuous row along the contour of the body. You can string beads onto a fishing line and then sew them to the base of the brooch. We do the same with the owl’s body: we collect it on a fishing line and glue or sew one bead at a time.

We cut off the excess fabric and glue the future brooch to a small oval piece of cardboard.

Then we make two holes in the leather base for a pin, insert it and glue the structure to the workpiece.

We make the legs and wings using small oblong beads, add another row to the body to hide the excess fabric. Ready!

Try different color combinations. Make your owls black and white, brown, or even very bright. In any case, your homemade beaded brooch will turn out very cute, touching and original. This is a great gift and a wonderful everyday accessory for girls and women of any age.
Master class: bird brooch
A very beautiful brooch on felt that any woman will like. In this step by step instructions You will find a pattern for weaving and embroidering a bullfinch, but your bird can be anything - it depends on the chosen pattern and colors.

What do we need?
- a piece of felt;
- sew-on rhinestones;
- standard size beads (two or more colors);
- beading needle;
- thread or fishing line;
- pin or ready-made accessories for a brooch.
Please note that felt can easily be replaced with a piece of woolen fabric or any other material (glued with cardboard and a piece of leather - for reliability).
Before starting work, you need to select a stencil of any bird and print it. If it is not possible to do this (or you are good at drawing), then copy the image on paper. The main thing is that you have ready-made template the size you want the brooch to be. We advise you to pay attention to our selection of bird stencils.
How to do it?
Place the bird figurine on the felt and trace it. Cut it out.

We cover the wing with large rhinestones. Glue or sew them.

We cover the wing with beads. To do this, fasten the thread from the wrong side, string two beads and make a seam. You can sew on one at a time if your rhinestones have a complex shape.

We make the trim along the contour of the future brooch. It’s better to do this in several passes and don’t be lazy about changing the thread and tying knots - this way the rows will lie more evenly.

Add a second, third and other colors to create the bird's breast and neck.

Fill all the small details with beads (you can also fix them with glue), and then make another additional row along the entire contour.

The brooch is almost ready. All we have to do is cut out another piece of felt using the stencil, connect it with a pin, and then glue it with the embroidered part, placing the stencil itself between them.

This beaded brooch can decorate not only the lapel of a jacket, but also a fabric handbag. By the way, it is believed that birds bring good luck, so your homemade brooch is not only a beautiful accessory, but also a kind of talisman.
Master class: brooch in the shape of a clover
A beaded brooch in the shape of a clover leaf is your talisman of good luck. This accessory looks great on a scarf, jacket, handbag and even on a hat. Cute, neat, original - this brooch will be a great addition to your look.

What do we need?
- green felt;
- green satin fabric;
- small beads with a small hole;
- rhinestone Brown;
- green beads;
- green bugles;
- flat wide beads;
- a piece of leather;
- pin or ready-made accessories for a brooch;
- threads;
- Super glue.
How to do it?
First you need to draw a quatrefoil on paper: yourself or using a stencil. Transfer the image to felt.

We string small brown beads onto a thread and close the ring. It is better to do it in two rows.

We sew fabric to one half of the clover. We also cut it out using a stencil in advance. To make a beautiful fold, use thread and beads. For convenience, it is better to stretch the felt over something.

We place a rhinestone in one of the corners, and on top the ring that we made in the second step. We process the outline with green beads. We fill the space with beads and beads of various sizes in in no particular order. Parts can be sewn or glued.

Gradually fill all the free space with decor.

Release the felt from the clamp and cut off the excess.

Glue a pin or hardware and a piece of leather to make a strong base. The brooch is ready!

You can give such a homemade beaded brooch as a gift or simply always carry it with you for good luck. This is a very beautiful accessory that will make you stand out and be remembered by others.
Bonus: video lesson
In this master class you will learn how to make a sponge brooch - another popular accessory today. In a similar way, you can make a brooch with any other image.
Choose any of the presented master classes and be sure to try making a beaded brooch with your own hands. It's quick and easy, and as a result you will get a very beautiful accessory that you will wear for many years. In addition, your brooch will be unique: even if you choose a popular silhouette, the colors and sizes of the jewelry will be exclusive. Create and wear with pleasure!
Views: 145,636
We all know that fashion never stands still. She can subtly rush forward, offering fantastic outfits and images, or she can go back, looking for “highlights” from fashionistas of past centuries.
It is thanks to this phenomenon - the cycle of fashion - that we owe the return of the brooch to the outfits of modern beauties. Surely many remember how lovingly their grandmothers kept brooches in ancient boxes and put them on on the occasion of a celebration.
Today, wearing brooches is also considered a sign of good taste, so fashionistas wear them not only on special occasions, but also in everyday life.
The brooch will be a wonderful gift for your mother, grandmother, friend or colleague on March 8 or any other holiday. Today we will tell you about several ways to make a brooch with your own hands.
You can make a brooch using almost any technique:

Brooches with embroidery

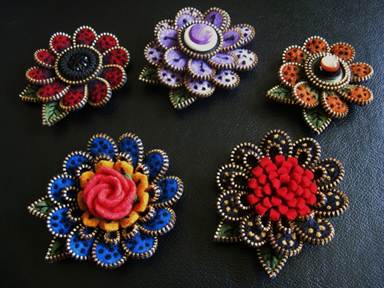
Brooches made of felt and beads

Lightning brooches

Satin ribbon brooches

Crochet brooches

Complex fabric brooches
It is quite possible to learn how to make all this beauty, the main thing is to know the main stages of creating a brooch.
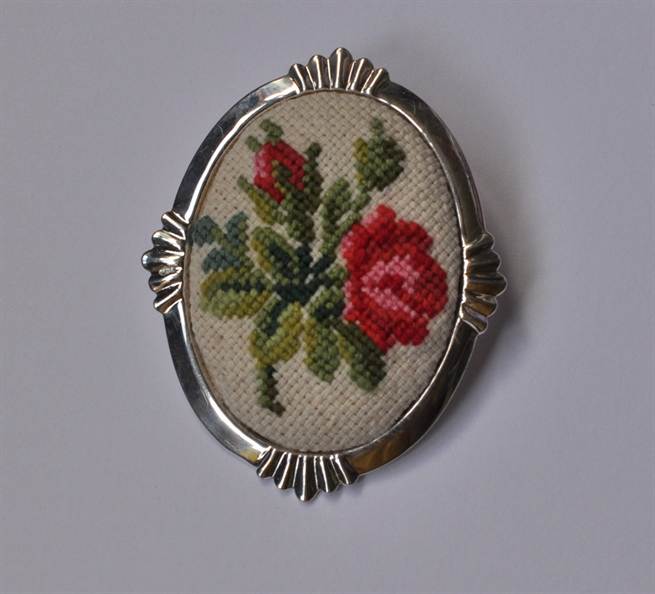
Brooch with embroidery on a fabric basis

To make such a brooch with your own hands you will need:
- small embroidered plot
- cotton or linen fabric for the back piece
- piece of cardboard
- lace
- a special lock for the brooch (you can, of course, get by with a regular pin, but it will be quite difficult to attach it).
Cut the embroidery into a circle shape. We try it on a cardboard circle (to prevent the embroidery from moving to the side, it is better to secure it with pins).

We tighten the needle along the edges with a “forward” seam, tighten the thread and secure it.
Don't forget to put some filling inside if you want the brooch to be soft and voluminous.


We do the same with the back part, making it a little larger in size. You don't have to put any filler in the back.

Attach the brooch clasp to the back.

Now we sew both parts together, putting lace between the parts.

The brooch is ready!
Instead of lace, you can use satin ribbons to decorate a brooch:


To make such a brooch you will need:
- blank - the basis for a brooch (sold in handicraft stores)
- embroidery on canvas or evenly woven fabric
- piece of cardboard
- padding polyester or other filler (optional)
- hot gun
The process of creating such a brooch is even simpler. We stretch the embroidery onto a cardboard base (see the description for the previous brooch), and then glue the embroidery to the metal base.

The brooch will turn out very delicate if you pass a satin ribbon through the edges of the blank.

A beautiful version of a brooch made from ribbons in the video master class:
As you can see, using this manufacturing option allows you to get an exclusive piece of jewelry in a vintage style.
Unfortunately, special accessories for making jewelry can be very difficult to find in small towns. And online stores often offer such accessories in sets of 5-10 pieces per package, which is not very convenient for those who want to “just try it out.”
Felt brooch

In order to make such a brooch you will need:
- felt in two colors
- floss threads to match the felt
- beautiful vintage button
- brooch holder
Cut out flowers and petals from felt using the suggested template.


Cut round holes in the center of the flowers.

Using floss threads, sew the veins of the flower.

Sew a brooch fastener to the leaves on the reverse side.

Pick up a beautiful button and sew it in.

Original master class
Brooch braided with beads
Another way to make a brooch frame is to braid with beads.

For example, watch this video tutorial on cabochon braiding.
Cabochon- precious or semiprecious stone, processed in a special way. After this treatment, the stone acquires a smooth convex polished surface without edges. And you can weave an embroidered plot in the same way.
There are many ways to decorate a handmade brooch. You may want to decorate the edges with braid.

Or crochet the edge:

The back part can be made not only from fabric, but also from felt:

- A strip of fabric at least 40-50 cm long and not 7-10 cm wide (you can use 2-3 stripes in one flower for splendor);
- Beautiful beads or buttons, you can also use beads;
- Sewing threads and needles;
- Brooch base;
- Tailor's scissors ()
Recommended fabrics: natural thin fabrics such as silk, chiffon, cambric, let, muslin and even dress wool.

How to make a flower from fabric with your own hands
Step 1

Fold a strip of fabric like an accordion (the size of the petals depends on the width of the fold);
Step 2

To prevent the accordion from falling apart in your hands, you can smooth out every wrinkle.
Step 3

Secure the resulting “accordion” with a tailor’s pin.
Step 4


Step back from one short section of 1.5-2 cm and cut out the shape of a petal.
Step 5


Cut the strip, iron and adjust the shape of the petals, if necessary.
Step 6
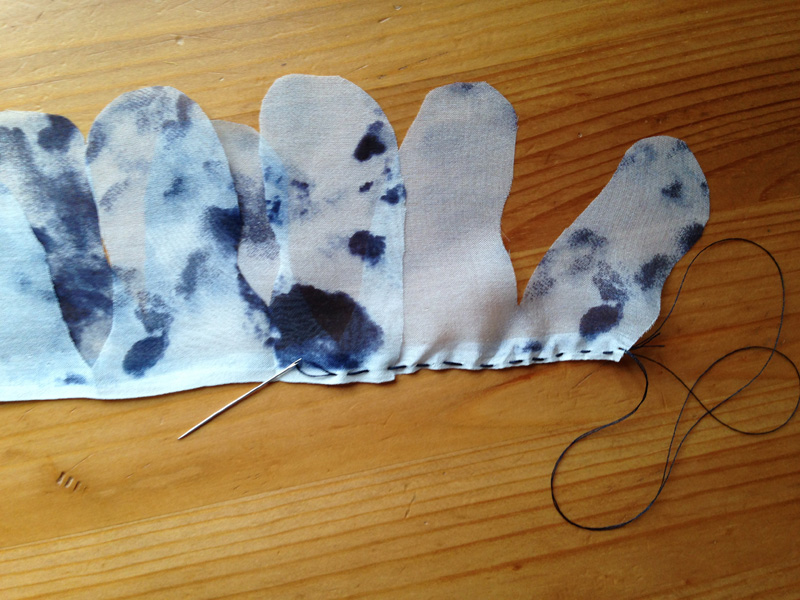
Gather the strip along the edge of the cut by hand using small stitches. Or sew a line with the maximum stitch length on a sewing machine.
Step 7

Pull the strip

Twisting it into a spiral to form a flower shape.
Step 8
Fasten the thread.Step 9

On the front side of the flower, sew a beautiful bead or button into the center.
Step 10

Sew the base for the brooch on the wrong side.

This is how you can easily and quickly make a flower out of fabric.
Petals and open sections of the strip do not need to be treated with anything.
Wear this beautiful accessory as a brooch or hair clip, or use it as decoration for a bag or belt.


