Decided to do quilling technique? Then know that this skill is very easy to learn. By the approach of the New Year, it is worth making snowflakes using this technique. In this article, we will tell you how to make quilling snowflakes for the new year for beginners. Here you will find interesting master classes and a lot of useful information.
What is quilling technique
Quilling appeared about 500 years ago in Europe. This technique involves twisting strips of paper. From these strips, combinations are made into a variety of crafts and patterns.
To create a quilling craft, you will need a small number of tools. You should prepare:
- toothpick,
- tweezers,
- scissors,
- glue.
In addition, paper is required. For crafts in this technique, strips of paper are used, which are 3 mm wide.
How to make a simple quilling snowflake
We talked about the quilling technique. Now it’s worth talking about how to make a quilling snowflake.
- So, you should take a landscape sheet on which stripes are drawn with a pencil and a ruler. The lines must be straight.
- Now the sheet should be cut into even strips.
- Next, take a toothpick or an awl and attach its end to the edge of the paper strip.
- Screw the strip onto the tool.
- The end of the strip should be glued to the coil that turned out. After that, the resulting roll is carefully removed from the toothpick or awl.
- You need to make another coil. However, the next coil should be squeezed a little with your fingers on one side. As a result, you will get a coil that will look like a droplet. It is worth making 5 such coils.
- After that, you take the first spool and glue 6 teardrop shaped spools to it.
- Then it is worth rolling 6 coils and squeezing them with your fingers from two opposite sides. As a result, you should get a figure that reminds you of an eye.
- New parts are glued between the snowflake petals.
- Next, take 3 strips, bend them in half and cut. You should have 6 short strips.
- 6 coils are twisted from new strips.
- A new coil in the shape of an eye is glued to each tip of the part.
- From long strips we make 6 coils. However, they should be slightly larger than the first coils. In this case, the paper should not be pulled tight.
- Glue new coils on the “droplets” parts between small rolls.
- Now it's worth making 6 more coils big size. They need to be bent with your fingers in order to give them the shape of a square.
- Square blanks are glued with the top to large coils.
- Now wind a strip of paper around the pencil.
- Glue the end of the strip and remove the coil.
- A new coil is glued to one of the tops of the snowflake. Thread or ribbon should be threaded into the ring.

If you manage to make such a snowflake, then ready product will look attractive on the Christmas tree. It can also be attached to a window or door.
Snowflakes in quilling technique
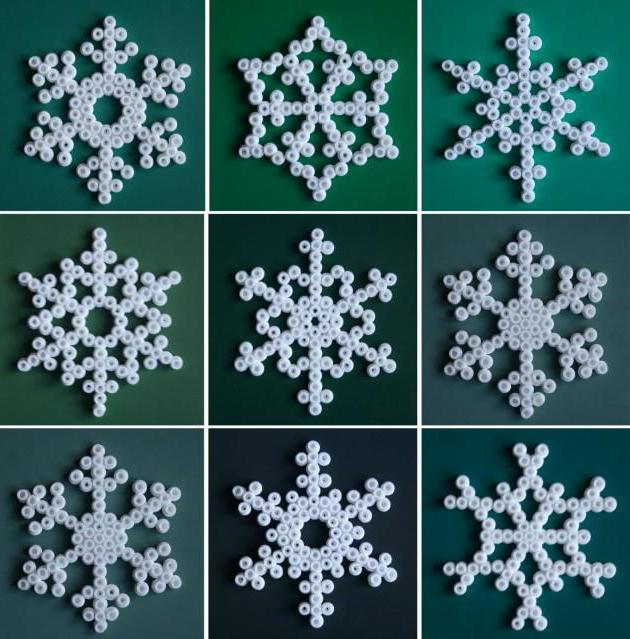
If you make all the details using the quilling technique, then completely different snowflakes can be obtained from these parts. For work, it is worth using many strips of paper that have equal length and width. These strips are wound on a toothpick. Lots of things like this need to be done. They are glued together with glue. Schemes can be used absolutely any. You can see examples of the scheme in the picture.
The process of creating snowflakes using quilling technique should start from the middle. In other words, you should glue the parts to each other in order to form a circle of them. After that, it is worth continuing to glue other coils to the circle. It is worth saying that the schemes of snowflakes can be different. For example, in some types of snowflakes fit snugly together. In others, on the contrary, the center should be hollow.

Quilling and what forms exist today
The quilling technique today has 12 forms of coils that are used in the work. Snowflakes for the New Year can be made both in one technique and using all at once.
- This blank is called an open coil. The end of the strip in this case is not glued.
- The next coil is the closed coil. The end is glued here.
- This reel is tight. The strip is stretched throughout the work. The end is tightly glued.
- Big coil. In its creation it is worth using a regular pencil.
- A drop. One end should be pressed with your fingers.
- Eye. At the workpiece, 2 ends are pressed with fingers.
- Petal. The coil is compressed by fingers, and on the one hand it is bent.
- Sheet. The coil is compressed on both sides and waves are made.
- curls. The strip is folded in half, after which the ends are wound in the right direction.

Snowflake schemes
Snowflakes from quilling on New Year considered a great decoration for the Christmas tree. Now we will offer you schemes of interesting snowflakes that you will make for the New Year using quilling shapes.


Finally
We hope that our article will help you in your work and by the New Year you will make a lot of snowflakes with which you will decorate a Christmas tree or your home.


What technique can better convey the airiness and lightness, the openwork lace pattern of snowflakes than the quilling technique? Making snowflakes out of paper, or rather from twisted strips, resembles a mosaic or a kaleidoscope with a huge number of options. The prepared parts can be glued to the base, making postcards or panels, or glued together to hang amazing lace decorations on the Christmas tree.
To perform these works you will need a white office paper. It must be cut into strips 5 mm thick along the short side. It is better to cut with a clerical knife along the ruler several sheets at once. For a small amount can be cut with scissors.
You can twist the strips with different tools. You can use an awl, a special slotted rod, a toothpick. But it was for making snowflakes that I most liked working with a wooden skewer.
To make a snowflake (pendant or applique), you need to prepare a variety of shapes from twisted strips. Forms can be closed, i.e. glued and open, where no glue is used. Both are suitable for applications. And for snowflake pendants, you can use only closed forms.
- Eye shape. Squeeze the round blank from both sides at the same time.
- "Square" shape. Make an “Eye” shape, turn vertically and squeeze the sides again.
- Rhombus shape. Make from "Square".
- Triangle shape. Make a “Drop”, take hold of the corner and flatten the base of the triangle.
- Arrow shape. Make a “Triangle” and press the middle of the short side inward with the end of your index finger.
- Crescent shape. It is performed almost like the "Eye", but in a curved shape. And the corners are pinched not opposite each other, but with a shift.
There is more than one master class from which you can learn how easy it is to create it, it will not be difficult at all if you put the whole process on the shelves.
It originated in European countries more than five hundred years ago and implies a twisting paper strips and their combination into various patterns and crafts.
To create crafts using the quilling technique (snowflakes, for example), a minimum of tools is required: an awl (can be replaced with a toothpick), tweezers, scissors and glue. The most important material is paper, which is cut into strips. Most often, strips about three millimeters wide are used for crafts.
simple snowflake
This craft is very easy to do and does not require special skills.
Master class on how to make snowflakes using the quilling technique:
- Take a sheet of plain paper and draw the same lines with a ruler and a pencil.
- Cut the sheet into strips.
- Take an awl or toothpick and attach the edge of the paper strip to its end.
- Wind the strip around the tool.
- Glue the end of the strip to the resulting coil and carefully remove the roll from the awl.
- Make another such coil, only now it needs to be slightly squeezed with your fingers on one side.
- Make five more of these droplet coils.
- Take the first card and glue six "droplets" to it.
- Now roll six coils and squeeze with your fingers on two opposite sides. You should get a figure resembling the shape of the eyes.
- Then glue the new pieces between the snowflake petals.
- Take three strips, fold them in half and cut. As a result, you will get six short stripes.
- From the new strips, twist six coils.
- Glue a new spool onto each tip of the eye piece.
- Now make six more coils from long strips, only slightly larger than the first. To do this, do not tighten the paper too much.
- Glue the new spools on top of the droplets between the small rolls.
- Make six more large coils and bend their sides with your fingers to make a square.
- Glue them with the top to the large coils.
- Take a pencil and wind a paper strip around it.
- Glue the end of the strip and remove the coil.
- Glue a new spool to one of the tops of the snowflake and thread ribbon or thread through the ring.
Such quilling snowflakes will look beautiful on a Christmas tree, doors or windows. Even after the end of the New Year holidays, many still do not want to take off this beauty for a long time.
Snowflakes (quilling) - gluing schemes
You can make a lot of different snowflakes from just a part of one shape. To do this, cut a lot of strips of the same length and width, take an awl or a toothpick and wind the rolls. Make more than ten units of identical coils, and then glue them together to make snowflakes (quilling). Schemes can be any, for example, as in the picture above.
In all cases, the process of gluing coils should begin from the middle of the craft. That is, glue the parts to each other so that they form a circle. Then continue to glue other coils. In some types, the rolls must fit snugly together, in others the center must be hollow.
More complex crafts
To make openwork snowflakes using the quilling technique, it takes more time and perseverance. But the result is worth it.
Instructions for creating openwork snowflakes:
- Prepare paper strips, tweezers and glue (Figure 1).
- Fold the five strips in half (Illustration 2).
- Lubricate one end of the strip with glue and glue it to the middle with tweezers (illustrations 3 and 4).
- Wrap the second half of the strip around the petal and glue its end (illustrations 5, 6 and 7).
- Saddle four more similar petals, only each should be smaller than the previous one. In total, six petals of each type are needed (Figure 8).
- Take the smallest petal and grease its tip with glue (Figure 9).
- Glue the petal in the middle of the other (Figure 10).
- Collect all five petals in the same way (Figure 11).
- Gather all six petals (picture 12).
- Squeeze the finished petal with your fingers, making it elongated (Figure 13).
- Give a flattened shape to all six petals (Figure 14).
- Glue all the petals together (Figure 15).
- Cut six more strips and fold them in half (Figure 16).
- Cut six strips, fold them in half and cut the ends diagonally (Figure 17)
- Screw each end onto an awl or toothpick (Figure 18).
- At a distance of 3.5 centimeters from the middle, glue the coil (Figure 19).
- Press lightly on each petal tip to fluff it up (Figure 20).
- Glue the "stamens" between the petals (Figure 21).
- Insert the bevelled strips inside the "stamens" and glue them (Figure 22).
- Take loose sequins and sprinkle them on a snowflake (Figure 23).
Snowflake is ready!
- You can make snowflakes-candlesticks using the quilling technique. To do this, collect two crafts of different sizes - one smaller, the other larger. Then just glue one on top of the other. In the one that will be on top, the middle should be empty. This is where the candle-tablet will be inserted.
- As a decor for snowflakes, you can use beads, rhinestones, sparkles and the like.
- To achieve an openwork look, expand your knowledge and make coils of different shapes.
Basic forms of quilling
There are twelve forms of coils that the quilling technique has. Snowflakes can be made using either one or all of them.
- Open coil: the end of the strip is not glued.
- Closed coil: the end is glued.
- Tight coil: the strip is stretched throughout the work and the end is tightly glued.
- Large spool: A pencil is used to create.
- Drop: one end is pressed with fingers.
- Eye: both ends are pressed with fingers.
- Petal: the coil is compressed and folded on one side.
- Sheet: the coil is compressed on both sides and waves are made.
- Curls: the strip is folded in half, and then the ends are wound in the appropriate directions (inside, inside out, in different directions).
Once you've covered the basics, you can move on to more complex work in quilling technique.
The quilling technique appeared quite a long time ago, about 500 years ago. For the first time, it began to appear in European countries. This technique involves twisting strips of paper and then gluing them together. Further, various patterns and crafts are made up of these swirling strips. Folded stripes form both closed and open shapes. From simple figures form patterns that can be both plain and whole works of art. Patterns in this technique are very airy and lacy. Therefore, today we will consider how to make an original quilling snowflake step by step. We will make an openwork snowflake that can be hung on a New Year tree or near the desktop so that it reminds us that the holidays have come and we need to devote more time to relatives and rest.
Learning the basics of quilling technique: snowflake step by step for beginners
For its manufacture we need:
- Toothpick;
- Tweezers;
- Scissors;
- Glue;
- Paper.
Let's start making a large snowflake using the quilling technique.
We take a landscape sheet and draw stripes on it with a pencil and a ruler. Make sure the lines are even. Then we cut the sheet along the drawn lines. A clerical knife can help us with this.
We take a toothpick and apply it to the edge of the strip, and then we wind the strip onto the toothpick turn by turn.
We fix the end of the strip and carefully remove the resulting roll from the toothpick.
If you do not quite understand the description of this process - do not worry, below will be presented to your attention a photo that shows step by step the process of creating basic elements.
We make another such blank, only now we squeeze one edge with our fingers. As a result of this action, we get a droplet-like element. For our composition, we repeat the above manipulations five more times.
Then we glue the resulting 6 droplets to the first figure.
Again we take a toothpick and wind more rolls and now we squeeze it on both sides so that the result is a figure in the form of an eye.
Between the petals-rays, we glue the parts we just made.
Now we take 3 strips, bend them in half and cut them, we get 6 short strips.
We miss them in the way described above.
On each tip of the part we glue a figure in the shape of an eye.
We make 6 more coils and bend them with our fingers until we get a square shape.
We glue them with the top to a large coil.
Now we wind a strip of paper around a pencil, glue the end of the paper and remove it from the pencil. This detail will act as a loop for hanging it on Christmas trees, or on whatever your heart desires.
Glue it to one of the tops of our snowflake. We stretch a ribbon or thread in the resulting ring.
As in any of the activities in quilling, of course, there are certain clichés, or in other words - basic elements. Let's see what they look like. Exist various forms coils. Let's look at the most popular ones.
- An open coil is when the end of the strip is not attached to its body.
- Closed coil - the end of the strip is fixed, forming a closed loop.
- Tight coil - the strip is stretched very strongly throughout the twisting and tightly fixed, such a coil looks like a knot on an openwork background.
- Large coil - when creating, we use an ordinary pencil or any other thick core or frame for winding.
- Drop - press one end with your fingers.
- Eye - press both ends.
- Petal - squeeze with your fingers and bend on one side.
- Sheet - squeeze on both sides and make waves.
- Curls - fold the strip in half and wind the ends in different directions.
You can see various options for snowflake schemes in the photo below:
Quilling is the art of creating openwork patterns from paper. Translated from English quill - "bird feather". The brainchild of your creativity can be beautiful airy lace completely transparent patterns. You can create amazing compositions full of rainbow colors that evoke the mood you need. Paintings made in this technique will fit into any interior: from Gothic to high-tech, the flexibility of this art allows you to combine rigor and elegance, colorful or gloomy tones, from flowers to portraits, it depends only on the desires and scale of work: all this is possible talk about quilling. You can not only spend time with pleasure, but also for the benefit of both your interior and your wallet, because quality work has a high price.
Video selection on the topic of the article
DIY quilling snowflakes. Master class with step by step photos
Maslienko Larisa Anatolyevna, teacher of physics, MBOU secondary school No. 96, Barnaul, Altai Territory
Description: Coming soon New Year's celebration. In anticipation of it, the students face a problem - how to decorate the school building, classrooms and Christmas tree. I want something unusual and beautiful. In this regard, the "workshop of Santa Claus" begins its work. At technology lessons, fine arts and circles additional education students under the guidance of subject teachers begin to make various crafts on the New Year theme. The New Year is a winter holiday, and the accompanying companions of winter are light, openwork, snow-white snowflakes. They can simply be cut out of paper or made from cotton wool. I suggest using the quilling technique for making snowflakes, which will help create a unique and original pattern. My master class will be useful for technology teachers or teachers of additional education and will help you make amazing jewelry with little material cost. Master Class Designed for students in grades 5-8.
Purpose: Snowflakes are suitable for decorating the interior, and will also look good on the Christmas tree.
Snowflakes - pictures,
Take a look, hurry up.
Each has six
golden rays,
And each figured ray -
Winter's enchanted key.
Target: making snowflakes.
Tasks:
- introduce quilling technique;
- to promote the development of creativity, accuracy;
- develop fine motor skills hands;We will need the following tools and materials:
-office or colored paper format A-4,
- a pencil with a ruler
- stick for rolls or knitting needle,
- scissors and PVA glue,
- beads for decoration
- white threads.Progress:
1. Line a sheet of paper along the length after 0.5 cm. Cut the resulting strips with scissors, observing the safety rules:
- Watch the cutting direction of the scissors.
- Scissors must be sharp.
- Do not hold the tool with the blade up.
- Do not leave it with exposed blades.
- Do not cut with scissors on the go.
- During work, do not approach a friend and do not distract him.
- Pass scissors can only be closed and rings forward.
2. Making "petals"
Roll the strip with one end onto the knitting needle into a roll. Remove it and slightly unroll until a ringlet with a diameter of 2.5-3 cm.
Glue the free end to the ring, observing the safety rules when working with glue:
- Work carefully so that the glue does not get on the fingers, face and eyes.
- If glue gets into your eyes, rinse them with in large numbers water.
- Wash your hands after finishing work.
- Use a tissue when working with glue.
You have to wait until the glue dries. Press the ring on both sides with your fingers, giving it the shape of a “petal”.
We need 12 such "petals"
3. Making "rollers"
Roll the strip with one end onto the knitting needle into a roll. Without removing the roll from the knitting needle, glue the free end. When the glue dries, remove the roll from the knitting needle, so we get a dense “roller”. We need 19 rollers. To make the snowflake brighter, you can make rollers from paper of different colors (for example, 13 blue and 6 white)
4.Making "hearts"
Fold the strip in half.
We roll one side of the strip onto the knitting needle inward to the kink and remove it from the knitting needle.
Let's do the same with the other side of the strip.
We glue the resulting curls together, forming "hearts".
We need 18 "hearts". In order not to confuse when assembling snowflakes, it is better to use "hearts" of different colors. (For example, 12 white and 6 blue)5. From the resulting figures, we will begin to collect a snowflake.
Take a blue "roller" and glue six "petals" to it with rounded ends. To make the base of the snowflake more durable, you need to glue the “petals” together as well.
Let's take six more "petals" and place the base of the snowflake between the glued "petals" with sharp ends inward.
Glue them carefully.
After the glue on the base of the snowflake dries, we continue its further assembly. We place blue and white hearts alternately near each “petal” of the workpiece.
In order not to get confused, I recommend first gluing blue hearts on the sharp ends of the snowflake, and then white ones on the rounded ends.
Take the blue "rollers" and place them two by two near the ends of the white "hearts".
Glue them together and the end of the "heart".
Glue one white to the blue "rollers". The remaining white hearts will be placed above the tip of the blue ones.
When the glue dries, the white hearts can be glued to the blue ones.
The structure is ready. Decorate it with shiny beads. We glue one bead in the middle of the snowflake and six on the white “rollers”. I recommend generously lubricating the beads with glue so that they do not fall off in the future.
6. Let's make a mount for a snowflake.
Pass both ends of the white thread into the hole of the bead.
Over the bead we will tie a knot from a shiny strip from the “rain” (you can use a white thread instead of “rain”)
Cut off the excess ends of the thread from the knot with scissors.
Tie the mount to the sharp end of any white "heart".
7. The snowflake is ready to use. You can decorate your closet with it.
Snowflakes look especially beautiful in a group of two or three pieces.
They can decorate curtains, wallpaper or hang on a Christmas tree.