As I"ve been promising, here is a photo tutorial of how to use the new Pinwheel Die from Lil" Inker Designs with ag designs which is super easy and FUN!
You can see the card I made using the finished product on my design blog . Thanks!
Tools you will need: Pinwheel Die, die cutting machine, one brad (the longer the *stem* the better) Optional: glue dots, lollipop stick, embellishments
Meet the Pinwheel Die. Somewhere along the lines I "ve mentioned in my posting that it looks more like a worm than a pinwheel. With some easy assembly it will be a beautiful, 3-D pinwheel. Six die cuts will form your final or full pinwheel, so this is what one looks like.
This is 6 pinwheel petals all cut and waiting for assembly. I knew I wanted this fun orange dot pattern to be my *inside* pattern or the prominent pattern on my pinwheel so I placed my paper facing up and my die on top of it cut side down. So, choose your *inside* pattern (which is what I"ve been referring to it as), then inside pattern side up and die on top of it cutting side down.

After all your petals are cut, stack them all on top of each other and insert your brad into the hole on the longer, straighter edge of the die cut so that the *head* is on the opposite side and the *stem* is poking up through the stack and facing you.

 Then, in order one by one start bringing over the opposite sides of the petals and secure onto your brad. We are basically working backwards, so you will be seeing your pinwheel from the back at this point.
  When each petal has been folded over, secure your brad closed. You may see something that looks like this:
 or this after you "ve fanned everything out
  Flip it over and you "re done! Ta-daaaaa! Isn" t it so pretty and cute? You can use your pinwheel exactly like this, but I like to add a *stem* and some embellishments. Also, sometimes I lightly press my finger over the folds of the pinwheel to flatten them ever so slightly, but it's really not necessary.
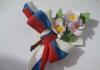
 I like to add a stem 2 different ways. A strip of paper works great, but here I "ll show you how a lollipop stick is really fun! These are just the Wilton" s lillipop sticks that are 2.5 in long. I think I got them on sale for $1.39 for 150 of them! I also like to add buttons and twine. I find all of these embellishments are easily secured with craft size glue dots.
 I added coordinating buttons in a stack and tied with some hemp twine and then plopped it (technical term, ha) right onto my roll or glue dots.
Turntables. These uncomplicated toys on wooden sticks with bright blades spinning at the slightest breath of wind are very popular with adults and children. It's hard to explain why people are so interested in watching these, to tell the truth, disposable gizmos. But if you dream up a little, then children's imagination easily turns home-made turntables into a Carlson propeller or a rotorcraft, romantic youth into a decoration for a wedding celebration, and a practical adult generation into a scarecrow for birds and moles.
A small digression from the topic, or Why you need to involve your offspring in the creation of a turntable
The windmill is a wonderful example of a toy that parents can make with their children. The manufacturing process will not take much time, but the spinner (made with your own hands, all the more so) will become a source of pride for the child, bring him closer to his parents, make him feel that he is on the same team with adults and can independently create even a simple, but miracle.
The benefits of such joint creativity will be undoubted for everyone: the child will learn the basics of three-dimensional modeling in a playful way, and his mentor-parent will be distracted from his adult activities and rest his soul.
Paper spinner making
A paper spinner is made from 2 multi-colored square sheets of paper (20 x 20 cm). You will also need:
- scissors;
- ruler with a pencil;
- awl;
- carnation or plastic push pin;
- a piece of polyethylene measuring 20 x 20 cm;
- iron;
- wooden stick.
In order for the spinner to be durable and attractive, it is desirable to make it two-color. To do this, take 2 sheets of bright paper of a contrasting color, put a piece of polyethylene of the same size between them and iron the entire three-layer “sandwich” with a hot iron - the polyethylene will melt and securely fasten the sheets of paper together.
As mentioned earlier, a do-it-yourself spinner is made on the basis of a square sheet of paper measuring 20 x 20 cm, but this is not so important. The main thing is to find and designate the intersection point of the diagonals of the square, thereby dividing it into 4 triangles. From the point of intersection on each diagonal measure a segment 1.5 cm long and put a mark. Armed with scissors, the sheet is cut diagonally to the mark line. Then, at each left corner of all 4 triangles, retreating about 0.7 mm, a hole is pierced with an awl. The same hole is made at the intersection of the diagonals.
It remains to sequentially lay all the triangular fragments on top of each other so that all the holes made earlier coincide, and fix the turntable on a wooden stick with a button with a plastic head (or a nail with a wide hat).

If everything is done correctly, then you get something like this turntable. With your own hands, it turns out, you can make a toy that looks no worse than a purchased one.
Making spinners from plastic bottles
Craftsmen actively use plastic bottles to make various crafts. Now the arsenal of their products has been replenished with another useful novelty - a turntable.

Bottle turntables will decorate the garden plot and scare away uninvited birds who want to feast on the grown products.
It is not difficult to make such wonderful flashlights-turntables. A plastic bottle is cut into narrow strips that are bent at a certain angle. Then a hole is drilled in the cork of the bottle and the windmill is mounted on a wire, through which the spinner will be attached to the support.
Afterword, or How to make life even more beautiful
As can be seen from the description, a do-it-yourself turntable is made quickly. The Craftsman does not require exotic materials. The remnants of wallpaper, cardboard juice boxes, plastic bottles are used - in general, materials that are often sent to waste as unnecessary. But the scope of this craft may be the most unexpected. A spinner made of paper or plastic can serve not only as a familiar toy.

It has become fashionable to decorate celebrations and weddings, decorate garden plots. Turntables are used during photo shoots, with their help they create unusual swaying panels for the holidays. A seemingly simple trifle can bring a sense of celebration into our lives, cheer up and make any event unforgettable. Isn't it a miracle?!
greetings to all brainfriends! And I share with you brainguided about the creation crafts windmill, clearly showing the conversion of mechanical energy into electrical energy.

By collecting this unpretentious homemade and having understood the principle of operation, it is possible in the future to make a larger-scale and actually operating wind generator. And a simple windmill will delight you by illuminating the courtyard!
Step 1: Materials
- marker
- little motor
- LED (mine is red)
- plastic or wood plate
- PVC tee 3/4 - 1/2 - 1/2
- connector 1/2
- glue gun
- drill bit for drilling
- blades
- flange 1/2
- PVC pipe scissors
- punch or awl
- sealing ring
- roulette
- 30cm PVC pipes 1/2
- and of course the wind

By the amount of materials needed, it may seem that the craft is complicated, but it is not. The motor can be taken from an old VCR or DVD, the blades are easy to build from spoons and a bottle cap. PVC pipes are perfectly cut with a regular hacksaw, and not only with special pipe scissors.
Step 2: Pipe cutting


We mark on braintube segments 2.5 and 12.5 cm, and then cut them off with scissors. This will result in three segments 5, 12.5 and 15cm.
Step 3: Marking the Hole


We put an o-ring on the front side of the motor, apply it to the tee and mark the hole for the LED, it will be located near the back of the motor.
Step 4: Drilling a Hole


Shilom or brain-kerner mark the center of the hole, so the drill will not slip, and drill a hole of such a diameter that you can easily install the LED into it.
Step 5: Mounting the LED


We take the LED and determine the polarity of its contacts: the long foot of the LED is a positive contact, and then we connect the LED to the motor. Positive contact to the "plus" of the motor, negative, respectively, to the "minus". We fix the legs of the LED by bending the contacts of the motor.
Step 6: Functional Check

We install the blades on the axis of the motor and blow on under the tree strong enough to light up the LED.
Step 7: Motor Installation


Gently bending the LED insert brainmotor into the hole of the tee until a snug fit, then insert the LED into the intended hole and straighten it.
Step 8: Fixing the Motor


Using a glue gun, we fix the motor in the tee.
Step 9: Finishing the Connector


Set aside the tee with the motor to the side and take the connector. We unscrew the connector and take out the sealing ring that is inside, this will allow the windmill to homemade rotate freely.
Step 10: Bush Assembly


We insert the previously cut piece of 2.5 cm tube into the connector, thereby obtaining a semblance of a sleeve.
Step 11: Mounting the tee


We mount a tee with a motor on the sleeve.
Step 12: Shank


As a “tail”, we tightly insert a piece into the tee braintubes 15cm, and insert a segment of 12.5cm as a "rack".
Step 13: Finishing the shank


Using hot glue, attach the plate to the shank.
Step 14: Homemade is ready!


We tighten or loosen the connector parts depending on your needs, mount the flange on the rack and glue all the fixed parts. At will, we paint the windmill and that's it, brain trick ready!
Thank you for your attention, I hope this homemade deserves to be a visual aid!
Or to decorate a flower bed.
Summer is just around the corner, which means the kids can't wait. But so that the child does not get bored in a lot of free time, he definitely needs to occupy himself with something. Alternatively, suggest making colorful DIY paper pinwheels that create rainbows as they spin in the wind. The manufacture of such turntables will take little time, but the joy of contemplating such beauty will be more than enough.
The highlight of these turntables is the strong color contrast. To make it bright, you can try different techniques for making paper turntables:
- Invite the children to draw, put prints, decorate paper, which you will later use for crafts, so that each of the “blades” of the spinner is unique.
- Place layers of printed tape or duct tape on the pinwheel paper to create contrast on the back of the craft.
How to make a do-it-yourself paper spinner
1. Download the pinwheel stencil. Decrease or increase the size of the stencil depending on what kind of paper pinwheel you want.
2. The first step is to glue the decorated paper with a pattern onto plain paper for crafts and cut the pinwheel along the contour with scissors or a clerical knife.
3. Make cuts on four sides of the resulting square diagonally from the corner, as shown in the picture. The length of the cuts is indicated on the stencil.

4. With a hole punch, you need to punch every second corner, as in the picture, and also make a hole in the middle of the future paper turntable.

5. Now you can start wrapping the corners of the future paper turntable inward.

6. Under each corner of the paper of the turntable, you need to drop a drop of glue so that they stick together.

7. Make sure all the punched holes in the pinwheel paper line up. The top of the paper spinner is ready! It remains to make a wand and a spinning mechanism for it.

How to make a stick and a spinning mechanism for a paper turntable with your own hands
Making a stick and a mechanism to make your little paper spinner spin is very simple. You need to take a pin, bend it and drive it into the eraser on the tip of a simple pencil. That's all!

For a giant spinner you will need a wooden stick, an eraser, a pin and a button. Cut off the eraser cube, make a small indentation in it and stick the stick in there.

We pass the pin through the holes in the paper spinner using a button. She will look cute and will not let the pin slip back.

When the pin is all the way through the eraser, you will need to check to see if the sharp end is sticking out at the back. If necessary, the pin will need to be bent so that small children's fingers do not get hurt.
.jpg)
Such colorful in the form of a pinwheel will not leave indifferent any child. What a child, adults will also be delighted with such paper turntables on a stick. These will become fun entertainment for everyone, because it's so fun to watch how the "blades" of the turntable, rotating in the wind, turn into a bright rainbow.
- this is the topic of our today's article. Naturally, in order for the child’s interest not to subside, even the most interesting thing should not take a very long time. So our homemade paper spinner is just such a solution.
To get started, tell your kid about the windmill, how people tamed the wind and learned how to use it for their needs. Then give the offspring a piece colored cardboard or thick paper and by your own example, armed with a ruler and scissors, start making a paper windmill with your own hands.
For too young children, it will be difficult, but years from 3-4 your son or daughter will already be able to independently cut with scissors the lines previously measured along the ruler and drawn with a pencil.

Read a very interesting article on how to make a bird feeder with your own hands. Birds will love your homemade feeder and will be very grateful to you, especially in the cold season.
But what can be done from plastic bottles: Interesting DIY craft ideas.
Tools for the job
- scissors
- hammer
- button
- double-sided flexible thick paper (suitable for photos)
- backing board
- wooden stick
Consider how big your paper pinwheel will be. It is most convenient to work with squares whose sides are equal 15-20 cm. Tell your child how to measure the required amount of cardboard.


How to make a turntable? Everything is simple. Cut out squares. From opposite corners, draw two lines diagonally - so you will find center. It remains only to cut the paper along the lines, not reaching the center a few centimeters.


Then we take button in the form of a carnation, we pierce all four corners of our windmill, bend the corners, nail the button to the top of a flat wooden stick. Do not drive the button completely into the piece of wood! Necessarily leave a gap, because your turntable should spin.