Perhaps every thrifty housewife eventually accumulates a mountain of buttons of various sizes and colors. I remember how my grandmother had a whole collection of buttons in her box, which as a child was so pleasant to look at and sort through. I don’t even know if she found a use for them, but now I know exactly how to creatively use these cute little things: so many wonderful home decor items can be created from ordinary buttons, which is simply amazing! We share ideas with you.
Decorative panel
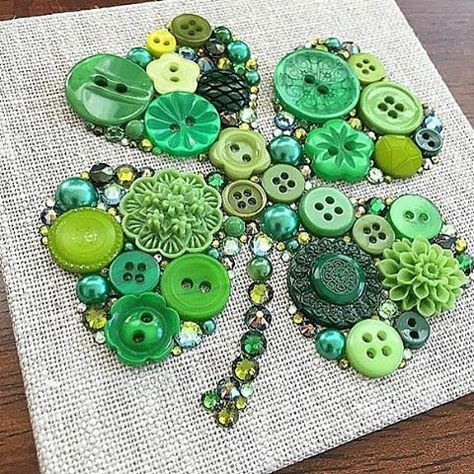
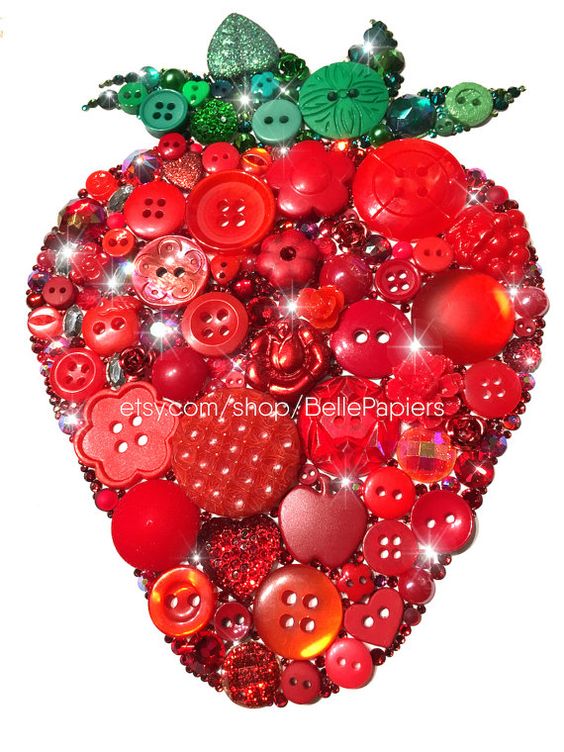
If the buttons are so beautiful that they are a sight for sore eyes, make a decorative panel out of them and admire them to your heart’s content! Just take a canvas, prime it acrylic paints and use glue to glue buttons in the shape of a heart, your favorite letter or any other design. This method is for those who love creativity.
You will need: canvas, paints, glue, buttons.
Complexity: 2.


Pillows
The simplest thing that comes to mind with button decor is pillows. In her master class, blogger Kat described in detail how she sewed a pillow and made a very impressive button print on it.
You will need: pillow, buttons, thread and needle.
Complexity: 2.

It is worth noting that decorating pillows with buttons is a great opportunity for creativity and imagination. In the photo below there are even more original ideas that will inspire you.


Calendar
And here is another very useful thing made from buttons - a wall calendar. It was suggested by blogger Diane Gilleland. This perpetual calendar will decorate your desktop and help you remember today's date, month and day of the week.
You will need: photo frame, buttons, fabric, felt, Velcro, snaps, glue.
Complexity: 3.

Tray
This beautiful piece will showcase your unique button collection in all its glory. Blogger Mel tells in detail that her mother once gave her these “delicious” vintage buttons, and now they came in handy for implementing such an original idea.
You will need: tray, cardboard, buttons, glue, glass.
Complexity: 2.


Table decor: napkins with buttons
You can also decorate napkins with bright multi-colored buttons. festive table. For example, add them to embroidery or make an original napkin ring.
You will need: napkins, buttons, threads and needles.
Complexity: 2.


Wall decor: imitation buttons
Very interesting idea for home decoration, but without using buttons. Blogger Jen's master class details how to make wall decor from plastic plates.
You will need: plastic plates, drill with a wide nozzle, rope.
Complexity: 2.


Another option for making “wall” buttons - a little more complicated, from wooden circles - can be found in this master class.

Watch
On his blog, Matt from Germany has a wonderful master class on creating bright knitted watches and decorating them with buttons that act as the core of knitted flowers. If you know how to crochet, try knitting such a cozy watch!
You will need: watch base, threads for knitting, hook, felt and buttons for decoration.
Complexity: 2.


For inspiration - a few more original ones wall clock with buttons instead of a dial.


Bookmarks
Blogger Maven suggests making fun paperclips out of buttons that can serve as bookmarks.
, both simple ones that can be done with children, and complex ones that require a lot of patience and several tools.To make interesting crafts from buttons, you don’t need to have any special skills, you just need to stock up on certain tools and learn about some tricks.
Here is just a small part of some of the most interesting (simple and not so simple) button crafts that you can make with your own hands.
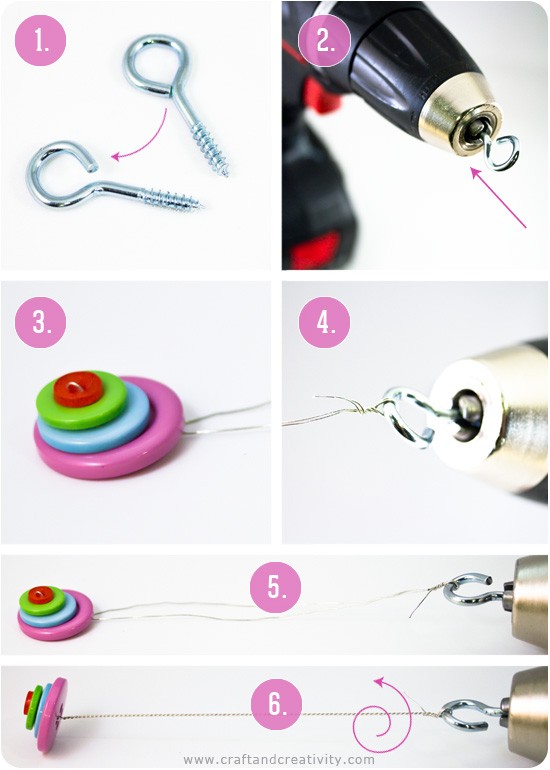
Button Crafts: Adjustable Button Necklace
You will need:
Buttons
Thread, cord, line, or string (strong and thin enough to fit through the holes in the button)
Scissors
Measuring tape

1. Measure approximately 150 cm of thread and cut a piece. Thread the needle and start pulling on the buttons one by one.
Start with reverse side buttons, into a hole, to the right and into another hole.
The first button should be approximately 40 cm from the end of the thread.

Insert the second button in reverse, i.e. so that it attaches to the first face to face.
Repeat alternately as much as you want. In this example, the length of the button necklace is 50 cm.


2. Making an adjustable clasp:
Prepare a button with two large holes - you will have to thread it 2 times
Insert this button about 10 cm from the end of the thread

Thread the other end of the thread through the needle and pull the end through the same button (this time it will be on the reverse side).
3. Tie a knot at each end of the thread.
* By pulling the ends of the thread, you can adjust the length of the necklace.

Button bracelet (photo)

Button tree

You will need:
Panel (you can use chipboard, canvas or a wall from a photo frame)
Lots of buttons
Scrapbooking paper
Simple pencil
Tree and bird patterns (optional).

1. Making the base. If you have canvas, you can paint it; if the wall is from a photo frame, cover it with fabric or you can also paint it; if chipboard, sand the edges and apply varnish.
2. Prepare a tree template. You can print it out and then transfer it to a wooden base.

3. Prepare a bird template and transfer it to scrap paper or thick paper, then paint it.

4. Apply glue to the buttons and glue them according to the tree template. The crown of a tree can be made from green buttons different shades, and the trunk is brown.

5. Glue the birds to the tree.
The painting is ready and can be used to decorate the interior.

Tree made of buttons (photo)


Button tutorial: bowl

You will need:
Buttons different forms and sizes (small buttons stick better)
PVA glue (you can dilute it a small amount water)
Brush
Scissors
Jar (on which you will place the ball)
1. Inflate the balloon to the desired size.
2. Place the ball on the jar with the tail down.
3. Cover half of the ball with glue using a brush or just your finger.


* While applying the glue, you can hold the ball by the tail and wiggle it so that the glue spreads evenly. After this, you can place the ball on the jar.
4. Let this layer of glue harden. This will serve as a layer of protection between the ball and the buttons.
5. Apply a second layer of glue and start gluing the buttons - they should fit snugly against each other. Cover the floor of the ball with buttons.
* To prevent the buttons from “sliding” down, after gluing them, turn the ball with its tail up and place it on the jar.
6. Leave the workpiece to dry. This may take several hours.


7. When everything is dry, cover the glued buttons with another layer of glue.
* If necessary, to strengthen the structure, you can apply a fourth layer of glue (after the third layer has dried).

8. Carefully cut off the tail of the ball so that the air slowly comes out of it.
* If necessary, remove excess dried glue using scissors.

Crafts from buttons for children: cars

You will need:
Pin
Buttons
tube
Thin wire
Adhesive tape (electrical tape)
Regular glue (if necessary)

1. Cut two pieces 2.5 cm long from the tube.

2. Pull pieces of wire through the cut tubes and attach to the ends of the button.

3. Make another such blank and insert both into the clothespin - one secured in front, and one in the back, where you need to secure it with electrical tape.
* You can make several of these cars, and make a slide out of cardboard to let the cars go.


Button applique: flowers

You will need:
Buttons
Wire
Felt, drape (or other dense material)
Pliers

1. Prepare one wire and start stringing buttons on it (through one hole).
2. To secure the buttons, the wire must be bent (see image) and passed in the opposite direction through the other hole of each button.


3. Twist the wire after it has gone through all the buttons.


Thrifty housewives carefully rip off buttons and save them, in case they come in handy! Some people accumulate such accessories for years or throughout their lives. But not everyone knows that it can be used not only for its intended purpose, but also for manufacturing, decorating and creating entire masterpieces! In this article you will learn how to do original crafts made from buttons with your own hands, from the simplest, but no less creative, to very complex compositions.
Button paintings
About the technique of creating paintings from buttons
Almost everyone in their home has a certain supply of buttons to create a whole picture.

First, you need to understand what you would like to depict with them. Some prefer abstraction, i.e. buttons can be sewn on in a chaotic manner. This is perfect for decorating sofa cushions. But perhaps your imagination has painted a certain picture for you.
If you have decided what you want to depict, then you can proceed to the next stage. Using carbon paper, transfer the sketch onto the fabric - it should be thick enough. Due to this, it will not be deformed due to the weight of the buttons themselves.
Once you have traced the design onto the fabric, start selecting buttons and combining them on the canvas like a mosaic. Do not rush to sew, as you may make a mistake.
The simplest thing is to create a bright melody on paper from buttons.
“Plant” cute daisies on burlap...
...or decorate your congratulations with a fluttering butterfly
The buttons in the jar look original.
The marine theme is relevant always and everywhere.
Children's crafts, metrics and monograms
Multi-colored buttons can be used to make voluminous educational toys for small children. For example, from colorful buttons of various sizes you can glue a frog, fish or caterpillar...
If the button from which you decided to make the animal’s face does not have holes for the eyes or nose, then you can make them using a hot nail.
Beads made from buttons are also suitable for training fingers and hands and will help. Try to use buttons that feel different to the touch and make knots between them.
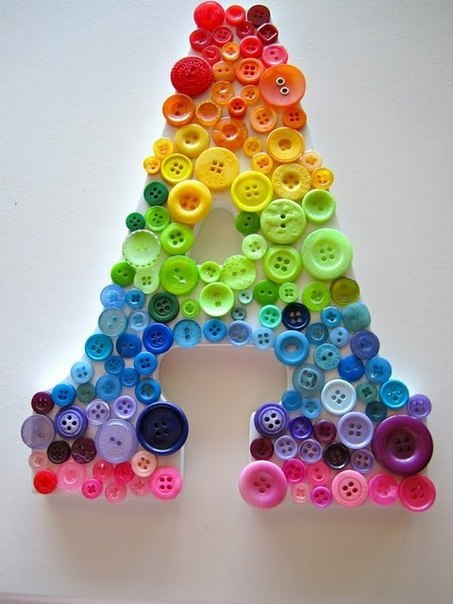
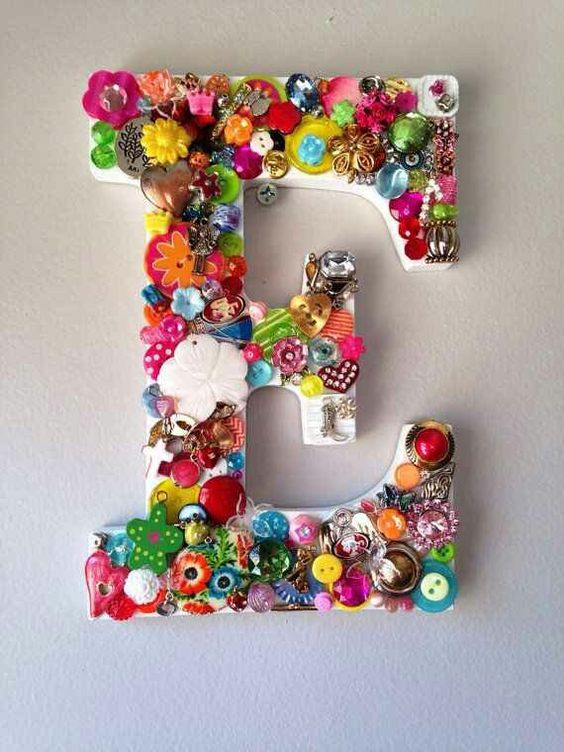
In addition, your baby will learn and remember letters faster if he does them himself. You can make such a monogram panel with it. Perhaps this will be the initial letter of his name. This will also instill taste and help you acquire the skill of combining different colors and textures.
You can simply cover the letter with buttons in all the colors of the rainbow from red to purple...
...and in addition to buttons, use other decorative elements.
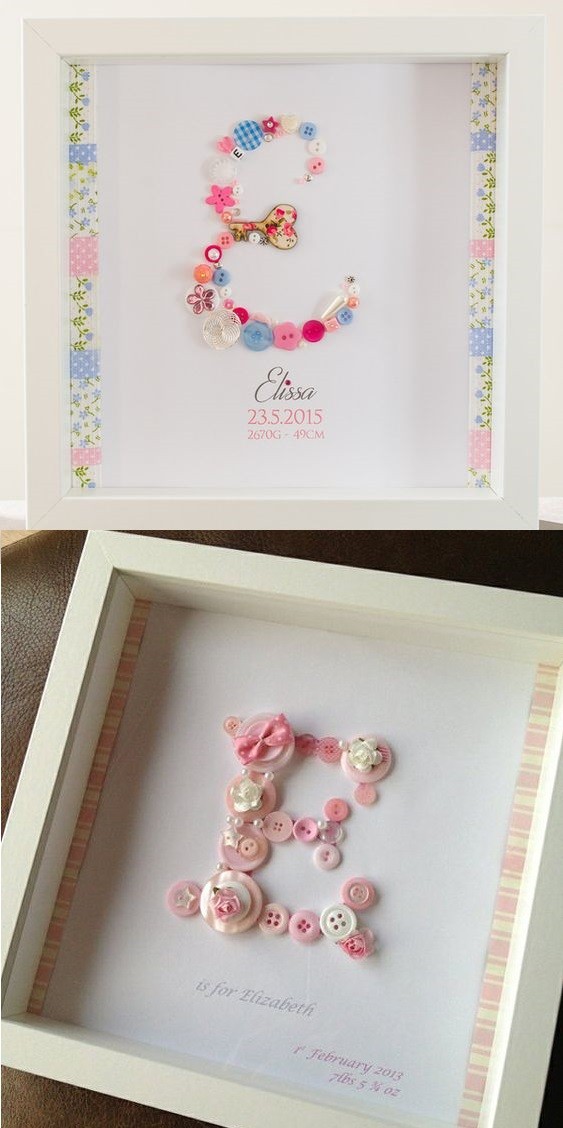
Using buttons and rhinestones, you can make an original metric as a gift for someone.
These could be the small feet of a boy or a girl.
Or maybe children's hands.
Or the initial letter of the name with the date of birth. Perhaps you can come up with something of your own, individual, for such a case!
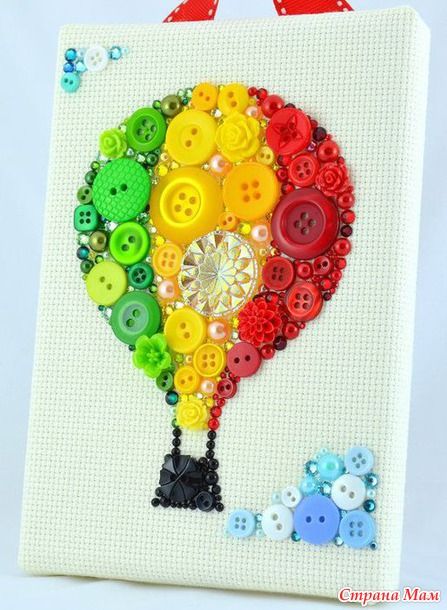
In addition, you can teach your child to “draw” using buttons, rhinestones and beads.
It's better to start with simple panels, such as a bright balloon.
A more complicated option - with a color transition from light blue to dark blue.
From buttons you can create all kinds of images with animals, for example, with a bright red fox.
Filling the outline with buttons and beads can serve as a kind of coloring or. This will instill perseverance and patience in the child, and most importantly, teach him to bring the work he has started to its logical conclusion.
New Year's decorations made from buttons
The simplest thing is to collect buttons of different sizes and colors on a wire or fishing line.
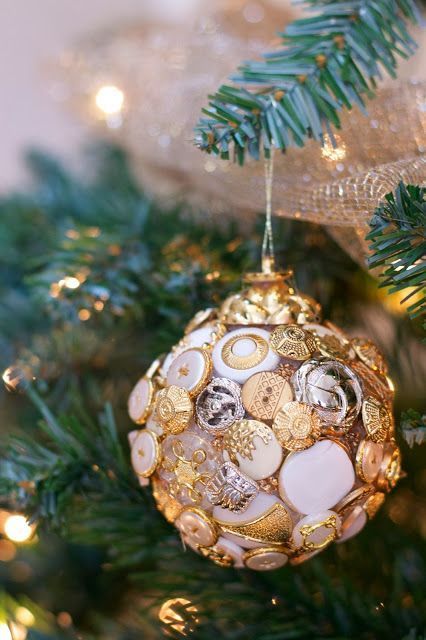
Or wrap a cardboard blank with twine or thread and “dress it up” with large bright buttons. The star of such a Christmas tree can be made in the form of a fluffy pompom.
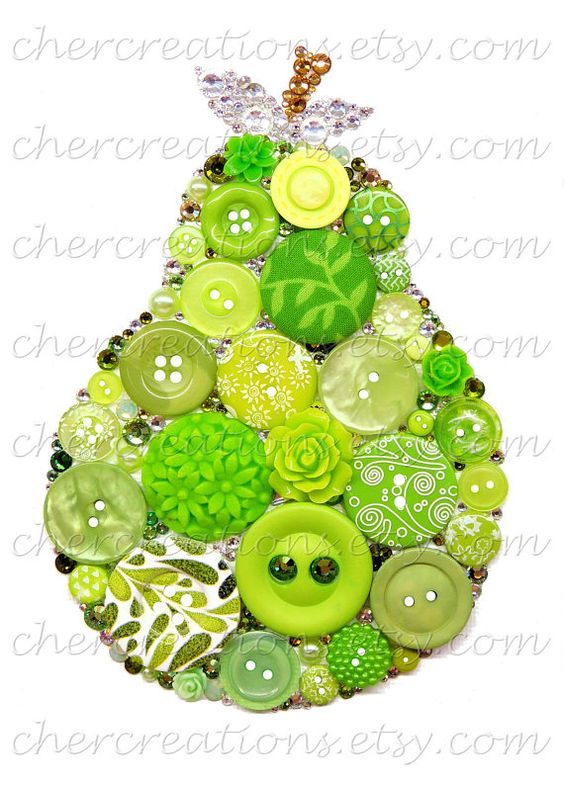
You can make it out of buttons volumetric sprocket in pastel colors. Don’t forget to fill the empty space between large buttons with smaller ones or rhinestones.
Using gold buttons, you can make it so elegant!
Making such a bouquet is not at all difficult. For this you will need: wire, buttons, decorative elements, pliers.
We start by sorting the buttons by diameter and color. We fold the buttons in the form of peculiar pyramids, of which the bouquet will consist.
Then we string the buttons onto the wire in an orderly manner. After all the buttons are on the wire, we intertwine the ends together, thereby fixing the pyramid-flower.
The stem of a wire flower can be twisted into a spiral or decorated with tape suitable color. For the bouquet we prepare 21-25 flowers.
You can decorate the bouquet with butterflies, bows, etc.
It's even easier to make a tree of happiness. All you need to make it is buttons, wire and pliers.
Button accessories
You can use buttons to create various accessories, as well as decorate shoes.
With the help of bright buttons, home slippers will sparkle in new colors
Also, buttons are an excellent material for making.
You can cover larger buttons with fabric and make such a wonderful autumn composition.
Buttons can be used to make very interesting, and most importantly creative and individual things.
You can sew it on a piece unusual buttons various shapes, the main thing is that they match the color of the fabric and each other. Happened original decoration, which can be worn, for example, under a white or pink shirt.
Bright polka dot buttons can be tied together with decorative twine or leather cord.
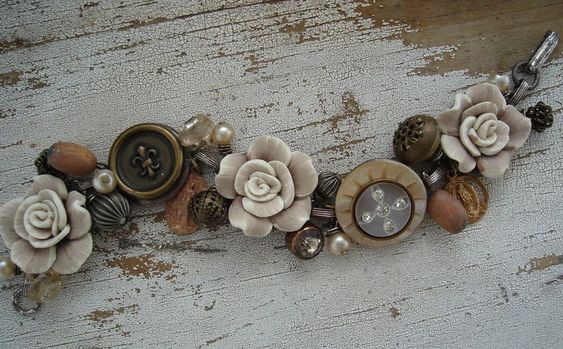
A bright bracelet is made on a chain using wire.
Or such a dim, but no less attractive bracelet with roses.
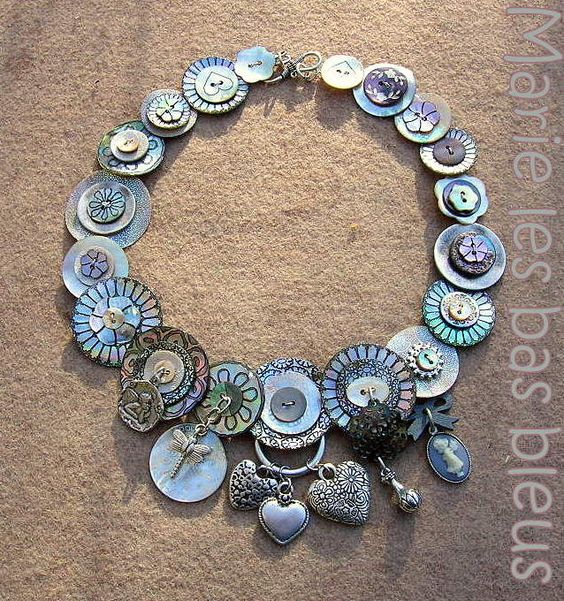
By placing one button on another, a smaller one on a larger one, we get wonderful elements for a necklace. We hang all kinds of decorative elements from them - angels, dragonflies, hearts, etc.
A bunch of buttons can be hung on a keychain, it looks bright and interesting!
Interior decor items
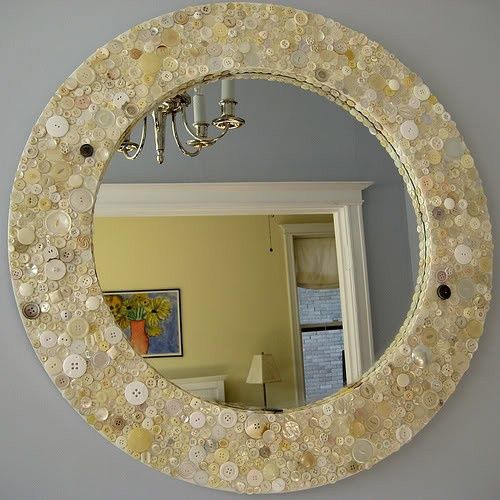
Buttons are also a very versatile material for decorating the interior of your home. For example, a simple mirror can be decorated like this at in the right way.
Using buttons in pastel colors, you can make such a noble mirror. Here and there add a color accent using darker buttons.
Using the same principle, make your own original photo frames. Combine buttons of different textures, but choose them so that they are in the same style. For example, pearls look very elegant with gold.
Bright purple and lilac buttons go perfectly with rhinestones and bronze elements. Photos will look brighter in such a photo frame!
Or make a bright photo frame by combining buttons with others decorative elements or even small toys. This photo frame will fit perfectly into a child's room.
From simple, unpretentious buttons you can glue together an original colorful stand for a mug. It is better to use superglue to glue parts together.
Coffee cans can also be decorated with buttons. We cover the jar with buttons of any color and cover it with spray paint on top.
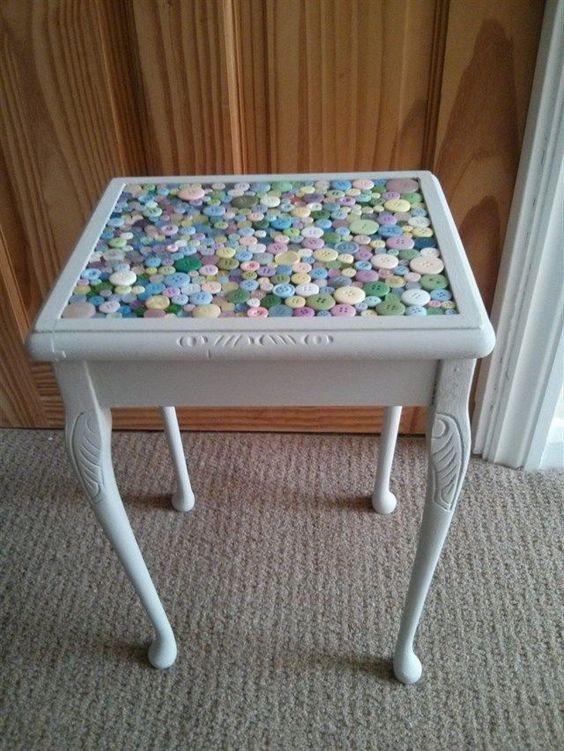
The tabletop can also be decorated in an original way by laying out buttons in a chaotic order or in a specific pattern.
You can make a bright mosaic canvas.
Liven up any decor. Make beautiful color transitions, placing one button on top of another.
Or another option - a delicate pink-lilac watch, but with button numbers.
Buttons are great for decoration. Create your own chamomile field!
Or make an original pillow decorated with sewing-themed decorative elements: small spools of thread, decorative scissors, measuring tape and, of course, buttons.
Using buttons you can make any pattern on a pillow, the simplest and cutest is a heart.
Unattractive brown buttons can be used to make these cute acorns. Use a foam piece as the center. Next, glue overlapping buttons. The hat can be made from an old bowl covered with fabric.
Make a globe out of buttons!
Panels and paintings
Let's look at the secrets of choosing and combining materials when making paintings and panels from buttons.
First, you can make "flat" paintings from buttons...
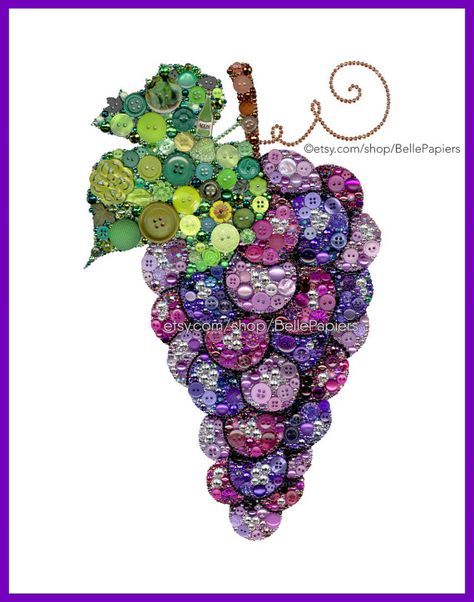
….or volumetric options, for example, by gluing buttons overlapping each other...
...or stick small ones on top of large buttons, playing with each large button.
The background of the product plays an important role. You can lay out the picture on a fabric canvas, or you can make strokes of paint, so the picture will look brighter and more impressive.
The button pattern can be monochrome...
...or with a predominance of one color, but with bright splashes...
...or other bright accents.
And you can make the depicted drawing completely multi-colored.
The main thing is to be able to combine buttons harmoniously, and the material is a minor matter.
Rhinestones and beads are a bright “felt-tip pen” when composing pictures.
Don't be afraid to use bright colors!
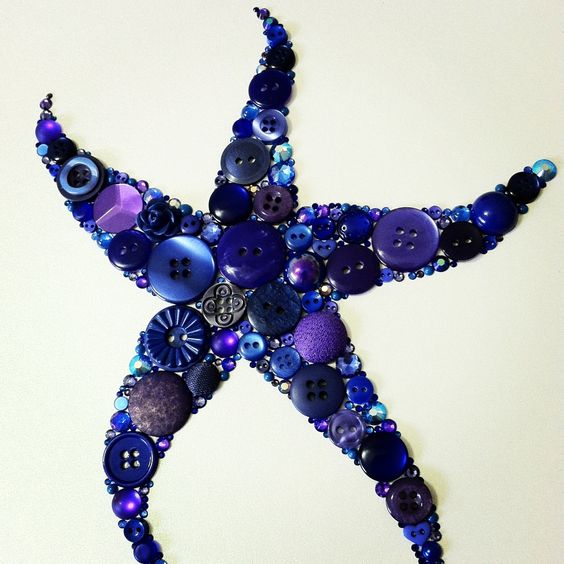
Animalism is very common in this type of needlework!
- bright starfish
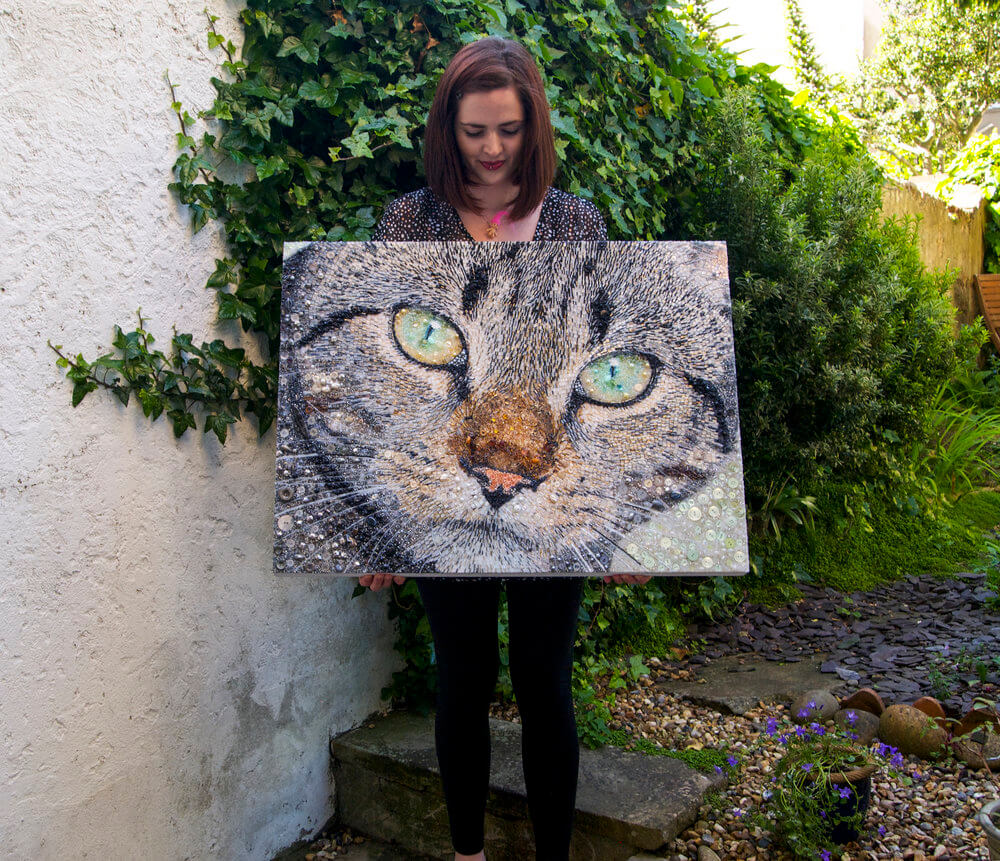
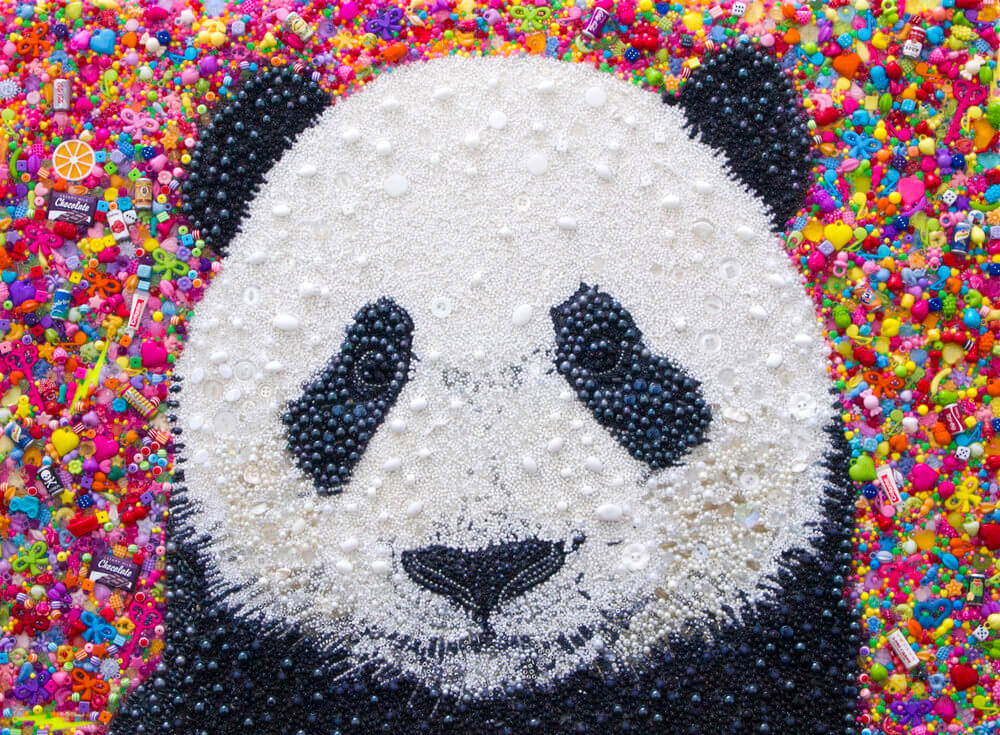
Having learned how to make simple paintings, you can move on to complex work. For example, making portraits from buttons.
Perhaps you too can succeed in button art portraiture.
[nDOMe] Do it yourself In his master class he shows how to create a portrait from buttons:
Creating portraits is, of course, the highest aerobatics! The faces are mainly made of light beads, in rare cases from the buttons themselves.
Masterpieces of button art from famous masters
There are artists in various countries, who are known all over the world and they gained this fame thanks to their works made from buttons. The whole world admires them!
Augusto Esquivel is an Argentinean artist who works with buttons of various colors and creates delightful installations from them. These are, without exaggeration, real works of art!
Button art for Augusto began with a box of buttons found in the attic. They were quite ordinary, but there was a whole box. Augusto began to create three-dimensional images from buttons and fishing line, coupled with his spatial imagination. He stretches fishing line or threads between two surfaces and places buttons on them according to design. As a rule, string-button garlands are attached to the ceiling.
His most famous work is the black piano (“Upright Piano”), which he created from 30 thousand buttons. This sculpture weighs 20 kilograms. Augusto created his masterpiece over the course of two months.
In addition to the piano, other musical instruments were created from simple clasps.
Augusto is also capable of creating portraits of famous people.
Sarah Jane Connors is an artist who creates paintings from buttons and beads. Her childhood hobby grew into art; Sarah began to create magnificent paintings, which were exhibited at various exhibitions.
It takes the artist 1-2 months to produce one painting. Each bead and button is attached to the fabric with glue.
Sarah finds materials for her works at flea markets, flea markets, and charity shops. The artist pays a lot of attention to detail, so she carefully selects materials according to shape, color and size.
In her works, the artist conveys the inner beauty of nature and every creature.
The background of the paintings is created with no less diligence and care.
Sarah Jane Connors' paintings are undeniable shining example recreating beauty!
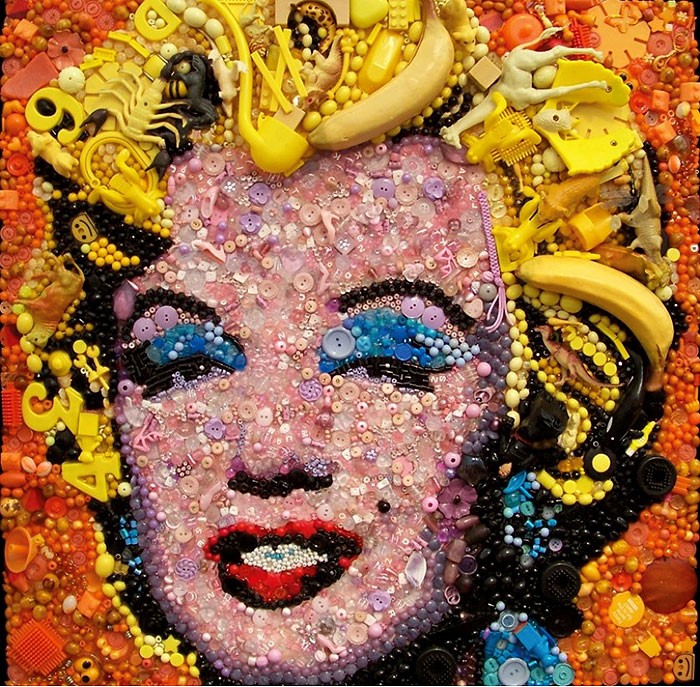
Jane Perkins
Jane Perkins is a famous British artist of our time. She paints her pictures using buttons, beads, hairpins, toys, lids, boxes and other small things that many will consider old, unnecessary trash. She collects materials for creativity wherever possible - on the street, from friends and acquaintances...
Each such painting is unique, even if the artist made the same painting twice. First, Jane attaches the buttons with hot glue so that they can be re-glued and, if necessary, the shade of the image can be adjusted. When the painting is finished, the artist looks at it for a while and makes certain changes. Next, the buttons are firmly attached.
Most of Jane's paintings were purchased for private collections. The most famous works are the Queen of Great Britain, the President of the United States, Mona Lisa, Marilyn Monroe, etc.
The peculiarity of Jane's paintings is that they must be viewed from a great distance. They are quite large in size and made with large “strokes”, which were made from designer microcircuits and other elements.
You can see even more paintings by Jane Perkins in this video Ruby Cohn:
Don't be afraid to try something new, create something original and creative from something painfully familiar! We wish you all inspiration and creative success in all your endeavors.
Categories


Everyone knows what buttons are. But not everyone realizes that they can be used not only for their intended purpose, but also to create various types of decor. How to make crafts from buttons? Read below.
Features of making paintings from buttons
Many people have accumulated quite a lot of such accessories at home. It is quite possible to turn it into wonderful panels and paintings with your own hands. There are a lot of ideas. Some of them are also intended for children. For example, there are many ideas for crafts for kindergarten from buttons. But more on that later.

Before you start working, you must decide on the plot of the picture. It is also important to choose a style. Some people like abstraction, others gravitate more toward the classics. As for the topic, you can look up something on the Internet or come up with something of your own.


The next step is to transfer the sketch onto the fabric. After this, you can begin to select buttons and try to make different combinations of them like a mosaic. It is better to overlap the patch, so the pattern will be more voluminous.

The most important thing in the work is to choose the right colors and strictly follow the chosen scheme. It is also advisable to try to make the most neat knots.

As soon as the last element is sewn, the fabric must be stretched in the frame. The DIY button craft in the form of a panel is ready.

Nuances of choosing material
The choice of material depends on what exactly you decide to make. In the case of a painting or panel, you can use thread or glue to attach the buttons.

If you settled on the first option, then you should choose their color wisely. The shade of the threads should match the fittings and not distort the image as a whole.

Are you a gluing advocate? Remember that depending on the situation, you can use the following types of glue: PVA, polymer or superglue.

You only need to apply it on the buttons just a little bit so that there are no streaks. Hot glue can also be used. It allows you to adjust and re-glue individual parts.

Interior items
Craftswomen love to use buttons to create original interior decorations. So, they can completely transform an ordinary, boring mirror, adding style and a certain charm to it.


Crafting something with kids is a wonderful activity that you can’t imagine better. Very often you have to prepare decorations for a kindergarten, school or home for some holiday. For example, if your child went to school for the first time, you can write out your congratulations in beautiful three-dimensional letters. And on any other day (Birthday, New Year etc.). And if you don’t know how to make letters with your own hands, this article will come in handy for you.
Letters can be made from absolutely any materials, it all depends on your imagination; in this article we will tell you the most interesting and common options.

First option

Probably the most common option for homemade letters is letters made of cardboard, because this is a very affordable material. The principle of operation is very simple: you just need to cut out the letters you need according to the sketch and glue them together, that’s all. As you can see, there are no complications or sophisticated methods. Ready product You can paste it over with colored or self-adhesive paper, or simply paint it with paints or colored felt-tip pens.

Soft letters

Very often letters are made from fabric; this method is a little more complicated than cardboard, but also very simple.
Usually letters are made from felt, since it holds its shape very well, is quite dense, and looks very nice.

In order to make such letters, you need to cut a letter out of fabric, leaving room for a seam, fill it with filler (sintepon, down, scraps of fabric) and sew it together. You can do this with a machine stitch, or you can carefully do it with your hands.

For letters made of fabric, you can come up with wonderful decorations from beads, somehow lining the outline with them, for example. You can also sew buttons, beads, clasps to a fabric letter, or decorate it with some kind of embroidery. It will look very original, your loved ones will definitely appreciate your work and idea.
Related article: Photos of bedroom interiors in oriental style

Crafting from paper

There is probably no more popular way to make letters from paper. This way you can create simply extraordinary masterpieces. Paper letters are convenient because they can be painted in any color you need without much difficulty.

Letters made from napkins turn out very beautiful. The letters turn out fluffy and cute, otherwise this technique is called letters (or numbers) from paper flowers. The technique is also quite interesting:
- First, take a single-layer napkin and cut it into four equal parts. We place these pieces on top of each other and fasten them in the middle with a stapler.
- We cut the squares into a circle.
- Now, from edge to center, cut each layer into thin strips and straighten them.

- We cut out the letter itself from cardboard and glue the resulting flowers around the entire perimeter.
This is the beauty that results:

IN similar technology you can make letters from corrugated paper, but then the circles will need to be cut out immediately from a large sheet, but this way the flowers will turn out even fluffier and more voluminous, and, therefore, more beautiful.
Unusual way

Letters from quilling turn out to be interesting, not childish and fluffy, let's try to make such an interesting craft:
- First, take a sheet of paper that will serve as the base and draw the outline of the future letter on it.
- Now let's prepare the strips with which we will work. To do this, cut colored paper into strips no thicker than six millimeters.
- Glue a wide strip of thick paper along the contour of the letter.
- Twist small strips of colored paper into curls. You can screw them onto the handle and hold them for a while.
- Well, now we decorate the letter as we wish.


