An original balloon for decorating a children's room can be made from paper with your own hands! To design such volumetric crafts, it will take very little time.
The, step-by-step master class will help you learn how to make a paper balloon without much effort!
To create a craft you will need the following materials and tools:
- colored paper or cardboard;
- scissors;
- paper clips;
- glue stick.
In creating this craft you can use both colored paper, and colored cardboard. IN in this case, the ball will be made of medium-density cardboard.

You can choose the shades of the ball at your discretion. From each sheet you need to cut out the following blanks for the base of the ball and basket.


To do this, the ends of the lower workpiece must be carefully “brought” to the top.


The first row is ready!

Then, in the same way, create the second row of the ball, drawing out the stripes of the upper workpiece.


Gradually, the ball will begin to take on the required shape.

Afterwards, the ball should be woven in this way until the end.

At the same time, each row must be secured with paper clips and the strips carefully pulled together.

In the end, we got this ball!


Then, so that it does not lose its shape, its bottom must be fixed with glue. Glue is applied to the tip of each strip, and then they are glued to the bottom part.

Gradually you need to remove all the paper clips.


The top of the ball is complete!

Now, from the previously cut blanks you need to create the lower part of the ball. To do this, you need to connect the first part into a ring using glue.


Then, apply glue to the inside of it and attach it to the ball.

Afterwards, leave until the glue dries completely!

In the meantime, you can create a cart! Along the notches on the bottom of the basket, you need to bend the edges.

Apply glue to the edges and sides and connect them.

Now the final stage remains in creating a balloon! The basket should be connected to a balloon.

Glue is applied to the ends of the thin strips, and then they are fixed from the inside of the basket.

The result is such an original balloon!

The final look of the craft. Photo No. 1.

The final look of the craft. Photo No. 2.
It will complement the interior of a children's room well, becoming an interesting decorative element! Dimensions balloons can be very diverse!

The final look of the craft. Photo No. 3.
Huge colorful balloons in the sky always fascinate, this sight makes people different ages delight and joy. Balloons were invented by mankind a relatively long time ago, but now they are used not as a means of transportation, but rather for entertainment. You can make a balloon with your own hands, and it is not as difficult as it seems at first glance. Of course, it’s difficult to make a huge balloon, and there’s no point in making it, but a small balloon will be within the capabilities of anyone. This balloon can be launched with the whole family. And it will be truly exciting.
Before you start making a balloon, you should familiarize yourself with its design and structural features.
Balloon design

How to make a balloon
The following materials are used to make it: thick paper, thin tissue paper, twine, glue, thread, as well as a triangle, a long ruler, scissors, glue brushes and a pencil.
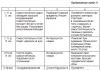
The amount of material depends on the selected ball size (D) (see table). It is difficult to make a ball out of paper, but a polyhedron with a large number of faces, similar to a ball, is possible. For example, for a ball with a diameter of two meters you will need 16 strips of paper.
How to make a balloon with your own hands?
Flying in a hot air balloon is an exciting activity with which you can diversify your weekends or holidays. There are companies that provide balloons for rent, so it is best to use their services. If you are interested in the process of making a balloon in theory, or you want to make a miniature balloon, then our article will reveal to you all the intricacies of this process.
Let's consider the manufacturing process of each element of the balloon separately.
How to make a hot air balloon dome with your own hands
The balloon dome is best made from durable nylon materials (polyester or polyamide). So that the fabric does not allow air to pass through, on the outside of it  need to be coated with polyurethane or silicone. The dome is sewn together from segments, the number and dimensions of which depend on the size of the balloon. In this table on the website sdelai-sam.pp.ua you can find the sizes of segments for diameters from 1 to 3 meters. To make a ball of larger diameter, calculate proportionally the size and quantity of the corresponding segment.
The base of the dome - the inflation hole - must be protected with a tape made of heat-resistant fabric. At the top of the dome it is necessary to provide a parachute valve through which heated air will be released to lower the ball. For greater strength of the dome, you can sew ribbons vertically and horizontally. At the top the tapes are attached to the parachute valve ring, and at the bottom to the suspension ropes.
Balloon basket
The basket is made from wooden wicker, and its bottom is best made from sea  plywood, which tolerates moisture well. The frame for the basket can be stainless steel cables that attach the basket to the dome. It is best to wrap these cables in leather covers to protect them from damage.
Balloon burner
This is the most an important part balloon, which you need to choose from special attention. These burners use liquefied propane as fuel. They are made of stainless steel with special protective covers.
Balloon assembly
The most difficult thing is to make a mechanism for opening the parachute valve, however, in specialized sports clubs, for example, aeronavt.1gb.ru, you can find recommendations on the design of this mechanism. The assembly sequence is as follows:
- We attach the steel cables to the lower rim of the dome and the basket using bolts.
- The burner is mounted on a rigid frame above the basket.
- The cords for controlling the parachute valve are attached to the cables.
- Inside the basket there are containers for storing cards, a fire extinguisher and provisions.
Sky and Chinese lanterns (hum loy or hum fei) are very popular in Asian countries. They are launched there during the holidays. For example, in Thailand there is a festival of lights, which is accompanied by the mass launch of sky lanterns. Recently, such balls have become increasingly popular in our country. Let's try to make a sky lantern with our own hands.
After many experiments, I finally found the simplest and fastest circuit to make.
To make a homemade sky lantern we will need:
1. Garbage bags 30l. (it’s better not to take more because the polyethylene in them is thicker and heavier) After many experiments, I finally found the simplest and fastest circuit to manufacture. To make a homemade sky lantern we will need:
2. Stationery tape
3. Aluminum wire 0.5mm
4. Tablet candle (you only need a jar)
5. Dry fuel tablet
The ball itself is glued together from several packages. From two to three. it all depends on the air temperature. In winter, even one will fly into the frost. In the summer, in the evening - at least two. To connect two packages, one needs to be cut along the soldering line and inserted into one another. Then seal the seam with tape.
The burner holder is made of aluminum wire. To do this, take two pieces of 40 centimeters each and twist them around the candle.
At the ends of the wire we make clips for the package.
We divide the bag into four corners and screw each corner onto clamps. All. Our homemade sky lantern is ready.
We use dry fuel as fuel. Break the dry fuel tablet into four parts. It may happen that the ball does not take off immediately, due to the fact that dry fuel is quite heavy. You'll have to wait until it burns out a little. To launch, straighten the ball and hang it. Light the fuel and put it in a jar.
It is worth mentioning about security measures. This thing is quite a fire hazard. Therefore, launches should be carried out away from trees and buildings. Definitely in calm weather. By the way, the slightest breath of breeze and the package will immediately melt or burn out.
The process of construction and launch on video:
(Visited 1,575 times, 1 visits today)
And the assortment will definitely tell you a lot great ideas on decorating balloons and creating new toys.
To sew a mobile from felt, you will need:
- felt in eight different colors (or less if you want to repeat colors through one);
- needle and thread or sewing machine;
- cotton wool or padding polyester for stuffing;
- bottle caps, buttons or glitter for decoration.
1. Print out the pattern. Select right size parts of the ball petals and transfer the pattern onto sheets of felt of different colors. Cut it out. Also cut out a circle from felt.

2. Sew the petals of the future ball together using a machine or by hand. Leave the hole unsewn on one side - it will be needed for stuffing the toy. Turn out the ball.


3. Fill the ball with padding polyester or cotton wool. Close the hole by sewing a felt circle.

4. Baskets of balls - a cork from a wine bottle, cut in half and decorated with felt strips. They can be easily glued with supermoment glue.
5. If desired, decorate the balloons with stars or sparkles.

6. Hang the ball from the mobile disk using long strong strings stretched through the top of the ball. Or maybe you will add snow-white clouds to your mobile, as we did, or multi-colored raindrops. Create your own unique toy that will delight your baby!