Twitch toys have been known since ancient times. These mechanical figures of people or animals, whose arms, legs or paws twitch funny thanks to a simple hinge mechanism, have always been especially loved by children.
Initially, twitchers were made of wood; in Rus' they were called “dancers.” Subsequently, the manufacturing technology was greatly simplified through the use of paper and cardboard. With the advent of color printing, twitch patterns drawn by artists began to be published in magazines, which made it possible to make colorful toys for everyone.
Well, the Internet has made the possibilities for creating a variety of twitches almost limitless. :) I invite you to use ready-made templates to make a mechanical toy from cardboard in the shape of the famous fairy tale hero- Puss in Boots. And at the end of the master class, another version of the twitch awaits you - the Monkey.
Master class: cardboard twitch toy “Puss in Boots”
Materials and tools:
— sheets of A4 size office paper (for printing templates);
— packaging micro-corrugated cardboard (1.5 mm thick) or cardboard for children's creativity;
- a sheet of thick white A4 paper;
- standard (stationery) knife;
- scissors;
- awl;
— paracord (4 mm in diameter) or other fasteners;
- nylon thread, narrow ribbon;
- glue stick;
— glue “Moment Crystal”;
- double sided tape.
So, we start by preparing the cardboard parts for the base of the twitch toy.
We print on office paper outline templates. We cut them out with small allowances.
We glue pieces of double-sided tape on the wrong side and glue the templates to the wrong side of the cardboard.

IN in this case micro-corrugated cardboard with a thickness of 1.5 mm is used. But I want it right away to draw your attention: the contours of the parts here are quite curly, with small elements, so cutting out of micro-corrugated cardboard can be a little difficult if you’re unaccustomed to it. And here you can go two ways:
1. neglect small elements and smooth out the contours when cutting;
2. use thin cardboard (for example, cardboard for children's creativity; for greater rigidity, you can make it in 2 layers); In this case, the toy will also be quite functional; below you will see an example of such a design of the twitch.
Next, use a regular stationery knife to cut out the parts of the base. Immediately make holes for fastening. I used a punch with a diameter of 4 mm. If a punch is not available, you can cut holes with a knife or awl.
The diameter of the holes may differ from the original depending on what fasteners you use.

On thick white paper (on the front side) we print colored puss in boots templates. Cut it out.

Alternatively, you can color the cat with pencils or felt-tip pens together with your child. A special set of templates is provided for this.
Using a glue stick, glue the colored parts onto the cardboard bases (on the front side of the cardboard).

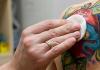
We fold our paws in pairs (on top of each other). And with an awl we pierce small through holes on the upper edges, as shown in the photo. These holes will be used to control the paws.

To attach the paws, white paracord with a diameter of 4 mm is used here. Cut 4 small pieces (the length is such that you can tie 2 knots).
We tie a tight knot at one end and melt the tip with a lighter. We pass the cord through the holes of the body and paws.

The paws should be located under the body.

This is just one of many mounting options. For movable fastening, you can use, for example, brads, buttons, wire, etc. - whatever you like best. The main thing is to make sure that the limbs of the twitching toy rotate freely in the same plane!
Let's proceed to the most important stage - creating the paw control mechanism. In fact, everything here is extremely simple. It is necessary to tie the paws in pairs with nylon thread through small holes. When the thread is taut, the limbs should be in a downward position.

Now we tie a long thread (can be folded in half) or a thin cord to the horizontal threads, both the top and the bottom, as shown in the photo.
We tie knots on the paracord from the wrong side of the toy. We check whether the paws rotate freely enough. We melt the ends of the cord.

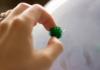
Cut out 2 circles with a diameter of 2.5 cm from cardboard. If you use micro-corrugated cardboard, make a slot in the middle on the wrong side of one circle and place the end of the thread there.

Glue both circles with Moment Crystal glue.

Alternatively, instead of cardboard circles, you can attach a large bead - for convenience and beauty.
Glue a cardboard circle with a diameter of 3.5 cm to the head from the wrong side onto a loop of narrow ribbon. 
The cardboard twitch toy is ready!

This is such a cheerful and lively cat in boots. The kids will be delighted! :)

A set of templates (contour, color and for coloring) for making the Puss in Boots twitch toy can be purchased at the Kartonkino store:
I already mentioned above that similar toys can be made from thin cardboard for children's creativity. These charming monkeys, created by, are made in just this way.

Note that the monkey on the right uses a tail, not a string, to control its paws. Or rather, there is a lace there too, it’s just glued between the halves of the tail. Very interesting option, agree.
And this is what the inside of the monkey looks like. Everything here is quite traditional.

The paws are attached here using brads. It looks very good, and the attachment process itself is simpler than with paracord. Don’t forget that when using brads, the holes need to be made smaller; just pierce them with an awl.
It is worth noting that the tail on the side was not the best solution - it interferes with the movement of the paw. But there is a choice: if you want, do it with a tail on the side, if you want, do it from below, or without a tail at all (not completely, of course, without a tail, it’s kind of in the background and just didn’t come into view).
Templates for the twitching toy “Monkey” can be downloaded here:
By the way, Anya Shidenko has many other interesting templates for making various products for children, as well as holiday accessories. You will find them by going to.
Well, now you know a simple and working way to make a twitch toy out of cardboard with your own hands. By analogy, you can even draw your own favorite character - some hero folk tale or a cartoon.
Or use ready-made templates. I have already shown you two versions of the toy. And you will find another one - Kitty - in the 9th issue of the electronic magazine "Masterklassnitsa".

We wish you pleasant creativity, fun and useful games with kids!
Yours Inna Pyshkina and the Kartonkino team.
Every day the number of people wishing to celebrate is growing Valentine's Day and make a gift or card with your own hands. We suggest making an unusual Valentine card - it is made of cardboard according to the principle of a twitch toy. An elegant ballerina doll can also become an original gift for Valentine's Day. Detailed master class with templates and photos will help you master new technology making crafts.
A jerk is a variant of a mechanical toy, the parts of which are loosely connected and driven by threads attached to the back of the toy. Twitch toys have been known since the ancient world. In the 19th century they were popular in all European countries. In Germany they were called "Hampelmann", in France - "Pantins", and in English-speaking countries - "Jumping Jack". Such toys were also made in Russia, they were called “dancers”.
Even children can handle making a heart-shaped valentine with movable wings. More delicate work remains with the ballerina figurine, whose arms and legs can be made movable.
Materials and tools for crafts
- Cardboard, preferably with a color density of 200 g/cm 3, colored in the mass (then the back side and edges of the product will also be colored), but any other is possible.
- Glue stick.
- Scissors.
- Devices for fastening moving parts: clips - brads (nails with a decorative cap and a leg in the form of a pair of flat tendrils made of soft metal). You can make a similar clip yourself - from a button and wire.

- Tools for making holes: a regular office hole punch (it makes holes with a diameter of 5 mm - they are suitable for clips with a diameter of 7 mm and larger); a special punch with a set of nozzles (by changing them, you can get holes of different diameters); cone-shaped awl.

- Threads for controlling the twitch are cotton, medium thickness.
- Fat sewing needle for attaching threads to parts.
- The holder is a wooden skewer.
- Double-sided foam tape for gluing the holder.

- Pastels and felt-tip pens for tinting and drawing details of the product.
- Crepe paper for making a ballerina dress.
Paired parts (wings, arms, legs) are cut out according to the same template, but in a mirror image.
DIY Valentine's card
Height - 10 cm, width - 15 cm

- Cut out a heart from packaging cardboard according to the template. Using a glue stick, stick it onto red felt or fleece. When the glue dries, cut the fabric along the contour of the heart.

- Cut out two wings from white cardboard according to the template. Make holes in the designated places (they are indicated by circles) and attach the wings to the heart with clips, as shown in the photo. When you bend the antennae of the clips, do not press them close to the cardboard, leave something like a leg. This can be done by hand or using tweezers.
You can fasten moving parts with a thin cord. Tie a knot at the end of the cord, string the pieces onto it, and tie a second knot so that the pieces can move freely between the knots. Cut the cord.
- To connect the wings to each other, pierce one of them with a needle in the place marked on the pattern with a bold dot. Secure the end of the thread with two strong knots. Without cutting the thread, pierce the second wing in the same place. Tie a few strong knots again. Cut the thread. During the connection process, the wings should be lowered down. The thread connecting them should be horizontal - not sag, but not too tight.

- Tie a control thread to the middle of the connecting thread and secure a bead at its end. Use double-sided tape to attach a wooden stick to the back of the heart.
The finished jerk can be hung on a thread loop attached to the top point of the product.

Twitchy ballerina
Height - 17.5 cm, width - 11 cm

- Using the templates, cut out the details of the ballerina’s arms, legs, and torso along with the head from the base cardboard (for example, packaging cardboard).

- Paper Brown Cover your head and hair completely. Paper flesh-colored- arms and legs. Cut out a part of the face along with the neck from the same paper and glue it onto the head. Use a pencil to draw the nose, eyes and mouth. Mark the jaw line. Using a brown felt-tip pen, draw wavy lines on your hair—strands. Make holes with a diameter of 2.5 mm in the designated places (except for the shoulders).

- Cut out the dress bodice and puff sleeves from red paper. From crepe paper cut a strip 4.5 cm wide and 40 cm long, fold it in thirds and glue the layers along the top edge with a glue stick.

- Using a needle and thin thread, sew the crepe paper along the top edge and pull off the thread. Glue the skirt in place. Using glue, attach the puff sleeves to the ballerina's shoulders.

- Separate the layers of the skirt, giving it volume.
- Using scissors, carefully trim the skirt to the desired length. The top layers can be made a little shorter than the bottom ones. Glue the bodice.

- Make holes on the shoulders. Connect the ballerina parts with clips, as shown in the photo. If there are no connecting and control threads, the clips on the shoulders need to be pressed harder, then the ballerina’s arms can be given a different position, and they will maintain it.
- To make the toy movable, use a needle and thread to connect the arms and legs in pairs, making punctures in the places marked with bold dots. Tie the control thread first to the middle of the upper connecting thread, then to the lower one. Tie a bead to the end of the control thread.
- Glue a stick to the back of the doll's body.
You can buy clips of different sizes, colors and shapes in the departments of art supplies and sometimes in office supply stores.
Discussion
What nonsense. And this was written by an adult?
01/29/2014 10:31:04, ndandaComment on the article "Do-it-yourself Valentines - funny twitch toys"
Our Valentine. DIY Valentines - funny toys - twitchers. Valentine's Day: DIY cards and valentines. Children's crafts. Valentine's Day: what to give to your loved ones.
DIY Valentines - funny toys - twitchers. February 14: gifts, valentines and funny pranks. Kuffner Trish. DIY hearts and valentines for Valentine's Day.
DIY Valentines - 2 master classes for the holiday. 2 hearts: a master class with children for Valentine's Day and a DIY Valentine's Heart template - funny toys - twitches Every day the number of people wishing to celebrate Valentine's Day is growing...
crafts for February 23. Children's creativity. Kindergartens and preschool education. But we have it not for February 23, but for the 70th anniversary of the Victory. I don’t know why it’s so early, but they’ve already told me to bring it. DIY crafts for Valentine's Day and February 23rd.
Craft for February 23rd. ...I find it difficult to choose a section. Child from 3 to 7. Education, nutrition, daily routine, visits kindergarten and relationships with teachers, illness and physical Here are postcards for dad for February 23, and a heart for Valentine’s Day.
Parental experience. Child from 3 to 7. Upbringing, nutrition, daily routine, visiting kindergarten and relationships with teachers, illness and physical. I have broken my head, I need to do a craft for the garden on the theme of Rus' before Epiphany (paganism). Does anyone have any ideas?
Rate the sun craft. In the Country of Craftsmen, I looked at crafts using the textile sculpture technique and made the sun into the group. I’m just starting my own Valentines - funny twitch toys. Crafts for Valentine's Day - a heart and a ballerina made of cardboard.
Children's crafts. Valentine's Day: what to give to your loved ones. We make wonderful valentines together with the kids. On back side I always sign Valentine's cards. Tender and nice words necessary for everyone. Master class for beginners – Stuffed Toys for yourself and...
Crafts for Valentine's Day - a heart and a ballerina made of cardboard. Crafts in d/s. Girls, please share your ideas or send me links. in the garden they gave me a task to make a toy...
In front of me are two sets with RTO felt from the “Warm Toys” series. DIY Valentines - funny toys - twitchers.
DIY Valentines - funny toys - twitchers. Making beautiful valentines with your own hands is not at all difficult. To do this you need available materials: cardboard, colored paper, ribbons, beads, various decorations and the desire to give beauty.
On Valentine's Day, the husband ate crap. It would be better if he drank our cognac and congratulated [h..k!] (can be replaced with [after all]). Does my little one like new ones? the bloke congratulates them, Well, I love the saint, Valentin comes to see me. On the World Wide Web Valentine on Valentine At least...
Tell me where I can find patterns for hand toys (for home puppet theater)? I looked through the search, downloaded everything that was available, but among those toys there is not a single one that is suitable. DIY Valentines - funny toys - twitches The number of...
Section: Crafts (Wonderful for Valentine's Day (I apologize if there was one), trail diagram). DIY Valentines for your loved ones. Valentine's Day is approaching, and it won't be easy to do without Valentines!
DIY Valentines - funny toys - twitchers. DIY crafts - from lids from plastic bottles. It can be replaced with cardboard: the quality of the craft will not suffer, the character will just look a little different.
Crafts for Valentine's Day. Children's room. Child from 7 to 10. Tell me, send me links about crafts for Valentine's Day. I just can’t imagine what a boy can do for this holiday???
Valentine's Day is just around the corner, but I personally have a hard time coming up with ideas. I don’t think it’s interesting to buy a gift, so I always come up with something and make it myself. It's time to start crafting again, this time for Valentine's Day.
DIY Valentines - funny toys - twitches C The same topic is discussed in the "School Psychology" Section. I completely agree with the author of “Valentine’s Day at School.” And in general, I don’t understand the grievances “my husband didn’t congratulate me on Valentine’s Day.”
This is not just a horse, it is a horse with moving parts, a twitching horse. You pull a thread, and it seems to run, raise its legs high and lift its fluffy tail. Making such a craft is included in the Perspective program, a technology notebook for grade 2. But not every second-grade student can figure it out without detailed instructions, how to make such a craft, where to thread the threads so that the horse runs. Now we’ll figure it all out: what to cut from and how to cut it, how to fasten it, how to give the horse movement. At the end of the instructions there is a detailed video on how to correctly connect the moving parts of the figure.
What will you need to make a horse for a technology lesson?
Horse template (from workbook on technology for 2nd grade), colored cardboard, colored paper, pencil, scissors, glue, thread, needle.
How to make a horse out of cardboard
We cut out the template from a notebook using technology. If you are not making a horse for a lesson, you can print and cut out this template:

When the template details are cut out, we transfer them to colored cardboard. To make it more accurate, we will trace from the inside out. We make the body and legs of the horse from brown cardboard, and the tail from yellow cardboard.

We cut out the details along the contour. On colored paper we draw a separate template for the horse’s mane and hooves and cut it out too.

Glue the mane to the head and the hooves to the legs using glue.

Now you need to attach the moving parts - legs and tail - to the body. Please note that the template is marked with crosses and dots. We mark them on the reverse side of our parts. Use an awl or needle to make holes in the center of the crosses and dots. Crosses both on the body and on moving parts. We will need to connect them so that the crosses on the body and parts match, and we will do this as follows:
Take a needle and thread and tie a large knot at the end of the thread. We see a cross under the horse’s chest (the horse is turned to us with its colored side). We stick a needle and thread into it. We put the front legs on the same needle, also hitting the middle of the cross. Pull the thread until the knot touches the cross.

We turn the horse inside out towards us and stick the needle into a point on the leg. There is no need to insert a needle into the body in this place, the point is only on the parts of the legs. We thread the needle and thread all the way through this point, then remove the needle from the thread and leave the thread hanging. Don’t cut it, we need it, we will pull on it to make the horse move.

Similarly, we attach the second pair of legs and tail. We lower the threads down, connect them to each other and tie a knot at the bottom. From the inside out, a correctly fastened craft will look like this:

We pull the strings, and the horse seems to run, raising its legs high and lifting its wonderful tail :)
Video on how to make a twitch horse
If you wish, you can decorate the horse by gluing sparkles and stars on it. The twitch horse is ready. Let's go get an A!
Such a cute horse can be made not only for a technology lesson, but also just so that you can have an interesting and useful time and please your parents or parents with your craft. younger brothers and sisters. And if you get creative, you can come up with a whole sea of different twitching animals, drawing instead of a horse’s head, for example, a dog or cat’s face and changing the tail.
OKSANA KOMISSINA
Master Class« Twitchy – funny toy »
All children, without exception, love moving toys. Of course, it’s easier to buy them in a store, but it’s much more interesting and useful to make them yourself. WITH you can play with twitchers, you can make them home theater actors, you can just give them to children, but it’s better to make these toys with them!
Children will be delighted with this activity.
Twitchy– mechanical option toys, the parts of which are loosely connected and are driven by threads attached to the back side toys.
Twitch toys known since the times of the ancient world. In the 19th century they were popular in all European countries. In Germany they were called "Hampelman", in France - "Pantin", and in English-speaking countries - "Jumping Jack". Such toys were also made in Russia, they were called "dancers".
Classic jerk- This is a man or a humanoid creature with a torso, two movable arms and two legs. Initially twitchers were made of wood, with the advent of color printing, blanks for them began to appear in magazines. On creating sketches of such toys real artists worked. Cardboard twitchers- This is something between a puppet and a paper doll.
The meaning of the craft and its role
Twitch toy promotes the development of the child's imaginative and logical thinking, creative and gaming abilities, coordination of movements, attention, perseverance, fine motor skills fingers, tactile sensations.
We will need:
Simple pencil;
Colour pencils;
- felt-tip pens;
Stationery knife or scissors.
Templates for future crafts
Hole puncher
Wire


Manufacturing technology
1. Lay out the parts jerky: body, two arms, two legs, four wires, a stick for twisting the wire, two short threads for horizontal tying, one long thread for adduction twitcher in motion, big stick - holder jerky.
2. We insert the wires into the holes made with an awl on the body on the arms and legs.
3. Wind the wire onto the counting stick and flatten it.
4. Insert the threads horizontally, connect the arms and legs, tying them. Cut off the excess ends of the threads.
5. We tie a long thread vertically to horizontally stretched threads and glue a large stick holder.
Here's what funny toys - they turned out to be jerks.
Publications on the topic:
“The Christmas tree has a forest scent, We invite the children to the holiday. Let this Christmas tree at the festive hour make us happy with every needle, make us happy.”
For production you will need the following materials: cardboard of two colors, colored paper, glue, double-sided tape, thread and needle, decorative elements (leaves.
On the threshold New Year. To make it more fun to greet him, my son and I decided to make a monkey hat from scrap materials. I present.
I want to offer you my Master Class for making a cardboard box "Funny caterpillar." You can make a pencil holder in it.
The New Year is coming to us, what will it bring us? A mischievous monkey will bring us happiness! I bring to your attention the toy “Monkey”.