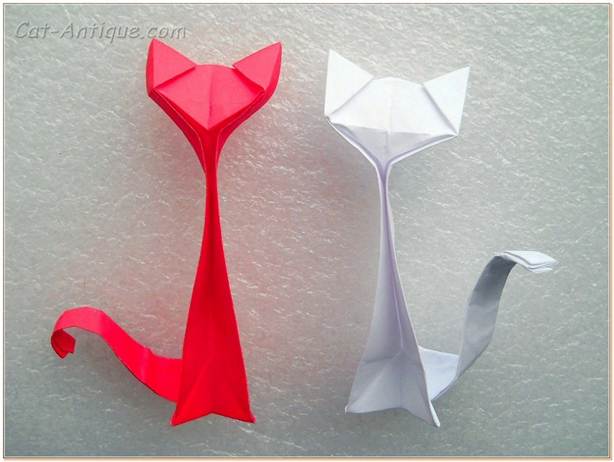
A ginger cat made of colored paper that walks on its own and does not need an owner. The shape of her body has a static position. Therefore, you can turn the craft into a convenient and practical stand for small items.
Necessary materials:
- colored semi-cardboard;
- White paper;
- black felt-tip pen;
- office glue;
- scissors;
- pencil;
- ruler.

Stages of making a cat:
1. The cat's torso will consist of a cubic shape. Therefore, to create it you will need to cut out a 17 x 5 cm rectangle from orange double-sided thick paper.

2. Mark along the top and bottom edges 4 cm four times. Connecting the markings. On the far left side we draw a semicircle to create the cat’s paws.

3. We bend the blank of the cat's body along vertical lines and cut it out along the intended contour to create paws. Let's reveal.

4. Apply glue to the side of the workpiece 1 cm thick. Glue the figure and get a cubic shape of the cat’s body.

5. From the same shade of paper, cut out a tail along the contour. Glue it to one of the sides of the body. You should also take white paper and cut out a semi-oval. Glue it on the opposite side of the body and get the front part where the head will be attached.

6. Draw the outline of the head and a long strip on an orange sheet of paper. Cut out the details. We bend the strip several times and glue it together to obtain a three-dimensional rectangle.

7. Let's embellish the cat's face with details. Cut out a couple of drops and circles from white paper. Glue it. We also cut out the middle of the ears, nose and mouth from pink paper. We attach it to the right places.
Let's add small details to the cat's face using a black felt-tip pen or marker. We draw pupils in the middle of each circle, a long mustache, eyebrows, and the outline of the ears and mouth.

8. Glue a volumetric rectangle to the back of the head.

9.
Next, apply glue to the side of the rectangle and glue the part to the wall of the body, where there is a white section of the chest.

10.
With this, our cute paper cat is ready in the form of a voluminous craft with a cubic body and a voluminous head. You can complement the craft with lines and small decorative elements, which will create the desired effect.


Origami is an interesting and entertaining paper craft that you can make with your children. Such crafts have a positive effect on the development of the child.
However, what craft should you start with? Naturally, for a child to want to learn how to make this or that origami craft, he must be interested. Therefore, first, try making a paper kitten with your child.
How to make an origami kitten?
A paper kitten is a great craft that will remind your baby of his favorite pet.
To make an origami kitten, you need to be patient and have a blank white sheet of paper.
Origami kitten diagram:
- First, you need to cut a square from the sheet. Then, you should bend it diagonally in half.

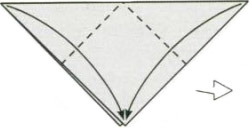
- After this, you should bend the folded sheet in half again. This must be done very carefully and weakly in order to outline the line. Thanks to this action, it will be easier for you to make a symmetrical muzzle for the kitten.

- Next, let's start shaping the kitten's ears. To do this, fold the bottom corners of the triangle up from the middle line. The last step is the formation of the kitten's muzzle. To do this, bend the top corner of the triangle down.

- To finally form the origami kitten’s face, you need to bend the upper corner of the triangle down.

- After all the steps have been completed, turn the completed craft over and finish drawing the kitten’s eyes, mouth, nose and antennae. The paper kitten is ready!

Origami kitten body
What is a kitten without a body? To make an origami kitten look interesting and realistic, you need to make a body for it.
For this:
- Take a piece of paper square shape and fold it in half diagonally.

- Then, bend the bottom corner of the origami upwards, and the kitten will have a tail.

- Connect two shapes and you will get a wonderful paper kitten.

Even a preschooler can make this craft; it is very simple and interesting to do.

To make your origami kitten beautiful and unusual, use the following tips:

- For a paper kitten, you need to take colored paper– because this is the only way the kitten will look impressive;
- When drawing a kitten's face, use maximum imagination and effort, because the animal's eyes are half the success.
- If you make an origami kitten from thicker paper, you can even put it up.
- The child will be interested if you make a booth or house out of paper for the kitten.
A paper kitten is a great craft, making which you can while away the evening and have a great time.
Watch also the video on how to create a kitten out of paper:
and one more option:
Paper art is called real art. Anyone can master it. Of course, the work may seem difficult at first. To become a professional in this field, start with simple crafts. Today we will tell you how to make a cat out of paper. You will see the most interesting options with diagrams and photos below.
The Japanese art of paper folding is based on the use of the square blank we mentioned in and the complete absence of cutting objects.
If you want to make this cute purring animal, but have not yet tested your abilities in paper art, we suggest you start from the very beginning. simple option manufacturing.
We will tell you how to make a cat out of paper based on individual steps. The work will take a little time. What you will need for work:
- multi-colored (preferably bright) paper;
- markers;
- PVA for assembling the structure into one piece.
Making a muzzle
The first thing we will do for the future cat is its muzzle. Let's get started:
Quick option
- From the prepared material, cut out a square. You can use any size, we offer standard 15x15 centimeters.
- Fold the square so that the opposite corners meet. Fold the resulting figure in half again to mark the center of the workpiece. The center line is very important; it will help make the face of the future product symmetrical.
- We unfold the resulting product and place it at an upward angle. We fold the corners located at the top of the triangle to the bottom. On the contrary, we direct the corners that are located at the bottom towards the top. You should get ears. We move them to the side so that the result does not stick out too much.
- We turn the product, which already looks like a muzzle, with the sharp end in our direction. Carefully press down all folded sides.
The cat's head is ready. To give it realism, we decorate the blank with eyes, nose, mouth, and antennae. Here everything depends on your imagination, these elements can be simply drawn, made of colored paper, and the eyes can be special moving ones. These parts can be purchased at craft stores.
Now we decide whether we leave the cat in this form or make it full-fledged, that is, with a body. If you chose the second option, then read the instructions further and find out how to make a paper cat with a body.
Making the body
 Paper origami cat pattern
 If there is a muzzle, add a body to it. It is made using technology. The future made cat can be used as a wall decoration in a children's room, as an addition to a bouquet of flowers, and even as an element of a postcard.
Let's not get distracted and continue making:
- take a square similar to the one used earlier;
- fold the figure and iron the folded sides;
- bend the bottom corner upward - this is the tail.
The cat's body is ready. All that remains to be done is to take PVA and glue one part to another. If you wish, you can add spots to the cat.
The previous method explained how to make a cat out of paper simple method. Let's not depart from origami art, and consider another interesting product.
You only need one A4 sheet, scissors,
We've made the muzzle, now we'll find out how to make the cat's body.
Let's continue working:
- Based on the results of the previous steps, you should have a figure that looks like an accordion. Fold at an angle upwards. Due to such actions, the body will turn back. The bent part will serve as a tail. It will help make the figure stable on the plane.
- We fold the tail blank into a ball so that the product looks close to natural. Unravel the resulting ball slightly.
- We open the previously made paws. Try to do this so that the neck remains unaffected. To make the figure stronger, you can lightly grab it with PVA.
Through much action and work, you have learned how to make paper. The finished product can be made even more beautiful by adding antennae, eyes and a nose to the face. Place the finished product on the table and admire the interesting craft.
Craft using a stencil
If you found the previous product very difficult, but still want a cat figurine. And you are ready to learn how to make something out of paper. We offer you a simple stencil manufacturing option.
For creativity, prepare:

- the stencil we offer;
- thick cardboard;
- scissors.
Procedure:
- open the finished template on your computer, print it (if the printer allows, this can be done directly on cardboard);
- cut out the cat’s paws and press the fold lines;
- roll up the material;
- using PVA, connect the head and torso;
- Using a small strip of cardboard, you can twist the tail and glue it in place.
The cat will turn out even more interesting if you make it unusual color. By the way, modern creative stores sell paper with interesting pigmentations. If you want to not only learn how to make something out of paper, but also create interesting craft, purchase paper, for example, with leopard print. Then your cat will be unique.
Volumetric version of the cat
We continue to produce figurines from the cat family. Now we will look at how to make a paper cat in a three-dimensional version.
If you are already practically a pro in the origami technique, then you will succeed in this craft without any problems.
For a voluminous cat you need:
- scissors;
- pens or pencils;
- Of course, multi-colored paper and cardboard.
As in the previous type of work, we suggest you use the templates that we have prepared. They can be printed directly on paper. If there is no possibility. Take thin paper for office work, carefully attach it to the open picture with the template on the monitor, and without pressing on the screen, draw the outlines. Remove the paper from the screen and draw clear lines on the table.

Redrawing from the screen is a longer option, because you have to do double work: cut out the template and transfer it to the main material.
Transfer each element of the template to the color from which the specific element will be made. If you initially use colored paper, glue it onto cardboard. The body must be made of cardboard. We glue the tail and all other parts to it.
 Template 2
 There is another way to make a voluminous cat out of paper.

To do this you will need:
- cardboard roll;
- pencil;
- awl;
- paints.
The work is done quickly:
- take a roll (you can cut off part of it if you want a small cat);
- We press the top of the roll on one side and the other, forming the head and ears;
- Apply muzzle marks on the resulting part with a pencil;
- we paint the resulting product with paints;
- at the bottom of the roll, use an awl to make a hole for the tail; it can be made from the remnants of the roll or wire (be sure to bend the material so that it is safe).
You learned not just how to make a three-dimensional cat out of paper. Using these instructions, you can construct a whole family of kittens.
A voluminous cat can be made on all fours. For this:
- take cardboard and fold it lengthwise;
- make a cut in the middle, these will be the paws;
- we also make the head and tail from cardboard;
- we glue everything together.
Additional elements of the muzzle can be constructed using multi-colored paper.
Other interesting options for making cats
Many people want to learn how to make something beautiful out of paper, we suggest you read for inspiration interesting options making cats.
You don't have to create appliques or use origami, check out the quilling technique.
Before making such a paper cat, prepare:
- strips for quilling work (width no more than five millimeters);
- tweezers;
- quilling stick;
- scissors;
- a nice base to work with.
Now we work following the steps:

- We make turns. The cat's head will require five turns, and the body six. The latter should be slightly elongated.
- Based on this we make a sketch of the future cat. We transfer the made turns to the base and glue them onto PVA.
- Making ears. They need to be twisted in the form of drops. We make regular turns, glue them together, and carefully flatten the top with your fingers. The same principle is used to make cat paws. We glue all the resulting parts to the previously prepared base.
- A cat cannot be left without a whisker. They need to be made from thin straight strips. We wind them onto a stick, straighten them slightly and glue them in the muzzle area. The same instructions are suitable for making a tail.
Now you know how to make such a cat out of paper. A little practice and finished goods Can be framed and hung on walls. Improved compositions can even be presented as a gift.
In what other form can paper cats be presented?
Your imagination can tell you here. We recommend that you try making a cone hat in the shape of a cat.

Before making a kitten's hat, prepare:
- multi-colored paper;
- scissors;
- glue;
- cone template.
If you have everything, let's start:
- print out the cone template and transfer it to colored paper;
- cut and glue the cone;
- We place the finished figure on a sheet of paper of an identical shade and make a mark for a wide circle and inside, a circle with a diameter slightly larger than a cone;
- cut out a large circle and a round hole in it, separate several strips on a small circle, grease it with glue and glue it to the cone.
We decorate the finished hat with antennae, eyes, nose and tail. Now you have learned how to make a kitten's hat out of paper.
Folding paper figures is a very popular technique, which is diverse and involves not only complex volumetric crafts, but also simple. This article will tell you how to make a cat using easy classic patterns.
How to make a cat out of paper using origami technique
We bend one square from left to right diagonally, then bend the left corner slightly to the right so that it looks like a tail. With this the body is ready.
For the head, place the second sheet of paper with one of the corners up and bend it down exactly in the middle. Fold both upper corners of the triangle, aligning their vertices with the vertex of the corner below. Having pushed through the folds, we bend the same corners upwards, not all the way, so that two triangles are formed in the foreground and one corner peeks out between them in the background. Then you need to pull these corners to the sides and straighten the folds made in the two previous stages.
Before us again is a triangle with a vertex at the bottom and 4 fold lines. Next, we separate the layers of paper from below and press the paper inward in those places where folds have formed from previous actions. The result should be a diamond with ears. Its top must be folded back, the fold carefully ironed and tucked into layers of paper so that reverse side nothing was sticking out. Finally, we insert the body inside the head and straighten the cat’s paws to the sides. Ready!

How to make a cat from A4 paper
This option is more difficult, but also suitable for beginners. Make a long rectangle by folding the sheet in half. We shorten it at one end by 10 cm, unfold the rectangle and cut it along the fold line. From these parts you can make two cats. One of the resulting rectangles needs to be folded in half in the same way as before, then press the fold. Turning the paper with the folding side towards you, you need to bend one of the halves up. We do the same on the other side so that the result is something like an accordion. It is very important that all fold lines are carefully ironed.
Next, unfold the sheet to the point where it was folded in half, place it with the fold down and fold the corner from the left side up. Open the workpiece and find the triangle formed by the folds, turn the paper so that it is at the top.
The point of the triangle's apex points downwards; you need to bend the top of the paper to this point and unfold the sheet completely, after pushing through the fold. The result is another smaller triangle, which will be the cat's head. Fold the edges down along the pressed lines to form a rectangular box. Then close the lines of the lower part with each other, pushing the triangle until the workpiece is completely closed.
Unfold the folded paper so that the head is on the left, then fold one of the sides in half towards you, not reaching the left side. After turning the workpiece over, you need to perform the same actions with the second part. The body is ready.

Now you need to shape the cat’s face along the outlined lines, carefully pressing the triangle inward. Then press the pressed lines to the top horizontal line. Look ready-made templates in order to do everything correctly and accurately.
The ears need to be formed along the upper vertical lines, next to which there are small triangles. They must be bent towards the center. Turning the cat's back to you, bend the resulting fold between the ears slightly back. At the same time, the ears themselves will also bend a little from the inside. The head is completed, all that remains is to give the body a believable appearance.
The torso must be bent and straightened in half horizontally, then slightly expanded and the lower part bent back at a right angle. At the same time, we form the legs: to do this, you need to turn the resulting fold upward at an angle until the corner closes. Roll the part at the back into a tube and slightly unfold it, resulting in a spiral-shaped tail.
The finishing touch will be to place the cat in a stable position. Open your paws slightly without touching your neck. She must remain collected. If desired, you can decorate the figurine. Such cats made from paper with a pattern look great.

It will be much more difficult to make a modular cat with your own hands, but it will look voluminous and impressive. In general, you can master the origami technique yourself by watching various master classes and video tutorials. It is ideal for teaching children, as it teaches them to read diagrams and drawings of varying complexity, develops logic and visual-figurative thinking, and teaches them perseverance and persistent goal achievement.
Working with paper provides a wide field for imagination and captivates even adults. The constant striving for perfection and mastering more complex figures delights a person. In addition, the process itself serves as an excellent relaxation and relaxation for the body.
Video on the topic of the article
There are probably few people who don’t like cats. People keep these furry animals to soothe their soul and body. There are often cats that feel headache from their owner, leaning against the sore spot, they take it for themselves and the person feels better. But no one can prove this. But if you believe in something, it will definitely come true. And there are people who cannot afford to have a pet because they have allergies. And then they start buying cat figurines, toys, and various souvenirs. This calms oneself down. Today we will teach you how to make an origami cat.
Such a figurine will definitely not harm anyone, but will only bring pleasure and please the eye. Moreover, this technique of working with paper is becoming more and more popular every day. Therefore, we invite you to our master class on an origami paper cat. We will make several figures of this animal from the simplest to the more complex.
Murka's head made of paper
First, we will try to make the easiest origami figure with you, it will be the head of a cat, which can then become a bookmark for a book or notepad. It can also be glued to a postcard, and the body can be completed with pencils, so you get a handmade gift. We invite you to view the diagram and get to work.
For this origami we will need a colored square sheet of paper that needs to be bent diagonally.
We bend the resulting triangle in half and unbend it back. We bend the lower corners of the triangle to the center line, which was obtained after bending. We bend the top corner down and turn our craft over. Now the cat’s face is ready, all that remains is to finish drawing the eyes, nose, mouth and antennae.

Two-part work
Now let's make together a slightly more complex cat figure, which will consist of two parts. That is, we will make the body and muzzle separately, and then simply connect them.
The cat will be black, so we will need two square sheets of black.
First let's make the body, it's very easy to do. Take a sheet and bend it diagonally.

Fold the bottom left corner to the right.

This is what the body should look like.
Now let's move on to the head. We take the second sheet and bend it also diagonally, but we will place it from top to bottom.

We bend the upper corners of the workpiece down, we do this so that their tops move in the lower corner.
Now we bend the same corners that we bent downwards back up, only not completely, but as shown in the diagram.

Let's pull the upper corners to the sides, so we will straighten the folds that were created at the previous stage.

Let's take the bottom corner and open it a little, so we will make the ears, pressing the upper edges towards the lines that were obtained in the previous step.

Now you need to bend the upper corner, which is located between the ears, down, smoothing it well. And unfold the workpiece.

After the manipulations done, the head should look like this.

Now we connect the two parts. We insert the body into the lower, slightly open corner of the head and glue it so that they can stick together. If you want to place a cat, then slightly open the tail and the lower right corner.

Making a curvy cat
If you easily completed the two previous crafts, then we suggest you make another cat, only more complex. This is what it will look like.

For this craft you will need a rectangular strip, colored only on one side. It can be size 8/20, but you choose the size yourself, it depends on what kind of craft you want to make.
We bend our strip in half.

And now each side needs to be folded in half again.

Unfold the last pair of folds back. Turn the strip over so that the closed side is at the bottom. Now we need to bend the lower left corner to the right, after which we once again bend only the upper left corner to the right as shown in the photo.
The strip needs to be bent to the right to the place indicated by the green dot in the photo.

We open our strip completely. And we turn it over so we can work with our heads.

Now we need to transform our face, for this we will use the terms: “valleys”, they mean concave folds and “mountains” ─ these are curved folds. We fold the upper side corners into a mountain diagonally, these will be the cat’s ears, and lift them up, while pressing on the middle part. The body should be folded into a flat strip.
If you get this figure, then you can follow the diagrams that we provide below and complete it to the end. Just remember that this figure is a little more complicated than the previous ones, so be careful.