Making rockets with your own hands from improvised materials is a popular hobby among Westerners. In Russia, home "rocket science" does not have such a high demand, but even here there are enthusiasts. And in most cases, these are not students of technical specialties, but parents of little fidgets and young dreamers. Only loving mothers, fathers and creative teachers-educators know how to make a rocket with their own hands from paper, cardboard, bottles, so that it not only involves the kids in a space journey, but also effectively takes off. Using diagrams and models, bold experimenters will make a rocket that flies from matches and foil. Don't believe? Experience our photo and video tutorials for yourself!
How to make a space rocket with your own hands from improvised materials - a step-by-step master class for children and parents

To give a child a new exciting toy, it is not necessary to visit stores and auctions of expensive children's goods. You can make a bright, interesting and, most importantly, safe little thing with your own hands. For example - an intergalactic rocket for entertaining role-playing games and virtual travel. And our step-by-step master class "How to make a space rocket with your own hands from improvised materials" will simplify and speed up the collective creative process of parents and children.
Necessary materials for a rocket from improvised materials
- plastic bottle
- colored terry sock
- glue gun
- red felt sheet
- thick foil
- cardboard
- scissors
- red and yellow yarn
- tube of paper towels
- thin lace
A step-by-step master class for children on creating a space rocket from improvised materials
- Wash an empty plastic bottle with warm water and dry it. Pull a colored sock over a clean, dry container. Tie with a thin cord under the bottom of the bottle, and cut off the tail.

- From red felt, cut out two circles with a diameter of 5 cm. Glue the figures on the finished base of the rocket, imitating portholes. On the red circles, fix the same round parts made of thick foil with a glue gun, but with a smaller diameter. Approximately - 3.5 cm.

- Draw three "fins" on a sheet of white cardboard. Cut out the shapes and glue point down to the rocket on three sides.

- From a cardboard tube (from toilet paper or paper towels), cut off a ring, 5-6 cm wide. Wrap the part with thick foil. Wrap the red woolen threads around your palm, then glue the resulting skein on one side to the previously prepared part.

- Do the same with yellow yarn. So it will turn out to make the lower part of the rocket with decorative flames. Fix the part with a glue gun on the bottom of the bottle. This step-by-step master class for children and parents "How to make a space rocket with your own hands from improvised materials" is completed!

How to make a bright rocket from cardboard and paper with your own hands - diagrams and models

If preschoolers are happy and delighted with a small toy rocket, the size of a bottle, then older kids will like a full-length spacecraft. Own intergalactic ship will allow younger students to feel like real captains and show courage, bravery and courage, as the main features of a male character.
How to make a large model of a rocket out of paper and cardboard with your own hands for a child, see the next master class with diagrams, photos and videos.
Necessary materials for a do-it-yourself paper and cardboard rocket model
- carton boxes
- colored paper
- yogurt cups
- disposable plates
- plastic caps and buttons
- adhesive letters and numbers
- bobbins of thread
- flower pot
- foam circle and pieces of fabric
- letter stencils
- markers
- scissors
- pencil
- satin ribbons
- thick foil
- glue gun
A simple diagram of how to make a do-it-yourself model of a rocket from cardboard and paper
- Start creating a bright rocket with the help of the kids. Let the kids help you with their favorite toy tools. Use a large box of household appliances as the base of the rocket. Ideally - from the refrigerator.

- Make the top of the rocket out of a painted flower pot, disposable tableware, and plastic bobbins from sewing thread. Decorate the details with pieces of satin ribbons and voluminous stars made of colored paper.

- Cut out a round window in the front wall of the rocket. Wrap the foam circle with multi-colored satin ribbons and glue it to the panel in place of the porthole. Glue a few spools of thread a little higher and mark them with sticky numbers. This will make it easier for the little pilot to count down to launch. Below the porthole, place another instrument panel to make the rocket more interesting.

- On the right side of the space rocket, equip the fuel cap with bright plastic buttons. For this, plastic bottle caps, spools of thread, old buttons from various devices are useful.

- Don't forget the front door. Draw a large oblong rectangle on the back of the rocket and cut through three sides (bottom, top and right). The remaining left side will serve as a curtain. Decorate the captain's door with decorative elements.

- On thick cardboard, draw two "legs", cut out the details and paste over them with foil. Fix the elements on the bottom of the right and left walls of the rocket. This completes the spacecraft. You can clearly see how to make a bright rocket out of cardboard and paper with your own hands in the model diagram.

How to make a rocket with your own hands so that it flies - step by step instructions with photos and videos

Even using the most primitive waste materials (candy boxes, cardboard tubes from napkins, etc.), you can make an unusual rocket with your own hands that will fly. Of course, she will not be able to surf the expanses of the universe, but she will boldly go on a journey through the children's room. Use our step-by-step instructions with photos and videos to make a glorious gift for your kids for the significant Cosmonautics Day.
Necessary materials for a do-it-yourself flying paper rocket
- tube of paper towels
- thick cardboard
- scissors
- pencil
- brushes and gouache paints
- permanent marker
- yarn
- straw for drinks
Step-by-step instructions with photos and videos for creating a flying rocket with your own hands

How to make a simple launcher bottle rocket to take off

If the kids have grown up a long time ago and are no longer interested in toy cardboard models, invite them to make a simple rocket with a trigger mechanism that can fly high and effectively. Rest assured, the trick with the launch of the spacecraft will cause wild delight even in an adult. What can we say about impressionable teenagers.
Materials needed for a simple launcher bottle rocket
- thick cardboard
- thin cardboard
- scotch
- plastic bottle
- plasticine
- wine cork
- pencil
- scissors
- Bicycle Pump
Step-by-step instructions for creating a simple rocket with a trigger
- Roll a sheet of thin cardboard into a cone. Trim the edge to make the shape even.

- Paste the finished cone with colored tape, this will increase its resistance to water.

- Wash and dry the empty bottle. Paint the container in any color, draw an emblem or leave an inscription if you wish.

- Glue the main part of the rocket - the cone - with liquid silicone to the bottom of the bottle. Try to make the structure as even as possible.

- Cut out 3-4 rectangular triangles from thicker cardboard. Glue the pieces to the bottle. So the rocket will have tail fins. Ideally, the "legs" should end at the level of the extreme point of the neck of the container.

- Weight the bottom of the rocket. To do this, wrap a piece of plasticine around the neck of the bottle and mask the load with adhesive tape.

- Pour 1 liter of water into the bottle.

- Make a thin hole in the wine cork with a needle. The size of the hole should not exceed the diameter of the needle from a bicycle pump.

- Carefully insert the cork into the neck of the bottle. Firmly insert the needle from the bicycle pump so that it does not pop out.

- Take the rocket with the neck up and connect it to the pump. Turn the spacecraft over and set it up so that it does not fly in your direction.

- While holding with your hand, inflate the rocket with air. Then release the craft and continue pumping air. A simple bottle rocket with a launcher will take off as soon as the cork can no longer hold pressure.

How to make a rocket from matches, foil and other improvised materials with your own hands on the video

And for those who strive to remember a fun and carefree childhood, being already old enough, we have prepared another master class with a video on making a flying rocket from matches, paper clips and foil. This time you don't have to make crafts from cardboard, paper, bottles and other improvised materials. It is enough just to remember the very unpretentious model that flies, and accurately reproduce it, observing safety precautions. And if you can’t restore the step-by-step instructions in your memory, watch the video “How to make a rocket from matches, foil and other materials with your own hands.”
Stunning, voluminous, and very easy to make toys for the Christmas tree with your own hands!
DIY Christmas toys. Christmas balls
1. DIY Christmas ball (option 1)
To make this Christmas decoration, you will need colored paper, thin wire, a stapler, and glue. The balloon you see in the photo above was made from three different colors of paper (pink, blue and light blue).
Work plan:
1. Take a small glass or glass (glass) and circle it on paper with a simple pencil 12 times. You should have 12 circles (4 circles of each color). Cut out the circles with scissors.

2. Fold each circle in half and stack them together as shown in the picture below. We use paper in three colors (A, B and C) to make this Christmas ball. Stack the circles in the following sequence - ABBCCAABBCCA. If, when making a New Year's ball, you used paper of two colors (A and B), then in this case the circles had to be folded in the following sequence - ABBAABBAABBA.

3. Fasten the circles of paper together with a thin wire, wrapping it around them along the fold line. Twist the ends of the wire together. If you do not have wire, then you can fasten the circles with a regular stapler.


4. Spread the circles and glue the adjacent halves of the circles to each other. Each half must be connected to one adjacent at the top, and with the other - at the bottom.

2. DIY Christmas balls (option 2)

Cut out three circles of the same size but different colors from colored cardboard or thick paper. In the first of them cut a cross (fig. a), in the second circle make a horizontal cut in the middle and perpendicular to it two cuts in the direction from the circle to the center of the circle (fig. b), and in the third - four cuts in the form of a cross, also along direction from the circle to the center (Fig. c). Pass the circle "c" into the circle "b". In circle "a", bend the corners formed as a result of its incision; you get a square hole. Pass the circles "b" and "c" into it, having previously folded them. Then straighten the corners again (fig. d). Attach a thread to the resulting ball.
3. Christmas paper balls (option 3)
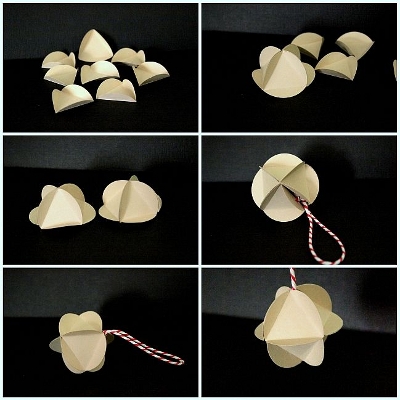
From old postcards or colored paper, you can make such cute Christmas toys - Christmas balls.

It is not necessary to make a large, complex ball; you can make a small Christmas ball with fewer parts.


4. Making a Christmas ball (option 4)
Very easy to make Christmas paper ball. To make it, you will need colored paper and glue.

Work plan:
1. Cut out eight identical circles from paper of different colors. Although, in fact, the number of circles can be any, but not less than three.

2. Fold each circle in half, right side inward.
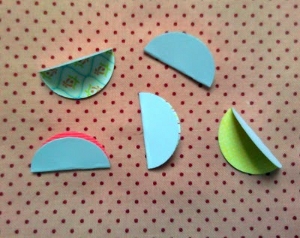
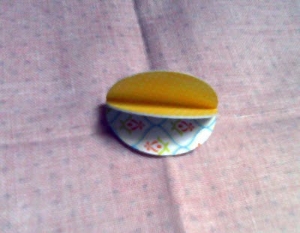
3. Glue the halves of the circles together as shown in the photo below. Glue is applied to the wrong side of the halves of the circle.
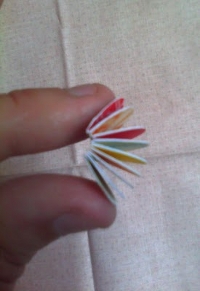

4. Before finally sealing the New Year's ball, thread a thick thread or ribbon through it. You can also make a wonderful Christmas tree garland from a large number of paper balls.

Note: such a Christmas decoration can be made not only in the form of a ball, but also in any other shape.
5. DIY Christmas ball (option 5)
To make these wonderful Christmas lanterns, you will need to cut colored paper into strips of the same length and width. The length and width of the strips depends on the size of the flashlight you want to make. To make one paper lantern, you will need an average of 14-16 strips of paper.

When making Christmas balls, you can use strips of paper of different colors and beads to decorate Christmas toys with your own hands.

If the strips of paper are bent in the middle, then you get such a New Year's decoration.

6. How to make a Christmas ball (option 6)
We suggest you make such a cute and easy-to-make New Year's craft from old postcards with your child.

1. Using a small glass or wine glass, draw and cut out eight identical circles.
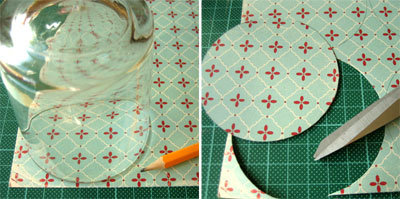
2. Using another object with a round base but smaller in diameter, draw and cut out two small circles.

3. Fold each large circle in half, and then in half again. See photo below.

4. Glue four folded large circles on one small circle, the remaining four on the other. As a result, you will get two halves of your future Christmas ball.
It is very IMPORTANT to correctly place the quarters of the large circles on the small circle. Try to carefully straighten the "pockets" of the folded circles and in advance, before gluing, estimate the correctness of their location. At the same time, focus on the very first photo, which shows a finished ball.

5. Now you just have to glue the two finished halves together and, when the glue dries, straighten all the pockets. Christmas ball is ready!

7. DIY paper balls (option 7)
8. Do-it-yourself ball of threads (spider web balls)
Thread balls look very attractive, do not require special skills and money. Many did them at school in labor lessons. And the use of these gossamer balls is limitless: just as an element of decor, and as a lampshade, and as New Year's toys. From several of these balls of thread, you can make all kinds of toys: snowmen, birds, fish. In general, everything that is enough for imagination. How to make a snowman out of thread, see the link >>>>

Making balls from thread:
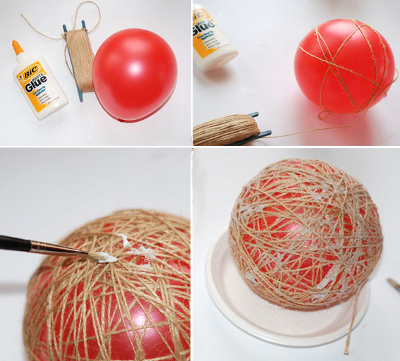
1. You will need: scissors, balloons, fat cream (Vaseline), any yarn, PVA glue, a bowl.
2. Dilute PVA glue with water, approximately 3:1.
3. Inflate the balloon to the desired size, give it a round shape, tie it with a thread.
4. After unwinding the required amount of yarn, put it in a bowl and leave for 5 minutes.
5. We smear the ball with a fat cream and wrap it with yarn, first leaving a large distance between the thread.
6. Gradually reduce the distance between the threads until the whole ball is wrapped in yarn and resembles a cocoon.
7. Cut the thread and glue it to the ball. Leave it to dry (at least a day).
8. Gradually untying the balloon, gently blow it off, and then remove it from the thread cocoon; tie a rope to the thread ball on top for fastening.
9. The balloon is ready!
When making a ball, you can use yarn (threads) of any color or paint with any paint or sparkles (spray). Especially for the New Year, you can decorate this thread ball with tinsel and stars. Hang small balls on the Christmas tree, decorate the room with large ones. Fantasize more!
If you are unable to wind the glue-soaked thread around the ball, you can wind the dry thread, and then carefully soak it with glue with a brush or sponge.
Instead of glue, you can use sugar syrup or starch paste. To prepare the paste, take 3 teaspoons of starch in a glass of cold water, mix thoroughly and bring to a boil. Instead of a thread, you can take a thin copper wire and wind it around the ball in the same way.
9. New Year's do-it-yourself. New Year decoration
Old Christmas balls can be updated by wrapping each of them in a piece of beautiful fabric and tying it with a ribbon.

April 12 - Cosmonautics Day! This is a great opportunity to tell children about space and make interesting space with your own hands! You don't need anything special for this! Quite enough improvised means! Probably, in any house where there is, there is cardboard, color, foil, various boxes. This is all you need to use. Such creative activities develop imagination, logical and analytical, stimulate the process of cognition! The child has a lot of questions, develops!
Try to answer all the baby's questions or find answers together. In a previous article on our blog, we told you how and what! You will find many interesting options in this article! You can make a whole alien landscape using any tray, plasticine, cardboard, foil, pasta, various springs, wire - whatever you find at hand! You can mold different aliens from plasticine! Great crafts -. It’s not at all difficult to make these, and the children really like them and become the favorites of the baby for a long time! With baking soda and vinegar or an aqueous solution of citric acid, you can make a seething volcano or acid rain!
Option 1. Pour a little soda into a glass, dilute the vinegar with water so that the smell is less and the reaction is not so violent. Gradually pour vinegar or a solution of citric acid to soda, observe the reaction.
Option 2. Make a plasticine volcano, and do it all in a crater! But all this must be placed on some kind of tray.
Option 3. Sprinkle a thin layer of soda on a large tray, pour a solution of vinegar or citric acid into a bottle of nasal drops and pour a little, watching how the soda reacts. It's almost like acid rain!
Do-it-yourself rocket

Let's make a very simple and beautiful rocket. Even kids can make this craft with your help. Materials needed: colored cardboard, colored paper, scissors, glue.
Here is an approximate pattern.

It is quite simple to make, the dimensions of the parts depend on what size rocket you want to get. 1. Cut out the rocket body, its top, and stand from cardboard. From colored paper - circles - portholes.

2. We glue the body and top. On the body on one side we make cuts. We apply glue to these cuts.


3. We cut the "legs" of the rocket: one from above, the other from below. We connect them.

4. We glue circles of portholes on the rocket body. 5. We make 4 cuts on the rocket body in order to install it on a stand.
That's all! Great ready!
DIY Lunokhod
Another simple and very interesting craft that can be easily done with children. For this craft, we need foil, some kind of box with a lid (we have a box of processed cheese), and for the wheels we needed a cylinder on which cling film, parchment, and foil were wound. If you don’t have such a cylinder, you can make wheels out of thick cardboard. You also need wire to connect parts of the body and antennas, scissors, glue.

This is easy to make. 1. We cut the cylinder into not very wide rings, which will be the wheels of the moon rover. This is easy to do with a sharp knife. 2. We wrap each wheel with foil.

3. We also wrap a box of processed cheese with foil. To do this, cut out a circle from the foil, which is larger in diameter than the box. Gently fold the edges inwards. 4. Inside we glue a circle of a smaller diameter to cover the edges and cardboard. 5. Glue the wheels to the bottom of the box wrapped in foil. 6. With the help of a wire, we connect the cover and the body of the moon rover.

7. The simplest thing remains. On the roof, we can attach antennas, radars or some other interesting gizmos, this is already a work of fantasy. All this can be easily stuck into plasticine, wrap the plasticine with foil and glue the whole structure to the roof of the lunar rover.

This is the one we made.
Aliens and space landscape
 Surely your child has some figurines of little men, monsters, freaks and so on. All of them can be used for the space game. From plasticine you can make aliens for every taste and color. And on a damaged computer disk, place various bizarre space plants. And so you get a completely cosmic landscape! We used foil, cardboard, spaghetti. Highly
Before Cosmonautics Day, various exhibitions of crafts are organized in preschool and school institutions. Today, a space rocket, a UFO or a solar system is easy to make even from improvised materials. Have fun with your kids and turn disposable tableware, cardboard boxes or toilet paper rolls into creative crafts on the theme "Space". You can make many unique products on your own.
Flying saucer made of paper utensils
Interest in UFOs arose a long time ago, so any child will be interested in making a flying saucer, which he often saw in films and cartoons. The easiest way to make such a craft is from plastic or paper of different sizes.

A UFO made of two plates will look original, one of which acts as a control cabin. In order to glue them, you need to make incisions on a small plate at the bottom, and then bend in a circle and stick it on a large plate. If you are working with paper materials, then it is easy to do this with ordinary PVA, it is better to glue plastic with hot glue. Do not forget to paint your craft with acrylic paints and decorate by gluing ordinary buttons along the contour.

A flying saucer made of and halves of a large egg from Kinder Surprise will look original. You can even use part of a plastic egg, it will be much more convenient to glue it than a large half. Don't forget to decorate your craft.

DIY space station
From rolls of toilet paper and towels, you can either ship, but the whole space station. To do this, you will need plastic bottles, double-sided tape, spray paint, plastic plates or vessels, acrylic paints. First, consider the design and dimensions of the future station. After that, prepare all the necessary materials and tools. The parts can be glued together with adhesive tape or hot glue. Make the base of the station from a 1.5 or 2 liter bottle. A beautiful stand is obtained from disposable plates or vessels, which will need to be turned over and placed on top of each other.

Attach one long towel roll to the bottle and 6 small ones at the bottom. Small parts from old toys can be useful to you in making a space station with your own hands. After you have completely assembled the craft, you can start painting. First, use spray paint, and then apply a pattern or some kind of pattern with acrylics. Such a craft will definitely win at the exhibition of space works.
If your craft consists of a small number of small elements, then instead of paint, you can use ordinary foil, which completely covers the craft.
Master class: How to make a rocket
From an ordinary cardboard roll, which most often ends up in the trash after use, it is easy to make a real space rocket. To do this, take a roll and a piece of corrugated cardboard. After that, make 4 cuts on the roll up to 5 cm deep and twist them so that you get a cone. This will be the top of the rocket. Glue it tightly with PVA.


Rocket from cardboard boxes for kids

Space robots from improvised materials
If your child is excited about robots, it is not necessary to buy a ready-made toy in the store. Try to make a beautiful robot with your own hands. This does not require any specific knowledge and skills. You can use ordinary cardboard boxes of different sizes and toilet paper rolls. Give a metallic effect to a fake using foil.


