Pompom is a very unusual accessory. It is often used to decorate hats, scarves and even curtains or lampshades. The history of the use of pompoms takes us back to the times of the tsarist army, when the uniform of a soldier and an officer could be distinguished precisely by the color of the pompom.
And for French sailors, the pom-pom even served as some kind of protection against head impacts while rocking on a ship.
Today, pompoms are back in fashion, so the question of how to make a pompom for a hat is very relevant. Especially It's nice to make it yourself, because it’s quite simple. In addition, modern handmade art allows you to choose absolutely different types yarn, combine different colors and use the most intricate accessories.
Of course, a cheerful accessory in the form of a soft round ball is more suitable for decorating a child’s hat. But adults are also often attracted to cozy hats with cute pom-poms made from soft and warm yarn. Next awaits you detailed master class, from which you will learn how to make a pompom for a hat and express your imagination to the fullest.
To make a pompom you can use absolutely different types of yarn:
- synthetic;
- melange;
- woolen
Also, prepare in advance:
- sheet of cardboard, A4 size,
- simple pencil,
- scissors
- and a compass or round utensil for the template.
And now we invite you to look at the photo, and also read the instructions that will help you make a pom-pom from threads with your own hands.
1. First you need to decide what size your pompom will be. It all depends on how thick the thread you use. A pompom made from fine yarn looks more elegant, resembling a small fluffy ball. Thick threads also have their advantage, because with their help you can create very original pom-poms, spending very little time and material on it. Beginners are usually asked to make a pompom from threads of thicker weave.
2. Let's start making the pattern. Take a sheet of cardboard and draw 2 circles on it. Their radius will be equal to the radius of your future pompom. In the middle of one of the circles, draw a circle, half the diameter, and cut it out. Attach this circle to the second large circle and cut a hole. Thus, you should end up with 2 circles with through holes in the middle. Something like two cardboard bagels.

3. Now we will wrap our circles with threads. To make it convenient for you to do this, prepare a small ball of yarn that will fit freely into the hole in the cardboard blank. Place 2 cardboard “donuts” together and begin wrapping them with thread. Take your time, follow the following technology: methodically insert the ball into the hole, gradually wrapping the edges of the circle with threads. Make sure that the threads fit tightly to each other. Place several layers of yarn around the circumference, adding new balls. This way your future pompom will look dense and fluffy. You can also use different colored threads to give your pom pom a different look. unusual color.

4. After you have finished wrapping your cardboard blanks, cut the threads with scissors in the place where they close the circles together. Do this carefully, holding the fibers of the yarn. It is best to place the pattern on the table. Prepare a long piece of thread, it will serve you to fasten the pompom.

5. Move the patterns a short distance apart and stretch the thread between them. Tie the thread into a knot exactly in the middle, trying to evenly distribute all the fibers.

6. Remove the cardboards after making a cut in the center. To ensure your pom pom holds tightly, wrap the thread around the middle a few more times and tie.

7. Thread a needle with a large eye into the remaining end of the thread and sew several stitches in the middle. Straighten the threads on the pompom using scissors. Your accessory is ready and now you can safely sew it on a hat or scarf.

How to make a pompom for a fur hat?
In addition to the usual pom-pom from yarn, you can make a pom-pom for a fur hat. Such an accessory will look very elegant and luxurious. In addition, it will be much easier for you to choose what to wear with your hat. fur pompom. After all, it is perfect for a fur coat, a winter coat, and a down jacket.
Before you start making a fur pompom, watch the detailed video, as well as prepare everything necessary tools and materials:
- scraps of natural or faux fur;
- scissors or stationery knife;
- thread, needle;
- padding polyester for filling;
- tape for fastening the product.
- Using a stationery knife, carefully cut out a circle from the fur. This must be done from the wrong side.
- Here we sew in a circle with large stitches, trying not to catch the fur.
- We measure required amount padding polyester and tie it with ribbon.
- We put the filling in, pull the fur together, and tie the ribbon in a strong knot.
- We tighten the pom-pom even more with the help of threads that we used to process the wrong edge of the fur and tie them in a knot.
- The pompom is ready, wear it for your health.
Video tutorials: how to make a pompom for a hat from yarn?
Often hats, scarves and children's clothing are decorated with various funny pom-poms. But pompoms can be used not only to decorate clothes; you can use pompoms to create different and amazing crafts with your own hands.
Any knitting yarn is useful for making pompoms. You can use new yarn or leftover yarn, yarn from an old item unraveled, boucle yarn, fleecy yarn, smooth yarn, etc. The pompoms always turn out soft, fluffy and fun!
In addition to yarn, you will need patterns, which you can make yourself from cardboard. The size of the resulting pompom will depend on the size of the pattern.
.jpg)
To make it easier to cut out the inner circle (this will be especially useful when making small pompoms), you can cut it along the line.
We take two templates (patterns) of the same size and put them together with cuts in different directions.

We take a thread (it is better to take a thread no more than 2 m long) and insert it into a needle. We twist the templates in one direction using a needle, completely filling the hole in the template.

You will need several threads. At the beginning of work, secure the tip of the thread with the first two turns. After the first thread ends, take the second thread and insert it into the needle. The end of the first thread and the beginning of the second are secured with the first two turns of the second thread. Thus, we wind the required number of threads onto the template.


Carefully cut the threads along the edge of the template with the tips of scissors.


We measure out approximately 30 cm of yarn. We move the templates apart and firmly tie the bundle of threads between the templates with two knots. The ends of the threads can be carefully trimmed, or they can be left for further assembly of the craft. The pompom is ready.
We remove the patterns.

Shake it. Trim any protruding threads.


From pompoms you can make a chicken, a bear, a pig, and various types. This white pompom can be used to make a New Year's craft: Snowman.
Useful tips
Beautiful and fluffy pompoms can be made from threads, paper and even fur.
How to make pompoms with your own hands. Option 1.

You will need:
Knitting thread
Scissors
1. Cut the knitting thread about 30 cm long and lay it on a flat surface.
2. Take a ball of thread and start wrapping the thread around your fingers. Don't wrap it too tightly, because... then you will have to remove it from your hand.


You can make a small, medium and large pompom. For a small one, you need to wrap it around one finger from 75 to 100 times, for a medium one - around two or three fingers 100-125 times, for a large one - around 3-4 fingers 125-150 times.
3. Remove the thread from your fingers and carefully place it in the middle of the cut piece of thread. Wrap this thread tightly around the removed piece and tie it in a knot, then turn and tie a knot on the other side.


4. Use scissors to cut the loops on the left and right. Just slide the scissors through the loops.


5. To make the pompom round, “cut” it with scissors.


Pompom wrapped around fingers (video)
How to make a pompom from yarn. Option 2.

You will need:
Knitting thread
Scissors
1. Cut a piece of knitting thread and tie the yarn, tie a knot on one side and the other.

2. Make the first cut along the yarn. The cut should be approximately 1/3 the length of the yarn.

3. Run your fingers through the yarn to straighten the threads. Next you will notice several loops - these also need to be cut.
4. Repeat steps 1-3 on the opposite side.

5. Carefully trim the threads so that you get a round and fluffy pompom.
How to make a pompom from threads. Option 3.

You will need:
Scissors.

1. Thread the end of the thread between the tines of a fork. Start wrapping the yarn around the fork until you get a small ball. Next, cut the thread.
2. Cut a small piece of thread and tie it around the wound yarn.
3. Remove the yarn from the fork and use scissors to cut the loops at both ends.
4. Make the pom pom round by trimming the ends of the thread with scissors.
Making a pompom using a fork (video)
DIY paper pompoms. Option 4.

To make one pompom you will need:
Corrugated paper
Ribbon, strong thread or wire.
1. Prepare 8 sheets corrugated paper(50x75 cm) and put them in one pile.
2. Start accordion folding a stack of sheets. One fold is 2.5-3.5 cm wide.


3. Tie the center with thread or wire paper accordion. You can leave a small loop to hang the future pompom.
4. Round the ends of the accordion.
5. Begin to carefully separate the accordion layers.


Paper pom-poms (video instructions)
Corrugated paper pompoms. Option 5.

You will need:
Corrugated paper in several colors (in this example we use 7 colors)
Scissors
Thin wire, strong thread or fishing line.

1. Choose 3 colors and prepare 4 sheets of paper of each color. In this example we used: 4 red leaves on top, 4 orange in the middle, 4 yellow on the bottom. Total 12 sheets.

2. Arrange these sheets in the following order: 3 red, 1 orange, 1 red, 2 orange, 1 yellow, 1 orange, 3 yellow.
*If necessary, trim the sheets so that they are all the same size.
3. Start folding the sheets like an accordion. The width of one fold is 2.5 cm.

4. Take a thread or wire 15 cm long and tie it around your paper accordion, in the middle. You can make a small loop of wire.


5. Use scissors to round off the ends.
6. Begin to carefully peel off each paper layer. Try to pull the layers out of the folds as much as you can. If there are small breaks, don’t be alarmed, they will be invisible in the fluffy pom-pom.


7. You can make a few more pompoms in the same way and then connect them. It will work out holiday decoration for home.

8. You can thread a thread through a wire loop so that the craft can be hung.
How to make a pompom for a hat
How to make a fur pompom
How to make a pompom (video)
Helpful Tips:
* Try using multiple colors. Wrap one half with thread of one color and the other half with another. You can even use 3 colors.
* You can add braid. First, wrap your fingers with braid and wind the thread over it. When you cut the loops of wound thread and ribbon, you will see how beautiful the craft will look.
* Pom poms can be used to decorate hats and scarves. In addition, they can be added to other crafts.
*Once you gain experience making pom poms, you can experiment with colors and shapes to create original pieces.
We cut out a square from thick cardboard, the side of which will be slightly larger than the diameter of the desired pompom. Cut a square piece of cardboard in the middle, approximately just below the center point. Next, cut a piece of yarn 30 cm long and insert it into the cut so that both ends of the yarn are the same size.
We begin to wrap the yarn around the cardboard, changing its colors as desired. If your pom pom is going to be about 6.5cm in diameter, you should wrap the yarn about 100 times around the cardboard. If the pompom has a large diameter, you need to make more turns of yarn; accordingly, there should be fewer turns of yarn if the pompom is smaller. Now we cut the yarn.
We tightly wrap the piece of yarn that will hang from the gap in the cardboard base around the turns of yarn, and also tighten the fabric. After this action, we cut the thread turns and use scissors to trim the pompom, giving it the shape of a ball.
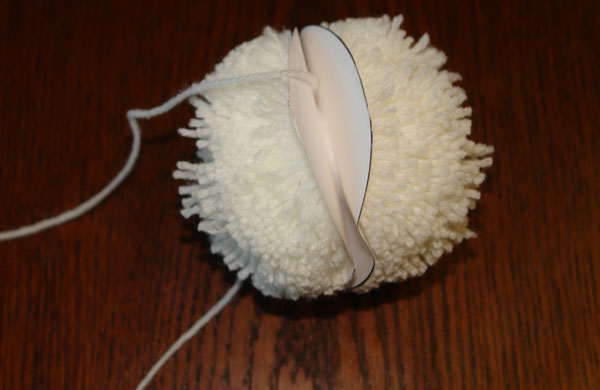
1. Cut out two rings from cardboard.
2. Place the rings on top of each other and wrap them tightly with thread.
3. Cut the threads along the fold.
4. Move the cardboards apart.
5. We tie the middle of the cardboard with thread.
6. Cut the rings and remove them.
Let's look at the classic and most common option for making a regular round pompom. Initially, you need to cut out a blank from cardboard that will be equal to the diameters of two circles from the product you have planned, plus about 1.5 cm. Next, we cut out the center of each circle, which is approximately one third of the diameter.
At the next stage, we place the resulting rings on top of each other. And as evenly and accurately as possible, we wind the yarn onto the cardboard ring until the side of the workpiece that is located towards the center is completely filled, and the pom-pom will be fluffier and denser, the more the better the center of the cardboard circle is filled.
The next step is to push the tip of the scissors through the wound yarn between two cardboard circles, then carefully cut the yarn, holding it carefully, but at the same time, without moving the yarn from the cardboard. We pass a thread between two circles of cardboard and tie the yarn that is on the cardboard in a fairly tight knot, long ends can remain - later they can be used to make a pompom mount for your product.

After all the threads are tied, remove the cardboard, first making a small cut on the edge of the circle. Using scissors, carefully trim the pompom - and you're done.
If the number of threads wound on the rings is insufficient, that is, the inner hole of the cardboard circle remains unfilled, then your pompom may not be quite spherical in shape. And its diameter may be less than calculated. If a sufficiently thick skein of yarn was taken to make a pompom, it should be divided into several balls of such a diameter that they fit into the inner hole of the ring without any problems. The ends of the yarn can also be trimmed with scissors along the outer cut of the ring before the circles are removed. In order for a round pompom to take on an oval shape, it can be “trimmed” to imitate the desired shape. Or you can cut out oval patterns instead of round ones.
Making a pompom tassel
We take a piece of thick cardboard and cut out a rectangle from it, the size of which will be slightly longer than the brush you need, and about 10 cm wide. Along the narrow side of the rectangle along it we place a cord or thread, folded several times, on which our brush will be held. Next we wrap the yarn around long side rectangle, winding our cord to the base. Moreover, the more thread is wound onto the base, the more voluminous the brush will be.
Next, tighten the thread that is laid along the narrow side of the cardboard. Using scissors, cut the wound yarn opposite the knot at the end. Then we cut a piece of yarn about 30 cm long and wrap it tightly around the tassel two or three times just below the knot, about 2.5 cm, then tie it securely. We thread the ends of this piece of yarn into a needle and hide it inside the tassel itself. All that remains is to shake the brush and trim off the uneven ends.
The pompom tassel can be sewn tightly to the product, or you can make a tassel on a cord without cutting off the thread that holds the pompom itself together. You can also decorate the tassel, for example, with a large bead. To do this, in the direction from bottom to top, you need to stretch the brush through a bead of the appropriate size.
We have selected several simple master classes with photos on how to make a pompom from threads with your own hands. Stock up on colorful yarn, cardboard, scissors and patience - let's make pom-poms.
The pompoms themselves are quite a nice and cute thing. But you can also make a lot of wonderful things from them: a mobile for a crib, a rug, or a postcard for mom. So believe me, if you try one of the ways to make a pompom from threads (yarn) with your own hands once, then you won’t be able to stop. It's simple, fun and, oddly enough, can be quite useful.
For example, if your child or teenager is looking for ways to earn money, invite him to make various beautiful things from pompoms with his own hands. And he can learn how to make pompoms from threads (yarn) with his own hands quickly and easily thanks to master classes with photos collected in our material.
How to make a small pompom with your own hands using a fork
The essence of all master classes with photos on how to make a pompom from threads (yarn) with your own hands is basically the same. Only the fixtures change. This could be a fork, a piece of cardboard cut in a certain way, or bushings from toilet paper. In any case, you will need to wrap many layers of thread around the device (the more pompom you want, the more). Then tie the wound thread tightly in the middle, this will be the center of the pompom. And cut along the edges the junction of the wound thread. But words alone are not enough, it’s better to look carefully at the photo, which shows in detail and clearly how to make a pom-pom from yarn.
How to make a pompom from threads using cardboard
How to make a pompom from threads using a cardboard frame

How to make a pompom with your own hands using cardboard rolls
How to make a pompom from yarn with your own hands: a method for the lazy
Joke. This method of making pompoms simply and quickly will be useful not so much for the lazy as for those who need a lot of pompoms. For example, if you are going to make a wreath on a door, a curtain or a rug from pompoms.

How to make a pompom from threads using cardboard rings
For some reason, this particular method of making a pompom is considered traditional. Although it is the most labor-intensive of all those described above. However, we cannot help but mention it. You will need two identical cartoa rings with the centers cut out, between which you need to thread a thread for tying. Then you wind the yarn, as in previous cases, in many layers. When you think there is enough volume for the pom pom, tie a fastening thread and cut the yarn joints along the outer edge of the ring. Then remove the ring, voila, and the pompom is ready.

We showed you the most popular and most simple ways How to make a pompom from threads with your own hands. And if you still couldn’t come up with an idea for a hobby, then here it is - pom-poms.


