After Halloween, a lot of seeds remain from pumpkins used for holiday “scary” lights. You can, of course, use them for their intended purpose - eat them or leave them for seeds, but pumpkin seeds can also be used to make a wide variety of crafts. For example, make a New Year's tree decoration out of them - golden balls.
To do it yourself Christmas decoration we will need: pumpkin seeds, a foam ball, PVA glue, a brush, a satin ribbon, a hot glue gun, glitter

We will take a foam ball as the basis for our homemade New Year's toy. It is better to take a ready-made one from heat-treated polystyrene foam, but if you don’t have any on hand, you can cut out a foam ball yourself or make a base from tightly crumpled newspapers, wrapping them with threads. The main thing is that the base for our toy is light.
We glue a satin ribbon onto our blank with a heat gun, which will become a loop for hanging our New Year's toy.

The next step is to cover our ball with seeds. Pumpkin seeds should be thoroughly washed and dried before use. We start gluing them from the very bottom according to the principle of scales - so that the top one goes over the two lower seeds. 


After we have completely covered our blank with seeds, our almost finished Christmas tree toy should be decorated a little with gilding. To do this, you need to dilute PVA glue with water in a 1:1 ratio and add dry gold glitter into this mixture. We apply the resulting composition to our New Year's craft using a regular brush.


Loop from satin ribbon Just decorate it with a small bow and our homemade New Year's toy is ready!

Autumn can rightfully be considered pumpkin season. Since it is in the fall that the “queen of vegetables” ripens - pumpkin. Pumpkin is very useful, especially for child's body, pumpkin seeds no less useful! In addition, seeds can be an excellent material for creativity! We offer 1 0 ideas and crafts from pumpkin seeds.
1. Toddlers can turn pumpkin seeds in a beautiful flower!
2. You can use the seeds to make a pumpkin applique.

3. If you string painted pumpkin seeds on a thread, they will turn out great beads for fashionista!

4. Application "Autumn tree" from seeds

5. From seeds it will turn out to be an original decorative one painting.

6. Autumn candlestick decorated with seeds, will not only decorate the room, but also warm it up!

7.A fun rainbow of pumpkin seeds for 2-3 year olds.

8. Pumpkin seeds can be decorated photo frame.

9. For development fine motor skills The game is suitable for kids" Sorting". To do this, you can take pumpkin seeds, beans, corn or others.

10. Well, this game will help you learn counting! Pumpkins and their seeds will help with this!

We hope you enjoyed these ideas! Create with children!
Multi-colored tree made from seeds and buckwheat
In kindergarten they asked to bring a craft from natural materials. I just recently saw on the Internet a gorgeous applique made from pumpkin seeds.

It was an amazingly beautiful autumn tree with a trunk and branches made from either coffee beans or beans, and bright orange leaves made from pumpkin seeds!
I really wanted to repeat this beauty. In the process, as always, our imagination ran wild, and our Tree turned out to be colorful!
Colorful autumn tree with orange, yellow, light green, cherry leaves against the background of a blue autumn sky - beauty! Do you want to make such an applique with your kids? Now I’ll tell you more.

We need:
- Sheet of cardboard;
- PVA glue;
- Brush;
- Watercolor honey paints;
- Pumpkin seeds - for leaves;
- Buckwheat, or poppy seeds, or coffee beans - for the trunk and branches.
How to make an applique from pumpkin seeds:
The most time-consuming part is coloring the seeds. But it’s not that difficult, I painted this much in 10-15 minutes (on one side, we’ll still glue the other). We leave the seeds so that the paint dries, and in the meantime we will make the silhouette of the tree.
The principle is simple: dip a brush in glue and draw the silhouette of a tree with a trunk and branches on the cardboard with glue.
Now let the children sprinkle the glue pattern with cereal - quickly, before the glue dries. We wait 5-7 minutes for the grain to stick, and carefully tilt the application so that the unadhered grains fall off.

And here are our colorful seeds ready for decoration. Take one leaf seed at a time and grease it with reverse side glue using a brush and glue the leaf onto the branch! You can do it another way: lubricate the cardboard, and then glue the seed. But the first option is more careful; the applique is not smeared with glue.

You can “lay” a layer of multi-colored foliage under the tree, and glue a few leaves so that they flutter picturesquely in the air!

If you have a little time, you can spend it usefully in preparation for the New Year: making items New Year's decor interior design and souvenirs for your loved ones and friends. So holiday gift and, at the same time, can become a decorative item Christmas tree of pumpkin seeds.
Pumpkin Seed Crafts are low-cost, their products have an interesting texture and look very impressive and unusual.
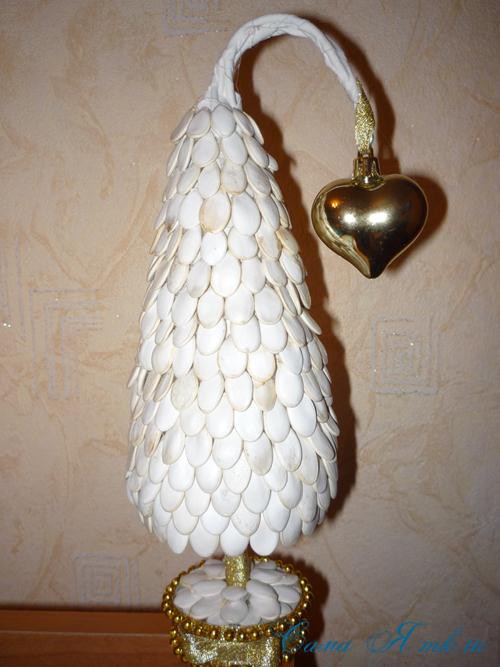
We will make a Christmas tree with a curved top; I have never seen anything like it on the Internet. Therefore, I really hope that my Master Class Readers and needlewomen of our site will like it.
To do Christmas tree made from pumpkin seeds You will need:
- pumpkin seeds,
- a cone made of polystyrene foam or floral foam,
- adhesive plaster,
- a plastic or paper cup, a small pot or other suitable container,
- some medium hard wire,
- 2-3 skewers for shish kebab,
- a little building plaster (alabaster),
- PVA glue,
- dry gold glitter,
- brush,
- hot glue gun,
- for the crown: a bell, an asterisk or a small ball, etc.
- decor - optional (ribbons, beads, etc.).
So, let's begin…
First, let's prepare the trunk of the Christmas tree...
We saw off the skewers to the desired length and glued them together with hot glue.
We dilute the plaster with water to the consistency of thick sour cream and place it in the prepared container. I have this paper cup, which I trimmed in advance.
Place the base of the Christmas tree in the center and wait a couple of minutes for the plaster to completely harden.

Now you need to prepare the cone...
We attach 2-3 small pieces of wire on top, one a little longer. We will make a loop on it to secure the decoration for the crown.


Let's start gluing with pumpkin seeds...
I immediately decorated the stand a little. Until our Christmas tree takes its rightful place, it is much more convenient to do this.

Carefully glue the bottom, trying to do everything as symmetrically as possible.
We lower the first row down half the seed, glue the next ones in a checkerboard pattern, also going half a seed onto the previous row.


Now you need to bend the crown. We attach the decoration and continue to cover it with pumpkin seeds.

Like this…

We dilute 1:1 water and PVA glue, mix with gold dry glitter and with a regular brush cover the entire Christmas tree, as well as the seeds on the stand.
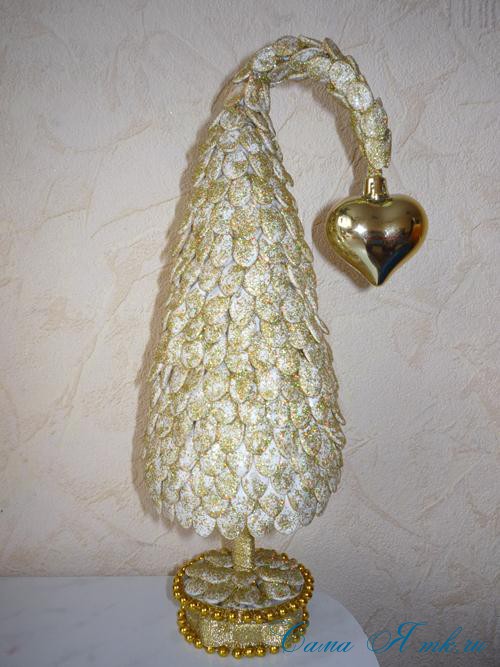
You can leave it like that. I decorated it a little with gold snowflakes.
It turned out like this Christmas tree made from pumpkin seeds.


I don’t think anyone will immediately guess what it’s made of. Christmas tree made from pumpkin seeds It turns out to be a very interesting texture. And it turned out to be very simple to do. Definitely try to do this DIY souvenir!
I was glad to help!
Let's save nature! Therefore the Christmas tree is on New Year we will do it ourselves. There are a lot of master classes on the topic New Year's crafts from various materials. Christmas tree crafts made from natural materials are popular: pine cones, coffee beans, acorns. In this master class it is proposed to make christmas tree with your own hands from pumpkin seeds. This is an easy craft that even the youngest children can do. No special materials are required for its manufacture; creative lovers will find everything they need.
Materials and tools:
Pumpkin seeds;
- cardboard;
- plastic tray;
- green sparkles;
- acrylic lacquer;
- fluffy colorful balls;
- plasticine;
- paper for decoration;
- tinsel;
- scissors;
- cotton wool;
- pencil;
- glue;
- stump.

How to make a DIY Christmas tree from pumpkin seeds
Let's start by making the base for our Christmas tree. We take any cardboard, roll it into a cone and fix the ends, which can be done with glue or a stapler. We place the wide part of the cone on a sheet of cardboard and draw a pencil around the perimeter of the cone, then retreat about 1 cm in a circle and again draw a line, going around the perimeter of the cone. We cut out a circle along the second line, from which we make cuts every 1 cm to the first line.

Glue the bottom to the cone using the cuts made. Since our crafted Christmas tree cannot stand on a flat surface (the seeds will interfere with it), it should have a trunk. In our case, this is a small block of a thick branch. Glue it to the bottom of the cone.

We take pumpkin seeds (some will be covered with a thin film, this must be removed, since it will not allow the seed to stick well to the cardboard) and glue it to the cone, one at a time, moving in a circle from the bottom of the tree. It is better to glue using a glue gun or Moment type glue. We glue the seed with the pointed part up, which we lubricate with glue; the whole seed is not smeared.

Having glued one circle, we move on to the second, one row should overlap slightly with the second. 

We cover the entire cone row by row. Glue a fluffy ball to the top. 
We grease a small area of the Christmas tree with acrylic varnish and while it is still wet, sprinkle this area with green glitter (this is convenient to do by dipping a clean and dry brush into the glitter, and then shaking off the glitter with your finger over the desired area). So gradually coat the entire tree with varnish and sprinkle it. The varnish will not only fix the sparkles, but also add shine to our New Year's craft. You can mix glitter with PVA glue and coat the Christmas tree with this mixture; when the glue dries, it will become colorless, and the glitter will stick well.

Glue the Christmas tree to the tray. 
We glue cotton wool to the tray around the tree. 
From the remains of plasticine we make a cube, which we wrap decorative paper(you can take holiday packaging plastic bags). It turns out to be an imitation of boxes with gifts.

Glue the gifts and multi-colored ones onto the cotton wool. fluffy balls, they will add bright colors to our New Year's crafts. 
Glue tinsel around the perimeter of the tray. 
We did it! creative craft DIY New Year's tree! Now you can start decorating the interior of your apartment or give a homemade New Year tree to your loved ones. Happy New Year!


Irina Nagibina
Сhudesenka.ru
You can buy many different New Year's decorations for your home, and even more interesting, make them yourself.
Now is the time to stock up on pumpkin seeds and dry them. You can make them out of them golden balls that will decorate New Year tree or the interior of your home.
For creating New Year's crafts You will need:
- pumpkin seeds,
- a foam ball,
- hot glue gun,
- dry gold glitter,
- PVA glue,
- gold satin or fabric ribbon.

Are being done pumpkin seed balls very simple, you can use either a ready-made foam ball or one you cut yourself as a base. The only thing is if you homemade ball, then you should wrap it tightly with any threads, since its surface is not thermally treated, and its glue will simply melt. You can crumple the newspaper into a tight ball and also wrap it with thread. The main thing is that the base is light.
So, let's get started...
We take the base ball and first fix the tape with hot glue, approximately as follows.
 Master Class - Christmas balls from pumpkin seeds.
  Master class - New Year's balls
 And so on until the end...
 Master class - New Year's balls made from pumpkin seeds.
  Master class - New Year's balls
 Crafts made from natural materials are beautiful in themselves and require almost no additional decor.
We'll just gild ours a little Christmas decorations from pumpkin seeds dry glitter. To do this, dilute PVA glue with water 1:1 and add gold glitter to this mixture. Apply with a regular brush.
 Master class - New Year's balls made from pumpkin seeds.
  Master class - New Year's balls made from pumpkin seeds.
 Decorate with a small bow made of gold fabric ribbon, and that’s it, ours. Christmas decoration ready!


