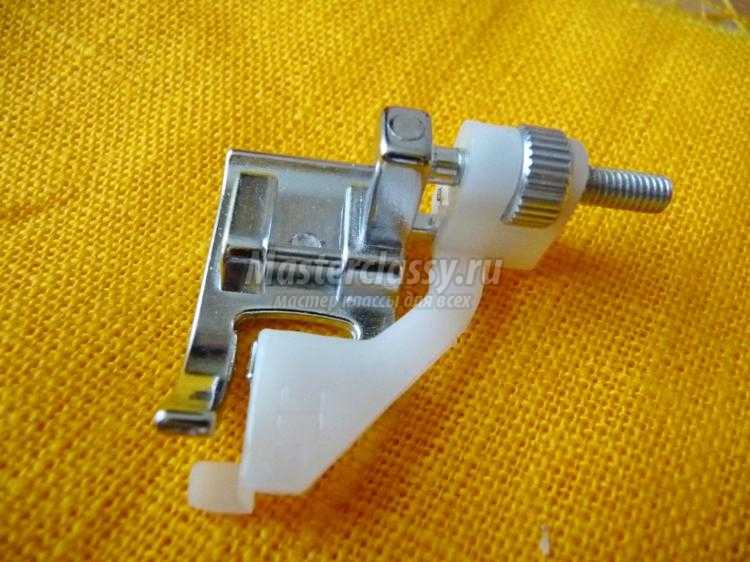
To sew buttonholes with a continuous stitch, special feet are used. The width and length of the loop are usually set before stitching, but in principle they can be changed during processing. Buttonhole stitching can be done either semi-automatically or automatically, it all depends on the type of presser foot installed.
On the automatic foot, adjust the length of the buttonhole by inserting the button into the holder. When processing a buttonhole with this foot, it will completely match the size of the button, which is very convenient. When using thick buttons, you need to manually increase the length of the loop slightly on the machine. Each machine has different adjustments; to do this, read the user manual that comes with the machine.
The semi-automatic presser foot has markings on the left side for adjusting the length of the buttonhole. Before you start stitching a buttonhole, mark its length on the product and move the sliding gate, matching the bottom marking on it with the beginning of the buttonhole on the product. When sewing, keep the ends of the threads on the left side of the foot.


These loops are worked with a zigzag and secured in the corners with long stitches. You can process “built-in” loops in 4 or 2 stages, it all depends on the functions of the sewing machine. In the second case, a machine pass is made in one direction, then securing stitches are made, then a pass in reverse side and again transverse securing stitches are made. Overcasting in 4 stages is more versatile, since during the processing of the loop it is possible to adjust the frequency of stitches.
- Place the stitch line in the center of the foot, and its beginning directly under the needle. Lower your foot and start stitching.

- Do the stitching slowly. Place the loop marking slightly to the left of the center line. When finished, raise the needle, move the fabric slightly to the left, lower the needle and raise the presser foot.

- Rotate the fabric 180°. Move the needle to the right, make a stitch and raise the needle. Make 6 wide securing stitches. Finish the stitch with the needle position on the left.
There is a very simple way in which you will learn how to make loops on sewing machine without a special function and a buttonhole foot. In this master class we will talk about this.
Most often, the loops on the clasp of a product are processed at the last moment, when the entire product is almost ready. It is important to remember that the locations of the loops must be duplicated, for example, using adhesive duplicator. It is advisable to choose dublerin of a non-contrasting color relative to the color of the fabric of the product.
You will need:

Tailor's pins for medium fabrics;
Tailor's pins for thin fabrics;
Small scissors;
Ruler;
Disappearing fine line fabric marker.
Step 1. Marking

Determine the width of future loops. The loop is usually made several millimeters longer than the diameter of the button.
Button diameter - 2.7 cm, selected loop width - 3.0 cm.

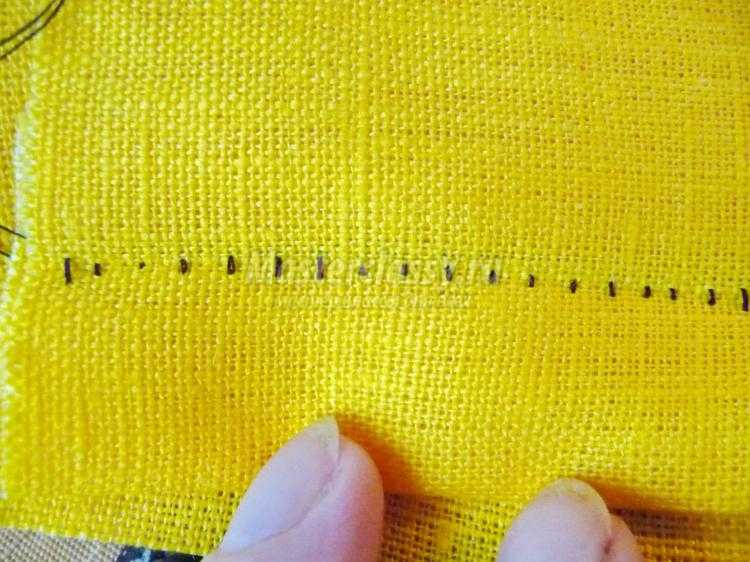
Mark the position of all the loops at the site of the future fastener. Using a washable marker, draw a loop frame that is 3.0 cm long and approximately 0.5 cm wide.
If you don't have a fine marker, you can mark the frame using marking stitches.

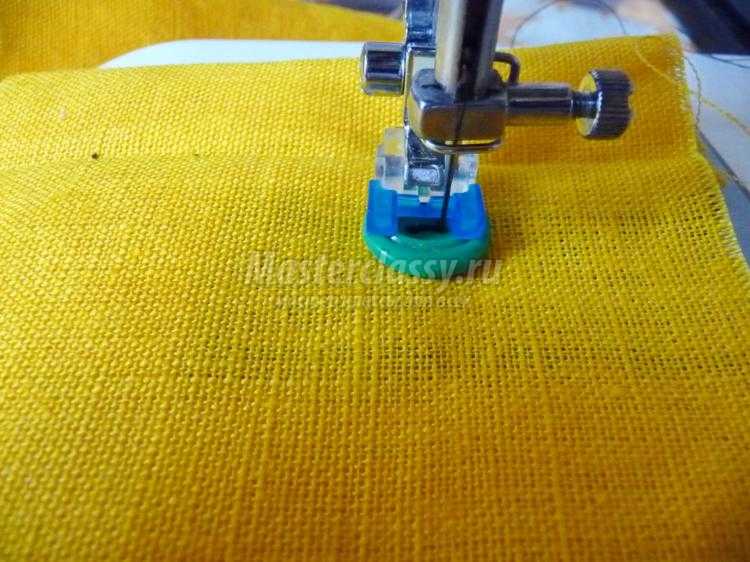
Baste the layers of fabric in the fastener area or pin them with tailor's pins.
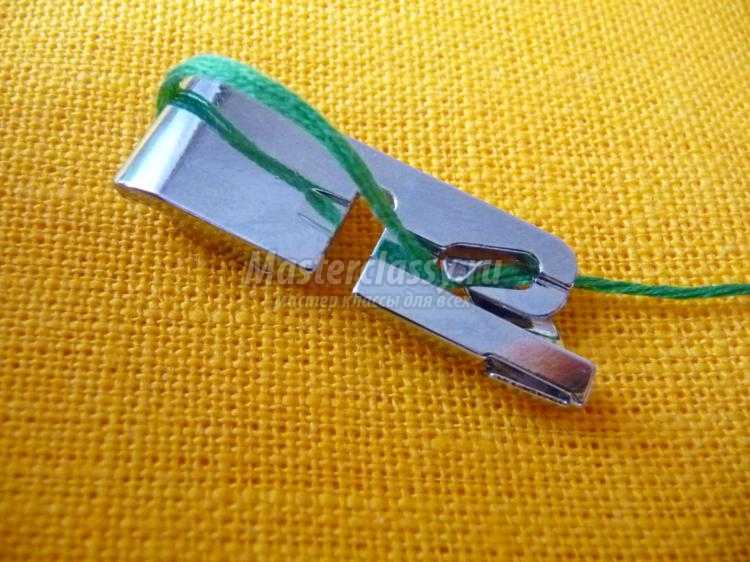
Place pins for thin fabrics on the loop frame, pinning them along the short sides, this will ensure convenience and accuracy when processing the loop frame on sewing machine.
Step 2. Frame

This operation is performed on a sewing machine.
Settings: straight line, 1.5mm stitch length.

According to the marking, stitch the frame with a line with a short stitch: the length of the stitch on the long sides of the loop frame is limited by pins, in the area of the short sides of the loop frame it is better to count the number of stitches, it should be the same on all short sides of all loops, this will ensure maximum accuracy of the loops.

Hinge frame. It is better NOT to remove the pins located on the short sides of the loop frame at this stage.
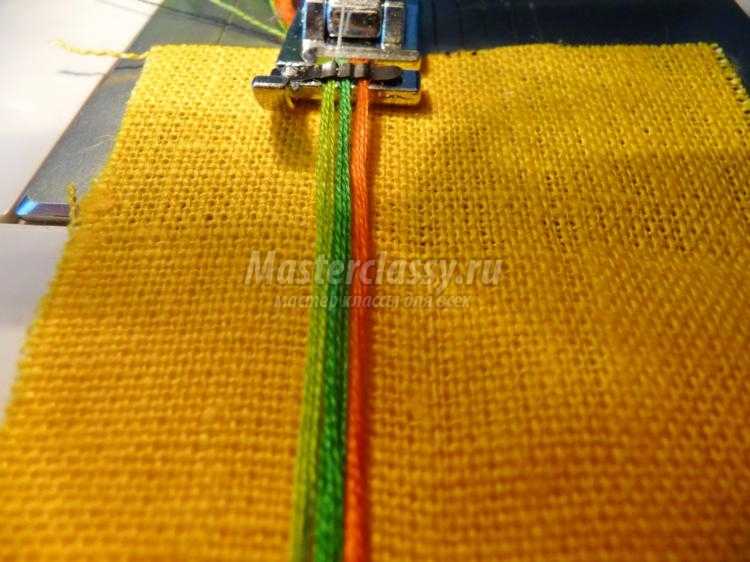
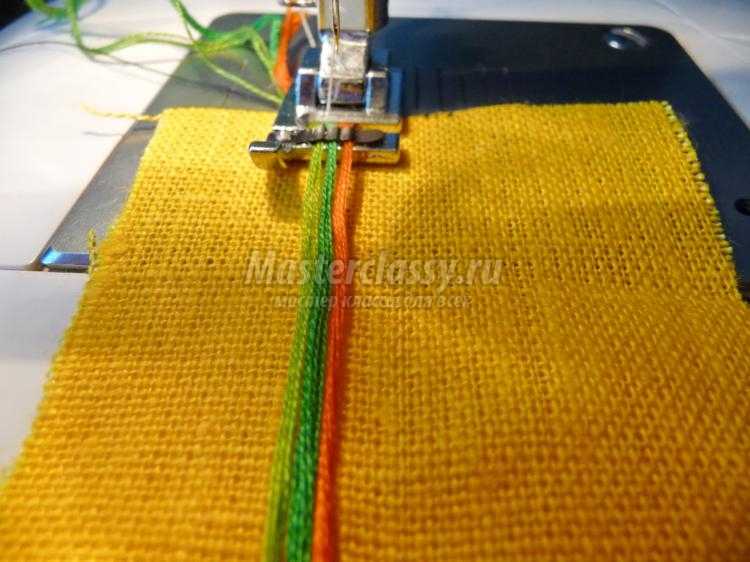
Step 3. Long sides of the loop

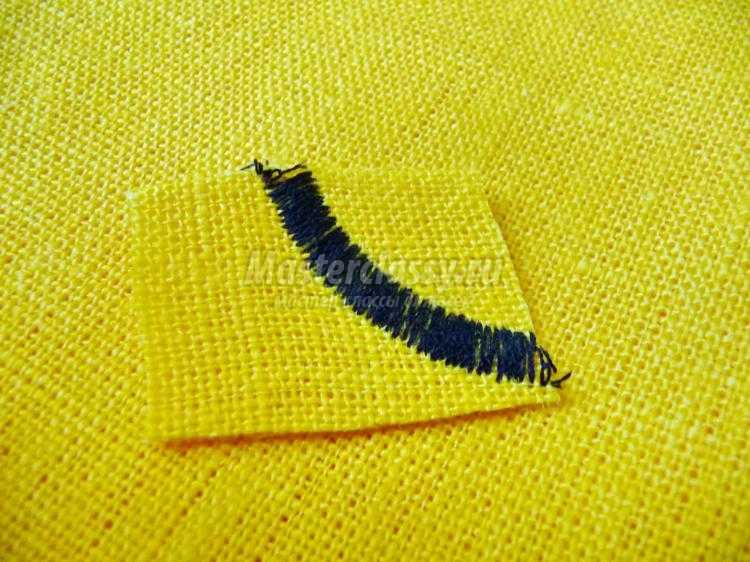
At this stage, the long sides of the loop are processed in a tight zigzag.
Settings: zigzag stitch, stitch length ~2.5 mm, zigzag density ~0.4 mm.


The zigzag must be laid along long side loops so that the stitches lie on both sides of the stitching that forms the loop frame. Length guidelines are pins.
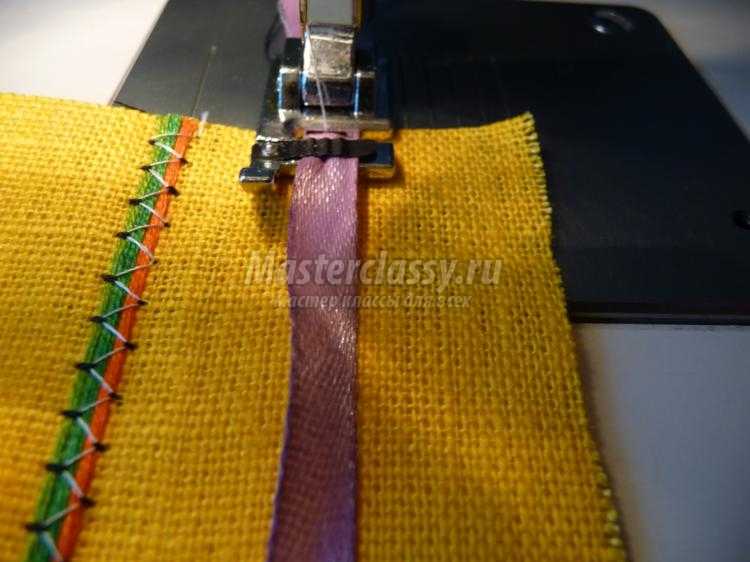
Step 4. Short sides of the loop

At this stage, the loop frame is closed - the short sides are processed with a tight zigzag.
Settings: zigzag stitch, stitch length ~6.0 mm, minimum zigzag density ~0.2 mm.

On a test sample, it is better to pre-select the stitch length to process the short edge of the loop. The stitch should cover the width of the loop. The machine foot is located exactly in the center of the loop, and the short side is clearly under the needle.
To close the width of the loop you need to make about 10 stitches back and forth, making point tacks at the beginning and end of the operation.


The loop frame is stitched, you can remove all the pins and markings.
Iron the loop area.
Step 5. Final processing

All that remains is to cut the loops. This operation can be conveniently performed using small and sharp scissors. It is very important not to touch the zigzag threads when cutting through.

Carefully trim the excess threads inside the loop, cutting out any excess threads.
How to easily and easily sew a button on a leg

To make it more convenient to sew on a button, forming a small “leg,” you can use a sewing machine needle: place the thick part of the needle under the button, and inject the sharp part into the fabric.
By training, Daria is a PR specialist and economist, but several years ago she devoted herself entirely to her favorite activity - sewing.
She learned to sew from magazines, books and using the Internet; she also has sewing courses, but Daria considers herself self-taught. She loves to study specialized literature on sewing different years and countries, and then apply the acquired knowledge in practice.
At the end of 2017, Daria became the winner festive competition from site.
She runs her page on Instagram and group
The semi-automatic loop is performed in four steps. You will have to turn the stitch selection dial four times:
- Setting;
- Left side of the loop;
- Setting;
- Right side of the loop.
The automatic loop is completed in just one step. The size of the buttonhole itself is automatically determined by the size of the button that is placed in the foot to make the automatic buttonhole.
You probably already know the basic rule regarding sewing needles: Replace with a new one after every large sewing project. Even a slightly dull tip or damaged needle eye can seriously affect the sewing result. Indeed, on modern sewing machines, the needle pierces your fabric at a speed of 600 to 1,000 stitches per minute. But at the same time it is also important to choose suitable type needles.
If you look at the needles on offer in the most ordinary sewing store, you may see at least a dozen different varieties. In appearance they are all similar, unless you look at them with a magnifying glass. But different types of needles have different needle eyes, different points, different shafts, etc. All these parameters are of great importance for the work.
Let's look at the main types of needles in accordance with the attached illustration:
1. Universal/standard
Features: slightly rounded tip, standard for sewing machines.
Materials: silk, rayon, cambric, chiffon, organza, linen, georgette, poplin, ribbed corduroy.
2. Jersey
Materials: thin knitted and knitted products, single (one-sided) jersey, corset fabric, knitwear
3. Stretch
Features: Medium rounded tip.
Materials: highly elastic knitwear, simplex, latex, lycra.
4. Jeans/denim
Features: sharp tip.
Materials: denim, canvas, twill, artificial leather.
5. Microtex
Features: thin shaft and very sharp tip.
Materials: microfiber, fine and tightly woven material, such as silk, taffeta, etc.
6. Leather
Features: The tip is shaped like a blade and cuts through material.
Materials: suede, pigskin, calfskin, goatskin leather.
In addition, it is important to consider the manufacturer of the needle. We express our gratitude to the Japanese company Organ Needles, which helped us prepare a large material on needles for sewing machines.
Flash card requirements:
The flash card with designs must be formatted. The optimal size of a flash card is up to 4 GB. It should not contain any extraneous files: documents, photographs, films, music.
Create a folder for the design:
You insert the formatted flash card into the turned off machine. Then turn it on and wait for the download process. The machine creates a folder on the EmbF5 card (the name may vary slightly). Also, in some cases, depending on the class of the machine, a MyDesign folder can be created. After that, take out the card.
Transferring the design:
You transfer the design to the card either by simple copying or using special software (Digitizer MBX). The design must match the size of the hoop you are embroidering on. If it extends beyond the hoop, the machine will not open it. In this case, the design should be divided into several individual ones using special software.
The first digit on the left is the last digit of the year of manufacture. For example, if your sewing machine was manufactured in 2007, then the first digit will be 7. And if in 2014, then the last digit will be 4.
The second number from the left is the quarter in which the model was produced. 1 - production month from January to March, 2 - from April to June, 3 - from July to September, 4 - from October to December.
Other figures refer to general information manufacturer.
For example, serial number 431092594. The model was produced in the third quarter of 2014.
To perform a double stitch, you will need a double needle (two needles on one holder). If your sewing machine produces a zigzag width of 9 mm, then the distance between the needles can reach up to 9 mm. For machines with a zigzag width of 5 or 7 mm, the distance between the needles should not exceed 5 or 7 mm, respectively.
A sewing machine has two spool pins that hold spools of thread. The rods can be vertical or one horizontal and the other vertical (the rod is included additionally in the package).
Install two spools, thread the threads symmetrically behind the thread guide, then into the double needle. Select the straight stitch sewing function and use the standard zigzag foot.
A double stitch is formed on the front side of the fabric, and a zigzag stitch is formed on the back side. For processing knitted fabric, we recommend using double needles stretch 130/705N No. 75/4.
Our company recommends that scheduled maintenance of Janome sewing machines and overlockers be carried out in specialized centers. If you want to do this yourself, please use only high quality lubricants designed specifically for sewing equipment.
Buyers are often faced with the fact that the cars they purchase are missing certain accessories. We would like to inform you that the following models may be supplied without a hard case:
- Janome 7518A
- Janome 7524A
- Janome 7524E
- Janome DC50
- Janome DC4030
- Janome Memory Craft 5200
Be sure to check the equipment of the sewing machine before purchasing from the seller. A sign that a hard case is missing is a low price. Hard car cover not sold separately.
You can sew buttonholes using the semi-automatic or automatic mode, which are available in different models sewing machines. Very rarely this procedure is done manually. The choice of method for sewing buttonholes depends on the model of the machine, the type of fabric and the skills of the seamstress.
Presser feet for sewing machines: types and functions
Modern sewing machines are equipped with a standard set of accessories, including several types of presser feet. Whatever option of paws is included in the standard set, it can always be replenished with a number of others purchased in a specialized store. Usually the set contains 3-5 types of feet that can be used to work with different types materials.
The functions of the paws allow you to:
- sew loops on fabrics of different densities and textures;
- fulfill different types stitching on leather, nubuck, knitwear, suede, synthetic film;
- make hems, blind and overcast seams, zigzag;
- sew in secret and regular zippers;
- decorate clothes using rhinestones, beads, sequins, elastic bands, piping, beads, ribbons;
- attach appliques, buttons;
- create quilts or patchwork (the English version of patchwork).
For the above tasks, the following types of presser feet are used (table below).
| Type of foot | Peculiarity | Purpose |
| Universal | Included in all standard sets of feet. There is a special groove up to 7 mm for creating a zigzag seam | Work with different materials and tasks |
| For overcasting fabric edges | Not available in all standard machines, but certainly available in overlockers | Sewing the edges of frayed fabrics, swimsuits and carpets |
| For straight stitch | Included in the standard set of feet | To obtain a one-sided even stitch. Most relevant when sewing silk, satin and chiffon products |
| For zigzag | Included in the standard set of feet for most Janome 5519 models | Can create straight and zigzag stitches |
| For lightning | Suitable for regular zipper. To sew a “hidden” stitch, you will need an additional foot. | When working with a regular zipper, you can replace it with a universal foot |
| For buttons | To be purchased separately | Suitable for regular and decorative buttons |
Buttonhole feet
The buttonhole foot is designed to machine a special hole into which a button will be threaded when buttoning clothes. The buttonhole foot differs from the usual one in that it allows you to make a continuous stitch. In this case, the width and length of the loop are set before stitching, but if necessary, they can be adjusted during the sewing process. To create an overcast seam, the machine uses semi-automatic and automatic modes. But in some cases you can sew the loops manually. The buttonhole foot makes the task easier and saves time and effort.
Features of using different methods of sewing buttonholes
How to use the automatic buttonhole foot. First you need to set the length of the loop by inserting the button into the holder. This method is very convenient, since the loop is the same size as the button. If you need to overcast a hole for thick buttons, increase the length of the loop. It is important to remember that in different machine models the length of the loop and the fastening of the feet for making automatic loops differ. This is especially true for older cars. For example, buttonhole feet from Brother are not always compatible with machines such as the Chaika. The same goes for the feet from the manufacturer Singer. So be sure to read the instruction manual.

The algorithm of actions is as follows. The center of the foot is placed above the marked loop line. The needle hole should be at the front end of the loop. The stitching of the loop is done in one pass.
For a vertical loop, the ends must be straight. When making a horizontal loop, one end is rounded or given the shape of a keyhole.
Features of the semi-automatic buttonhole foot
The difference between this foot model and the previous one is that on the left side it is equipped with markings for adjusting the length of the loop. Before you start working, you need to mark the length of the fabric and move the sliding shutter. In this case, it is necessary that the lower marking on the shutter coincides with the beginning of the loop on the fabric. During overcasting, the ends of the threads should be placed on the left side of the foot.
To create a buttonhole, semi-automatically make reinforcement stitches and stitch up the left side of the buttonhole. At the top of the loop, securing stitches are made (to do this, just press the memory button - the sewing machine will do the rest automatically). Next you need to make a line along the other side. At the end of the loop, stop again and sweep the loop in semi-automatic mode.
And the semi-automatic mode of use allows you to make loops with a cord. To do this, a special cord is inserted into the foot for processing loops. Then lower the needle, sew the sides of the loop along the cord and form securing stitches. At the final stage, the ends of the cord are tied tightly. Take a needle with a large eye to move the cord to the wrong side, pass it under the securing stitches in the corner of the loop and cut it. After this, the stitching of the loop is completed.
Methods for making a buttonhole on a machine
How to use the built-in buttonhole foot. On Janome machine 5200, you can use the buttonhole foot to make “built-in” buttonholes. If a satin stitch is used for regular loops, then in this case the loops are sewn out using a zigzag stitch, and long securing stitches are made in the corners.
To process “built-in” loops, two or four stages are used. In the first option, one pass “there” is enough, after which securing stitches are made, then a pass is made “back” and another series of transverse securing stitches. In the second option (four stages) you can adjust the stitch frequency.
The algorithm of actions is as follows:
- The loop line should be in the center of the foot, and its beginning should be under the needle. The foot is lowered and the stitching begins. Everything is done slowly so as not to miss a stitch.
- The loop marking should be slightly to the left of the center line. After finishing the stitching, the needle is raised, the material is shifted to the left, the needle is lowered again and the presser foot is raised.
- Next, make a 180 degree turn. The needle is moved to the right, a stitch is sewn and the needle is raised again. Make six more wide securing stitches.
- The stitch should be finished so that the needle is on the left. Then turn the fabric 180 degrees again.
- Raise the needle and change the stitch width. Sew along the other side of the loop. Raise the needle again and make six wide securing stitches again.
- The stitch is finished, the threads are tied tightly and their ends are masked between layers of material.
Before using any buttonhole method, you need to set up your sewing machine. Working with different types of fabric has its own characteristics. The easiest way to create loops is on woolen fabric, since the machine allows you to move the material in any direction. But when working with silk, chiffon and satin, flaws are possible, since an incorrectly adjusted rail can pull the material under the foot. Because of this, you will have to spend time redoing the loop. In this case, each new stitch will leave a hole in the fabric, and if the error is not noticed in time, the material may even rupture.

To set up the machine, first adjust the tension of the upper and lower threads. It is necessary to adjust the lifting height of the rack (if such adjustment is provided). Then check the pressure level of the fabric foot. The lower the pressure, the worse the material moves under the foot. It is most convenient to work when the fabric fits tightly to the teeth. But the cloves do not need to be raised high. This is especially true when working with thin cloth(chiffon, silk), as there is a risk of the product chewing.
A special lever must be brought to the presser foot, which is designed to automatically switch the operating mode of the machine. And only after all the above procedures can you proceed directly to sewing loops.
More information on the buttonhole technique can be found in the video below.
Good afternoon, dear needlewomen. Today we will look at using paws to sewing machines. If you like to sew, then this one Master Class for you. I bought sewing machine feet from a Chinese online store.
The paws are very good, but how do you know how to use them? I started looking for information and realized that this topic was poorly covered. But if you use such devices, you can easily and simply perform various operations. So I decided to figure it out myself and help people who are also looking for this information. So, let me begin.
Narrow edge lining foot. The paws can be different by 2 mm, 4 mm, 6 mm. The foot makes it possible to process the edge very smoothly and efficiently without markings. This foot is also called a snail. I’ll say right away that the paw is worthy. Cut the edge of the hem at an angle and tuck it into the snail. The fabric wraps itself very nicely.
The seam turns out very neat. The width of the seam depends on the foot. Wrapping fabric 2 mm by hand is not at all an easy task, but here any fabric, even if it frays a lot, folds up nicely. True, you need a warp, but you will be patient, and it will be your faithful assistant.
Using presser feet for sewing machines - master class


Using this foot, you can sew on various narrow cords by tucking them into the snail from below. Instead of top thread, it is better to use mono thread.

Assembly foot. Very the right foot. Using this foot it is easy and simple to make frills and ruffles. Pay attention to how you place the fabric. The fabric that is being gathered lies as the bottom layer, and the top layer is tucked into the groove of the foot and will be sewn evenly along the top of the gather. The assembly is uniform.


Edge stitching foot. I liked this foot because the plate allows you to guide the edge of the fabric along the edge of the needle. The overlock stitch is made strictly along the edge, the thread runs along the plate and lies freely, which makes it possible to stitch knitted items, the seam will not burst when stretched. We use an overlock stitch, imitation overlock.


Foot for sewing elastic, ribbons, braid. I can say that the paw is simply decent. Using this foot it is easy to sew on an elastic band. I inserted it under the plate and it lays flat and does not jump to the sides. And if you tuck thick threads of different colors under the plate and stitch, you will get a beautiful decorative braid. We use mono thread instead of upper thread. We use a zigzag stitch, or stitch zigzag.


Foot for sewing on appliques. The foot is transparent and the design is clearly visible through it, so it is used when it is important to sew accurately along the line. Used when sewing a zigzag stitch. The step distance is small, the stitching should be tight. For volume and beauty of the stitch, loosen the top thread, and then the stitch will highlight the beauty of your work.


Blindstitch foot. Everything is easy and simple to use, but I didn’t really like the quality of the lining, dots are visible on the front side. There is a screw on the foot, with its help we adjust the hem to the lining, but I still have visible marks and I think I won’t hem it like that.


Darning foot. This foot is designed for darning. Lower the teeth for free movement of the fabric. Comfortable.

Foot for sewing on buttons. Set up a zigzag stitch. Select the stitch height equal to the distance between the button holes. Simple and fast.

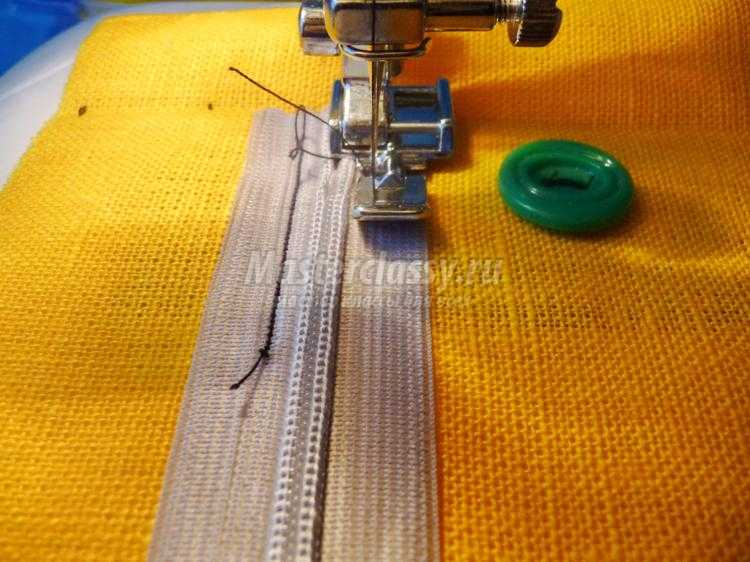
Foot for sewing on zippers. The foot has two holders, left and right - this makes it possible to sew the zipper on both the left and the right, you don’t need to control anything, the foot rests on the zipper and the stitching lies very evenly, when sewing zippers in this way, the fabric will never get caught in the zipper, the zipper opens without difficulty . I've been using this foot for a long time and I love it.

Sewing foot hidden zipper. It’s a wonderful foot, it’s like an iron; at the bottom there is a recess just the width of the zipper itself. I also use this foot for sewing on cords; it lies in the recess and is easy to sew on.

Using presser feet for sewing machines. Photo

Foot for lining fabric. How I regret not using this foot. The foot makes it possible to run the stitch evenly, the plate rests on the fabric and the stitch lies evenly, and there is a screw on the foot, and this makes it possible to shift the stitch, believe me, I sew like a pro and I won’t sew as perfectly as with this foot. If you sew a line and then move the screw, you can lay a second line right next to it. So great.


Solyanikova Tatyana Viktorovna
http://masterclassy.ru/shite/9162-ispolzovanie-lap...-klass-s-poshagovymi-foto.html
Sewing machine feet
June 14, 2013 - Irina AslanovaToday everyone knows what a sewing machine is. But not many people know about sewing machine feet and how many types of them exist now. Nevertheless, the paws not only expand the capabilities of the machine, but also make it easier to perform many processes, and most importantly, make them of high quality. By paying due attention to this article, you will learn a lot of new things, and by using the presser feet in practice, you will get great pleasure when sewing a variety of products.
If you bought a sewing machine, you will immediately see the adapter (mechanism for attaching the presser feet) “AU-100” and the “ziz-zag” foot - “AU-107”. In addition, as a rule, there is an additional foot for zippers “AU-101” and for loops “AU-116”.

(Allows you to quickly change paws, which is very convenient and speeds up processes)

(Standard foot for operations on
zig-zag basis)

(Needed for lightning.
Can be located on both sides of the needle)

(Excellent help when making loops. Convenient when making robots on slats and collars)
Many machines also come with the AU-108 blind hem foot, the AU-115 quilt foot, and the AU-105 button foot.

(Use for operations that require more careful execution. For example: blind stitches, etc.)

(Use for straight parallel stitches that run at the same distance).

(Use for buttons, fasteners, hooks)
The instructions for the machine always contain descriptions of the work for all of the above paws.
Today's home sewing equipment market can offer 40 or more types of feet for different functions. Paws are divided into semantic groups:
Complete most workflows
Making decorative stitches
Performing work with highly complex fabrics.
Sets of presser feet
Main workflows:
There are many paws on the market that can sew in hidden zippers, available in both metal and plastic.

(Inserting a hidden zipper)
Due to the fact that there is a special groove at the base of the foot, sewing in a “secret” zipper is done almost in the blink of an eye. To make good straight stitches on delicate fabrics, you need to use a straight stitch foot

When processing edges, you need to take a 2mm hemming foot “AU-111”.

For thicker fabrics, you can take a set of hemming feet with different widths (6 mm, 16 mm, 22 mm) “AU-121.”
If you don’t have a screwdriver, you definitely need an “overlock” foot “AU-109”.
This foot has a stopper that does not pull the edge of the fabric when used. If the fabric needs additional processing of part of the cut, then you can use the foot with a knife on the side to process the edge “AU-125”,

Decorative works:
Edging products is a complex operation, but with a special foot it is greatly simplified.
You'll be sewing bias tape in just a few minutes using one stitch using the edging foot "AU-117" or a foot with a ruler "AU-114".


Very interesting is the device that lays folds “AU-122”. With it you have the opportunity to sew a decorative part to the product in one operation.

If you want to give your product a more individual look, then use different types decorative finishing. For this purpose, you can use, for example, the beading foot “AU-130”,

foot for decorative cords AU-106 or braid AU-131,

Among those performing decorative operations, one should definitely mention the foot for embossed tucks (when used together with a double needle) AU-127, the foot for sewing appliques AU-110 and the foot for shirring AU-128


