Despite the fact that shop windows offer a large number of jewelry boxes made of various materials, the desire to make it with your own hands does not disappear. After all, this is not only a tribute to one's talent and skill, but also the desire to have an original thing that no one else can find. In addition, it is of great importance that a hand-made box will have exactly the size that is so necessary to place all the jewelry.
The box is made by hand in two stages:
1) Creation of the box itself from improvised materials;
The material for it can be duct tape rings, wooden blocks or baguette trimmings, old newspapers, shoe boxes, and other improvised materials.
Tape reel box If a small box is enough for jewelry, then you can make it from a paper tape reel. The size of the finished product will correspond to its diameter and height. For work you will need: For the bottom and lid of the future box, you need to make cardboard blanks. It is enough to attach the reel to a sheet of cardboard and circle with a pencil. We circle the resulting circles with another circle, the diameter of which is 3-4 centimeters larger than the previous one. These are the future rays with which the circles will be glued to the bobbin. Don't make them too wide. The narrower they are, the more accurately the bottom will stick. The end result looks like this: For the lid, you will need to cut a strip, slightly longer than the volume of the reel and half its height wide. In order for the lid to fit well, not to be too large, you need to wrap the future box with a strip and glue its edges. When the side of the lid is dry, you need to glue the top to it in the same way as was done with the reel. To strengthen the rigidity of the bottom and the lid, you can glue one more layer of cardboard inside, cut along the inner diameter of the reel. The finished box is decorated with your own hands using the decoupage technique, it can be painted with acrylics and varnished or glued over the entire surface with a self-adhesive film with a pattern that imitates natural material: wood, stone. The manufacture of such a box is more laborious than in the previous version, but it will also serve much longer than paper. For work you will need: pencil, ruler; Having decided on the size of the box, you need to cut out two blanks from the plank, equal to its length and width. At the end of each, it is necessary to make a 45-degree bevel with a knife so that the walls fit nicely. The depth of the bevel is equal to the width of the plank. Before gluing the side parts, you need to make sure that the bevels fit snugly, without gaps. Otherwise, they must be adjusted with coarse sandpaper. The sides are glued together gradually. After each subsequent gluing, it is necessary to check the internal angle between them. It must be equal to 90. Otherwise, the result may be any shape, but not an even rectangle. There are two bottom options: if the finished product will be pasted over with paper or cloth, then the blank for the bottom is taken equal to the size of the box and glued so that its side parts are visible; Wooden box covered with paper if a jewelry box with your own hands is covered only with varnish or paint, then it will look more beautiful when the bottom is hidden inside it. For this, a blank is taken, in length and width smaller than the size of the box by two thicknesses of the plank. For example: with a box size of 10x10 cm and a wall thickness of 1 cm, the bottom should be taken 8x8 cm. Lacquered wooden box The manufacture of the cover can also be in two versions: cut the workpiece and install it on the hinges. The best option for attaching the lid is a piece of piano loop, the length of which is a couple of centimeters shorter than the length of the box. All ends of the boards visible on the finished product must be carefully processed with sandpaper; glue the lid to the box and, after drying, carefully cut it off with an electric jigsaw, retreating down the body by one and a half to two centimeters. A wooden jewelry box is decorated with all known methods: varnishing, painting, decoupage, pasting with oracal, fabric, leather. Luxurious baguette box Boxes made of a baguette, a material for picture frames, look chic and rich. It is made of wood or plastic. Plastic is soft, can be cut and processed no worse than wood. You can buy a baguette in art salons, having previously determined how long the blank is needed. The principle of manufacturing such caskets is identical to working with wooden blanks. Papier-mâché box What is papier-mâché, how to work with it, we know from the school bench. The advantage of this material lies in the variety of forms of the finished product. It is enough just to find the original blank of the required shape to create an original box. For work you will need: Do-it-yourself papier-mâché box The base must be covered with petroleum jelly or cream, so that later you can easily remove the papier-mâché. The first layer of thinly torn paper must be wetted and covered with the entire surface of the base. Paper for the second and each subsequent layer is carefully smeared with glue. You need to make sure that there are no missed sections. It is convenient to alternate, for example, layers of newspaper and white paper. The better the paper is impregnated with glue, the stronger the papier-mâché will turn out. The number of layers is optional. After complete drying, the blank of the box must be removed from the mold and prepared for decoration. If it is a painting with paints, then it must be coated with an acrylic primer. In addition to painting, a do-it-yourself box can be decorated with beads, ribbons, buttons, figurines made of plastic or salt dough. Chinese papier-mâché box If the basis for papier-mâché was a round object, the lid was created together with the box, then it is necessary to remove it carefully, having previously drawn a cut line with a pencil. If the layout was created without a lid, then after removing it from the base, you need to align the edges with scissors. The lid is attached to the box before being treated with a primer. Holes for the connecting cord can be made with a paper punch. Decorated box with their own hands is opened with varnish. It is better to use an acrylic-based varnish purchased at an art salon. Artists cover their canvases with this varnish to avoid contamination and fading of paint. For work you will need: Cut out the sides of the future box of arbitrary shape from cardboard. Sew or glue decorative fabric to them on both sides, leaving a small allowance for the seams. A bamboo napkin can also be decorated with a fabric on the side that will be inside the box. The sides can be sewn or glued to the napkin, leaving some part free. The clasp can be made in the form of an eyelet and a button, or you can purchase a magnetic clasp at an accessories store. So that the jewelry box does not get dirty and has a neat appearance for a long time, it is better to open it with acrylic varnish. Below are photos of jewelry boxes made using different decoration techniques. For lovers of rigor and minimalism in everything, it is enough to make the box monophonic, covering it with paint and protective varnish.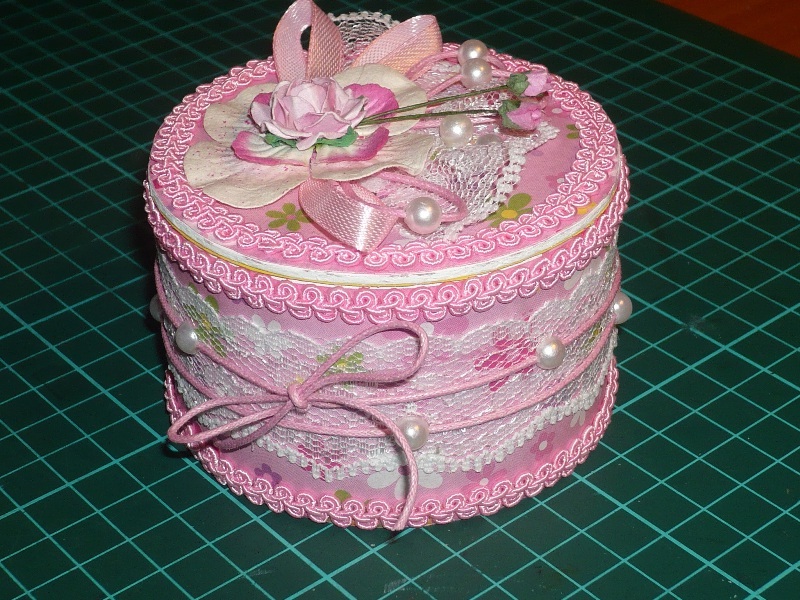
reel freed from adhesive tape;
thick cardboard;
pencil;
scissors;
glue (preferably PVA).
Before gluing the bottom to the bobbin, it is necessary to draw along the fold line with a non-sharp object, you can use the edge of tweezers or a metal ruler. This will help to gently bend them. To hide the petals on the side, you need to stick a cardboard tape over them, corresponding in length and width to the side of the reel.DIY wooden jewelry box
a long plank 10 millimeters thick, 10 centimeters wide, made of soft wood: pine, alder, linden;
a plate for the bottom and lid, its width is equal to the width of the finished product;
hand saw with fine teeth or electric jigsaw;
knife;
sandpaper;
PVA glue (it is better to take construction) or carpentry "Moment".Do-it-yourself box from a baguette
DIY jewelry box made of papier-mâché
newspapers or thin office paper;
vaseline or any cream;
scissors, brushes;
PVA glue or wallpaper.DIY box from a bamboo napkin
bamboo napkin;
thread with a needle, PVA glue;
scissors, cardboard, fabric for decoration;
magnetic clasp.Several ways to decorate boxes
All needlewomen someday begin to think about sales. But not everyone at this point begins to understand the secrets of successful sales. Alas, not only the quality of our jewelry makes them popular and bought. Especially if you focus on selling handmade products on the Internet. Here is the main picture! You will be able to deliciously present your jewelry and arouse the appetite of potential customers, you will become a sought-after master.
Let's talk about packaging today. Agree, it's not comme il faut to send a customer a piece of jewelry for 2-3 thousand rubles in a zip package))) Choose the appropriate packaging! And it is better if this packaging matches the decoration in color and style.
We offer you a master class on creating such boxes for jewelry and a small selection from the masters.
Master class from Galina Fediv http://ljalja-hobby.blogspot.com/
White cardboard (density not less than 200 g / m2) - for the bottom of the box, colored cardboard or scrap paper (here the density may be slightly less) for the lid, iron ruler, sharp hard pencil, stationery knife, double-sided tape or glue stick, non-writing a pen, a thin knitting needle or (as in my case) a nail file.
1. First, we need to decide what size box we need. For my thick harnesses, I make boxes 9 * 9 cm 2 cm high.
2. We make the bottom of the box. On white cardboard we measure on each side 2 cm, 2 cm, 9 cm, 2 cm, 2 cm.
3. Now we take a non-writing pen, a thin knitting needle or a nail file and connect the opposite sides, as in the figure
If this is not done, then when bending, creases may form or crack the cardboard at the fold.
4. Now we are working with the corner
Cut off the excess with a utility knife.
Repeat on each corner and get this result
5. Now we glue double-sided tape (or spread it with glue)
6. We bend along the lines and peel off the protective strips on the adhesive tape.
7. Now you can start gluing the bottom of the box. The corners will stick to the adjacent side
The bottom of the box is ready.
Similarly, we make the upper part - the lid, but the sides of the square will now not be 9 cm, but 9.2 cm. This is necessary in order for the box to close.
Here are the 2 parts
And this is what the box looks like with a flagellum
More packaging options (I chose the color to match the color of the jewelry)
To store jewelry and small accessories, it is not necessary to buy expensive jewelry boxes or organizers. It is enough just to make a jewelry box out of cardboard with your own hands. Most of the house has wrapping paper, small pieces of lace, beads or beads and other materials that can be used to create an original jewelry box.
Components for crafting:
Cardboard box shape
simple rectangular or square
A do-it-yourself cardboard box for needlework is formed from a box and paper tubes. First you need to choose a suitable basis for the box - for example, a shoe box. It is better to take a base for the bottom approximately the size of an A4 sheet or less, so it will be easier to go through the finishing process. 
To form the tubes, you will need glue, knitting needles. For weaving, you can use tubes of plain paper for printing, unnecessary press and magazines. The finished cardboard box can be painted with acrylics or left as is.
It is advantageous to use colored paper for the printer: it has an extensive color palette.
The process of creating a cardboard box with your own hands will not take much time. First, on the outside of the box, you need to glue the vertical tubes that serve as guides. You need to glue in the interval of 4-6 cm - it all depends on the size of the box. Then the tubes are bent to the side faces, and then inward.
A compacted cardboard is glued to the bottom, suitable in size, which will hide the place where the tubes are fixed. Then the tubes are twisted around the circumference of the base. The lid also folds up.
Round box
For needlewomen, a round coil left over from adhesive tape is an expensive material. This base can be used in different types of needlework: decoupage or scrapbooking, decorate with coffee beans, beads, beads, jewelry stones, glue leather or fabric. To make a box of round cardboard with your own hands, it is advised to use interlaced cardboard. 
First you need to attach the reel to the cardboard and draw three circles along the inner and two along the outer diameter. Circles with a smaller diameter are glued together, it is recommended to use Moment glue. Process the finished element with sandpaper and glue it with a circle of large diameter, placing it in the central part.
As a result, a lid will be formed that will hermetically close the box.
If there is a need to process the edges with sandpaper. The box layout is ready. It is allowed to decorate it to your taste with different beads and decorative stones using any needlework technique. The lid can be made slightly protruding: you need to increase one of the circles with a large diameter. This will make the box easier to open.
Heart shaped box
The heart-shaped box is wonderful as a gift wrapper for Valentine's Day. First of all, you need to cut out a heart-shaped element from cardboard - this is the bottom of the box, the dimensions of which will determine the parameters of the box as a whole. Then you need to cut out a wide strip of cardboard with teeth on one side. Glue the strip to the bottom. Assemble the other side in the same way. 
It is necessary to glue the two halves of the walls and attach them with paper clips, wait for the glue to dry. Decorate the box inside and outside with paper with different textures or ornaments. Glue two pieces of fringe to the base - they will be as curtains on which the lid is held. Then cut out the second heart, this will be the top cover. It must be glued to the curtains.
Decorated paper should be glued in the same way. Then, to your taste, you need to decorate a cardboard box in the shape of a heart. Along the contour, as an option, you can glue lace. Top decorate with flowers, beads, ribbons, etc.
How to make a lid for a box

Decorate the box with fabric
To decorate a cardboard box with your own hands, you can use not only an old press or wallpaper, but also decorate with fabric. With the help of a covering, it is possible to glue the box with cloth. Such a thing can serve as a separate present, as well as an organizer for saving small household items, for example: toys for children, home decor items, sewing supplies.
Materials and accessories that are indispensable for lining the box with cloth:
- Box. When choosing, it is allowed to apply the rules described above for working with the press, magazines, wallpaper.
- The very fabric of which you will sheathe the box.
- Specialized glue, adhesive tape.
- Sharply sharpened scissors.
- You may need an awl in the work, as well as a strong cord (you need to choose the color of the fabric).
In order to do everything accurately and get an excellent result, you need to follow the recommendations:

Soft box made of cardboard and fabric
It is possible to make a box with your own hands from compacted cardboard and glue it with a cloth. Make a cover with a synthetic winterizer - it will be soft. This box is perfect for storing jewelry, materials for needlework. The parameters of such a box are 18 cm by 9 cm. Also, you can enter your own value, based on what you will use it for.
To create you need:
- thick paper,
- matter,
- filler,
- glue,
- stationery,
- paper tape.
You need to draw a circle of the desired diameter on thick paper and cut it out. Cut out rectangles for the sides. 
Instruction:
- Form a box with adhesive tape and clips.
- Glue the box.
- Glue the bottom of the box with fabric.
- To seal the side faces, cut a rectangle out of not very thick cardboard and glue it with a cloth.
- Cut out a lid from cardboard and glue the side. Put the synthetic winterizer on the lid and glue it with a cloth.
- Glue the edge of the lid with an additional piece of paper with a cloth.
Needle box
To create a needle box you need:
- White matter in peas.
- Satin ribbon.
- Tape reel.
- Compacted cardboard.
- Glue gun or regular quality glue.
- Scrapbooking paper.
- Stationery.
- Fillers.
Instructions for the formation of a do-it-yourself needle box made of cardboard:

The needle box is almost ready - it remains to decorate:
- Glue a red satin ribbon on top, bottom and sides.
- Circle the coil on a white cloth with scarlet peas.
- Sew the canvas, leave half unsewn.
- Cut off the pieces so that the seam does not come apart.
- Turn out on the front side.
- Insert the cardboard circle into the fabric.
- Put some filler inside.
- Glue the bottom of the fabric with cardboard.
- Add more filler, tuck the top of the fabric, glue it to the cardboard.
In order to decorate the cover of the needle bar, make a bow from the ribbon and glue it to the cover.
Master class on creating a box with drawers
An excellent box with retractable drawers can be made with your own hands from available resources, such as cardboard or matchboxes. Ordinary matchboxes will fit only tiny rings, but if you buy travel or fireplace matches, you can make a full-fledged casket.
Required items to create the box:

Formation will take very little time:
- matchboxes, without a layer of sulfur, glue together;
- glue thick cardboard on the outside;
- surfaces that are visible to decorate with wallpaper or film;
- fasten decorative buttons on a fishing line or wire with an awl.
If desired, decorate with beads, drawings, bows.
Box in the form of a doll sofa
Instructions for making a box in the form of a doll sofa:

Step-by-step instructions for the organizer box
To design an organizer box, you must have:
- raw wood box;
- velvet fabric;
- quality glue;
- brushes.
The tools you need to create an organizer box:

Instruction:
- Treat the wooden box with a stain, everything that has not been absorbed must be wiped off with a rag.
- Using a drill, you need to drill a hole in the center in order to fix the handle
- Cut two pieces of fabric slightly smaller than the bottom and lid of the box. Then you need to cut another piece half as much. Next, you need to lay a short piece of fabric on a long one, stitch it to make a pocket. Fix the velvet fabric and organizer inside the lid and at the bottom of the box.
Box in the form of a book with a cache
Instructions for making a cache box:

Making a shabby chic box
Components for making a box:

From a decoupage napkin, you need to cut out a pattern, then divide it into layers. Cover the entire area of a pre-made cardboard box with paint. Dry with a hair dryer and leave to dry completely. Rub the box with a candle in places where there will be scuffs. Be sure to rub the corners with a candle. Cover the box with a white acrylic primer, dry.
Rub the box with sandpaper to create a worn effect. Attach a decoupage pattern to the box, apply glue on top. Let dry, paint over the edges of the pattern with a brush with your own hands. Dry and varnish.
Ideas for decorating a homemade jewelry box
A do-it-yourself cardboard box is easily decorated with anything, suitable: beads, old unnecessary jewelry, decorative stones, buttons, etc. Show your imagination, you can look at various decoration options on the net for inspiration. Do not be afraid to do something of your own, the main thing is that it be done from the heart.
There are many variations of creating a beautiful cardboard box at home. Decided to do something interesting with your own hands? Choose the option you like and act.
Video: do-it-yourself cardboard box
How to make a cardboard box with your own hands, see the video clip:
Master class on how to make a cardboard box with your own hands:
Currently, the decoupage of the box is gaining more and more fans, which is not surprising. After all decoupage allows you not only to express your creative abilities with your own hands, but also to get an interesting thing. There were even related books on sale. What is decoupage? This is a special technique with which you can transfer any image to the surface. In this article, we will consider the decoupage technique for the jewelry box.
Necessary tools for decoupage boxes
The technique of decoupage of the box involves the use of the following items:
- box blank (you can use a blank purchased at a specialized store);
- napkins for decoupage technique;
- sandpaper;
- PVA glue;
- decoupage glue;
- acrylic paints;
- sponge;
- brushes;
- screwdriver;
- adhesive tape or tape;
- various decorative elements;
- acrylic primer.
Decoupage technique
So, having collected the necessary tools, we proceed directly to creativity. Perhaps the most ideal material for decoupage is wood. At the same time, in this technique, you can process both the tea box and the plastic surface with your own hands. Whatever material you choose, in any case, the box must first be prepared. To do this, we process the surface of the box with sandpaper.
Then the workpiece can be primed with acrylic primer.
Metal elements are best removed with a screwdriver. The next step is toning the workpiece. To do this, paint over the box with acrylic paint.
The next step is directly transferring the pattern to the surface of the workpiece. Such transfer pictures can be purchased at a specialized store. To do this, we separate with our own hands the top layer of the decoupage napkin, on which the pattern is applied. We tear out the elements of the picture with our hands. Having placed the napkin on the desired field of the box, we apply decoupage glue.
Leave until completely dry. From above we apply varnish in several layers. The next step is to decorate the box with your own hands.
First, we return all the elements removed at the first stage of work. The decoration of the box depends solely on the style chosen for decoupage. In addition, the product can be ennobled using the craquelure technique.
To better understand the sequence of actions, watch the video at the end of the article.
Ideas for decoupage boxes
Decoupage of the box is a creative activity, so even if you are guided by clear instructions, you will get an original little thing. Let's consider the main ideas that are used when decoupage boxes. Among the most popular:
- vintage;
Today in stores there is a wide selection of boxes in which you can store jewelry. They can vary in their shapes, colors and styles. However, many needlewomen make such items with their own hands. There are different ways to make a jewelry box, with which you can realize any idea.


How to make a box out of a box?
The easiest way to make is to take a cardboard box as a basis. There is a similar item in almost every home. You can use shoe boxes, packaging and any other options that fit the size.
Such a DIY jewelry box does not require creation from scratch, so the main actions will be aimed at decorating and combining the box itself with the lid.


You will need to take several steps.
- Film cleaning. Thanks to this step, the decor process is facilitated: varnish or paint is applied easier.
- Then you need to create a couple of cuts in each corner of the lid and align the folded edge of the sides.
- Using glue (it is best to use PVA for this purpose), glue the turned edge to the side of the box (outward or inward at your discretion). All connections should look straight. Additional tape is allowed.
All further actions are occupied by decorating the product for jewelry with the help of fabric. Under textiles, it is best to put foam rubber of small thickness. Most often, needlewomen resort to decorating the outer part with velvet. Alternatively, you can use non-woven wallpaper.


You can equip the internal filling for jewelry using a towel. This is the best option for storing rings. To do this, you need to cut the towel into pieces, the width of which is equal to the width of the box. Then the material is twisted into a tube, fixing it with a thread.
Formed tubes can be placed in a box and covered with corrugated paper or cloth. As separators, you can use wire or wooden skewers.
Such a compartment is very convenient for arranging rings, but some girls use it for earrings as well.


Cardboard production
You can also use thickened cardboard with a fabric sheath. Such a box with a lid will also have an attractive appearance and is suitable for storing jewelry. The cover is duplicated with synthetic winterizer.
To create you will need:
- paper with good density;
- the cloth;
- filling material;
- adhesive;
- scissors, clerical knife;
- paper tape.


A circle of the required size is drawn on paper, which is then cut out. The sides are formed from a rectangle.
The execution of the work includes several points.
- Using adhesive tape and a clip, form the "skeleton" of the box. It will be oval, as in the picture.
- Then you can start wrapping the box.
- The bottom part is lined with fabric.
- The lid is also created from cardboard, to which the side is glued. Then you need to put a synthetic winterizer on the lid and also use textiles as pasting. The edges are decorated with paper.


Master class on creating from wood
This option is more complex than the previous ones, but such a product has a long service life.
First you need to prepare the necessary tools and materials.
- Pencil.
- Ruler.
- A long plank 10 mm thick and 10 cm wide. Soft wood products are suitable: pine, alder, linden.
- Board to create the bottom and cover. Its width should be equal to the dimensions of the finished base.
- Hand saw with fine teeth. Alternatively, you can use an electric jigsaw.
- Knife.
- Sandpaper.
- Construction glue PVA. The use of carpentry "Moment" is allowed.
After the dimensions of the future box are determined, it will be necessary to cut out two blanks from the planks, which will be equal to the length and width indicators. On the end part of each workpiece, a bevel is equipped with a knife, the angle of which is 45 degrees.
This angle provides a beautiful joint between the side parts of the box. The depth of the bevel is identical to the width of the board.

Before proceeding with the gluing process, it is necessary to make sure that the bevels are in tight contact with each other, and there are no gaps between them. If discrepancies are observed, they can be eliminated with coarse sandpaper.
The side parts need to be glued gradually. Each step is checked against the inner corner. It should be 90 degrees. Otherwise, in the end you cannot get an even rectangle, and the wooden box will look unattractive.
The bottom can be done in two ways.
- If you plan to stick with paper or textiles, you will need a blank for the bottom, which is identical in size to the parameters of the box. In this case, you need to glue it in such a way that the sides are visible. That is, it is simply glued from below to the “skeleton” of the product.
- If the product will be varnished, it is recommended to hide the bottom inside the box - in this way it will look aesthetically pleasing. This will require a blank that is smaller in size than the size of the base by two board thicknesses. For example, if the box is 10x10 cm and the wall thickness is 1 cm, then the bottom will be 8x8 cm.

The cover is created using the following method:
- the workpiece is cut according to the given dimensions of the base and mounted on hinges;
- the optimal solution is fixation on a piano loop, the length of which is 2 cm less than the length of the box itself;
- using sandpaper, the end parts are processed.
Any materials can be used as decor: varnish, paint, decoupage, fabric, leather, beads and plain paper.


other methods
A jewelry box can be made from many materials. Some of them are in every home and are even thrown away as unnecessary. However, in the hands of skilled needlewomen, any items can get a second life. For example, you can create a creative jewelry box from scotch tape reels.
For work you will need:
- 2 reels of adhesive tape, the dimensions of both products must be the same;
- glue;
- cardboard;
- regular pencil;
- scissors or utility knife.

- The reel is placed on a cardboard sheet and outlined with a pencil. Alternatively, you can use a felt-tip pen or marker.
- Then two identical circles are cut out: the first will act as the bottom, and the second as the lid.
- One of the bobbins is cut into two parts. This blank will be used as a cover. It should have slightly smaller parameters compared to the box itself.
- Cardboard circles are glued to the reels.
- Polymer clay is often used as decor. Previously, the material is subjected to softening, rolled to the desired size.
- After that, the inside of the box is covered with clay. All joints with seams and irregularities must be carefully hidden.
- Passes are not allowed. If you ignore this rule, bubbles will appear.
- When the inner part is ready, you can start working on the outer layer. Squares of different colors with patterns will look stylish. Before laying the extreme row, a ribbon should be glued, which will act as a curtain for fixing the cover.
- Then each part that is processed with polymer clay should be placed in the oven. When the material has cooled, the item can be exploited.


There is another option to easily create a jewelry box at home. This will require an unnecessary book. Such an item can be used not only for jewelry, but also as a cache, which contains every little thing. If you want to hide something from prying eyes, you do not need to use the decor.
If you decorate a box from a book, you can get a very original little thing. The manufacturing process itself is simple and within the power of any beginner.


