DIY cylindrical pencil holder made of cardboard. Master Class.
Shvedkina Elizaveta, 7 years old. Kindergarten No. 90. City of Tyumen.Supervisor: Kovalchuk Valentina Nikolaevna. Educator. Kindergarten No. 90. City of Tyumen.
Description: The master class is designed for preparatory children preschool educational institutions groups, junior school age and their parents.
Individual pencil cups are required for visual arts. And for artistically - creative activity Cups for pencils should be varied and externally different from each other. Of course, you can use plastic glasses as pencil holders, but you will agree that it is much more interesting to make a pencil holder with your own hands, not only for yourself, but also as a gift.
Purpose: Present, practical use- pencil holder.
Target: Making a cylindrical pencil holder.
Tasks:
To consolidate the ability to analyze the cylindrical shape of an object as a whole and its individual parts, to create a cylindrical object from individual parts.
Develop the ability to roll rectangular cardboard into a tube.
Develop the ability to make patterns and decorative compositions.
Reinforce techniques for cutting out several objects or parts thereof from accordion-folded paper.
Foster independence and creativity when applying.
Develop a sense of color and composition.
Necessary materials:
Colored cardboard
Colored paper
Glue
Scissors.
Ruler
Simple pencil
Stencils
We'll color the whole world
In blue, in red, in yellow.
On a green lawn
Pink bunnies are jumping.
How good are they?
The guys have...(pencils)
Progress
Choose the type and color of cardboard for the pencil holder (smooth or rough).
Red pencil holder

1. Determine the height and circumference of the pencil holder.
On a strip of cardboard for the outer side surface of the pencil holder, mark the place for gluing, make cuts along the entire length of the strip of cardboard to glue side wall to the bottom.

2. You can decorate the pencil holder with applique now or after gluing, depending on the decor.

3. We roll up the strip of cardboard for the outer side surface and glue it together (spread glue on the shaded part). You can also fasten with tape from the inside or use a stapler.
We bend the cuts.

4. We cut out two inner and one outer parts of the bottom (the diameter of the outer part is 2 - 3 mm larger).

5. We spread the inner part of the bottom around the perimeter with glue and glue it to the cuts (we bring it inside diagonally).
Glue the outer part of the bottom. We cut off the excess.

6. We cut out the inner part of the side surface of the pencil holder (the height is 2-3 mm less than the outer part, and the length is equal to the length of the cardboard sheet).

7. We roll the inner part of the side surface of the pencil holder into a tube with the colored surface inward and insert it, securing it with glue (you can insert another inner part to make the walls thicker).
We insert the second circle inside for the bottom with the colored surface facing up (you don’t have to glue it and you can always change it).

8. Finish, if necessary, decorating the pencil holder.
The following pencil holders differ from the red one only in decoration.
Yellow pencil holder

Decoration
1. Cut out a strip of white paper equal in length to the side surface of the pencil holder (the height may vary).
2. Bend the strip like an accordion, outline the pattern, and cut it out.

3. Smooth out the cut out pattern and paste it onto the side surface.

Pencils can live together in such pencil holders


My pencil is bored:
- Why won’t you give me the paper?
And I stand without work,
But he could create a landscape!
Don't you need a portrait?
Yes, such a thing - which doesn’t exist!
Contact me, don't be shy,
Well, listen to my advice!
I can build a house
He will be next to the pond,
Here is the window, here is the porch,
It will be comfortable to live in it!
And draws with a pencil:
For me - a portrait, for you - a landscape,
And he’s building a house for someone,
Maybe this house is yours!
I. Efremov
We all periodically want updates, and updates in almost everything: in clothes, in the house and even in work.
An original, creative glass for pens and pencils can easily update the look of your desktop, and, of course, lift your spirits. I propose to make this cute and useful little thing using a minimum of materials that can be found in everyone’s home.
To work you need to prepare:
1. Cardboard cylinder from foil or film;
2. Peas (split into halves);
3. PVA glue and pencil glue;
4. Sheet of cardboard;
5. Compass;
6. Simple pencil;
7. Green corrugated paper;
8. Scissors;
9. Yellow acrylic paint;
10. Ladybugs for decoration.

First, we cut off a part from the cylinder equal to the desired height of the future cup. This part will be the basis of our glass.

In order to make the bottom of the cup, on a small sheet of cardboard using a compass we draw one circle, the diameter of which is equal to the diameter of the cylinder, and around it we draw another circle, the diameter of which will be 1.5-2 cm larger than the previous one.

We draw the distance between the circles into equal sectors. 
We cut out the circle along the contour and cut the sectors to the beginning of the smaller circle. 
Now you need to bend the resulting segments and glue them to the outside of the glass. 
The bottom of the future corn cup is ready.
It's time to start decorating the cup. Lubricate a small section of the cylinder with PVA glue 
and glue peas on it in a circle. 
We try to glue the peas of the next row strictly above the peas of the previous row. 
In this sequence, cover the entire surface of the cup with peas. 


When the glue is completely dry, take a brush and yellow paint and paint the entire pea cup, 
so that it finally looks like an ear of corn. 
We make corn leaves for the cup from green corrugated paper or ordinary office double-sided paper. If you used corrugated paper, then stretch the leaves a little in width.

Glue the finished leaves to the bottom of the cup. 
For gluing corrugated paper, it is best to use glue - a pencil, it does not allow it to get wet thin paper and does not deform it. 
Also, to hide the seams between the leaves, glue a small piece of corrugated paper folded in half to the bottom of the cup. 

This is what the glass should look like. 
If you wish, you can slightly decorate our corn cup by sticking a couple of bright ladybugs on it. 
I hope you had a lot of fun and Have a good mood in the process of creating this unusual cup for pens and pencils. Now your writing and drawing supplies will always be in perfect order. And also this one original craft made with your own hands, you can always give it to your friends - classmates and even your favorite teachers! Good luck to everyone and success in achieving new creative heights!
Pencil boxes, that is, stands, or simply cups for pencils and markers, for creative people, of course, should be unusual, creative, stylized to resemble something.
In this section we are ready to offer you a lot of examples of such wonderful crafts. The material for original pencil stands can be salty dough or plaster; plastic bottles or bushings from toilet paper, corrugated cardboard or toothpaste boxes. Here you will find master classes on original pencil holders in the shape of a rocket, ladybug, flowering meadow, little man in folk costume, various animals, cartoon characters, and others, and others...
Pencil holders that are pleasing to the eye and carefully store pencils.
Contained in sections:Showing publications 1-10 of 157.
All sections | Pencil holder. DIY pencil holders
One of the tasks for artistic and aesthetic development in the group early age is teaching children to distinguish primary colors and name them correctly. I suggest you create pencil holder, which can be used for its intended purpose, and also as a teaching aid...
Master class “Using waste materials in working with preschoolers in design classes. Pencil""Usage waste material in working with preschoolers in design classes. pencil» Educator: Zhuravleva O.I. Now it has become fashionable to talk about ecology, about new ways of using garbage for the common good. Taking care of the environment is very important...
Pencil holder. DIY pencil holders - Stands for pencils and brushes. Construction from waste material
Publication “Stands for pencils and brushes. Construction from waste..."  "Second life of unnecessary things" Empty cans, plastic packaging, boring clothes, bottles - all this seems useless to us, and therefore mercilessly goes into the trash. What if these are excellent working materials for creating new, beautiful and functional things?...
 Image library "MAAM-pictures"
 Dear Colleagues! Today I offer you a simple and accessible master class on making a pencil holder. It can contain colored pencils, pens, markers. Such a pencil holder will decorate a fine art corner. Required material for the manufacture of...
 Goal: expanding knowledge about school Objectives: Teach children to sculpt beautiful and at the same time useful objects necessary for every schoolchild; Introduce a new method of sculpting from plates and reinforce the method of sculpting from rings; Strengthen the ability to solve riddles; Continue to develop...
 I would like to bring to your attention such a cute Pencil. For production you will need: A4 cardboard, colored paper A4 format, scissors, glue, ruler, pencil. On cardboard of any color (of your choice), draw an oblique line and draw the same line on the colored one...
Pencil holder. DIY pencil holders - Master class “Pencil holder made from caps”
 I collect caps every year. And a lot of them have accumulated. And I wanted to do something with them, so I decided on a pencil holder in the shape of a heart. For the work, I needed cardboard, which is the base, and super glue, which I had for the ceiling tiles. And of course the lids are different...
 IN kindergarten and at home there are often a lot of “extra” pencils and markers, which sometimes adults and children don’t know where to put. They are scattered on tables and shelves. So that these accessories do not get lost and they have “their own” place, the guys and I decided to make a stand-...
September 1 is just around the corner, the time when all children go to school, and students go to technical schools and higher educational institutions, the time has come to gain knowledge. Students spend most of their time in educational institutions, but they also spend just as much time at home preparing and doing homework.
 In order for the acquired material to be better consolidated in an educational institution, it is necessary to have a comfortable and beautiful workplace Houses. Certainly important desk, a comfortable chair, and it is also very important that everything you need is always at hand. A desktop stationery set - a keeper of pens, pencils, erasers, paper clips and other such important little things - should cope with this task.
 In this article, the News Portal “site” has prepared especially for you best selection the most original stands for pens and pencils, which you can easily make yourself from scrap materials. You can use this homemade stand for pencils and pens yourself, or you can give it as a gift to your girlfriends or friends, brothers or sisters.
DIY stand for pencils and pens

Necessary materials:

- threads;
- scissors;
- plastic jar;
- wooden sticks from ice cream popsicle;
- brush and glue.
Manufacturing:
We cut off the top of the plastic jar so that the bottom remains and a few more centimeters up. Using glue, glue the wooden sticks to the plastic jar (see photo).
 Now we intertwine wooden sticks with multi-colored threads, filling the voids with threads.
 Use threads of different colors, then the pencil holder will turn out especially bright and unusual.
 You can decorate the finished pencil holder with rhinestones, interesting stripes or buttons.
DIY pencil stand made from a tin can
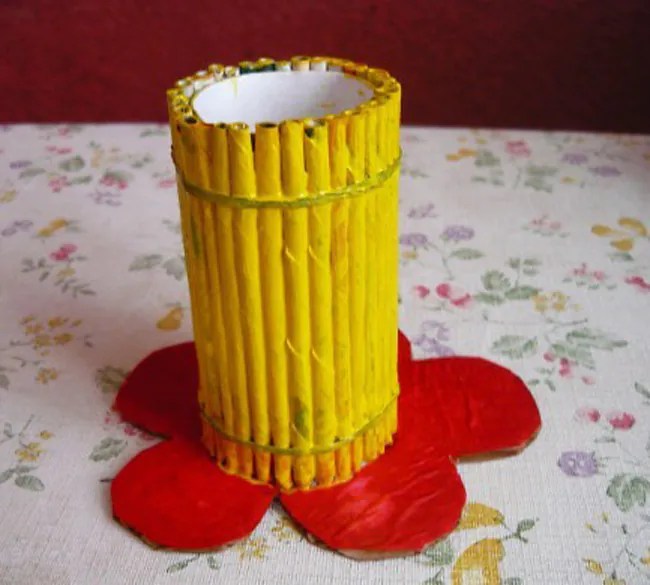
DIY stand for pencils and pens made from newspaper tubes

Necessary materials:
- newspapers or magazines;
- cardboard toilet paper roll;
- glue;
- cardboard;
- double sided tape;
- threads;
- acrylic paints.
Manufacturing:
Make tubes from newspaper or magazines and coat the ends with glue to prevent them from unraveling.
 Glue onto a cardboard roller using glue. newspaper tubes vertically. For more security, tie them together using threads.
 Make a shaped bottom for the pencil holder from a sheet of thick cardboard (it can be a flower, a leaf) and glue the bottom with double-sided tape.
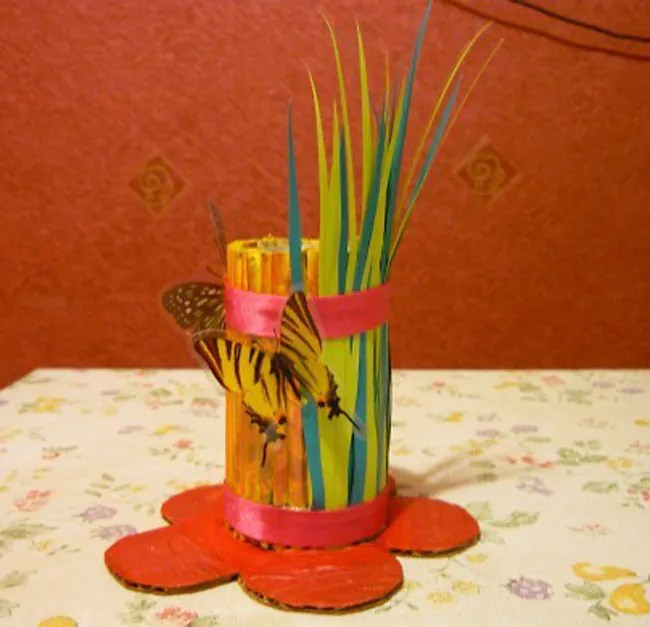
 Now you can decorate the pencil holder and the bottom.
 You can decorate a finished stand for pencils and pens using different elements - grass cut out of paper, leaves, flowers, etc.
Stand for pencils and pens from the telephone directory

Necessary materials:
- thick book (telephone directory);
- glue;
- acrylic paints;
- cardboard toilet paper rolls;
- cardboard;
- scissors or stationery knife.
Manufacturing:
We cut the telephone directory and wrap the pages into cardboard rollers, fixing everything with glue. We cut out a shaped bottom from a sheet of thick cardboard and glue it to the finished structure. Now you can decorate everything acrylic paints.
 If you cut a telephone directory into pages of different heights (see photo), you can end up with an original and unusual pencil holder, different in height.


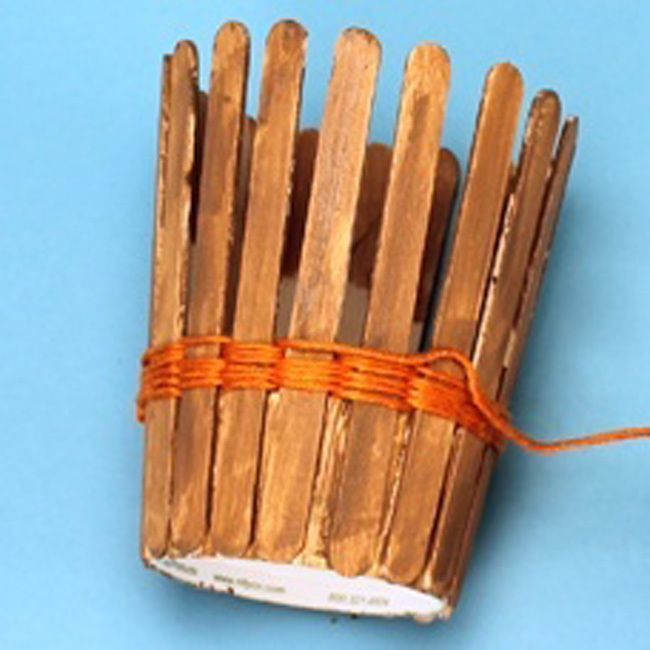
DIY gold pencil holder
Stand for pencils and pens from a tin can

Necessary materials:
- tin jar;
- textile,
- glue;
- decorative braid and ribbons.
Manufacturing:
We measure the tin can and sew a cover for it from the scrap of fabric we like. Covers the fabric with beautiful ribbons and braid. We put a cover on the jar.
We tuck the edges of the cover inside and glue them with glue.
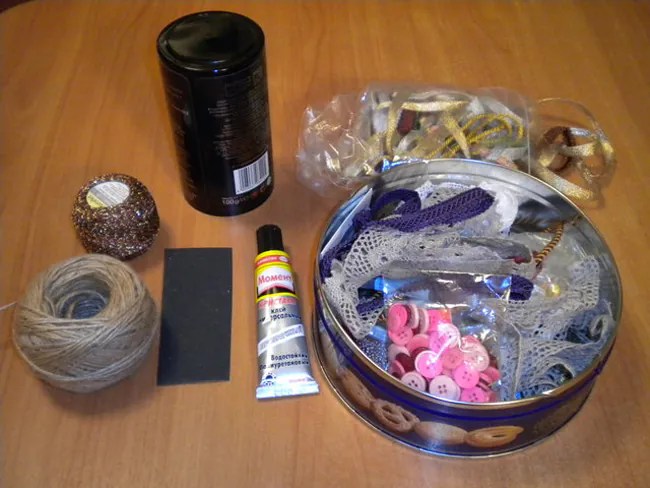
Stand for pencils and pens made of mosaic

Necessary materials:
- can;
- a piece of foam;
- primer;
- stationery knife;
- acrylic paints;
- glue
- cement mortar, sealant, or putty.
Manufacturing:
First of all, you need to apply a layer of primer to a previously cleaned tin can of dirt.
 Using a sharp knife, cut out squares from a sheet of foam plastic that need to be decorated with colored acrylic paints.
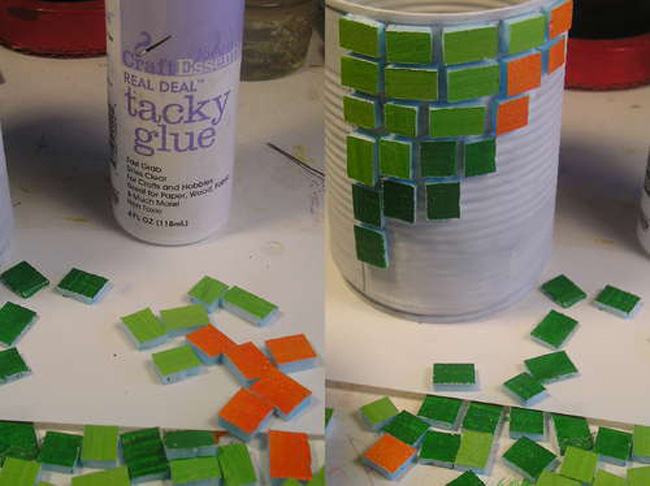 We glue the decorated foam plastic pieces to the tin can with glue, not forgetting to leave gaps between them.
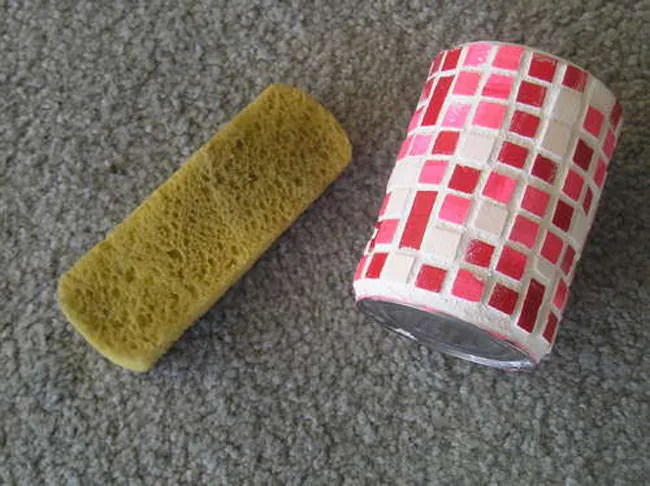 Now fill the cracks with primer using a regular sponge. All excess is wiped off and the pencil holder is ready.

DIY tumbler stand for pencils
Stand for pencils and pens made of thread

Necessary materials:
- can;
- threads;
- glue;
- buttons, braid, ribbons and bows for decoration
Manufacturing:
The tin can must be carefully wrapped with multi-colored threads, periodically coating them with glue so that they do not unwind later.
Now you can start decorating. Decorate the pencil holder with buttons, beads, decorative braid and rhinestones.
A beautiful and stylish DIY pencil stand will not only decorate your desk at home, it is a great opportunity to show your originality at work. There are many ways to make a stand for pens and pencils, but it is best to use wood, because... it will show your seriousness. This is an inexpensive, plastic and durable material that can be beautifully decorated. In addition, the work does not require many tools and materials. It is quite possible to make a stand for pens with your own hands and from waste carpentry or scrap materials.
Option with solid base

The easiest way to make a pencil stand with your own hands is to make it from a single piece of wood. For such work, you only need the workpiece itself, a drill, a drill of the appropriate diameter, and sandpaper. Since the product itself is small, it can be sanded by hand.
First you need to draw markings on the side on which the holes for pencils will be located. This can be done with a simple ruler and pencil. It is important to use a pencil, since traces of it can then be easily removed using sandpaper when sanding the product.

It is not necessary to use a wooden cube for the stand; it can be a parallelepiped, a round unprocessed piece of wood cleared of bark; you can even take as a basis a wooden toy or figurine that you want to remake.

Then we simply drill holes, grind the product, removing all irregularities, burrs and other flaws, after which we simply arrange the pencils. If desired, you can tint the product and coat it with varnish to give it a more respectable look.
The only requirement is that the workpiece has one flat side so that the pencil stands are stable and do not fall at the most inopportune moment. Otherwise, there are no limits to your imagination.

Options from separate parts
It will be more difficult to make a pen stand with your own hands from individual pieces of wood. To do this, you will need small planks or pieces of plywood (necessarily with a well-defined texture). Next, we simply cut pieces of the required size and glue a box from them.
Since the operational load on this stationery is small, it is enough to simply make small grooves on the sides and use good glue. It is not advisable to use screws or nails, as they will significantly damage appearance crafts, it will have to be further decorated.

If you use minimal tinting for wood, then such stationery as a stand for pens and pencils made of wood will look very stylish and beautiful on your desktop. In addition, it has much greater stability than options made from lightweight materials. Therefore, your office or work desk will always be in order.
Probably the most difficult way to make a pencil stand is to glue it yourself from small pieces. But this wooden pencil holder looks very beautiful and stylish.

To work, you will need approximately identical blanks, of such a size that your accessory has the appropriate capacity. In addition, it will take quite a lot of time and patience to ensure that the sample you make looks beautiful.
There is nothing complicated in the work itself; in addition to the bars, you only need glue and a wooden plank as a base. Next, the wooden blocks are simply glued to each other using the well method. You can even use popsicle sticks as bars, because only the space between their rows depends on the thickness of the bar itself.

These are not all the ways to make a pencil holder. You can come up with your own unique design, or draw a drawing according to which you will make the product. In addition, you can decorate products in a wide variety of ways, including burning or carving on wood. A modern stationery will not surprise anyone, but a beautiful, unique, one-of-a-kind pencil holder will perfectly express your originality and spontaneity. Plus, it makes a great gift for any office worker.


