Oksana Telikova
Good day to everyone who took the time to stop by and see me!
I would like to dedicate this entry to the symbol of the coming 2018!
Dog- a responsible and friendly symbol. It is believed that with it will come balance, inner peace and order.
From my last year's publications you may remember how to make Christmas decorations - dogs.

Having found a few minutes of free time, I started preparing for the New Year, much later than usual! Started with manufacturing postcards. Today I invite you to take a look at what I came up with.
To work for me needed:
* linen fabric;
* glue "Moment";
* scissors;
* acrylic and gouache paints;
* pony brush No. 2;
* background for postcards, you can use leftover wallpaper;
* curly scissors;
* various decorative additions: satin ribbons, braid, buttons, beads, snowflakes, bells
How created:
I printed out the silhouette of the one I liked dogs.
I cut it out and pasted it onto linen cloth.

I cut it along the contour. This is the most difficult stage of the work, in my opinion)


I outlined the outline using brown gouache.

I drew the auricle, eye, nose. To make the nose shine and look natural, I painted it with black nail polish.


I selected paper for the background and cut out rectangles with curly scissors.

Then came the most interesting and enjoyable part of the work.
Surround every dog with beauty)


It took very little time to make! And both I and, I hope, the recipients experienced pleasure. postcards) All that remains is to enter good words wishes!

I wish everyone an upbeat New Year's mood!
Publications on the topic:
 Would you like to give a postcard? self made, for International Women's Day? I bring to your attention a master class on making postcards.
 Master Class. Card for Mother's Day. Good evening! On the eve of Mother's Day, I would like to suggest simple postcard to this wonderful thing.
 Any parent or grandparent would be pleased to receive a homemade gift from their child. Today we will show you a master class gift.
Handmade postcard to a veteran dedicated to the 72nd anniversary of the Victory. "Nothing is forgotten, no one is forgotten" Description: given.
 DIY postcard “I’ll give mommy a flower” using the 3D applique technique. Children's master class Necessary materials and tools:.
May 9 is not just a holiday, it is one of the great days, revered not only in Russia, but also in many other countries that suffered from the invaders.
DIY postcard dog symbol of the New Year. You don’t have to stress and buy a ready-made postcard with a picture of a dog. But I can say for sure that you won’t buy such a postcard with the symbol of the New Year anywhere, but you can make such a postcard with a dog with your own hands. The master has developed a postcard template especially for you and shares the secret of how to make a New Year’s card with a dog with your own hands. Only a homemade card has a real price in New Year's greetings! Craft time is 30 minutes. Photo and video illustrations are included.
How to make a New Year's card with a dog with your own hands
To make a New Year's card, you will need a sheet of thick A4 paper. The required tools are scissors, a stationery knife and a ruler. The blade of a stationery knife must be renewed before work. Download the file for the blank postcard “Dog symbol of the New Year” from the link. See photos and videos for details.
Template “Dog Postcard” printed 
 Be sure to use a new blade
The postcard making scheme is simple.
- We print the postcard template file on the printer.
- We cut the lines of the postcard design along the contour.
- We cut through the dog's eyes. We smooth the edges by rotating the cap from the pen. Watch a video.
- Cut out the letters of congratulations. The most time consuming part. But you can skip this operation and leave the letters printed
- In the middle of the sheet with back side We draw along the ruler with the blunt end of the scissors and fold the sheet in half. Watch a video.
- We bend the ears, muzzle and bone of the dog. The postcard has acquired a finished look.

 Cutting postcard lines


The “dog symbol of the New Year” postcard is ready. As always, the Master leaves you the freedom to further decorate your card with appliqué, pieces of foil, rhinestones or sparkles. Have a good New Year! See other crafts for the New Year on, be sure to visit paper video channel Sekretmastera on Youtube. The channel needs your support for further development.
DIY cards 2018 you can start doing it long before the New Year itself, because there are a huge variety of handmade techniques in the world - it takes a lot of time to try just a few of them. But as a result of your efforts, you will have excellent greeting cards ready for all your relatives and friends.
DIY postcard for 2018
You can get an excellent design option with a minimal set of materials. The first thing you need to think about is the size. finished product- it should be noted that the most attractive will be precisely small craft. Take a yellow paper rectangle measuring 15 by 20 cm and fold it in half.Finish the edges of the part decorative ribbon- it’s best to choose one that is contrasting and corresponds to the New Year’s theme.
Take green corrugated paper and cut out a couple of triangles, one should be larger than the other. Break a popsicle stick in half and glue it as stems on the back of the Christmas trees. Place a small piece of padding polyester in the middle of the card, which will act as a snowdrift, and place Christmas trees behind it.
Write nice words wishes on a separate piece of paper. You can print out the greeting if you want to use something special beautiful font. Outline the boundaries of the detail with strokes - this will look even more impressive.
The final stage of production will be gluing the rhinestones; they can be attached in any order.
DIY postcard for New Year 2018
Everyone will be very pleased to receive a Christmas tree as a gift, and it is not at all as difficult to do as it might seem when looking at the photo.
Cut out green paper rectangles - the narrowest, medium and widest, while the length of the parts should be identical. Fold them accordion-style along the short side. By long side Fold the white sheet in half to form a card base.
Lubricate the end and beginning of the smallest accordion with glue, open the white sheet halfway and glue the accordion to the inner fold on the right. Do similar manipulations with the remaining accordions, placing them in ascending order in the center and on the left. The result should be a three-dimensional Christmas tree.
To decorate the craft, cut out paper details - a couple of red balls and a star, as well as blue, yellow and orange balls. The star is glued, of course, on the top, and the balls are in a chaotic order. So, DIY New Year's card for 2018 It’s almost ready, all that remains is to add the congratulations - for this purpose you can choose to use pencils, felt-tip pens or colored pens.
DIY New Year 2018 card
The scrapbooking technique is ideal for making cards - the result is simply masterpieces. Be sure to try it too - follow the photo tips and everything will certainly turn out as it should. The boot card looks very original; its production will not be quick, but the result is worth it.To work, you will need to use a boot template - attach it to watercolor paper, trace and cut out the two bases.
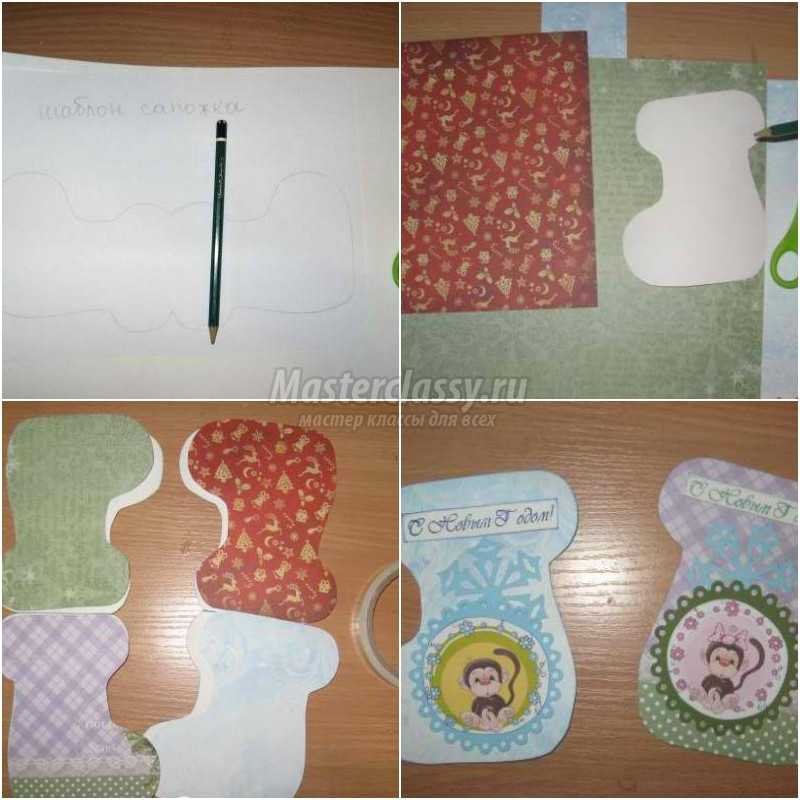
The front parts must be decorated using stamps, pictures and decorations. First of all, tone the pictures with pads along the edges, then glue them with a glue stick onto the cut out circles of green and blue color. In the master class, the pictures show funny monkeys, but since you are making DIY 2018 symbol postcard, then you should look for images of dogs. Also glue a large blue snowflake from a cut-out, and at the top - a pre-tinted inscription “Happy New Year!” Sew inscriptions and pictures on a typewriter.

Attach the front boots to the backing, sew each side separately with a machine. Cut a couple of pieces of 3mm wide blue satin ribbon, blue pom pom ribbon and blue mesh. Tie bows and arrange bouquets of white stamens with glitter and berries in sugar of different colors (green, blue, white, silver). Glue the decorations, to complete the decoration process there will be dots that will need to be placed on the circles with liquid silver glitter. Funny New Year's boots are ready!
DIY New Year cards for 2018
Postcards in the shape of New Year's bags will look very beautiful; they can also be made using the scrapbooking technique.The first step is to cut out the template; it should be traced three times on watercolor paper and cut out. Tint each bag to create an attractive aging effect.

Cut the template in half and trim it all down a couple of millimeters. Attach a single template to the New Year's scrapbook paper and cut out 6 parts - 2 pieces for each card bag.
Immediately attach one piece to each backing and begin decorating the front ones. Cut out three "Happy New Year" stamped in black ink, tint the edges of each and attach to the front pouches. Glue also along the cut out circle of red and white, as well as a holiday-themed picture. Sew all the decor on a machine.
As you know, almost every bag has ties and ours will not be an exception, which is why cut pieces of red and white cotton cord, as well as various ribbons (green and red, satin with a New Year’s print, green and red organza). With all this splendor, “tie” the bags with bows using New Year’s bracelets. Glue each front pouch onto the backing and sew.

Using the scrapbooking technique, make and.
DIY postcard for 2018 dogs
This technique, such as quilling, is extremely popular with both children and adults, because with the help of twisted elements you can create very interesting and attractive compositions.To create a greeting card using the quilling technique, you should prepare a card base, narrow long paper strips (you can purchase ready-made ones, or you can cut them yourself). You can use Dragon glue as a fixing composition; you also cannot do without a twisting tool and a thematic decorative element - snowflakes.
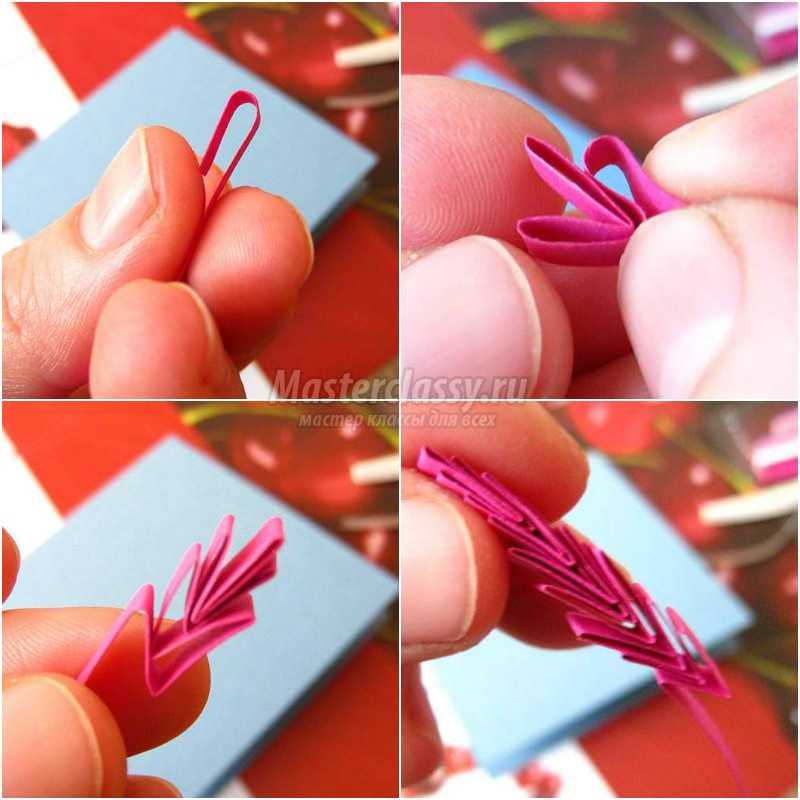
Make two spruce branches, following the photo hint. To make a candle, secure paper strip desired color on the tool and roll it into a roll, then remove and loosen slightly, squeezing the ends on both sides. Twist the candle flame in the same way, only use two colors of paper at once.

To make bells, roll up a tight roll, remove from the instrument and immediately glue it on. Make another such element. When the rolls are dry, carefully push out the center using a toothpick. Press on both sides to make the bell flatter.

Apply glue to the desired places on the card base, then lay out the paper elements, lightly pressing on top with your finger. Try to disturb the product for a while so that the glue sets. After gluing the bell, twist the tiny strip into a tight roll and, having glued the tip, glue it inside - this will be the tongue. To complete the composition, use decorative element. Of course this is one of the simple options quilling cards, and in general, using paper components you can “draw” anything you want.
Make and.
New Year card DIY Year of the Dog 2018
Beautiful volumetric version DIY cards for the year of the dog 2018 can be done together with children, keep in mind that its design is such that if you want to print a congratulation on a printer, this must be done first.

To create the card base, take A4 cardboard and fold it in half. On one half, draw a sketch of the Christmas tree - you don’t have to do it in detail, a couple of lines will be enough.
Cut the corrugated paper into strips, they should be one and a half centimeters high, the length will depend on the fluffiness of the future Christmas tree. Please note that the stripes must be different lengths to create a stylized Christmas tree.
The next step will be gluing the corrugated paper strips - first you need to glue the bottom tier, and then gradually rise to the top. After gluing the strips, you should gather them up a little so that the outline of the tree resembles a skirt with tails.
For decoration, you can use a Christmas tree on the top, pieces of “rain” and tinsel, sparkles, etc.
Postcard on New Year- a banality or a sweet tradition passed down from generation to generation? Everyone has their own answer to this question. But we can say for sure that a handmade New Year’s card is a touching craft, and also very useful for children. Firstly, working with small details in the process of making a postcard has a very positive effect on the development of motor skills. Secondly, in order to draw or make a card for the New Year, you need to train perseverance and accuracy. And, thirdly, a DIY New Year 2018 postcard promotes the development of imagination! And this is not to mention how much warmth, love and kindness they carry in themselves homemade cards. But aren’t these the main messages of the coming year? In general, if you want to please your family, especially mothers and grandmothers who love to keep children’s crafts, then be sure to take a closer look at the step-by-step master classes with photos and videos from today’s article. In them you will find different techniques making postcards from colored paper and cardboard, including scrapbooking. You will also learn what and how to draw on a New Year’s card, and you will also find options depicting the main symbol of 2018 - a dog. Almost all of the step-by-step lessons described below are suitable for use in kindergarten and school.
A simple DIY card made of cotton wool and colored paper for the New Year 2018 - step-by-step lesson with children
To make the following simple card from cotton wool and colored paper for the New Year with your own hands together with your children, you will need a minimum of materials and time. This is a kind of express version of a “last minute” postcard. Nevertheless, a simple postcard made of cotton wool and colored paper for the New Year 2018 with your own hands with children looks presentable, festive and original.

Necessary materials for a simple DIY card made of cotton wool and paper for the New Year with children
- white double-sided cardboard
- colored paper
- scissors
Step-by-step instructions for a simple DIY card made of colored paper and cotton wool for the New Year 2018 with children

Easy DIY postcard with buttons for the New Year for children - master class with photos, step by step
You will find another option for a simple and easy to make DIY New Year’s card for children in the master class with buttons below. This card can be made together even with very young children at home or in kindergarten. Light postcard do it yourself with buttons for the New Year for children a good gift for parents.

Necessary materials for an easy DIY card with buttons for the New Year for children
- buttons of different colors
- cardboard
- felt-tip pens
- ruler
- nail polish with glitter
Step-by-step instructions for an easy master class on DIY cards with buttons for the New Year for children

DIY postcard-dog (symbol of the year) for the New Year 2018 - step-by-step master class, photo
Since the dog is a symbol of the New Year 2018, its image can easily be used to design a postcard at school. And it’s even more interesting to make the entire card in the shape of a dog - this original congratulations definitely won't go unnoticed. Read on to learn how to make a dog card (the symbol of the year) with your own hands for the New Year 2018 at school.

Necessary materials for a DIY New Year 2018 dog card for school
- colored paper
- scissors
- cardboard
Step-by-step instructions on how to make a dog postcard symbol of the New Year 2018 with your own hands at school

DIY New Year 2018 card with a dog - how to draw the symbol of the year, step by step
Would you like to draw a postcard with the symbol of the New Year 2018 as a dog? Then our next step by step lesson just for you. It suggests using an image of a cute puppy to design the title page of a holiday greeting. Read more about how to draw a postcard for the New Year 2018 with your own hands with a dog symbol below.

Necessary materials to draw the symbol of the New Year 2018 dog on a postcard with your own hands
- paper
- colour pencils
- simple pencil
- eraser
Step-by-step instructions on how to draw a postcard with the symbol of the New Year 2018 with a dog with your own hands

Do-it-yourself original card made of paper and cardboard for the New Year 2018 - step-by-step lesson with photos
You can make a simple but very original postcard for the New Year 2018 with your own hands from plain white paper and cardboard. Ready postcard it turns out voluminous and minimalist style. Therefore, you can give such original cards made of paper and cardboard for the New Year 2018 to both friends and family.

Necessary materials for an original DIY card made of paper and cardboard for the New Year 2018
- cardboard
- paper
- scissors
- simple pencil
- ruler
Step-by-step instructions for an original do-it-yourself postcard made of cardboard or paper for the New Year 2018

Beautiful postcard for the New Year 2018 with your own hands: how to draw easily and simply, photo
To draw a beautiful postcard for the New Year 2018 with your own hands easily and simply, you do not need to have any special artistic talents. Even with the help of an ordinary black marker, you can create an original drawing for a New Year's card. Read more about how to easily and simply draw a beautiful postcard for the New Year 2018 with your own hands below.

Necessary materials to easily and simply draw a beautiful postcard for the New Year 2018 with your own hands
- black marker
- cardboard
- simple pencil
- cup or saucer
- eraser
Step-by-step instructions on how to easily and simply draw a beautiful New Year's card with your own hands

Do-it-yourself original postcard for the New Year 2018 using scrapbooking technique - step-by-step master class with photos
Scrapbooking - technique beautiful design memorable cards and photo albums, which everyone can master. We suggest starting with original postcard for the New Year 2018 with your own hands using the scrapbooking technique from the next master class. The main feature of this original DIY New Year's card is that the scrapbooking technique is used to decorate its interior.

Necessary materials for an original DIY New Year's card using scrapbooking technique
- red double-sided cardboard
- sheet of white paper
- scissors
- pencil and ruler
- gold foil
Step-by-step instructions on how to make a postcard for the New Year 2018 with your own hands using scrapbooking technique

Do-it-yourself voluminous New Year's card with children from colored paper for school, step by step with photos
Voluminous and very funny postcard for the New Year made of colored paper is good for children in primary school. It is done very simply and quickly. But the result is excellent, bright and interesting! How to make a three-dimensional New Year's card with your own hands from colored paper with children going to school next.

Necessary materials for a three-dimensional DIY New Year's card made from colored paper for children to go to school
- cardboard
- white and colored paper
- ribbons
- pencil
- scissors
- black marker
Step-by-step instructions for making a voluminous New Year's card from colored paper for school with your own hands

How to make a postcard with your own hands for the New Year 2018 for your mother and grandmother - step-by-step master class with photos
What kind of DIY New Year's card can you make for your mother and grandmother? Of course, sweet and unusual in a feminine way, for example, like from step-by-step master class with a Christmas tree below. Read more about how you can make a DIY New Year’s card for your mother and grandmother below.

Necessary materials to make a DIY New Year's card for mom and grandma
- threads
- beads
- needle
- fabric ribbon
- decorative tape
- cardboard
- stamp with a themed design
Step-by-step instructions on how to make a DIY card for the New Year 2018 for your mother and grandmother

DIY New Year 2018 card: how to draw a Christmas tree, master class with video
Beautiful card for the New Year 2018 with your own hands - always a relevant craft for small children, kindergarten and school. In addition to decorating such a card with colored paper and cardboard, it can be decorated with beads, sparkles or rhinestones. The scrapbooking technique is also well suited for this purpose. You can also draw a postcard with pencils, for example, like a postcard with a Christmas tree for the New Year 2018 with your own hands from the master class with the video below. You can always complement the drawing with a dog as a symbol of the coming 2018.
By eastern calendar 2018 is the Year of the Dog, so the main character of our card will be a cute puppy in a New Year's hat.
To make cards you will need: paper, scissors, glue, bulky double-sided tape and great desire.
This is the kind of postcard we will make for you.
Dog. DIY voluminous New Year card 2018
Step-by-step instructions for assembling a three-dimensional dog
New Year's Dog. Cutting templates

Background for making postcards.

As a background, you can use paper with a New Year's theme, plain paper with a density of at least 160.
Step 1. We cut out the details of the Dog figurine along the contour. Small scissors should be used to cut out parts. Younger children may need adult help.
.jpg)
On parts numbered 2 and 8, make cuts in the indicated places along the white lines.
Step 2. Prepare double-sided cattle. Cut it into small pieces.
Take the Dog part (part No. 1). We glue pieces of double-sided tape on the back.
.jpg)
We glue this detail to the background - the base.
.jpg)
Step 3. Place tape on reverse side details No. 2. Glue this detail to image No. 1.
.jpg)
.jpg)
Step 4. We glue the volumetric double-sided tape onto the following parts in ascending order of numbers, aligning their contours with the image on the previous layer.
.jpg)
The top of part No. 10 must be tucked into part No. 1.
The postcard is ready.
.jpg)
The volume is visible here.
.jpg)
Step 5. Don't forget to sign New Year's greetings There are postcards inside and we give them for joy!
.jpg)
Happy New Year!
.jpg)


