Materials and tools
- easy synthetic fabric: acetate silk, organza, tulle, veil, crepe-satin in two colors - for flower petals and for leaves;
- metal base for the flower - automatic hairpin;
- a small piece of felt to match the color of the leaves;
- a glue gun or other universal glue (preferably one that glues metal);
- a needle and thread in two colors to match the color of the petals and leaves;
- a strip of corrugated paper to match the color of the leaves;
— soft wire, about 30 cm long (you can use beading wire);
- a small piece of double-sided adhesive pad (available at fabric or craft stores);
- satin ribbon matching the color of the leaves, 5 mm wide and about 1 m long.
- scissors, candle.
From the fabric for the petals, cut into squares with sides 3x3 cm, 4x4 cm, 5x5 cm, 6x6 cm - 5-7 pieces for each given size. The result will be approximately 20-30 squares. The more blanks, the more magnificent the flower will be.

From each square for the petals we cut out figures in the form of truncated droplets or hearts - without a sharp tip. Look at the photo:

In the flame of a candle, carefully melt each petal.

As the fabric melts, it becomes deformed, and we get petals that look like real ones!

We start sewing the flower from the middle, from the smallest petal. To do this, we twist the petal into a tube and stitch it at the base with matching threads.

Gradually add and sew new petals in a circle - from the smallest blanks - to larger ones, forming a flower.

Making leaves. We cut out rectangles measuring 9x4 cm from green fabric. We plan to make 3 leaves, so we will prepare 6 rectangles from the green main fabric and 6 rectangles from the adhesive double-sided interfacing. We also need wire - three pieces of approximately 10 cm each, corrugated paper in the form of a long ribbon 1 cm wide.

We wrap each of the three pieces of wire corrugated paper- form the basis for the leaf. Glue the ends of the paper.

We form a sheet by folding the blanks together (like a sandwich): green flap + gasket + curved wrapped wire + gasket + green flap.

We glue this “sandwich” together by ironing it with a heated iron through dry gauze or a thin white sheet of paper. The double-sided adhesive pad melts under the iron and holds the fabric and wire frame. We cut out the leaves from the rectangle, melt their edges over the candle in the same way as we did the petals earlier.

We make “bows” from a satin ribbon, stitching the centers with threads to match the color.

We put the leaves together and sew them together, attaching bows. Glue the flower to the leaves. After the glue has dried, you can additionally sew the leaves and flower together for a strong connection.

Glue a piece of felt onto the base of the hairpin. It is better to do this in advance so that the glue has time to dry. Glue the flower to the hairpin. We follow all gluing instructions written on the tube! - so that our flower stays firmly on the hairpin and does not deteriorate when worn. Leave for a day for the glue to dry.

Hairpin with voluminous flower ready. Our rose turned out beautiful, spectacular - just like a real one!


- for: nylon or satin ribbon in two colors - 10 pieces of one color and 5 of another. The length of the segment depends on the width of the tape. With a width of 2.5 cm - length 7 cm, with 3.5 (3.8) cm - 8 or 9 cm, with 5 cm - 10 cm. The wider the ribbon, the larger the flower;
— for the bandage: satin ribbon 2.5 cm, approximately 50 cm long;
— elastic band 2 cm - cm 10;
- scissors;
- needle with thread;
- bead or rhinestone for decoration;
— burner/lighter/candle.
So let's get started. If you have a burner, then use it to cut the tape into pieces of the required length (depending on the width of the tape), at the same time singe the edges so that they do not fray (photo 1). If you don’t have a burner, then cut it with scissors and burn the edges with a lighter or over a candle flame. These are the petal blanks we got (photo 2).

We fold the ribbons at an angle of 90 degrees so that there is an equal distance from the edge of the ribbon to the corner (photo 3). Fold it again, connecting points A and B marked in the photo. It should look like photo 4 (view of the wrong side). Photo 5 - side view. We string the petal onto a thread and a needle. We start from the front side, make 2 stitches (photo 6).

In this way, we collect five petals in a circle and tighten them (photo 7). View from the front side - photo 8, view from the back - 9. We make two more of these flowers, collect all the tiers of our flower using thread and needle or glue (photo 10, 11). We decorate the center of the flower with a bead, rhinestone or a beautiful button (photo 12).

Let's take satin ribbon for dressing. Having stepped back 2-3 cm from the edge, we make an incision and singe the edges (photo 13). We insert an elastic band into the cut, sew across the length of the tape and along the edges, without catching the elastic along the dotted lines marked in photo 14. We do the same on the second side, turning it right side out (photos 15, 16).

We bend the edge of the satin ribbon under the elastic and stitch it without catching the outer layer of the ribbon (photo 17). This is what should happen on the front side - photo 18. We do the same on the second side of the elastic, this is how the bandage turns out - photo 19. Determine the place where the flower is attached and sew it on.


The American bow is a voluminous bow with many intricate curls. This bow is usually made from grosgrain ribbons different colors and different widths. When looking at the American bow, it seems that making it with your own hands very difficult. In fact, this is not so, because this design consists of several different bows assembled together. So, let's try to figure out how to make an American bow with your own hands.
, ribbon bow. American bow
This intricate hair clip is made from large quantities ribbons of different widths. To create the bow itself, take a ribbon that contains some kind of pattern or just polka dots. The background ribbons can be plain or contain a motif that emphasizes the design of the main bow ribbon. The ribbons themselves must be made of rep.
To create an American bow we will need:
Rep ribbons.
For the main bow you will need three ribbons of different widths (it is better that the width of the widest one is no more than 3-3.5 cm). For the background, 3-4 types of ribbon on which the bow itself will be located can be from 1 cm to 2.5 cm wide. This is not fundamentally important. The only important thing is that you arrange them harmoniously, but more on that later;
Scissors;
Cardboard;
Needle and thread;
Glue;
Pin, clips;
Lighter.
To create an American bow, we need to learn how to make its famous curls. We will use a special template that we will create ourselves. Take a regular piece of cardboard 15x7.5 cm.

Cut a line exactly in the middle, 0.6 cm wide and about 3.8 cm long (a little more than half).

We will need three such templates different lengths. Each is 2.5 cm smaller than the other, but the width remains the same. I got templates with lengths of 17.5 cm, 15 cm and 13.5, respectively.

Prepare a 2.5 cm wide ribbon, a pin, a clip, a needle and thread and a template. We begin to form a bow.

Using a clamp, secure the tape at the edge of the template, on the side where the slot is located.

Wrap it around the template twice. Insert a pin through the template, into the center of the tape, to secure it (as shown in the picture above).


Carefully remove the tape from the template without removing the pin.

The next step is very important part in creating the American bow. Hold the ribbon with the tail up and fixing the center of the ribbon, where the pin is located, with your fingers we begin to separate the turns to the sides so that we get something X-shaped.

Pull the stitches until a uniform "X" is formed. When you look at the back of the bow, the ribbons should be aligned horizontally.

Using a thread and a needle, make several stitches exactly in the middle of the bow. Make sure it doesn't lose its X shape.

Pull the thread tightly, wrap it several times and secure with a strong knot. 

Using the same technique, make 2 more bows, but with templates of different sizes.
The next part of creating an American bow is creating the background, such “spikes”. To form it, you can take ribbons of any width, for example 3.8 cm, 2.5 cm and 1.5 cm wide. Cut each 12.5 cm and make a V-shaped cut at the ends, which is immediately sealed using a lighter.

Take 2 ribbons of the same color, place them crosswise and pierce the middle with a needle.

Do the same with the rest of the ribbons, placing all the layers on top of each other. Thus, organize a beautiful background for the bow and give it an X-shape, as shown in the photo. When all the ribbons are in place, sew tightly right in the middle and tie them with thread.

These are the parts we should end up with. Now they are all ready to come together and create an American bow.

The American bow hairpin is ready! All that remains is to attach the middle in the center. But I leave this decision up to you.

Attach the base with reverse side. It could be either an iron “crocodile”, or a small automatic hairpin, or an elastic band, or... Your option.

Beautiful hair clips can transform any hairstyle - the more original the hairpin, the more interesting the hairstyle looks. The most original, unusual and unique hairpins are those that made by hand. Let's try to make an interesting hairpin from ribbons in a retro style.
Materials:
metal hairpins,
4 mm wide tape of any color
hot glue gun.
Instructions:
You need to take a hairpin and 60 cm of ribbon. The middle of the ribbon cut is placed at the base of the open clip. Then you should pass one edge of the tape through the middle, but through the outside. Repeat with the second ponytail too.

This weaving continues along the length of the entire decoration. After this, a tight knot is tied at the end.

This is what the hairpins looked like before.

But we won’t stop there and will make them more modern and sophisticated. The remaining tails of the ribbon are twisted and the flagellum is folded in half, forming a spiral cord.


And now we have in our hands excellent hairpins, made by ourselves in retro style!

You will need the following materials:
- two sushi chopsticks (sold in any large supermarket);
- acrylic paint Brown;
- a small piece of fabric with a beautiful ornament;
- decorative thin cord approximately 10-15 cm;
- PVA glue and brush.
How to make a hairpin. Master Class.
1. Cut wooden sticks so that their length is approximately 18 cm. Cover them with brown (or black) acrylic paint, leave to dry.

2. Lubricate the upper part of the stick with PVA glue. Now wrap each stick with cloth (see photo). Fold the raw edges of the fabric, glue along the fold and attach to the stick.

3. Apply glue to a small area of the stick below the fabric (about 1 cm), and wrap it several times with decorative cord. Secure the ends of the cord well with glue.

That's it, our hairpin is in oriental style ready.

How cute little girls look in beautiful dresses and with delicate flowers on their heads! It turns out that such a cute decoration as an openwork flower can be easily made with your own hands.
To create such a cute headband for a girl, you will need a minimum of effort and free time, but despite this, it will look great and will be a wonderful addition to any little fashionista’s outfit.

Headband with a flower for children, handicraft masterclass:
For work you will need: lace, a piece of felt, a beautiful button or bead, elastic lace or a wide elastic band, and for older girls you can take a regular plastic headband, scissors and a glue gun.

Using hot glue, glue the gathered lace onto the felt circle: start from the edge and move inward in a spiral.


Glue a bead or button into the middle and glue the finished flower onto the base.


That's all: the wonderful headband for the little princess is ready! Isn't it easy and simple?

More ideas


How nice it is to appear at a party with your hair decorated fashion accessory hand-made, namely, a hairpin made with your own hands, and in such a way that everyone around is literally “dying” of envy! It's just a matter of small things - how to make a hair clip?
That's New Year literally knocks on doors, which means that children's matinees and adult parties begin! What unites all ages? Of course, the desire to please and look exclusive!
Surely you would like your little one to go to the party with a beautiful hairstyle, which would include a hairpin that would be ideal for her outfit, and even one of a kind! And this can only be achieved in one way - by making a hairpin with your own hands!
Show your imagination, and it is quite possible that after you make a hairpin for your daughter, inspiration will come to you and you will create something amazing for yourself!
Instructions for making jewelry
In order to do fashionable hair clips for DIY hair, you will need a lot of decorative material and a base for hairpins (if you can’t buy them at a craft store, buy cheap hairpins that you don’t mind breaking).
How to make a hair clip for a girl? Everything here is very simple: you probably still have some scraps of beautiful fabrics. Guipure, organza, and bright chintz, which is best starched, are suitable.
- Prepare cardboard patterns of flowers and petals, which need to be attached to the fabric and traced with a pencil;
- Assemble a flower from several fabrics, lay a large flower down, a smaller one on top, and the smallest one even higher;
- Make holes in the layers and bring out wires or thick fishing line from bottom to top, on each end of which put a bead and fasten it with glue (super glue, “Titanium”);
- Place a large bead in the middle; if there are leaves, glue them under the flower;
- According to the shape of the base of the hairpin, cut a piece of contrasting fabric so that you can glue it to the base, tucking the edges.
After the background is glued to the base, attach the flower, also with glue or by sewing it on. The hairpin is ready! When making it, you can use the same shades of fabric that were used in the child’s New Year’s outfit.
It is even easier to make such a hairpin from ribbons:

Ribbons, beads, feathers - everything will come in handy!

A wonderful hairpin can be made from a piece of satin or satin ribbon. To do this, take the base for the hairpin, a piece of tape of such length that when assembled it completely hides the base (you can make several smaller elements and attach them in one line). After decorative elements When they are ready, attach a fluff and a large bead to the middle of each of them in a contrasting color. Attach everything to the base, spray with hairspray and sprinkle glitter around the edge, spray again. The hairpin is ready!
A hairpin made of lace will look very elegant and delicate. She will immediately highlight a real lady!
For manufacturing you will need the following materials:
- Cotton lace (width – 7-10 cm, length – 40 cm);
- Satin ribbon of delicate cream color (length – 40 cm);
- Artificial pearls – 10 pieces (diameter – approximately 0.2 cm);
- Gold button (medium size);
- The base is a hairpin to which decorative elements will be attached;
- Wire – 2 pieces (2 cm long).
- For the work you will need matching thread, a needle, scissors and glue.
Make a hairpin as follows:
- First, the lace is cut into two strips and sewn together, then the resulting part is turned inside out and the seam is straightened.
- Next, the two straight edges of the lace part are sewn together and gathered in the center, giving the shape of a bow.
- You also need to make a thin bow from a satin ribbon. This element must be attached to the center of the lace bow and tied with wire.
- Wrap the center of the bows once with a piece of satin ribbon and sew on the wrong side.
Sew a button into the center of the bow. Embroider the lace bow with pearls. The exquisite hair decoration is ready.

You can make fashionable hair clips with your own hands from feathers, leather and rhinestones. The skin needs to be attached to the base, so that it looks most organic, feathers need to be attached to it, after placing beads on the base of the feather, large beads, rhinestones and fluff should be glued between the feathers. Such decoration will not be embarrassing to show at the most important party!
If you have the skills to work with thin copper wire, you will certainly be able to create an amazing vintage hairpin - it requires a base or clip, a roll of wire and beads or small transparent beads. To secure the beads, you need to thread two wires through them and twist them on both sides - the shape of the pin can be any, but a star or an unusual flower looks very beautiful. The flower is attached to the base of the hairpin using wire or glue.
Nowadays kanzashi jewelry is not losing its popularity. In order to make your own hair clip using this technique, you will need a base for the hair clip, a colored satin ribbon, and beads for decoration. Suitable materials to help create jewelry include tweezers, a pin, scissors, a needle and thread (or glue).
- First, cut out the number of squares needed to create a hairpin from the ribbon. They need to be folded in half, and then in half two more times.
- Cut off a corner of the tape and scorch it (it’s best to do this with a burning candle).
- From the tape, cut out the required number of petals in the same way as squares, and connect them together using thread or glue.
Decorate the elements cut from the ribbon with rhinestones and attach them to the base.

What other materials can you use to create hairpins?
Choose:
- Sequins;
- Bugles;
- Buttons;
- Beads;
- Artificial flowers (you can buy them or make them yourself, for example, from salt dough);
- Lace;
- Braid;
- Decorative stones.


The bow hairpin is suitable for both a child and an adult lady, provided that the materials are slightly different. For a child, choose a bright satin ribbon and contrasting guipure - for example, fuchsia-colored satin and white guipure. Roll them into bows, fasten them with a large bead, and surround the bead with small beads. For yourself, you can choose dark gray satin and white guipure, fastening them with a beautiful exquisite pearl! Agree that if you complement such a hairpin with a string of pearls and pearl earrings, you will look like a real lady!
And if you are a real needlewoman, then you can create a whole ensemble for hair decoration in the form of a bracelet, earrings, or ring. Your original image will definitely be noticed!
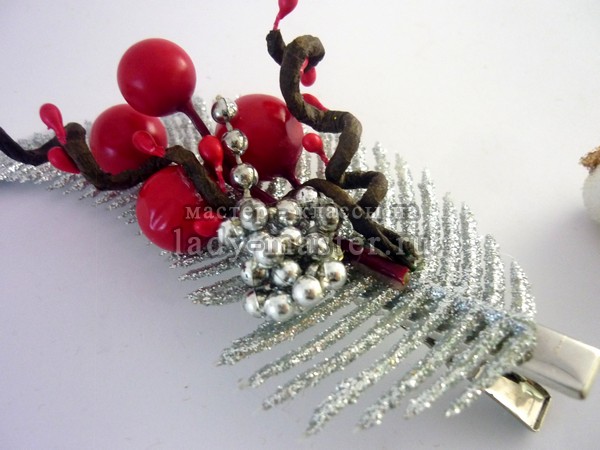
From today's master class you will learn how to very quickly and easily make a beautiful hair clip that will become a worthy decoration in New Year's Eve or at Christmas.
To make it you will need:
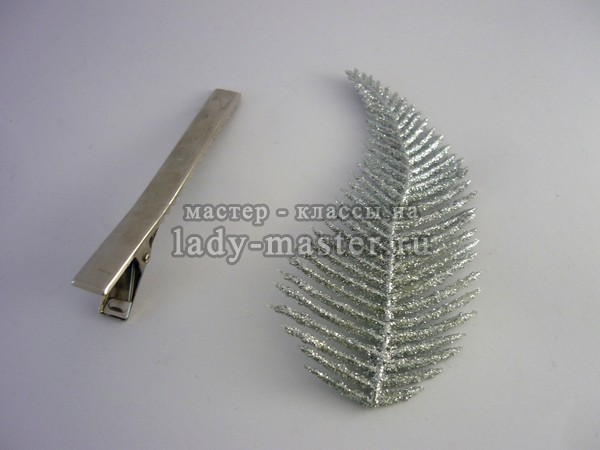
- metal hair clip;
- silver decorative leaf;
- brown tape;
- red stamens;
- silver beads on a string;
- red, white artificial berries;
- fishing line;
- glue gun
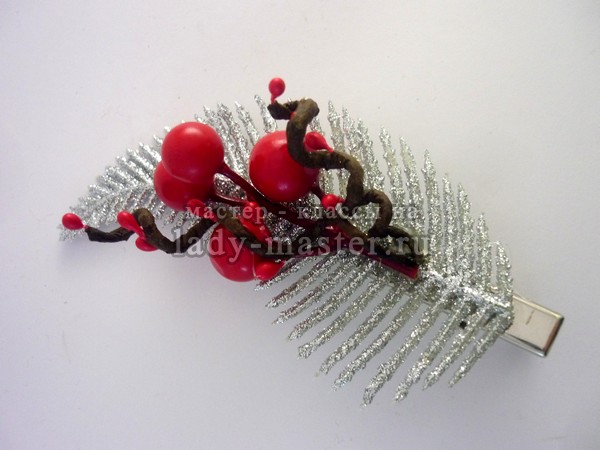
Select a leaf of such a size that it extends beyond the hairpin. Leaf color may vary. But in accordance with it, you will need to select the rest of the decor. The main thing is that you can attach the leaf by its spine to the hairpin.
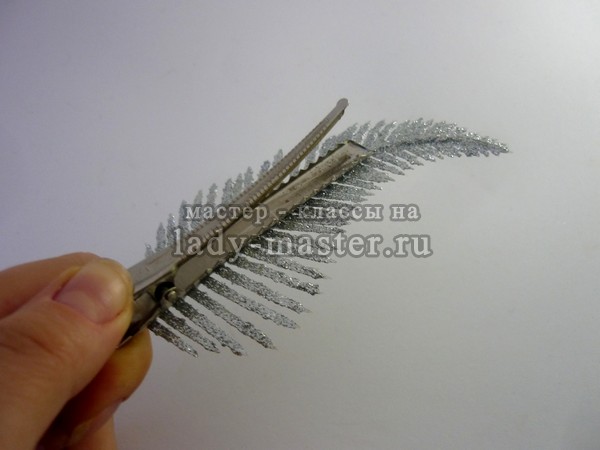
We apply glue to the upper part of the hairpin, not reaching the rise, which we take with our fingers to open the clip. We immediately attach the leaf along the ridge to the metal surface. Additionally, we tie the leaf to the hairpin with fishing line exactly in the middle. The line should pass between the teeth of the hairpin and the feathers of the leaf. We tie a knot on the outer surface, as it will be possible to hide it with decor.
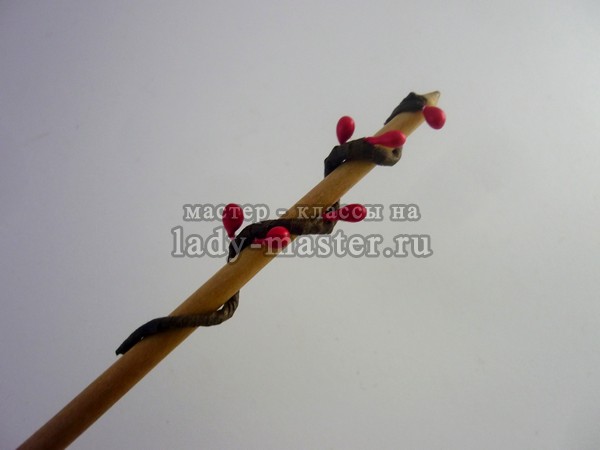
Take the red stamens and cut them in half. We cut the wire into two lengths of 10 cm and 7 cm. We begin to wrap it with brown tape, weaving in the stamens. The threads on which the stamens are located should not be visible. There should be one piece at the end of the wire.
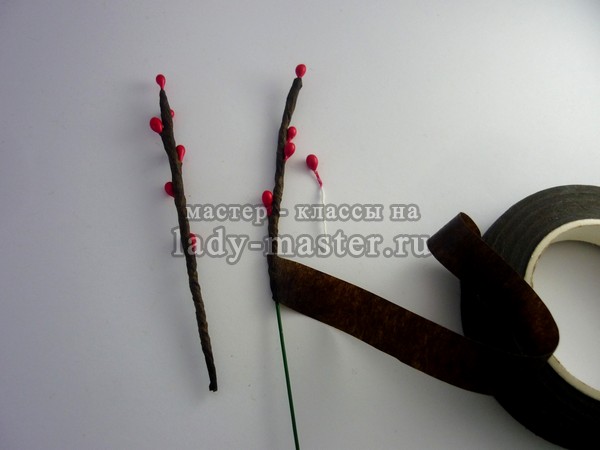
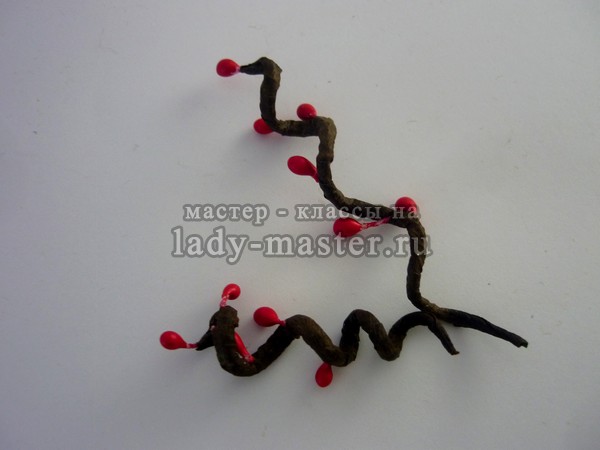
We will give these branches a spiral shape. Each one needs to be wound onto some thin object. This could be a long toothpick or a brush handle. Adjust the curls yourself. One branch can be completely twisted, and the second is simply wavy.
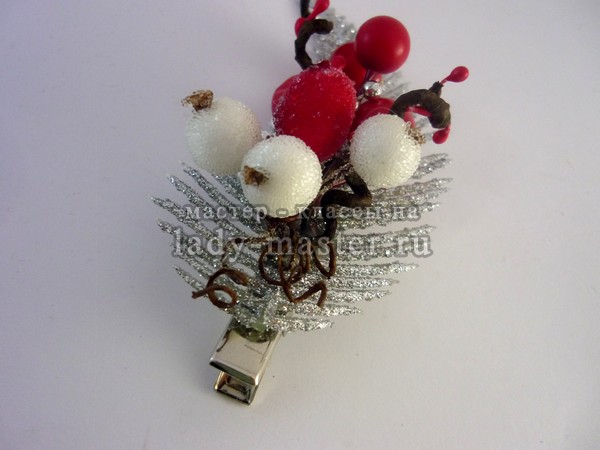
Now let's create a composition on our silver sheet. We attach a sprig of red berries, then cover it with prepared brown sprigs on top. To make the composition three-dimensional, we straighten them in different sides at an angle of 45 degrees.
Using silver beads on a thread, we form a knot several times. We cut it, leaving short ends, and attach it to the composition. Thus, we cover the inner part where the fishing line and the ends of the branches are located.
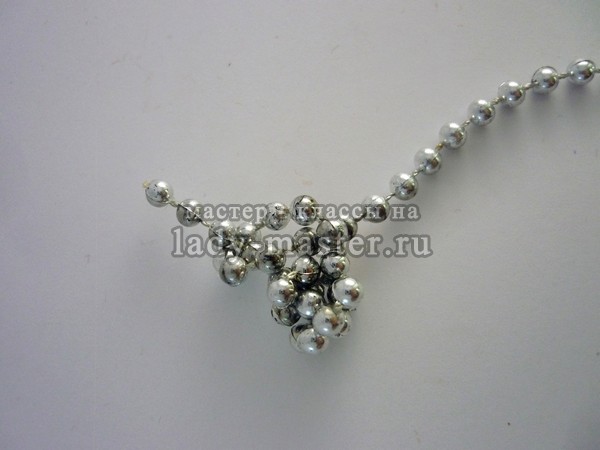
We form a small bouquet of berries on a wire. We connect all the others with one wire. The other tails must be twisted in the same way as the branches with stamens were formed.

We straighten the spirals and attach the bouquet in the same direction as the entire decor. Finally, we cover it with the same silver knot, which will complete the entire composition.