Many of us love various computer games. More recently, we rejoiced at simple eight-bit images in the games of the good old consoles. Today, however, game graphics are striking in their realism, and the question arises - what if this realism is not only at the visual level, but also at the level of sensations? Is it possible to have a mouse that will simulate the real recoil of a firearm when we play our favorite shooter? You can not only have such a mouse, but also make it yourself.
Making a vibrating mouse in the video:
To do this, we need a torch or lighter, a switch that can be taken from any children's toy or an old radio player, a computer mouse itself, a dowel or nail, a vibrator from an old mobile phone or a motor from some old toy, glue gun and a screwdriver. It is, of course, advisable to use a vibrator from a mobile phone, since it has relatively small dimensions; 3.7 volts is enough to power it, while the mouse tries from 5 volts, which allows the motor from the phone to accelerate even faster. First you need to solder two wires to the phone vibrator, which, in addition to its small size has a built-in imbalance, whereas on a conventional motor you need to create an imbalance manually.

The first step is to disassemble the mouse. After disassembly, it becomes clear that there are three contacts at the bottom of the left click. One wire from the motor needs to be soldered to the middle contact.

The second wire of the vibrator must be connected to one wire of the switch. In this case, polarity has absolutely no meaning. It doesn’t matter which wire will be positive and which negative, since this will only affect which direction the motor in the phone’s vibrator will spin. The connected wires must be insulated using a glue gun.

The second wire from the switch must be connected to the connector from which the multi-colored wires come. In our case, it needs to be connected to a red wire. These wires must be soldered with extreme caution so as not to touch or damage neighboring ones. Again, at the end you should isolate everything with a glue gun.

The mouse is ready. All that remains is to assemble it, having previously measured all the parts so that the vibrator does not touch the mouse body itself. Most the best option There will be gluing in the middle, based on the mouse.
Fishermen, in turn, are also well aware that pike and catfish love to eat rodents and try to catch the predator with artificial bait in the form of mice. In this article, we will learn how to make an artificial mouse at home and what artificial mouse fishing technique is used by fishermen.
Who pecks at the mouse?
How to make an artificial mouse?
To make the body of the bait, we need a material with positive buoyancy. This can be cork, foam rubber, hard foam, from which floats are usually made. It is advisable to use foam without pores, or finely porous. The pores are sealed with wax and the surface of the bait’s body is varnished. The ideal material would be foam rubber or vapor barrier, which is used to insulate walls and roofs. If such materials are not available, then wood will do. You just need to cover its surface with drying oil or varnish. The length of the bait blank is usually 4-5 cm, and the diameter is 2.5 cm.
Let's make a mouse from wine cork and polyurethane (we will henceforth call it rubber). We take a piece of rubber and process it with a knife to get such a blank.

In principle, you don’t have to glue the cork to it. You will get such a solid structure, to which you only need to attach a tee and an eyelet for fixing the leash and the main fishing line. To get an even and smooth workpiece, it is processed first on a small machine and then with fine sandpaper. If you don’t have a machine, probably some retired jack of all trades has a workshop where there is a machine. For a small fee, you can ask to use this tool for a while. You can thank a person with a fish caught with a mouse bait, or an “attractant”.
You can make about 10 of these blanks different forms and sizes. We will glue the cork to some, and not to others. After finishing the workpiece to the required condition, we do the following. We take a piece of wire and thread it through the body of the bait. At the ends of this wire we make rings with ducklings. Soak the wire in Moment glue and thread it through the center along the body of the bait. It turns out that we have ears on both sides. We attach a tee to one, and a leash or carabiner with the main fishing line to the second. Here is one of the bait options.

But the tee can also be attached to the side. To do this, we need another wire into which we will thread a washer. Again, soak the wire in glue, wait 10 minutes and thread it through the body of the mouse from the side. There will also be a ring at the other end. Thus, we will get a mouse with four rings - one for attaching the main line, one at the back and two on the sides for attaching tees. You can attach one, two or three tees depending on the conditions and the fishing object. It turns out to be such a variable bait.
This is what a mouse with three tees looks like:

As you can see, a piece of cork is glued to it. In order to secure the cork well to the rubber, it is necessary to attach a longer wire onto which we will place the cork. Naturally, we also soak it in glue and leave it for 10 minutes. The end of the wire with the ring should be located in the center of the plug in the nose. A carabiner with the main fishing line will be attached to it.
You can make mice of different weights, shapes and volumes. For long casts, some models are loaded with lead. Simply take a strip of lead of the desired weight and size and insert it into the bottom of the rubber blank. Before doing this, carefully make a cut with a sharp knife. You need to make a compartment that resembles a memory card slot. A strip of lead is inserted into this compartment. You insert it, and then check how the mouse floats on the water. If it does not sink, but sinks a little, then you should insert either a thicker strip or a longer one. Load your mouse the way you want. Then close this compartment with a piece of the same rubber soaked in glue. We coat the top with glue to make a sealed bait. On a pond, see how realistic your product looks, how the mouse swims, and how best to do the wiring.
Another important point regarding the tightness of the artificial mouse. All the holes through which the rings come out are well lubricated with glue so that there are no holes or cracks in the places where the rings close with the body of the bait. It is better to put washers on the wire that will fit tightly and stick to the body of the bait. It will turn out very aesthetically pleasing and reliable.
Some baits can be made from several corks, and some can be wound with thread on a tee. As a result, we will get the following mice:

You can cover the bait with fur or plush. If you have fabric from an old gray coat, cut off the top and glue it to the bait. There can be a lot of options here if you show your imagination. As a result, we will get baits that, in terms of catchability, are in no way comparable to store-bought counterparts. Having looked at the cost of artificial mice, many spinners will realize that they can make them themselves.
Where and when to catch an artificial mouse?
The most promising period for catching a predator with an artificial mouse is considered to be mid-summer - late autumn. The best time there will be evening and night. It's better to fish when there is no moon. Wide water areas and reaches and holes with a small current are considered promising places. During the day, the same pike and catfish can only be caught in the area of deep holes.
Areas with fallen trees and the coastal zone, where there are many overhanging bushes and other vegetation, are also considered promising places. Often, pike or taimen take a wait-and-see attitude and lie in wait for a swimming rodent.
Artificial mouse fishing technique
For different models baits need to be wired differently. We do it in such a way that the mouse swims slowly. While retrieving, we twitch the spinning rod a little so that the bait dives a little. Mice are able to swim to the other side, so it is better to throw the bait across the current and guide the bait through it.

We move the mouse in such a way that it copies the swim of a living mouse as accurately as possible. Since fishing is carried out mainly in the dark, it is better to hone this skill during the day in order to perform automatic fishing at night.
Bites vary in degree of activity. If he takes catfish, he usually takes it for sure. Such small food for him is like sunflower seeds for a person. A pike or taimen can first swim next to it and sluggishly attack. Experienced fishermen feel such bites and do not rush to hook. You need to wait a few seconds and let the predator swallow the mouse well. If there are a couple of tees on it, then at least one should fit well into the mouth.

If the fish is in no hurry to swallow the bait, then you can take a short break in the retrieve. The technique of fishing with an artificial mouse is in many ways similar to fishing with other surface baits. When it is very useful to pause, during which the attack follows. If the fish is well caught and, as they say, sits on the tee, then you should let it walk a little. To do this, you can loosen the clutch a little. If you come across a very large individual, then screw the clutch on the contrary. Our task is to tire the predator. He usually behaves quite violently. Pike or catfish are not bream, which often weakens after a few violent jerks and lies on its side and can be taken without a landing net.

It is better to have models of different sizes and shapes with you. This can also be combined with wiring techniques. When catching catfish, of course, it is better to use the largest mice. A large piece, as they say, makes your mouth happy. When fishing for pike, it is sometimes better to use mice with one tee. These are good for fishing in the morning in small water areas.
They will allow you to purchase any at competitive prices!
Subscribe to us at - we publish a lot through them interesting information, Photo and video.
Popular sections of the site:
It will allow you to understand how all fish bite depending on the time of year and month.
The page will tell you about many popular tackles and devices for fishing.
We describe in detail living, plant, artificial and unusual.
In the article you will get acquainted with the main types, as well as tactics for using them.
Study everything to become a real fisherman and learn how to make the right choice.
You constantly use a computer mouse (or, to put it “pretentiously”, a mechanical manipulator that converts movement into a control signal), but have you ever thought about what you can do with a computer mouse? It turns out not so little. Select an object or copy it, move or delete, open or close a file or folder, everything and much more can be done with the computer mouse. That's what we'll talk about.
In this lesson we will get acquainted with the computer mouse, learn some of its secrets, and also learn what you can do with the mouse in the browser. You, using the mouse, can select a folder, file or some program and perform some actions, move in the desktop area, open a folder or run a program. You can copy or delete a word or entire text.
Computer mice come in ball, laser, wired and non-wired types. But the principle of operation is the same for everyone. When you move the mouse across the surface of your table, the cursor moves on the monitor screen, duplicating your actions. There are only three main buttons needed to work with a computer mouse. These are the left and right keys and the scroll wheel (scroll). Using a computer mouse and additional keyboard buttons, you can significantly simplify and facilitate many operations on the desktop, when working in programs and in browsers. Let's get acquainted with some tricks of working with the mouse.
The simplest operation that you have probably already had to perform is to select some text. To do this, simply add a vertical slash at the beginning of the text. It is also called in English - pipe(in Russian you can safely pronounce "pipe") To do this, use the left mouse button to click at the beginning of the text and hold down the left mouse button and drag (without releasing the button) to the place where the desired text ends. What to do if the length of the text exceeds the page size? The following combination will help you here. Place the cursor at the beginning of the text, hold down a key on the keyboard, Shift and click the left mouse button, without releasing the key on the keyboard, go to the end of the desired text and press the left key again. All text is selected, you can perform further actions with it.
Copy and paste the text.
You need to transfer part or all of the text to another location or folder. We already know how to highlight text. Now, on the selected text, right-click and in the contextual (drop-down) menu find “copy” and click on this item. All the necessary information is saved in your clipboard (the clipboard, if you don’t go into details, is temporary storage where the files, folders, and text you copied are stored). Now find the place where you need to paste what you copied, right-click on it and select “paste” from the drop-down menu. These operations can be done in another way. Select what you need, then hold down the keyboard keys CTRL+C. Everything has been copied. Select the place where you want to paste what you copied, put a slash (one click with the left mouse button) in the desired place and press CTRL + C. That’s it - the text is pasted.
Let's change the scale.
Sometimes, when you open a website or page, you see that the font is very small. Not everyone, especially older people, has good eyesight and it is difficult for them to read such a font. It turns out that this can be fixed quite simply. To do this, hold down the CTRL key and scroll the mouse wheel forward or backward. The font size will increase or decrease accordingly.
Open link in new tab.
You've already had to work on a page and move to another page or tab without closing the first one. At the same time, you performed the following action: “Right-click on the link and in the menu that opens, select - Open page in a new window.” But this whole process can be simplified. Hold down the CTRL key and click on the link. That's it, the link will open in a new window.
Move using the right mouse button.
You already know how to move a folder or shortcut on the desktop. If you don't know, I'll tell you. Hold down the selected object with the left mouse button and, without releasing, move it to the selected location. But it turns out that this operation can be performed using the right button. The principle is the same. Right-click and drag to the desired location. When you release the key, a menu will open where you will be asked about your next actions. Choose what you need.
Select a word or text.
If you need to highlight a word, just hover your mouse over it the right word and double-click the left key. Is it possible to select the desired paragraph in this way? Certainly. Place the cursor at the beginning of the text again and left-click three times. The required paragraph is highlighted, you can perform further actions with it.
Third button.
Most users don't use the third mouse button. Few people know about its capabilities. But nevertheless, she can do something. For example, when you open a browser page and click on the wheel, the cursor will change its appearance to round. Now you can, by moving the cursor in different directions, the movement of the page on the screen will also scroll in all directions, and the further the scroll pointer moves, the faster the page will scroll. Sometimes very convenient when scrolling pages with large text.
These are the little tricks of a computer mouse. We'll stop there. Of course, the topic is much broader than stated, but throughout all subsequent lessons, we will return to this issue.
In the next lesson we will introduce the concept of keyboard shortcuts. These are combinations of two or more keys that can be pressed to perform tasks that typically require the use of a mouse or other pointing device. Keyboard shortcuts make using your computer easier, saving you time and effort when working with Windows and other programs...
In the meantime, I say goodbye to you. As always, you have questions, reviews and of course comments. If you have not yet subscribed to my news, then welcome!
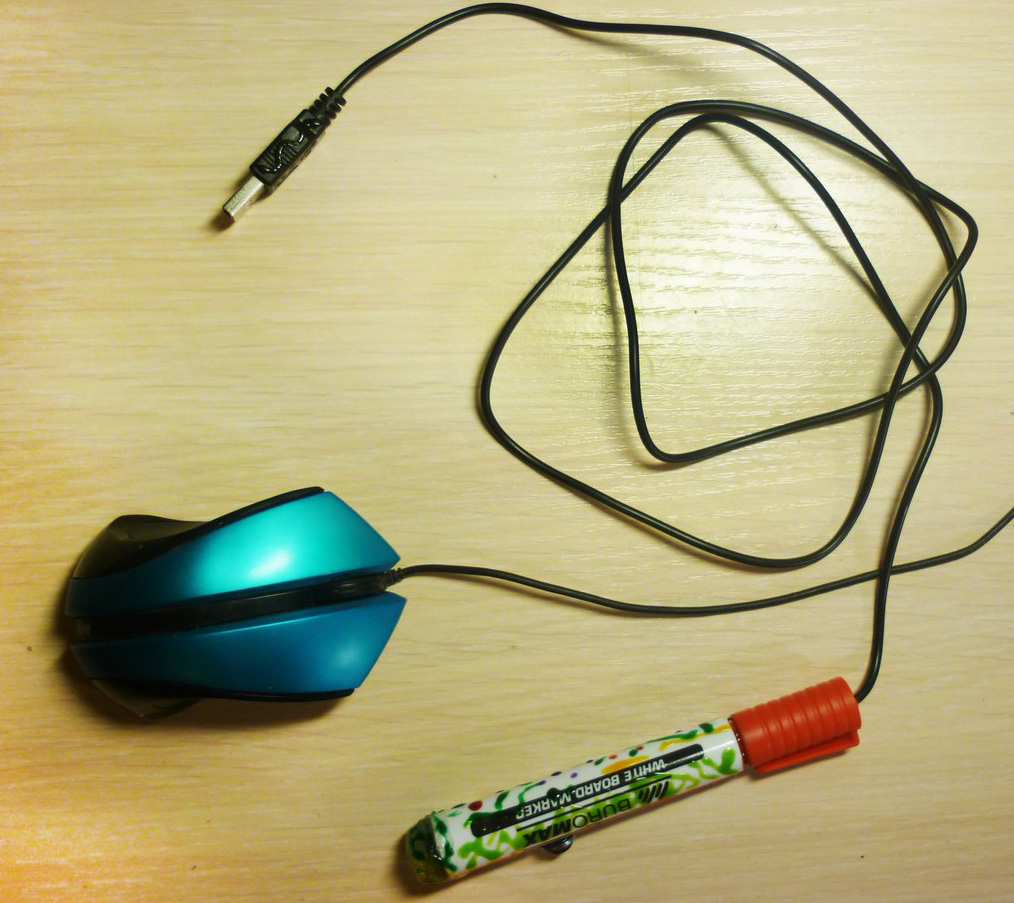
- I’ve had the idea of drawing on a PC for quite some time now, and dabbling in Photoshop and illustrator.
- Yes, there are tablets for this, but I think buying, ala, “try and forget” is an inappropriate solution))
Therefore, it was decided to make from what was at hand...What do we have? That's right - mouse)
We also have a marker that you can try stuffing her insides into.
- As it turned out, not everything is so simple, There are usually more parts in mice than fit into a marker.
- However, if you look, then you can find a SINGLE-CHIP mouse, inside the kit - 2 electrolytes of 47 uF / 10V (one on the power supply, and the second on the button) + a 100nF ceramic capacitor.
- It connects directly from the PC, all buttons also go directly.
- This chip already contains a sensor + controller.
- Size – DIP chip.
1) How does the mouse work?
This is a CAMERA that “photographs” the surface. The information enters the chip, it compares this “snapshot” with the previous one and determines the movement.
- She just shoots at high speed.
- In order for the “camera” to see what it is filming, it is illuminated by an LED (usually red), you CAN install any one (of a different color/size). And power it from anything.
- Light-emitting diode not synchronized, and the change in brightness is done to save energy, protect the matrix (camera) and aesthetics.
- Important point– optics. The meaning is simple - you need the “picture” of the surface to be sharp (otherwise there is no comparison), in general, just like in your favorite soap dish.
2) What do we need in order to repeat?
- Mouse with one chip(Which one is above). Price – 3 dollars. From it we will take a chip, a body kit and a lens.
- Marker (also above). It's for 50 cents))
- Hot melt adhesive.
- LED 3mm (any color)
- The button is not fixed (there is a photo below). It will be analogous to the left mouse button.
- Something for decoration (a pen for design should have a design;))
3) Let's get started:
- Disassemble the mouse (you can even break the case, we don’t need it). Suitable for us like this, it's cheap and single-chip!

- Draw the pinout of the microcircuit ( the picture below is an example). The pinout can be copied from the board.

- Cut off the unnecessary part of the optics and glue the remaining part to the sensor with hot glue:

- Disassemble the marker. We don't need the upper part.
- Make a hole for the button

- Pull the wire through the marker.
You can take the following buttons, for example:

- Using overhead soldering, assemble the MK + wires + for the button + attachment. Should fit in the marker.
- Fill with hot glue (it’s better to check how it works first)
You'll get something like this)) No drivers are needed, the mouse is still: