If you like to create beautiful things with your own hands, try this type of needlework such as embroidery. In this way, beautiful three-dimensional embroideries on clothes, various paintings and crafts are created. Let's find out what ribbon embroidery is, what tools are needed for beginners, and attach a video with step-by-step ribbon embroidery lessons.
Features of this embroidery technique
To get started, you will need the following tools and materials:
- Ribbons. They come in different widths. It is better to take satin ribbons with a width of 7 - 25 mm.
- Fabric for embroidery. Gabardine is best suited.
- Hoop(wooden or plastic).
- Needles with a wide ear and a blunt end.
- Auxiliary tools: scissors, matches or lighter, candles, glue, awl, pliers and a special marker for drawing.
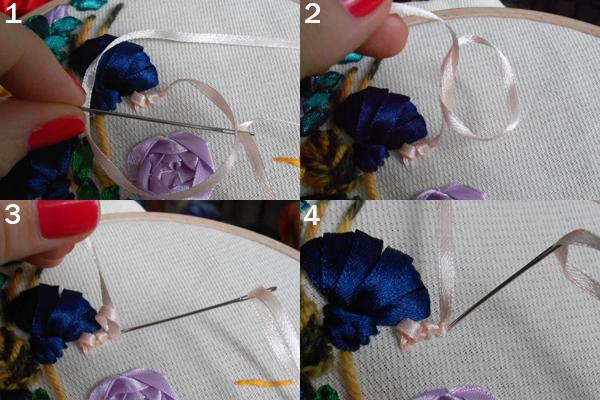
After purchasing the tools, we begin threading the ribbon into the needle. To do this, you need to cut one end of the tape in a straight line and burn it with fire, and cut the other end at an oblique angle. Thread the ribbon at an oblique angle into the eye of the needle and pull the needle slightly down the ribbon. Then pull the needle through the same end of the tape, leaving 0.5 ml short of it.
Now hold the needle by the sharp end and pull the tape down. This will create a knot that holds the ribbon firmly in the needle.
Now make a flat knot at the other end of the ribbon. To do this, bend the end of the ribbon and insert a needle with the resulting knot into the resulting bend. It turns out to be a loop that you need to put on your finger, insert a needle instead of your finger and tighten the tape. We get a knot. Now you can start embroidering patterns.
Ideas for such embroidery with patterns
Let's look at a few embroidery ideas satin ribbons with a diagram for beginners step by step. We use a straight stitch. The needle passes from the back to the front side, pulling the ribbon through. Then, at the required distance, it is brought out on the wrong side.
Daisy ribbon embroidery pattern for beginners with step-by-step photos

The stems are embroidered with floss threads folded several times. First, lay the thread along the line of the stem, secure with needles.

Then make a stitch with another thread, bringing the needle from the wrong side to the front side and grabbing the thread that lies on the fabric.

Sew all the chamomile trunks in the same way.

Chamomile petals are embroidered with ribbon Green colour and wider than the previous one. Based on the diagram, we embroider the petals, starting from the top.


We fill the middle of the daisy with beads or embroider with rhinestones.


Rose ribbon embroidery with step-by-step photos for beginners
To embroider roses with ribbons, you need to create buds. Following the diagram in the photo, twist the desired number of flowers. Sew them with thread and singe the ends with a lighter.
Rose leaves are made from ribbon cut into squares. Having singed the edges, fold them three times diagonally to form a triangle.
Trim the edges and singe the cut ends while holding the triangle with tweezers. Using a needle and thread, pin the corner of the triangle. Having created three petals, secure them with threads. Use glue to attach the petals to the rose.
Apply a design to the fabric and secure the resulting buds. Creating designs using step by step photos and instructions for beginners, you can embroider poppies, asters, tulips, peonies, lilac buds and other various flowers with ribbons.

Poppies
To create poppies you will need a wide red ribbon, green for the core, black floss for creating the stamens, a candle and glue.
- Create a poppy petal template from cardboard and cut out 12 identical pieces.
- Gather the petals with glue or thread.

- Cut out rounded parts. The resulting petals will be attached to them.
- Using hot glue, apply the petals in a circle, overlapping each subsequent one. The bottom layer will consist of 9 petals. The last one half covers the previous one and forms a circle.
- The last three petals form upper layer. Glue them to the middle of the flower.

The poppy core is made from a circle of fabric


Master class on butterfly ribbon embroidery for beginners with step-by-step photos
We offer a simple master class on embroidering a butterfly. For this you will need tapes 5 and 12 mm wide and a needle.

Video with master class lessons of such embroidery for beginners
Check out the video showing step by step lesson on embroidering roses with ribbons for beginners. You will need canvas, a hoop, a marker for drawing, scissors, a needle, ribbon and thread in the color of the ribbon. A simple way to create a beautiful bud.
Very beautiful embroidery lilac ribbons. You will need ribbons to match the color of lilac and petals, threads and yellow beads, a pencil, scissors and a lighter.
To embroider tulips with ribbons you will need ribbons in the color of the bud and petals, threads, needles, scissors and a lighter. A simple way that you can do on your own.
Master class on “embroidery of pictures with ribbons.” To work you will need bright satin ribbons, a needle and floss. The finished - volumetric embroidery - is framed.
In this lesson we will learn how to make knots, which are often used in ribbon embroidery. Flower cores, berries, small roses, etc. are embroidered with knots. Its shape and volume depend on how the knot is made.
For those who want to learn ribbon embroidery, the master class will help you master a simple, French, colonial knot, as well as a twisted “ingot” knot.
Simple knot


French knot


Remember, the more ribbon you wrap around the needle, the larger the knot will be.
Twisted ingot knot with chain stitch


Step by step photos - Olga Ivanova (Olga)
This way you can embroider unopened flower buds or leaves.

The flower cores in this work are made using knots
The colonial knot is a bit similar to the French knot. The difference between them lies in the way the thread is wound onto the needle. Just like the French Knot, the Colonial Knot can be used to fill the center of a flower, used to embroider lilac or mimosa flowers, fill an empty fragment in a motif, or use it as a small rose.

For the Colonial Knot, you do not need to use a wide ribbon. When embroidering with a wide ribbon, the knot will turn out bulky and unsightly. It is best to take a tape with a width of 0.5 mm - 1 cm, with 0.5 mm being preferable.
We fix the tape with any in a convenient way and bring it to the face in part 1.

Now you need to do the winding. It, unlike the French knot, is made around a needle in a figure eight. Place the needle under the ribbon from left to right:

Now we take the tape and wind it counterclockwise in a figure eight.


Insert the needle into the fabric next to point 1 at point 2

You should not overdo it here. The tighter you pull it, the more difficult it will be to pull it through.

We drag the needle to the wrong side and get a Colonial Knot.

Below is a schematic of the Colonial Knot. Here you can clearly see that the winding is done with a figure eight:

Winding can be done in any direction, that is, if at the first stage we wind from left to right, then the next movement is against clockwise. And if at the first stage the winding was done from right to left, then the next movement By clockwise.
This type of needlework originated in Ancient Greece: women wove bright ribbons into their hair, and over time they decorated carpets and bedspreads with them. In the Middle Ages, this type of craft was appreciated by Italian women. They decorated canopies, chair backs, curtains to make them more attractive and stylish. In other European countries - France, Germany, Spain, Great Britain - they learned about ribbon embroidery only in the 14th century. Moreover, in these countries, not only decoration was put on stream, but also the production of light silk ribbons, which craftswomen used for finishing clothes, room accessories - curtains, curtains, tapestries, and upholstery of furniture attributes.
Ribbon embroidery is still popular today. It is used to decorate pillowcases, duvet covers, bedspreads, as well as to create paintings for the bedroom or study. Ribbon attributes will be a wonderful interior decoration in different styles: from classic to modern. Our review will allow you to master this type of needlework and teach you how to create sophisticated and elegant attributes for your home.
1. Materials and tools
Of no small importance in the quality of embroidery is the choice of equipment with which you implement creative ideas. Every craftswoman who decides to learn ribbon embroidery must purchase the following items and materials for this:
- needles;
- fabrics;
- ribbons;
- markers for marking;
- hoop.
If their quality leaves much to be desired, then so does the appearance of the final product.
It is best for beginning craftswomen to purchase already ready-made kits for embroidery, which will contain everything necessary materials in the right quantity. And what remains after completing the embroidery can always be put aside for the next product or your own experiments - there are enough ribbons in the set to spare.

Of course, you won't always find exactly the design or pattern that you like, although the variety of sets is impressive. In this case, you can come up with and draw what you want to do yourself. Here you will have to independently select and buy the necessary accessories and materials for the work. To make it easier for you to navigate the huge variety of offers and options, below we have provided a detailed list of what you will need.
Needles
In something like embroidery, you can’t escape without a needle. Therefore it is worth paying Special attention to select this important tool. It would seem that all needles are the same and are suitable for any materials, but this is not so.
Regular needles are not suitable for ribbon embroidery. You will need to purchase needles with a wide eye that you can easily thread the ribbon through. Needles are selected depending on the width of the ribbons so that they do not twist, but at the same time do not slip. For example, a needle number 18 is ideal for ribbons about 7 millimeters wide. The larger the number, the thinner the tape. This is the basic rule for marking needles.

The needle for embroidery with ribbons should be moderately sharp so that it can easily pass through the fabric, but not too sharp so as not to spoil it.
Textile

Since you are just starting to do ribbon embroidery, it is better to use Aida canvas from 11 to 14 as the basis for embroidery. In general, they use the most different fabrics- cotton, linen, wool, fleece or felt. It is important that your material is not transparent, as all the seams will be visible.
Ribbons
When choosing them, it is important to consider one point: there are products that cannot be washed. This decorative ribbons and they are made of light and thin materials. They are used to decorate tablecloths, handkerchiefs, and curtains. But there are also more durable “bases” made of satin and silk with an edge. They can be washed an unlimited number of times, and they will retain their rich and rich shade.


Not all ribbons are equally well suited for this type of needlework. Better to buy special tapes for embroidery because they have a certain width. Choose soft ribbons and do not forget that all the colors of the future product should be combined and harmonized.
Markers
Using markers for marking, you will draw an accurate sketch of the future image. There are two types of markers on the market: disappearing and water-washable. If your embroidery speed is slow, then you will constantly have to apply a disappearing marker to the fabric. There is a high probability that you will get confused in the little things, and the drawing will turn out far from ideal. In this case, it is better to choose water-washable markers. They are easy enough to get rid of when the product is finished.
Hoop
One more necessary tools In this type of needlework there are hoops. They are needed to ensure that the fabric is stretched tightly when embroidering. Then the thread and needle pass better and the pattern lies much smoother. You can use both round and frame hoops. But make sure that your fabric is not overstretched, otherwise it may damage the design and the material itself.
When choosing a hoop, you should pay attention to the following points:
- The hoop or frame (base) must be smooth and free of defects. The smooth surface will not damage your fabric or embroidery, but the slightest defect can ruin the whole job.
- It is better to choose a wooden hoop, as the fabric is held tightly by the wood, unlike plastic hoops.
- Pay attention to the clamps. Good clamps are attached fairly tightly to each other and do not allow the tension of the fabric to weaken.
- You should not choose products painted in bright colors. The fact is that poor-quality painting can ruin appearance your product.
- And the main rule is that you should not select a hoop larger in size than your design, this will only be disorienting.
Video: Materials and tools for ribbon embroidery
Embroider with ribbons
Now you can safely move on to the needlework process itself. Let's start with the basics:
How to thread a ribbon through a needle
Practice on a small piece of tape you don't need to start with. Taper the tape at one end. To do this, you need to cut it diagonally. This will make it easier to thread the ribbon through the needle. After this, pull it through the ear and pierce this end in the middle, stepping back a few centimeters from the edge. There is no need to pull the needle through the ribbon. Instead, pull it long end all the way, and then behind the cut short one, also all the way. Ready!
Video: How to thread a ribbon through a needle
How to attach ribbon to the wrong side of fabric
We thread the needle through the wrong side of the fabric. On the next stitch, pull it through the edge of the ribbon that remains on the wrong side. And now, make another stitch to secure the ribbon to the fabric. You should thread the needle not through the tape itself, but through the canvas.
Basic techniques for ribbon embroidery
Straight stitch(also has names - a large, elongated straight twisted stitch, or a regular ribbon stitch) - we pass the needle through the wrong side of the fabric, straighten the ribbon, pass it through another point on the canvas so that the stitch is even.
Video: Straight stitch in ribbon embroidery
Straight stitch with curl(elongated with a curl, Japanese stitch) - suitable for embroidering petals. You need to thread the needle and ribbon not only through the fabric, but also through the ribbon itself. This should be done towards the end.
Video: Straight stitch with curl in ribbon embroidery
French knot(French knot, French knot with a twisted stitch on the leg) - the ribbon is brought to the front side of the material, and then we wrap it around the needle. There is no need to tighten it, it should remain free. Bring the ribbon to the front side and, holding the resulting knot, carefully pull it to the wrong side of the canvas.
Video: French knot in ribbon embroidery
These three basic stitches are enough to understand the principle of ribbon embroidery and create stunning pictures or decorative elements on the surface of tablecloths, handkerchiefs, curtains and tapestries.
Embroidery ribbons has been rapidly gaining popularity lately. A fairly simple, fast, but at the same time very effective embroidery technique is gaining more and more fans every day.I suggest that those who have not yet tried their hand at this type of embroidery give it a try...
First, we need fabric. In principle, you can embroider with ribbons on almost any fabric - from organza and silk to knitwear and velvet.
I think for starters it’s better to take some natural fabric (or with a small addition of synthetics). Medium density and hardness.
I don’t have simple fabrics on hand right now, so I will embroider on Lugan.
Needles must have a wide eye.
The best needles are the chenille type - a wide eye and a sharp tip.

If there are none, you can sew with tapestry ones - a wide eye and a blunt tip, but it will be much more difficult.

You may also need a regular sewing needle with a sharp tip.
I suggest this embroidery motif:

Those. - we will embroider a heart. A small motif is used to change the shape of the finished embroidery. Those. - if there is a desire, they can fill empty spaces. For example:

Or

The scheme, in principle, is not decisive, since the number of colors and their arrangement in the picture will depend on the ribbons you have and personal preferences. It is needed for a general idea - in which part of the heart we will embroider...
By tapes
We proceed from what is available at home or in stores.
I have ribbons in three sizes: 2mm, 3mm and 5mm.
It turns out that my flowers will be quite small

Ribbon color:
Green - one tone is required, if desired - you can use two or three shades
other colors - three shades. Of these: two (more possible) in the same color scheme - for example - red and pink, one to choose from - for example, blue (you can also use more shades)
If you really have a hard time choosing, you can use one color... no big deal. There will be just flowers of the same color.
We are not afraid to replace colors and improvise.
Attaching ribbons to the needle and fabric
There is no need to cut the long ribbon, otherwise it will fray during the embroidery process and become wrinkled - I cut about 40 cm
Making a knot to attach the ribbon to the fabric
Cut one end of the tape straight. Fold the ribbon

Piercing with a needle

And we stretch the ribbon right through to the very end - at the tip of the ribbon you get a neat knot

Just in case - a diagram

Attach the ribbon to the needle.
We cut the second end of the ribbon at an angle - this will make it easier to insert it into the needle:


We pierce the tip of the tape with a needle, approximately a centimeter from the edge

Pull the long end of the ribbon so that the punctured hole is pulled towards the eye of the needle:

Now we take the short tip, pull it to the end of the eye of the needle and remove it from the needle, as if stitching a ribbon

We carefully pull this whole thing up

Embroidery size
I want you to learn not just ready-made diagram and precise instructions to embroider, namely to improvise, focusing on the available materials, and not on instructions in books or magazines. Moreover, there is nothing complicated about it...
Each of us can draw a heart of the size he needs. This is just a form - which we will already fill out with embroidery.
The diagram will only be needed to roughly guide you in which zone of the heart to embroider which flowers.
It’s just that depending on the ribbons used and the size of the heart, each person will get a different number of flowers.
For example - you will have five large ones, and I will have 15 small ones
I made the size based on the size of the existing cloth: roll
My heart at its widest horizontal part was 14 cm
I marked the outline with dots using a water-washable marker.

In the first part of the lesson we fill in the area marked in blue on the diagram

It is absolutely not necessary to make the same number of flowers - you can make the flowers smaller, but in larger quantities. Or fewer large flowers.
Please note that there is free space between the flowers for leaves.
For orientation, I first embroidered one flower, looked to see if its appearance and size suited me or not, and only then marked the canvas for the rest of the flowers.
Rose on a spider's web
We will fill the selected area with roses embroidered on the web.
The web can be made from floss threads, or from the same ribbon that you use to embroider.
We will do it according to the second method
If you have a good eye, you can do without markings:wink
We mark a circle for the future flower - mine has a diameter of about 2.5 cm. We divide it into five sectors
I hope it will be clear from the photographs. Making a web


The next photo shows that after making the last ray, we do not bring the needle to the wrong side, but drag the ribbon under the already embroidered rays

We begin to form a rose by alternately stretching the ribbon under or above the rays of the web


Last stitch: bring the tape to the wrong side and secure it there

On the wrong side

It’s better not to straighten the ribbons too much - this will make the rose fluffier and more natural.
Choose the degree of tension yourself - whoever likes what. I make a tight flower (I’m just used to it) You can make the tension of the ribbons looser - the flower will look a little different
try.. experiment.. :flowers:
As I said - after sewing the first rose - I marked where I would embroider the rest of the roses

I decided to make roses in three colors: pale blue, light blue and bluish-turquoise

Fill the sector marked in pink with flowers

Take a long ribbon = 12.5*width of the ribbon. Plus 2-3 mm on the sides - burn them with a lighter. We mark the tape into five parts, 2.5*the width of the tape.

We stitch the needle forward with regular threads matching the color, as shown in the picture.


We take the ends of the thread, tighten the gathering and tie the threads


We cut off one tail of the thread, thread the second one into a needle and sew the flower onto the fabric. We make stitches in the center area where the tape is gathered

Use a 2mm ribbon to make French knots in the center.


Choose the number of twists around the needle yourself - I did only one turn. You can make Frenchies not with ribbon, but with floss. Or sew on beads or beads.
I wasn’t able to take a photo of the process - it’s inconvenient to take a photo with one hand and at the same time twist the tape and hold it. Therefore, for those who don’t know how to make Frenchies, watch the video:
Making the required number of flowers:

We make a half-opened flower from a ribbon divided into three parts (we divide according to the same principle as for 5 petals)


We make a bud from one segment of ribbon:


Sew onto the fabric in the area where the tape is pulled together

Tip: Sew the half-opened flower and bud onto the fabric a little away from other flowers - keep in mind that we will still need to make the calyxes of the flowers.
By varying the number of buds, large flowers and half-opened ones, you can get your own, completely individual design
We make stamens. We pull the 2 mm ribbon to the front side

Twist the ribbon

We pierce the fabric in the area where we will have the tip of the stamen and, holding the ribbon so that it does not unwind, pull it to the wrong side and immediately bring it to the front side, making a hole next to the previous one - we embroider a French knot on the tip of the stamen

In the same way we make the number of stamens you need. You can make such stamens on large flowers


Embroider the area marked in yellow:

It is better to mark the middle of the flowers (since we will be embroidering flowers similar in structure to daisies). The diameter of my finished flowers is 1.5 cm. I took ribbons 3 mm wide

The flowers are very simple. Attach the ribbons as usual. We draw the ribbon in the area of the small circle and make a stitch to the large circle

We straighten the ribbon so that it is even, not twisted, and tighten the stitch - it is called - Straight stitch

Since I decided to make this flower two-color, I make the next stitch through a small gap, which just fits another stitch. You can make it three-color - then you leave room for two stitches. Well, if it’s one color, then we embroider in a row...

The stitches can be placed symmetrically, or you can show your imagination and make different distances between them


We fasten a ribbon of a different color to the needle and begin to fill the gaps left between the stitches.


You can make these stitches a little shorter or longer than the stitches of the first color

We fill the middle with French knots or beads. My flowers are small, so I made fruzels using floss thread in two folds. How to make French knots - see the First lesson

It seems to me that it turns out somehow unfinished?


This is the result we should get so far:

Let's embroider thin branches.

On the diagram I marked them with green and light green colors. Depending on whether you will use one or two colors of ribbons when sewing ribbons, we determine the color of the branches
If there is one color of ribbon for all the leaves, then, of course, we also embroider all the branches with the same color of floss.
For the lower branches that form the shape of a heart, I took a thin ribbon of light green color - 3 mm - for the leaves. The leaves will be smaller there
And on the remaining sheets of tape 3 and 5 mm - green
We select floss that matches the color of the ribbons

Embroider with a regular stem stitch

My branches:

I decided to make buds on the “hanging” branches.
We will embroider them ribbon stitches
I embroidered the buds with 5 mm ribbons
We bring the tape to the front, straighten it

We pierce the ribbon with a needle in the area where you will have the top of the bud and bring the needle and ribbon to the wrong side

Straightening the tape

We begin to tighten, forming the top of the bud

For the bud, tighten the ribbon so that the tip becomes sharp

We do the same for the cups of buds - ribbon stitch(I have 5 mm tape). We draw the ribbon just below the lowest point of the finished bud

We make a ribbon stitch - as described above, only we tighten it tighter to get a narrow leaf

Embroider another leaf:

Bottom of the cup - straight stitch(with which we embroidered flowers like daisies) We bring it out at the bottom of the bud on the left side and go to the wrong side on the right. It turns out like a loop with which we wrap the bud from below.

Straighten and tighten

Using the same ribbon stitch, we embroider the leaves, which are marked in green in the diagram.

Depending on how tightly or lightly you tighten the ribbon in this stitch, the shape of the leaves will change. You can also change the shape of the leaves by piercing the tape not in the center, but to the right or left of the center.

I embroidered leaves on the “hanging” branches with 5 mm ribbon, and around the roses with 1 cm ribbon.
I will embroider the buds in three shades blue color: darker at the base (above), and very light at the bottom
I make the buds to match the roses... but in theory, you can use a different color... as if it were just another flower...

And here is my heart at this stage:

We embroider the branches at the bottom of the heart, which are marked in pale green, using a stitch that many embroiderers know as the “lazy daisy”

For this seam, you can straighten the ribbon during the embroidery process, you can, on the contrary, leave it as it lies (it seems to me that it turns out more naturally) - in general - as you like


This is what I ended up with:

I filled the voids with beads to match the beige flowers.

Closer

Slightly tinted the leaves with regular white acrylic paint to dim the excessive brightness of the ribbons. The intensity of the tint can be varied by diluting the paint with water. I applied the paint with a regular brush No. 2

OK it's all over Now.

Embroidery with satin ribbons will appeal to those needlewomen who like to see the result of their work immediately. Work, so to speak, in broad strokes. Unlike cross stitch or satin stitch, a small bouquet can be embroidered in a few hours.
1:981 1:991
To embroider the large panel I had planned, it took 8 approaches, 2-3 hours each. The technology of ribbon embroidery is quite simple and does not require special skills. After mastering the basic techniques, you can safely start copying masterpieces.
2:452 2:462Below is my first work - a large panel embroidered with satin ribbons.
2:652 2:662
Ribbon embroidery technology
materials and tools
- satin ribbons of different widths
- floss threads, colored yarn, regular threads
- long eye needle
- canvas or natural fabric with a fairly sparse weave. A needle with a silk ribbon 0.5 cm thick should pass between the threads, but the stitches should not show through on the reverse side
- hoop
- scissors
- lighter
You will need yellow ribbon of different shades with a width of 0.5 and 0.3 cm, and yellow floss threads. The ends of all ribbons must be cauterized.
3:233 3:243
1. Tie a knot at the end of the ribbon (0.5 cm). We pull the entire ribbon from the inside out so that the knot is pressed tightly against the fabric. We straighten the ribbon face up and lay it down the way the grain should lie in the spikelet.
2. We stick the needle into the place where the grain should end.
3. Pull the entire length of the ribbon inside out. You don’t need to pull too hard so that the beautiful fold at the end of the grain remains on the front side.
4. Arrange the remaining grains in a herringbone pattern, reducing them towards the end of the spikelet.
5. We admire.
6. Using a 0.3 cm tape, duplicate all the grains with smaller stitches, placing them inside the grains.
7. Use floss threads to decorate the spikelet and stem.
4:9

The stitch used to make the grains is the main one. They also make petals of daisies and other flowers, and greens.
5:745 5:755Ribbon embroidery technology: leaf
You will need colored yarn.
5:8801. Choose a place for the leaf. The first time you can draw its outline with a pencil or chalk. Then you won't need it.
2. We stretch the thread from the wrong side to the front side. At the very top point of the sheet, pick up a couple of threads of fabric and pull the needle through. Or we take the thread to the wrong side and return it through very closely spaced points, which is more difficult.
3. Grab a couple of threads of fabric in the center of the sheet and pull the needle through.
4. Grab a couple of threads of fabric at the top of the sheet and pull the needle through.
5. Place stitches from the center of the sheet to the outline and back. Alternately with different sides from the center. We reduce the stitches, approaching the base of the leaf.
6. Decorate the leaf with a stem. We admire it.

Embroidery with satin ribbons: lilac
6:856 6:8661. Cut a small piece of tape, round the corners, and burn it with a lighter. Using a simple thread we draw on the outline. The example shows a contrasting thread for clarity. For the product, it is better to take a matching thread.
2. Tighten the thread and tie its ends. We get a ball.
3. Sew on the ball. By threading a needle through the center, we get a flower.

7:9
Ribbon embroidery: poppy
You will need a red ribbon 2 cm wide. Red and black threads. Green thin ribbon for the core.
7:2521. We run a running stitch along the edge of the tape. After 6 cm, fold the tape at an angle of 90 degrees and continue the seam along the fold.
2. After another 6 cm, make a fold again.
3. We get a square. We sew the pre-cauterized ends of the tape tightly.
4. Tighten the running stitch and get a flower with a hole in the middle. Two petals from the front side of the ribbon, two from the back.
5. Sew the poppy with black thread, making several knots from green ribbon in the center.

8:9
Embroidery with satin ribbons: cornflower
You will need a blue ribbon 0.5 cm and a second needle with regular thread to match.
8:2291. We take out the ribbon, straighten it with the wrong side up, and lay the future petal. At the top point of the petal we grab it with a regular thread.
2. We take the tape to the wrong side of the embroidery through a point located just below the place where it came out. The first one is the one on the far left - the petal is ready. The next petal will be on the far right. Then again to the left. We place it slightly overlapping the previous one.
3. Then we embroider the place to which the petals are attached (“receptacle” - the Internet kindly tells us). Place three regular stitches as shown in the diagram.

9:9
Ribbon embroidery technology: rosette
You will need a 0.5 cm ribbon and simple matching threads.
9:1841. Embroider a star with an odd number of ends.
2. We bring the tape out from the center of the star. We lay it in a circle, placing it under every second ray of the star. On those rays where it lies on top, we make a fold so that the tape turns over.
3. When the circle closes, the ribbon falls under those rays that it did not fall under in the previous circle.
4. If desired, the tape can be pulled tighter. Then the rosette will be thicker.

A very useful element for making flower cores, inflorescences, and decorating twigs.
10:200
2. We do not remove the tape completely, leaving a small loop.
3. Thread a ribbon through the remaining loop and tighten, holding the second loop on your finger.
4. A second loop remains with a small knot at the base.
5. We pull the needle and ribbon through it and only now finally tighten it.
6. We move the tape to the wrong side at the base of the knot.

11:9
1. Place the ribbon on the front side of the embroidery. We grab a couple of millimeters of fabric and pull the needle through.
2. We do not remove the tape completely, leaving a small loop. We pass a needle and ribbon through this loop.
3. Tighten.
4. Place the tape at the base of the knot.

Most often used on the inside out.
12:11551. Place the ribbon on the front side of the embroidery.
2. Make a simple knot on the ribbon, but do not tighten it.
3. We pick up the knot with a needle and press it to the fabric.
4. Only now we tighten it. We take the thread away from the base of the knot.
12:9
1. We bring the thread to the front side of the embroidery. Use a needle to hook a few centimeters of fabric and pull it through.
2. We lift the fabric again and pull the needle and thread through. We place check stitches alternately on different sides.
3. We get beautiful branches that can be decorated with berry knots or left as is.

14:9
You will need a ribbon 1 cm wide and simple matching threads.
14:1711. We attach a ribbon along one edge.
2. We sew together the pre-cauterized sections and tighten the seam.
3. Sew it to the fabric, making a knot in the middle.

1. Place the ribbon on the front side of the embroidery. We insert the needle into the adjacent point, and take it out where the top of the petal is supposed to be. We stretch the tape.
2. Make a simple stitch directed from the center of the flower outward.


