Today we invite you to fashion bracelets with your own hands.
Thread bracelets have become mega popular today. This bracelet is worn not one at a time, but in rows of several copies. On your hands, such bracelets look very stylish and fashionable. Well, today we propose to make such a bracelet with your own hands. Look at the photos and videos, choose the bracelet you like and start learning. All you may need (depending on the type): floss threads, beads, chain, button, gold nuts, ring, scissors and adhesive tape. Good luck!
Weaving bracelets
How to make a bracelet from threads
You will need: floss threads or lacing, large beads, scissors and a button.

Measure the required number of threads so that we get a piece that, folded in half, will be equal to: 1st side 66 cm, 2nd 48 cm. Then we fold it in half (see photo). You should end up with 3 identical threads and 1 short one.

At the very top, retreating about 1.5 cm, we make a knot. Cut off the short 4th thread.

Start weaving. We braid 2.5 cm and thread the beads into the left strand.


Again, left-empty-right. This is what you should get.

We weave along our wrist. At the end we also simply weave about 2.5 cm (as at the beginning). Let's make a knot.

We thread a button through one end, two threads into each hole. We tie a knot.

Cut off the excess threads. Like this beautiful bracelet We made it with our own hands from threads and beads.

Oh, here's what they look like in different colors.

And on the hand. Very stylish. Is not it?

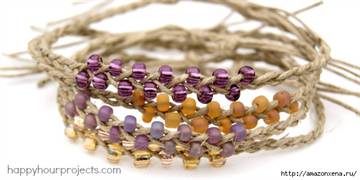
Macrame bracelet

To weave a bracelet in macrame style you need: 3.5 m of thin colored lacing, a flat ring, an embroidery needle, scissors, tape.

Cut the lacing into sections: 2 x 70 cm, 2 x 50 cm and one 25 cm. Fold the 50 cm piece in half and pull out the loop on the ring. Also repeat on the other side of the ring (see photo).

Take a 70 cm piece, fold it in half and make air loop, wrapping it around our 50 cm section. Left side We throw 70 cm of the cut over the right one and thread it inward as shown in the picture on the right.

Pull it all the way and push the resulting knot tightly, all the way to the top.

Now we make an air loop on the other side. This time we throw the right side on top.

Make a tight knot again. Continue weaving macrame: left, right, left, right, etc., until you reach the desired wrist length.

Upon completion of weaving, insert the needle on one side and the other in turn and pull through 2-3 knots as shown in the photo.


Trim off any excess threads.

Now take the remaining 25 cm piece and pass it through the outer strands on both sides, tie it as shown in the photo.

We begin to weave macrame as in the beginning: left, right, left, etc.

Having made 5-6 rows, we also sew them up using a needle.

We make knots on both sides and cut off. If the last steps seem difficult for you, you can simply weave macrame around the entire perimeter of the bracelet.

Your original macrame bracelet is ready.

DIY bracelet with beads

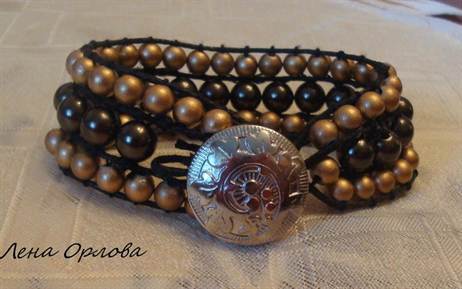
For this bracelet with beads you need: leather cord, colored lacing, beads connected together, nut.

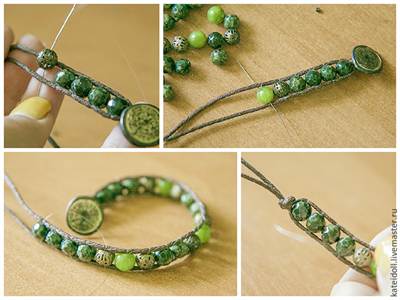
Fold the leather cord in half to create a loop that is just the right size for the nut as it will be the fastener. Start wrapping the leather cord with colored lacing (6-7 times).

Lay the beads along the cord and continue to wrap the lace around each bead.

Continue wrapping, measuring the length around your wrist.

At the end, make another 5-6 loops and tie a knot with leather lacing, wrapping it around the loops.

Thread the nut and make a knot again, securing it.

Cut off any excess threads.

Such simple bracelets you can make a whole bunch.

On the hands they look very beautiful and modern.

How to make a friendship bracelet
Another mega popular bracelet is the friendship bracelet, which is woven from colored floss threads.

These are exactly what you will need.

Take a pair of 6 colored threads. We tie them into a knot, leaving an extra 5 cm. For the convenience of weaving the bracelet, we secure its upper part with tape.

As in the picture: we tie together the 2 outer threads: red and orange.

Pull up and to the right to tighten tightly. Important: make double knots! Now do the same with each color (i.e. red with all the colors until it is the outermost one on the other side).

Repeat the same with opposite threads.

When both red threads are in the middle, tie them and pull them to the bottom (also twice).

Repeat weaving until the end. We get charming rainbow bracelet friendship. You can braid it at the end.

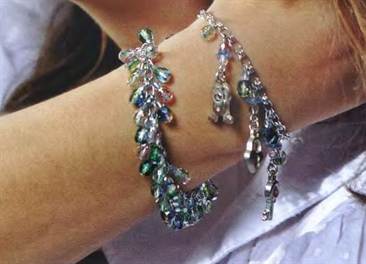
Look, they are our beautiful ones)))

Isn't it lovely?

Weaving bracelets from threads and chains

All you need is colored threads, a thick bracelet chain, scissors, and bobby pins.

We divide the threads by color into two thick strands. We grab them with bobby pins and begin to pass them through the chain links.

We pass the first strand and put it under the other. We also draw a second strand and, again, let it down.

We repeat the steps until the end and get a chic wicker bracelet.

O-o-very stylish)))

DIY bracelets video
Related posts:
No similar entries found.
A bracelet is one of the most popular accessories. Naturally, every needlewoman sooner or later begins to wonder how to weave bracelets with her own hands. There are many ways to make these jewelry. The work uses the most simple materials: beads, laces, beads, elastic bands, leather, threads. Regardless of the method of weaving, bracelets look unusual and incredibly beautiful.
A bracelet is one of the most popular accessories
In order to weave shamballa, it is not at all necessary to have extensive experience in making jewelry. Even a beginner can cope with this task. You just need to be patient and get to work good mood. Without a doubt, even a beginner can easily complete this job.
What is necessary:
- cord;
- threads;
- beads;
- glue;
- lighter.
We weave in stages:
- Make one knot on the lace and attach it to the work surface with a pin.
- Tie several square knots.
- Thread the first bead onto the central cord.
- Tie the next knot under the bead.
- Fix all other parts in the same way.
- Make at least four more square knots and immediately cut off the remaining cord and burn them with a lighter. Additionally coat them with glue.
- To make a lock, place the edges parallel to each other.
- Place a small cord across it and then tie about ten square knots.
- Burn the ends of the thread and string beads on them.
- Make knots at the bottom and burn with a lighter.
Gallery: weaving bracelets (25 photos)


DIY rainbow bracelet (video)
How to make a bracelet from beads
Weaving a bracelet in in this case unusual, but simple. The finished product looks elegant and noble. It's hard to even believe that this beauty was made at home.

The bracelet weaving in this case is unusual, but simple.
What is necessary:
- beads;
- pliers;
- iron rings;
- ear clasp;
- clasp for bracelet.
Progress:
- Connect a couple of rings together.
- Take a couple more rings and push them apart a little using pliers.
- Pass this pair through the already connected ones and clamp again.
- Take the workpiece in your hands so that the last of them are in the upper part, and the first are held between your fingers.
- Insert a bead between the rings and clamp.
- By analogy with the previous ones, tighten a couple more rings.
- Re-insert the bead and clamp it with the next rings.
- The scheme of actions is subsequently repeated until the product is of the required length.
Secure along the edges of the fastener.
Waxed cord bracelet in different ways
There are several ways to make bracelets from waxed cords. In this case, additional materials can be used, but even those products, during the work with which nothing more than cords are required, turn out to be bright and unusual.
How to weave a bracelet from multi-colored waxed cords
A bracelet made using this technique will definitely attract the attention of others. It is bright and very unusual, and is made quite quickly and simply.
What is necessary:
- waxed cords in green, yellow and black;
- springs;
- padlock;
- beads;
- round nose pliers;
- scissors.
Progress:
- Tie a colored knot around the black cord and tighten it tightly.
- Place the edge in the spring and clamp it with pliers.
- Place the black cord in the center, and pass the yellow one under the black one, bring it to the top and pass it through the loop that has formed.
- Braid the black piece with the yellow piece ten times.
- String a bead onto the green element and now braid the base with it, also making a dozen knots.
- Alternating colors and stringing beads, braid the workpiece completely.
- Decorate the remaining edge with a spring.
Connect the product using a clasp.
Weaving a wide bracelet from waxed cord with macrame knots
In order to make this unusual decoration, it is enough to prepare a thick cord, a clasp and be patient.
Progress:
- Fold the lace in half and thread one of the fastener parts through it.
- Thread the ends of the cord into the loop that has formed and tighten.
- Now thread the ends into the second part of the fastener, measure the required length and wrap the fastener.
- Pass the ends to the first of the fastener parts, and then begin weaving knots directly at the base of the fastener.
- When the product is the desired length, trim off the excess and melt the ends.

In order to make this unusual decoration, it is enough to prepare a thick cord, a clasp and be patient.
Bracelet made of threads and chains: how to weave it yourself
Making this decoration is a simple and fun process. The product, which is obtained as a result of very little effort, looks simply amazing and extraordinary.
What is necessary:
- floss threads of two colors;
- chain;
- hairpins.
Progress:
- Tie the threads together into a knot.
- Attach hairpins to each of the buns.
- Pull a thread of one color through the first link, and attach a second one on top and also thread it through this link.
- Braid all the links in the same way.
- Secure the ends of the thread with a knot.
Tip: if you wish, you can make not a single, but a double braid. This will make the product a little wider.
Ribbon bracelet: simple weaving technique
This is one of the easiest ways to weave bracelets. The work will take a minimum of time and effort. At the same time, the bracelet turns out to be very delicate, elegant and unusual.
What is necessary:
- silk or satin ribbon;
- scissors;
- beads;
- lighter.

This is one of the easiest ways to weave bracelets.
Progress:
- Measure the required length of tape and cut it.
- Carefully burn the edges with a lighter.
- String a bead onto the ribbon and secure it tightly with knots on both sides.
- Thus, place all the prepared beads on the ribbon.
How to weave a bracelet from rubber bands: step-by-step instructions
You can weave a lot of colorful and unusual decorations from elastic bands. Working with this material is so simple that even a child can do it in a short period of time.
What is necessary:
- 3 pencils;
- hook;
- special clasp;
- elastic bands of different colors.

You can weave a lot of colorful and unusual decorations from elastic bands.
Progress:
- Using a chain pattern, weave six petals one by one for the future flower.
- String all the petals onto one elastic band and immediately secure with another iris.
- Place one iris on a pair of pencils, twisted in the shape of a figure eight.
- Put another pair on top of this part, but no longer twisted.
- Remove the bottom element from the pencils and stretch it through the next couple.
- Weave in this way until the required length is reached.
- Use a fastener to secure the ends of the workpiece.
- Place the pre-woven flower in the same area.
DIY elastic bracelet (video)
Having mastered the technique of making at least one bracelet, it will not be difficult for any needlewoman to cope with other work. Regardless of the choice of material, the jewelry turns out beautiful and unusual. Due to the fact that their production does not require significant material and time costs, in a short period of time you can significantly expand your collection of jewelry. There will definitely be a use for each of them in the future.
Created 01/21/2013Handmade work has always been highly valued. Making a bracelet with your own hands is not at all difficult. Materials for making bracelets may vary. This includes wire, leather, and cords. Various beads: glass, metal, wood, natural stone.
The bracelet can be woven from beads, made from polymer clay, wood and even paper and plastic bottle(by cutting strips from the bottle and braiding them with cord, thread or fabric). There are plenty of options.
In order to make a bracelet with your own hands, you will need accessories, tools and your own imagination, or ready-made ideas.
Among the tools, you can limit yourself to only scissors and sewing needle, if making a bracelet does not require working with wire. IN otherwise You will need wire cutters and pliers to cut the wire and bend it. The wire will need to be bent into small curls. You can't do this with regular pliers. You need narrow-nose pliers, as in the photo (right).

In stores you can find a lot of different accessories (wooden and plastic blanks, chains, beads, rings, clasps, etc.), which allows you to make a bracelet with your own hands that is in no way inferior to a purchased one.
Several ideas for DIY bracelets
It is not necessary to buy special materials for the bracelet. It can be made from available materials. Here's an example: button bracelet.

- scissors
- rubber
- buttons

Measure the required length of the elastic according to the thickness of your wrist and plus a few centimeters for the seam. Cut with scissors. Place the ends of the elastic on top of each other and sew tightly with thread.

Now sew the buttons to the elastic in the usual way, placing them along at will. You can add other elements to the buttons.

This bracelet is made from buttons. Unusual and original.

Example of how to do it cord and chain bracelet.

- elastic cord
- chain
- clamps
- pliers
- sewing threads
Cut two pieces of elastic cord of the same length the width of your wrist, taking into account the length of the chain. Separate the required number of links from the chain.

Fold one cord in half and thread it through the end link of the chain. Then thread the ends of the cord into the resulting loop and tighten.
Also thread the second cord through the other side of the chain.
Fold the ends of the cords overlapping each other, coat them with glue and wrap them with threads.
Lubricate the inside of the clamp with glue and place it on the connected ends of the cords. Squeeze the clamp with pliers. The clamp should close from the inside of the bracelet.
You can make several of these bracelets from cords of different colors and wear them together.


Here, the elements that are woven into the middle of the bracelet play an important role. Metal rings look beautiful and stylish golden color. Bracelets with elements of different colored stones will look feminine. You can weave several bracelets and wear them together, as they turn out thin and elegant.
- 4 meters of cord for a shamballa bracelet (or waxed cord)
- ring (or other decorative element)
- scissors
- duct tape

Cut 2 pieces of 50 centimeters from the cord. Fold one of them in half, thread it through the ring, then thread the ends of the cord into the resulting loop and tighten. Do the same with the second lace on the other side of the ring.

Cut 2 cords of 1 meter each. For convenience, secure the top cord with adhesive tape. Let's start weaving a bracelet. Place a 1 meter long cord under the one attached to one side of the ring. Its edges should be approximately the same. Pass the right end over the cord that is braided. Place the left end of the cord on top of the right. Next, take the left half of the cord, pass it under the braided cord and bring it into the loop formed by the right cord. Pull both cords. This is how a macrame knot is woven.

Move it close to the ring and continue weaving such knots.

But start the next knot from the left end of the cord, then again from the right and so alternate until you have weaved the desired length.


Now you need to carefully secure the ends of the cords. To do this, thread the end of the needle and insert it under the weave.


In order to pull out the needle, it is more convenient to use pliers. Also “hide” the other end. Trim off the excess. Can be secured with transparent glue. This side of the bracelet will be the wrong side.

Using the same method, braid the cord on the other side of the ring, making the same number of knots as the first time. Also secure the ends.
Now you need to make an adjustable “clasp”. To do this, fold the cords of the two halves of the bracelet together.

For convenience, they can be tied at the edges with pieces of lace. Take the remaining cord and braid the ends of the bracelet with 5-6 knots.

Using a needle, secure the edges of the cord and trim off the excess. Do this from the wrong side.

Tie knots on the cords, retreating the desired distance and trim off the excess edges.

Place the bracelet on your hand and pull the ends.
You can weave macrame with the same knots wide bracelet. To do this, you will need a fairly long thick cord and a snap clasp.

Fold the cord in half and thread it through one half of the clasp. We thread the ends of the cord into the resulting loop and tighten. We thread the ends of the cord into the second half of the clasp, measure the required length along the width of the wrist and wrap the ends of the clasp again. We bring the ends to the first half of the clasp, draw them into the clasp (make sure that all the cords are the same length) and now begin to weave macramé knots right at the base of the clasp.

We weave to the end, trim off the excess, leaving the ends of the cord about half a centimeter. We bring them one by one to the fire to melt them. Be careful. They will melt and can be secured in this way, carefully pressing them against the weaving so that it is as neat and unnoticeable as possible.


To do bracelet made from copper wire , wrap it around your wrist and cut it with wire cutters so that one end of the wire extends slightly over the other.

Use pliers to bend one end of the wire into a circle. String the beads onto the wire, arranging them as your imagination dictates. Bend the other end of the wire as well. The bracelet is ready. Give it to him round shape by the wrist.

Can be done single ring bracelet.

Unbend the ring, put three small beads on it and bend the ring. Then straighten the second ring, also string three beads, connect them to the first ring and bend them. Do this until you get the desired length according to the width of your wrist. Attach a lock to the last ring.

Another one interesting idea for a DIY bracelet. People around you may not even guess what it is made of. When you open cans with Coca-Cola, beer and other things, metal “keys” remain. We will use them to make a bracelet.

Cut two pieces of leather or suede lace 60 centimeters each (you can take a narrow satin ribbon), put them together and tie a knot.

Pass one cord into the top hole of the “key” from the jar, and the second cord into the bottom hole. Leave about 5 centimeters from the tied knot to the first element. Place the second “key” under the first one so that the holes overlap. Thread the upper cord into its upper hole. Bottom - to bottom. Place the third “key” on the second one so that it is located close to the first one. Pass the upper cord over the first and third “key” into the upper hole of the second. The lower cord also goes into the lower hole of the second “key”.

Then, under the third, place the fourth “key” close to the second, pass the upper cord from below into the upper hole, the lower one into the lower one. Apply the fifth to the third “key” on top of the fourth and also connect with a cord. Do this until you get the desired length. Wrap the cords around the edge of the last element and tie a knot, leaving 5 centimeters. Trim off the excess ends. This is the bracelet that is tied on the hand with a double knot:

Popular memory wire bracelets.

Making such a bracelet with your own hands is very easy.

Measure the required number of turns on the wire and cut off the unnecessary ones with wire cutters. Bend the end of the wire with pliers. String the beads. Bend the other end of the wire.

That's it, your bracelet is ready.

Here's an example of how to do it chain bracelet. Measure the desired length of chain. Remove extra links. Attach the toggle clasp. To do this, straighten the outermost link, put the clasp ring on it and bend it back. Various elements can be attached to the chain links. For example, these are butterflies. The desired link is also unbent, an element is put on it, and the link is bent.

It will look feminine leather bracelet with flowers. To make it, you can use an old belt, cutting out a part without scuffs of the required length according to your wrist, plus a few centimeters for the clasp, for which buttons are used. For colors, use leather of the same color. Cut out petals from it. Gather the flowers using a thread and needle and sew or glue them to the base of the bracelet.

You can make a bracelet from beads, gluing pins into them on both sides and connecting the pins with single rings. At one end of the bracelet, a ring is attached to a pin, and a clasp is attached to it. At the other end, only a ring is attached to the pin, onto which the bracelet will be fastened. You can use “caps” on both sides of each bead.

As you can see, making a bracelet with your own hands is easy and fun.
There are many ways to make beautiful and colorful bracelets with your own hands. Clicking on the photo will take you to an article with a detailed description:
A brief description of the process: we sew a ribbon from thick fabric, a thick trouser-type ribbon is sewn inside for greater density, we attach a clasp, sew on various beads, pendants, and connectors. For the intermediate connection, half rings made of dense wire were used, similar to those that are sewn onto the belt of a bag. It seems to me that this part could be replaced with some kind of bronze-colored connector or a wide end for ribbons.
Here's another interesting idea for using tape. This bracelet uses brass billet. But I immediately came up with the idea to play with a beautiful ribbon using a polymer clay blank.


In the same blog, the bracelet is crocheted from a dense synthetic cord-yarn, and after that a thin chain is threaded between layers of thread.

If you don’t know how to knit, you can simply use a piece of knitwear and glue it to the base:

And this method is for those who like difficult paths. The base is braided with wool for embroidery:

This base uses thick wire, braid with rhinestones and regular knitting threads: 
Almost the same meaning here. Only, not braid was used, but a ball chain:

Another option for weaving on a leather cord:

You can wrap the base not only with a waxed cord, but also with a fabric ribbon:

Or like this, more organized by ribbons:

And if you add decorative details:

I have already given a link to a bracelet of this type. But one more time for company. Various are attached to the clasp decorative elements, and then braid it. An excellent way to recycle all sorts of ribbons, assorted chains, etc.

Chains are generally convenient for bracelets - they are strong, do not stretch, can be attached to any clasp, and are easy to decorate. For example, with these colors:

Here's another simple option with chains:

Still simple way - bracelet on pins. This will require several pins and a clasp:

Flowers can also be attached to a piece of fabric, as in this romantic bracelet:

Or like this: 
Which interesting way processing the seam with a chain on a fabric bracelet:

Or even like this:

But here is a simple option for girls or beautiful ones grosgrain ribbon, on an elastic band. Literally one line on a typewriter:

And in this weaving, not beads are used, but nuts:

Another way with nuts:

Another way to make a braided bracelet with beads:

Or like this with small beads:


Slightly different model. If as a child you weaved rings from colored wire, then this skill will be useful for weaving such bracelets from rope, cord, fabric and any dense material:

Or like this from a thick synthetic cord:
I like this version of the clasp for woven bracelets even better. 
Or weave beads in several rows. Like this necklace bracelet. For fastening you can use crimps or squeegees:

Another beaded bracelet:

Another option for the most patient. The bracelet is woven using macrame technique from embroidery threads:

How did we forget about fashionable Shambhala bracelets:

And here are some more simple bracelets. In the style of shamballa bracelets:

Or here’s a simple way to use beautiful connectors. How to make a slip knot is generally a very useful science. This fastening method is perhaps the most convenient for making children's jewelry:

In general, any element with two holes will do. For example, hook-and-loop fastener:

Another simple option for girls using old bijou elements. The elements are simply sewn onto a cord base.

Braiding metal beads. The thought began to pulse - to make beads of this shape from polymer clay):

Recycling option. Thick wire is threaded into the seam cord of old jeans. You can further simplify the process if you use memory wire, for example, here such a thickness of 1mm or even wider .
In general, a wire with memory Goldmine. No fasteners or special tools are needed, just the beads are strung on a wire, the ends are tucked into a ring. for such cases it is better to use wire 0.6 mm thick, since crumbs, pearls and beads usually have holes smaller than 1 mm:

Well, or like this from small pieces of memory wire:

The idea of such a bracelet is that wooden spatulas (or ice cream sticks?) are used for the base. They are soaked in water and dried in a glass.

Beads, stone chips, beads inside a mesh. We also just brought this mesh:

Some ideas are simply fantastic. In a plastic cord (dropper?) pasta painted in different colors is poured))) A very original idea:

And here the cord is glued to the base ring for the bracelet:

A little polymer creativity.
How to make a one-piece bracelet from polymer clay by clicking on the photo:

But I won this bracelet in one game, it will come to me soon. Master class on making a one-piece bracelet by clicking on the photo:

Another original and simple way to create a bracelet. To decorate the ends of the bracelet, you can use not only end caps, but also large caps. We recently brought large limit switches, see this section:

That's all, not today! Have a nice handicraft evening and a sunny mood!!!
When the holiday approaches and the choice of outfit has already been determined, it suddenly turns out that the necessary decoration is missing, some little thing that will add charm to the image and add zest to the overall look. DIY bead bracelets can become such decorations.
Methods and options
The easiest way is to string the beads on a strong thread or fishing line, attach a clasp and you can put them on.
Handicraft stores sell a lot of different accessories. By choosing to your taste, you can make original decorations.

The basis for such a bracelet is a chain with a lock, to which beads strung on pins are attached.
For work you will need wire cutters, round nose pliers and pliers. The beads should be of medium size so that 2 beads can fit on a pin.
It should look something like this:

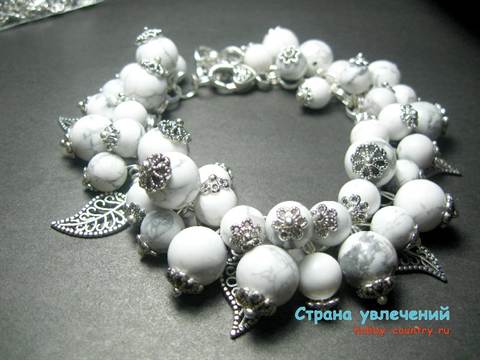
Beads for such a bracelet are selected in two types: medium and faceted. The color of the beads should be in harmony with the color of the beads. Before you start, they can be laid out on the table to select the appropriate play of light and shadow. Having collected the required number of blanks, you can begin assembling the bracelet.
Using tools, pins with medium beads are hung on each link of the chain in a checkerboard pattern. Pins with faceted beads are attached between them. The result is a voluminous bracelet.

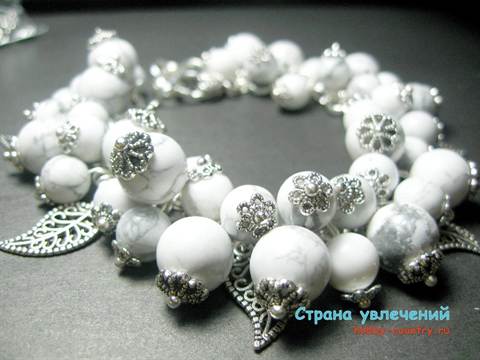
This bracelet is made according to the same principle, only the pins have shaped cups and leaf-shaped pendants are added.
From scattered beads you can make a bracelet like this:

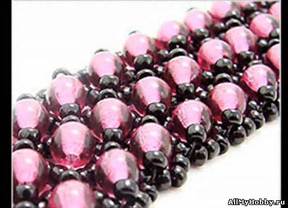
Cords and beads
Original jewelry is made from cord and beads. Even some men wear them. For such bracelets, large beads with large holes are selected.
You can see a master class on making a bracelet below.
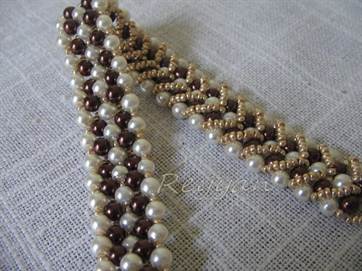
This bracelet is made of thick cotton cord and two types of 8 mm beads.
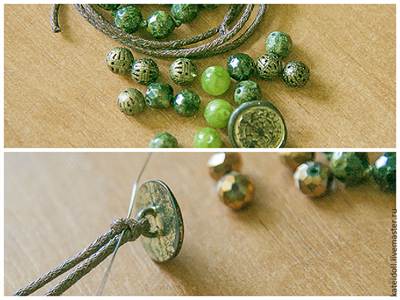
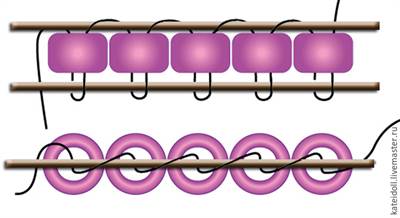
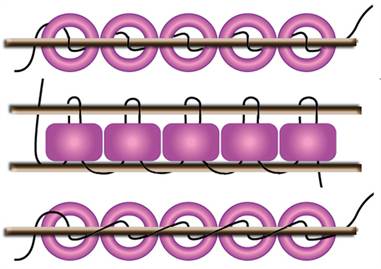
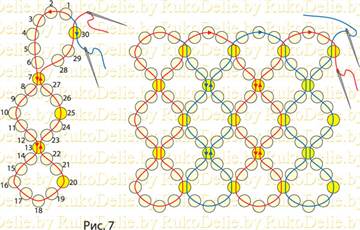
The beads are attached to the cord according to the following scheme:
A decorative button is used as a fastener.

The bracelet will be smoother and stronger if you stitch it a second time.
The beads are attached to the cord with monofilament.
Using this pattern, you can weave a wide variety of bracelets.


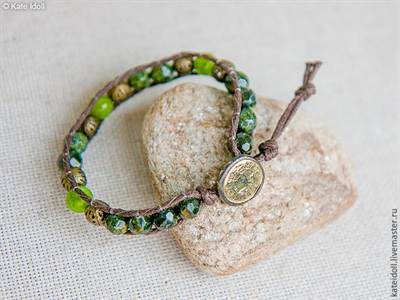
Another example of weaving a bracelet from cord and beads:

Everything is simple here: an ordinary braid is woven from a cord - a spikelet, and beads are woven into it.
Colored beads
There are endless possibilities for creating unique masterpieces!


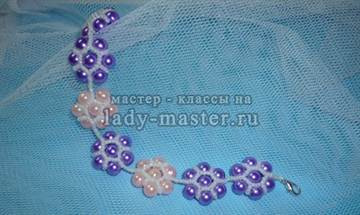

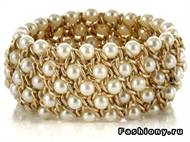
All these bracelets are woven according to the same pattern.

The same diagram is shown here.
Weaving is carried out using two needles, the thread is taken with a large margin, because beading does not like knots.
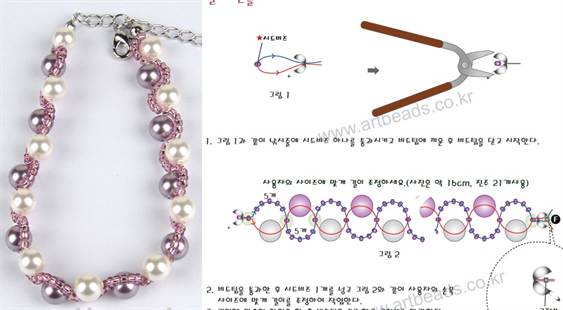
The second way to weave beaded bracelets is through mesh. It weaves quite simply.

By weaving beads into a mesh, you can create beautiful jewelry.
A master class on beadwork for beginners can be seen in the video at the end of the article, but now read its brief description.
To make such a bracelet, you will need Czech beads and 3-4 mm beads.
The thread should be at least 70 cm. The thread is threaded into a bead needle and the carabiner is first attached, leaving about a 15 cm tip.


A bead, 15 beads, a bead, 15 beads, and so on until the desired length of the bracelet are strung onto the thread.
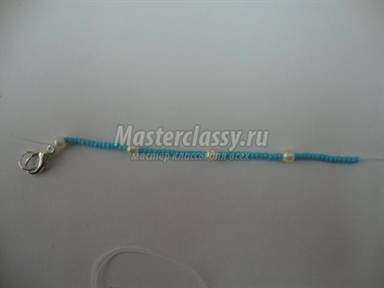
A ring for a carabiner is attached to the end of the thread.

15 beads are collected, and the needle goes in the reverse order.

In this way, as many rows as needed are collected. This product contains 5 rows.

The thread is secured in the same way as when sewing, but for strength, at least 3 knots are made, each through several beads.

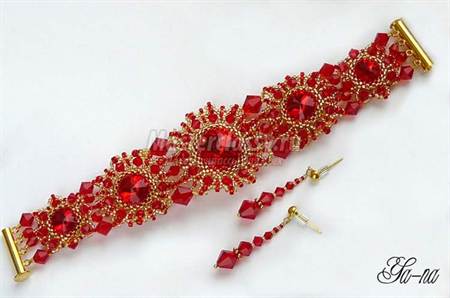
Delicate lace
Other materials are also used to create bracelets. They can be made from ribbons and beads, as in the photo.


