Leather bracelets are universal accessories that have been in fashion for several seasons and remain popular. Women's baubles can be woven or flat, because the preferences of girls are different. But many agree that handmade products are interesting and look much more original than those sold in stores.
They come in different colors, sizes and shapes, you can use a wide variety of weaving patterns and a huge selection of methods for weaving leather products.
Such products can look both elegant and extravagant. It depends on the weaving method. How to learn to weave leather bracelets? First you need to purchase small pieces of leather and cut them into strips. There are many weaving patterns, but it is better to start with the simplest ones.
Bracelet "braid"
This is one of the simplest and most elegant solutions for a leather bracelet.
Weaving products can be done in several directions.
- Wrap a long leather strap around your wrist and add 2 centimeters to this length, this should be enough length. The width of these strips may vary. You can try weaving from narrow strips 1.5 to 3 centimeters wide;
- Using a hole punch, make holes at the ends of the strips;
- You can attach a metal button to the holes or thread laces through them. These are standard ways to secure the ends of products;
- This blank can also be decorated with rivets or patterned holes;
- Then, you should weave a traditional braid of three stripes.
You can weave a slightly unusual braid using another method
- Using a ruler, a wide leather ribbon should be divided into three equal-width parts and cut evenly along, but not all the way to the end. The ends can be decorated with decorative buttons;
- As a result, you will get three stripes from which you need to weave a braid: No. 1 - on the left, No. 2 - in the middle, No. 3 - on the right;
- You can start weaving. One edge of the bracelet must be threaded between strips No. 2 and 3 and lowered down. As a result, the stripes will be twisted;

- Then you need to pass the edge of the bracelet between strips No. 1 and 2 and lower it down;
- We repeat the previous steps one by one until the bracelet is ready;
- The last step should be to straighten the bracelet.
Different types of leather behave differently depending on its softness, finish and thickness. Some bracelets will turn out tight, some will be looser, it all depends on the technique and quality of weaving, as well as on the skin and its plasticity.
If you have mastered one version of leather weaving, you can continue to learn how to weave bracelets using various techniques.
Bauble with embroidery

You can add a leather ribbon decorated with appliqués, colored threads or interesting studs to a thin woven bracelet.
This can be a strap about 3-4 cm wide. You can buy special leather for baubles, or take an old belt, bag or the top of a soft old shoe.
The leather can be black, it will contrast beautifully with bright embroidery, brown skin also looks beautiful and stylish.
You should also stock up on metal decorations, such as heart-shaped ones, which can be purchased at any craft or scrapbooking store.
You can embroider with thick stitches of bright thread or decorate the product decorative elements. Such a product can be fastened with an ordinary button.
How to weave a leather bauble
You will need:
- narrow strips of leather or leatherette of any color;
- thick cord or wire;
- lighter;
- large lock with hook;
- scissors;
- Super glue.
How to weave a bauble:
- Cut a piece of wire or cord 15 cm long;

- Singe the ends of the lace using a lighter or other fire;
- Make a loop;
- Using glue, you need to attach the loop to the surface on which you will weave the bracelet;
- Insert the leather cord under the wire;
- Braid the wire like a double flat knot used in the macrame technique;
- Repeat until you have tied the entire cord. Knots can be placed on only one side or on both;
- Cut off excess cord;
- Glue the padlock at the end, hiding the ends of the wire and both ends of the leather strip underneath.
It’s not at all difficult to learn how to weave various leather accessories. These items are probably not suitable for a business lunch or a trip to the theater, but in other cases, they can be actively used as an interesting accessory.
They will look especially good with clothes in country, casual or ethnic style.
Girls, summer is coming and wouldn’t it be time to take care of updating your jewelry box? I suggest starting today with a couple DIY leather bracelets– they are made easily and simply. Interested? Then let's gut out mom's old ones leather jackets and daddy's belts. The only request is not to succumb to nostalgia for parental upbringing and cut your father’s straps into thin strips. Go.
Option one.

This is a bracelet bracelet. Delicate, beautiful, thin. He’s been asking for a pair for his hand, so I advise you to weave several pieces at once. To make it, you can buy a leather blank, or you can make it yourself: Cut a wide strip of leather along two lines, and use an awl to attach buttons to the ends.

Now is the time to start weaving. Thread the lower end of the bracelet alternately with three threads and straighten the twisted strips so that the bracelet is flat.

Each of the braided bracelets differs only in the thickness of the braids. Don't worry if you don't succeed in weaving the bracelet the first time. Train and become a pro.
Option two.

This bracelet is made in pastel lavender colors. It is gentle and thin. Perfectly suited for spring and summer outfits.

We will need:
- white, light green and lavender thread (about 40 cm each)
- strip of white leather (40 cm)
- silver chains about 20 cm
- silver plug with clasp
- scissors and glue
Step 1: Cut the thread into nine pieces of about 20 cm, two for each color (green, lavender, white and white skin) and a silver chain. Place them in groups of three, as in the photo. Fasten the edges of the ribbons.
Step 2: Start weaving. To achieve an even pattern, make sure that the different colored threads remain in the middle of each strand.
Step 3: When you get to the end, secure before cutting off the ends. Glue the ends of the bracelet and clasp together.
Step 4: If the bracelet is too short, extend it with a chain.
That's it - your bracelet is ready!
Option three.
For this bracelet you will need some skill with a sewing machine, but the result is worth it. In our version it is white and pink DIY leather bracelet, but you can change the colors and choose a different composition.
So, get ready to work:
- scissors, knife;
- a piece of white leather measuring 3x25 cm;
- thick pink fabric;
- hooks;
- ruler;
- sewing machine.

Cut the leather into nine strips 0.33 cm wide. Divide the strips into three parts: three strips each and braid.
Fold the pink fabric as shown in the picture and sew it to the skin. Secure the hooks. That's it, the bracelet is ready - it's time to show it to your friends.
Option four.
This bracelet is radically different from the three previous ones in that it is not woven using braids. Measure your hand and calculate the length of the leather strips (you will need two). In addition to them, stock up on coarse thread and follow the instructions indicated in the figure. Good luck.
Option five.
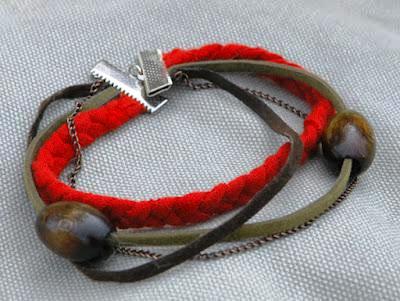
This cute bracelet contains a lot of elements: a braided braid, stones, and even chains. I recommend preparing thoroughly.

Materials:
- knitted fabric
- thread, needles, pins
- scissors
- ruler or tape measure
- leather cord
- thin metal chain
- 2 wooden beads
- 2 fasteners
- jewelry pliers


Following the instructions in the photo, you will succeed beautiful bracelet. Don't forget to measure your wrist at the widest point - at the thumb to know the exact length of your bracelet.

Jewelry and accessories made of leather always look very interesting. You can choose the right product for any style of clothing. and with your own hands from the remnants of leather from old unnecessary things. For example, weaving a leather bracelet will take only half an hour, and you do not need to have any special skills or tools.
For such a stylish decoration leather will do any make and color: a simple bracelet in the form of a braid will look great both from rough thick leather and from thin, well-crafted leather.
To make a leather bracelet you will need:
DIY leather bracelet in the form of a pigtail: master class
On the wrong side of the leather cut, use a pen and ruler to draw a “pattern” for the bracelet. The length of the bracelet bracelet must be at least 19 cm. You need to make two slits along the middle (not reaching the edge) to get three cords. The width of the cords is 3-6 mm (the thinner the leather, the narrower the cords should be), respectively, if the width of the cords is chosen to be 4 mm, then the width of the bracelet will be 1.2 cm. The length of the slots themselves is 16 cm.

Use sharp thin scissors to cut out the workpiece.

You can start weaving. It is more convenient to place the workpiece vertically, mentally number the cords from left to right 1, 2, 3.
Weaving consists of repeated four steps.
Step 1. Unscrew the bottom of the bracelet between cords 2 and 3.

This is what “abracadabra” should look like at first glance.

Step 2. Carefully straighten the cords to create a weave: 1st to 2nd, 3rd to 1st, 2nd to 3rd.

Step 3. Turn the bottom of the workpiece from front to back between cords number 3 and 2.

Step 4. Distribute the weaving carefully upwards, the result should be the original arrangement of cords 1, 2, 3.

Repeat steps one through four. Typically, repeating the steps twice is enough for the bracelet to be long enough to create a neat, finished braid. Using your hands, straighten all the cords evenly.


Use scissors to round the edges of the workpiece, and use an awl to make holes for fastening on each side of the leather bracelet.

For the lock connection you need a thin cord made of leather: cut a strip of leather with scissors about 20 cm long, about 3-4 mm wide.

Now, for the lock-connection, you need to glue the workpiece from several small pieces of leather (size no more than 1.5 × 1.5 cm). In general, it is better to do this procedure in advance (a day before), because it takes about 24 hours for strong bonding.

When the stack of leather pieces is glued together, trim the edges in a circle; for a neater look, you can sand the edges. Make a hole in the middle using an awl (you can pre-heat it).

Thread the prepared thin cord into the holes on the edges of the bracelet (from the inside to the front). This is where tweezers with sharp and thin edges will help very well, because you need to thread the cord so as not to widen the holes too much, otherwise the fastening will not be tight.

Then thread the ends into the prepared circle of leather, measure the required length of the cord, cut it and tie knots at the ends.

Your DIY leather bracelet in the shape of a braid is ready.
A leather bracelet will look even more interesting if you weave it so long that it goes around your wrist several times.
The option is more complicated - make the bracelet wider, for example, by 9 cords, but weave it in the same way, dividing the cords into three groups.


How to make leather weaving? How to learn quickly? How to become a master and give beauty to yourself and your loved ones? We'll talk about this in the article. Fashion does not stand still. Very often, in magazines and fashion shows, skin dominates. Earlier Leather Products were reflected in clothing, but recently leather accessories have been gaining popularity. Let's look at the basics of working with the material.
Handicraft progress
The history of working with leather is quite interesting. Processing began from the Stone Age, when clothing made from skins, belts, belts and bags gradually appeared.
Weaving is a type of leather processing where craftsmen combine several techniques to create a product. Often in jewelry practice there are woven macrame elements made from lace.
What can you create from? It's easy to use up unwanted leather items. For example, gloves, briefcases, etc. But do not forget about the quality of the material. Pay special attention to thickness, elasticity and color. It will be more difficult to work if the product has a drawing or some kind of ornament.
But the masters advise not to remake the old into the new. Better to spend money on new skin so that the accessory can be worn longer and be attractive. Each item has its own expiration date, so often unnecessary things can ruin the whole job. Leather is sold in specialized stores. I'm glad that there are many colors and product options.
For beauty
It’s easy to make bracelets with your own hands, which are becoming more and more popular. Such products look elegant and beautiful. It all depends on the weave. You need to purchase pieces of leather that will become the base and cut them into strips. Manufacturing requires few materials and a lot of attention.
So, let's begin. Let's consider several weaving options that are suitable even for men. The first option is a bracelet bracelet.

It is thin, delicate and looks beautiful on the hand. This accessory is multifunctional because it can be worn at any time of the year.
We will need a leather blank. If there is no such thing, then cut a wide strip of leather and put buttons at the ends, as the diagram shows.
Depending on the fittings, the style of decoration changes.

The second option is “Women's secrets”. The accessory is suitable for bright summer outfits. You can choose the color yourself, depending on your ideas. The technique is simple, even a child can handle it.
Take three colors of thread, a strip of leather, some chains, a plug with a clasp, scissors and glue.
- Cut the thread into 9 parts (20 cm, two pieces each). We lay them out in threes, having previously secured the edges.
- Let's start weaving. Watch every movement so that the product is smooth and beautiful.
- Finally, pay attention to the clasp. Secure the bracelet before trimming the ends. Apply glue to the ends of the bracelet and clasp. The accessory is ready!
To make sure it works correctly, look at the photo:

The third option is an unusual braid.
- To get a wicker product, we take three identical leather ribbons.
- Remember the numbering of the stripes: 1-left, 2-middle, 3-right.
- Let's start weaving. We pass the edge of the product through No. 2 and No. 3, and lower it down. The stripes are twisted.
- We pass the edge between No. 1 and 2, lowering it down.
- We repeat the previous movements until the end of work on the product. Straighten it.
Craftsmen divide types of bracelets into categories. They vary in design.
- Thin and thick accessories:

- Accessory with buttons, fasteners:

- With patterns or rhinestones:

- With a few turns around the wrist:

In addition to regular weaving, there is circular weaving. In addition to thin leather, you will need a rope. It is this that the cords braid.
Progress:
- Take four birch cords about 2 cm. We prepare a rope of the same length. Pay attention to the diameter - from 3 to 5 mm.
- Using glue (preferably “Moment”) we connect the ends in a circle (15-20 mm in length). Secure the gluing area with thread.

- We divide the cords into two parts. Remember the left and right parts by mentally numbering them. We take the left ones in the left hand, and the right ones in the right hand.
- Let's use the diagram.
- When the length is about 130-140 mm, we secure the end with thread.
- Lubricate the unbraided ends with glue. Leave to dry.
- Flatten the ends of the tubes. Make a place for the fixer, install.
Here is the result, which looks like a whip:

Leather bracelets not eternal, because they are made of delicate material. You don’t always find high-quality products in stores, so when purchasing, check its strength and the presence of excess threads. Of course, the leather belt also needs to be checked. Often they can become worn, worn out and lose their shape. It is dangerous to buy products in online stores; there is no way to check the quality and verify the authenticity of the brand. Try making your own accessory. It's easy to enjoy the work. But it’s even nicer to wear something you made yourself.
Video on the topic of the article
The creation of wicker leather products, an art that came to us from ancient times, at first glance seems incredibly complex and incomprehensible. However, this is not at all true, because there are many types of weaving, and they all differ in complexity of execution. For items such as belts and bracelets, the most common leather weaving methods are braid, circle braid, and single puzzle. Today we will tell you how to make accessories woven from leather material with your own hands. If you decide to make something out of leather yourself, then you will definitely need the lessons on how to weave leather presented below.
Jewelry made from leather or leatherette is suitable for both men and women.
Circular braid method
Any four-cord weaving technique, including this one, causes the skin to shrink. For this reason, it is better to cut the laces slightly longer than necessary. As for thickness, it is recommended to use a thin cord for circular weaving, because the product will be more voluminous.

Cut four cords and tie their ends together. For convenience, let's denote them as A, B, C and D, starting from the left and ending on the right. Secure the workpiece on a paper holder, or by gluing it to the table with tape.
To avoid confusion, for the first time it is better to weave from multi-colored laces, or mark each one by tying a colored thread to it.
Weaving a voluminous bracelet
Start with lace D. Bring it to the left over B and C, so that the order changes to A, D, B, C. Then move B to the left, behind D, to make A, B, D, C. Throw the A-cord over to the right through B and D, then intertwine with cord D. If done correctly, ends D and A will be in the center, B will be on the left, and C on the right.
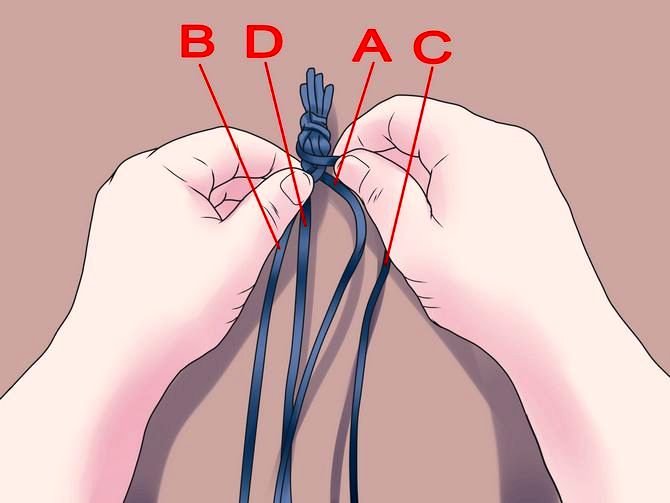
Take B and A in your left hand, and D and C in your right. Pull them in different sides to tighten the weave. Pass cord C over D and A, then move A to the left through C. Move cord B to the right through A and C, and C, in turn, through B. Tighten the weave again, spreading the pairs of laces apart.
Repeat all steps several times until you obtain the desired length of the product. When finishing the work, tie the ends of the laces. To connect braided strands into a bracelet, special fittings, for example, an end clamp or ready-made clasps, are ideal.
Single Puzzle Method
Cut a long strip of leather and cut longitudinal stripes into it. The ends should remain intact. You will end up with a strip of leather cut into three cords.
Secure one end of the strip to your work area. Pull the lower end towards you, and then pass it between the 2nd and 3rd stripes - this will make weaving easier. On top of the braid, place the first cord on the second, and then thread it between the second and third. Throw cord 3 through the first, the second through the third. Finally, pull the end of the braid towards you again and pass it between laces 2 and 3.

Repeat these steps, following the pattern, until you finish weaving. At the end, make a loop again by threading a strip between the cords.
To make women's bracelets, add various beads, rhinestones and other details to the weaving.
Weaving a leather whip
To weave a whip yourself, you first have to cut the leather to make the first knee (the one below). It is better to weave it from thin strips 5-7 mm wide. The knee may consist of 5 or more stripes. It is advisable to use long and straight stripes.
Before you start cutting, mark a piece of rawhide, marking a strip equal in width to all the strips, and step back 5-10 mm from the end for fastening.

The lower knee is woven like this: spread the strips to the sides and weave them alternately, weaving the strips on the right and then on the left. Make sure the pattern is symmetrical. The knee should gradually thicken. To do this, add a liner of rawhide or similar material to the middle of the weaving. About 5 cm before the end, stop increasing the weaving diameter and weave another 8 cm without the liner.
The next parts of the whip should be thicker than the previous one. To do this, either increase the volume of the liner, or the width or number of stripes. The whip is made from an ordinary stick. You can cut out various patterns on it, or leave the surface flat - as your imagination tells you.
Braided strap
Using various techniques weaving, you can make a variety leather accessories, including the belt. Prepare 3 laces made of leather, leatherette or suede, each approximately 5 meters long. A round steel ring is suitable as a buckle. You will also need superglue.
Fold the laces in half to form a loop - this is needed to secure the buckle. The outermost cord on the right will be the basis of the weave.
 Tie a knot by pulling the cord as shown in the photo. Tighten the ends well. Weave the remaining knots in the same way.
Next, twist the main cord to create a wavy pattern. Continue tying knots, now from right to left. Weave as many as you need. If the cord is too short, lengthen it using glue.
Finding a clasp for a necklace on a thin leather cord can be difficult. Clasps are not suitable for beads, nor are they suitable for chains. You have to either look for specialized stores or tie the ends of the cord into a knot. In the latter case, both the necklace, which loses its grace, and your neck, which is chafed by the hard knot, suffer. We offer you an original solution to this problem, the only drawback of which is the non-detachable cord. So, you need to take care of its sufficient length in advance.
Materials and tools:
A tube bead with a hole of a suitable size,
Stapler with staple,
Operating procedure
1. Untie the knot.
2. String a bead onto one end of the cord.

3. Coat the cut ends of the cord with superglue and glue them together. But such gluing, of course, will not hold - the surface area of the cuts is too small. The cord will come apart under the weight of the pendant or pendant.

That's why...
4. Using a stapler, we carefully chop off the already glued ends, firmly connecting them with a staple.


5. For greater strength of the connection and so that the bead fits tightly into the gluing area, coat it with glue and wrap it with a piece of cotton wool.

We saturate it with glue and quickly insert the bead, hiding the gluing area.
Usually the cross is put on after the sacrament of baptism. You can wear it on a chain or a special ribbon. The cross is considered not only a symbol of Christianity, it is also a talisman. Worn under clothing, but wearing it on top is not prohibited. Can be combined with samples or other decorations. However, the cross must be worn on a separate string (chain). When putting it on a rope, the question often arises as to how to tie the knot.
Knots for tying a cross rope
There is no specific technology for tying knots (their number, shape, size). It is worth using the method that is convenient, easy to implement, reliable and durable. There are many types of such nodes.
One of the most simple ways, are the following nodes:
Straight
Mother-in-law
You can use slightly more complicated options:
Surgical
|
Step 1. The edges of the cord are overlapped. |
Step 2. Turn around again. |
|
Step 3. The ends are brought out from above the twist and crossed. |
Step 4. Pulling the ends tightens the knot. |


Flat
|
Step 1. A loop is made on one side. The second part is superimposed on it. |
|
|
Step 3. Drawing from above itself, it comes out of the loop from below. |
Step 4. By pulling both ends, the knot is tightened. |


The ends of the knots can be processed using a lighter (burned) to ensure the reliability of the bundle.
Types of cords for a cross
Laces (another name for gaitana) used for wearing a cross are divided according to materials of manufacture into the following types:
- Leather;
- Rubber;
- Silicone;
- Silk;
- Textile.

Gaitana made of leather.
Leather gaitans are durable. They are elastic and treated with special solutions that repel moisture. There are models on sale with inserts and clasps made of precious metals (gold, silver). For massive crosses, thick braided laces are suitable. More elegant products look good on thin leather ropes. This natural material Suitable for everyday wear, complementing any look.
Cords made of rubber and silicone are also not afraid of moisture, have flexibility, softness and at the same time good strength. Silicone cords, unlike rubber cords, have a glossy appearance. It lasts throughout the entire wear time.

Silk braid for the cross.
Silk laces and ribbons made of cotton fabric can be bought directly in the church, during baptism. They can have a variety of colors, wash well and have a delicate texture. These gaitans are ideal for children. They do not irritate the baby's skin and are easily cleaned of dirt while bathing the child.
When tying such ropes to a child, you should be too long length. The lace should not get tangled, cling, be comfortable during movements and not choke the child (easily removed if necessary, without untying the knot). The knot should be made small so as not to irritate (rub) the baby’s skin.
How to weave a rope for a cross
You can weave a rope (lace) for a cross with your own hands, with a little patience and perseverance, using several simple methods.
The first way to make two-color weaving.

This round cord is made of four threads:

- Threads of different colors are taken and secured.
- Dark colors are located at the bottom and top, light colors are in the middle.
- Dark threads intertwine with light ones, constantly being above and below them.
The second is a spiral two-color ribbon. In this version, the threads are knitted alternately with a regular knot (dark in light and vice versa).

Another simple way:

- Fasten one end of the thread motionless.
- The other is to start twisting.
- Fold the resulting lace in half (it will twist itself).
- Straighten the creases, tie the ends with knots.
You will get a simple, twisted rope for a cross.
The creation of wicker leather products, an art that came to us from ancient times, at first glance seems incredibly complex and incomprehensible. However, this is not at all true, because there are many types of weaving, and they all differ in complexity of execution. For items such as belts and bracelets, the most common leather weaving methods are braid, circle braid, and single puzzle. Today we will tell you how to make accessories woven from leather material with your own hands. If you decide to make something out of leather yourself, then you will definitely need the lessons on how to weave leather presented below.
Jewelry made from leather or leatherette is suitable for both men and women.
Learning to weave from genuine leather: the circular braiding method
Any four-cord weaving technique, including this one, causes the skin to shrink. For this reason, it is better to cut the laces slightly longer than necessary. As for thickness, it is recommended to use a thin cord for circular weaving, because the product will be more voluminous.

Cut four cords and tie their ends together. For convenience, let's denote them as A, B, C and D, starting from the left and ending on the right. Secure the workpiece on a paper holder, or by gluing it to the table with tape.
To avoid confusion, for the first time it is better to weave from multi-colored laces, or mark each one by tying a colored thread to it.
Making a voluminous bracelet with your own hands
Start with lace D. Bring it to the left over B and C, so that the order changes to A, D, B, C. Then move B to the left, behind D, to make A, B, D, C. Throw the A-cord over to the right through B and D, then intertwine with cord D. If done correctly, ends D and A will be in the center, B will be on the left, and C will be on the right.

Take B and A in your left hand, and D and C in your right. Pull them in different directions to tighten the weave. Pass cord C over D and A, then move A to the left through C. Move cord B to the right through A and C, and C, in turn, through B. Tighten the weave again, spreading the pairs of laces apart.
Repeat all steps several times until you obtain the desired length of the product. When finishing the work, tie the ends of the laces. To connect braided strands into a bracelet, special fittings, for example, an end clamp or ready-made clasps, are ideal.
We analyze a simple step-by-step method of a single puzzle
Cut a long strip of leather and cut longitudinal stripes into it. The ends should remain intact. You will end up with a strip of leather cut into three cords.
Secure one end of the strip to your work area. Pull the lower end towards you, and then pass it between the 2nd and 3rd stripes - this will make weaving easier. On top of the braid, place the first cord on the second, and then thread it between the second and third. Throw cord 3 through the first, the second through the third. Finally, pull the end of the braid towards you again and pass it between laces 2 and 3.

Repeat these steps, following the pattern, until you finish weaving. At the end, make a loop again by threading a strip between the cords.
To make women's bracelets, add various beads, rhinestones and other details to the weaving.
We are engaged in weaving a leather whip in a simple MK
To weave a whip yourself, you first have to cut the leather to make the first knee (the one below). It is better to weave it from thin strips 5-7 mm wide. The knee may consist of 5 or more stripes. It is advisable to use long and straight stripes.
Before you start cutting, mark a piece of rawhide, marking a strip equal in width to all the strips, and step back 5-10 mm from the end for fastening.

The lower knee is woven like this: spread the strips to the sides and weave them alternately, weaving the strips on the right and then on the left. Make sure the pattern is symmetrical. The knee should gradually thicken. To do this, add a liner of rawhide or similar material to the middle of the weaving. About 5 cm before the end, stop increasing the weaving diameter and weave another 8 cm without the liner.
The next parts of the whip should be thicker than the previous one. To do this, either increase the volume of the liner, or the width or number of stripes. The whip is made from an ordinary stick. You can cut out various patterns on it, or leave the surface flat - as your imagination tells you.
We make a braided strap from genuine or eco-leather
Using various weaving techniques, you can make a variety of leather accessories, including a belt. Prepare 3 laces made of leather, leatherette or suede, each approximately 5 meters long. A round steel ring is suitable as a buckle. You will also need superglue.
Fold the laces in half to form a loop - this is needed to secure the buckle. The outermost cord on the right will be the basis of the weave.
 Tie a knot by pulling the cord as shown in the photo. Tighten the ends well. Weave the remaining knots in the same way.
Next, twist the main cord to create a wavy pattern. Continue tying knots, now from right to left. Weave as many as you need. If the cord is too short, lengthen it using glue.
Video on the topic of the article
Nowadays, it is becoming increasingly popular to decorate your hands with bracelets and your body with belts and sashes. self made. The most common in this regard are leather products. Do-it-yourself leather weaving seems to many to be an incomprehensible art, and products made using this technique attract with their elegance and unusual appearance. This type of needlework has its roots in ancient times, and few people risk competing in skill with the masters of this craft. In fact, everything is much simpler than many people think, and following one of the master classes below, you can make leather baubles with your own hands without turning to a master.
Preparing for work
Any creative process starts with preparation.
Measurements
In order to make a product, you need to know its exact length, for this:
- Take a tight thread or lace so that it does not stretch, wrap it around the place where the product will be located.
- Add a small allowance - for a bracelet it is approximately 1 cm.
- Unfold the rope on a ruler and mark the length of the product.
Important! If it is a belt, add the necessary allowance for hanging ends, if any.
Preparing materials
The first and most important step in this art is the preparation of the material. In order for the result of your work to exceed all expectations, you need to carefully process the materials. Here are step-by-step instructions for this:
- The first step is to choose the thing that you want to use as material for your creativity. This product must be from genuine leather, otherwise you will not achieve the desired result.
- Check the leather for fragility. To do this, apply a little effort and look. If the material tears or cracks, it is not suitable for your job.
- Now open the item at the seams and set aside heavily frayed and damaged areas.
- Next, wash the fragments that you received in washing powder at a temperature not exceeding 35 degrees. Rinse and wrap in a dry piece natural fabric to remove moisture.
- Stretch the leather onto the board using small nails and a hammer.
Important! Make sure that the material is pulled equally in all directions.
- Also, have with you all the decorative elements and the lock that you will need for work.
After completing all these steps and allowing your workpieces to dry completely, you can begin to work. There are many instructions and options on how to make leather jewelry. You will see the most elegant and common ones in our article.
Single puzzle
Do-it-yourself leather weaving is very exciting activity, because you can weave a variety of patterns. One of these is a product with the intriguing name “single puzzle”. Let's consider step by step instructions for weaving.
Step 1
To make the product look neat, take a strip of leather about 3 cm wide. Determine the length as the measured length of the adjacent part of the product plus another 1.5 lengths.
Important! As weaving progresses, the leather will shrink, so adding length will not be unnecessary. But don't overdo it, because too much allowance will only harm the work.
Step 2
Now take the prepared strip and make two parallel cuts along its length, dividing it into 3 even strips. At the same time, the edges of the strip should remain intact, approximately 1.5-2 cm long.
Important! Make sure both cuts are equidistant from the edges and from each other.
Number these cords in your mind from left to right: 1, 2, 3.

Step 3:
- Fix one end of the workpiece on the work surface. You can use a thin nail for this.
- Now let's get to work. Pull the workpiece by the lower end and pass it from top to bottom between strips number 2 and 3.
- Bring the tip back to its original position.
Important! Do not look at the fact that the cords are twisted, this will simplify the weaving process.
Step 4
Now that all the preparatory processes have been completed, follow the algorithm:
- In the upper part of your braid, place 1 cord on top of 2 and then pull it between 2 and 3. As a result, it should fit under cord number 3. Such manipulations are reminiscent of weaving a regular braid.
- Next, throw cord 3 over 1, then throw the second one over top 3.
- Now you have some distance between the second and 3rd cord. Pull the tip of your product towards you, then stretch it between cords 2 and 3. The first stage of production is ready.
- Repeat all over again before this step to obtain the required density of the braid on the product.
Important! Don't forget to thread a loop between cords 2 and 3 at the end of the weave.
Circular Braid
Another interesting do-it-yourself leather weaving is called “circular braiding”. To perform this technique, follow the instructions:
- Cut 4 equal cords about 1.5 times the intended length. This technique also shrinks the skin. The thickness of the cords is recommended 5-7 mm.
- Tie the ends of the cords on one side with thread.
- Let's denote them A, B, C, D from left to right.
- Fix the product as in the first method.
- Place cord D over B and C.
- Now we place B on top of D in the same way.
- Now draw A over B and D to the right. At this point, the order of the cords is B, D, A, C.
- Weave D over A to the right.
- Next we place cord C over D and A to the left.
- Now we weave A over C.
- We lead B to the right through A and C.
- Finally, draw C over B to the right. We get the original order. This completes the first weaving cycle.
- Repeat steps 5-12 until the end of the cords.
- After the braiding manipulations are completed, tie the ends of the cords and decorate them with fasteners at your discretion.
The bright bracelet or harness is ready!
Maiden braid
This type of product is distinguished by its ease of manufacture. In order to make a simple accessory, you will need to follow these instructions:
- Cut 3 cords of the same width.
Important! Length doesn't really matter here, but the longer the better. For a bracelet, the optimal number is 20 cm.
- Tie these strips at one end and secure them to the work surface.
- Now braid a regular braid, which you braided on your hair more than once in childhood.
- After finishing the weaving, tie the ends together.
Important! If the product is large in length, do not be afraid to secure it at the desired length mark and trim off the excess.
More braids
There are many different braids that can be transferred to bracelets. DIY leather braiding involves making braids with 3, 4, 5, 6, 7 and even 8 cords, all of which look beautiful, natural and elegant. Let's give a few more unusual ways weaving braids from leather.
Method 1
This manufacturing method also uses 3 cords of the same length, preparation for work is the same as for “ girl's braid" But the weaving method itself is slightly different from that described above. Follow the instructions:
- Cross the left strand with the middle and right strands over the last two.
- Now stretch the former middle strand under the right one, then throw it over the former left one.
- Repeat the steps until you finish braiding - you will get a very unusual leather braid.
Secure the bottom of the product and you're done!
Method 2
Your product will take on a very unusual look if you use this method of weaving leather with your own hands. For such a product, you need to take 5 strips of material and fasten them parallel to each other on the working surface. For the convenience of describing the operating algorithm, we number them with numbers from 1 to 5 from left to right.
Let's get started:
- We pull cord 1 over 2 and under 3 cords, after which we pull 5 over 4 to the right and under 3 and 1 at the place where they cross.
- Next, we pull the 4th strip under 1 and over 3. At this stage, the numbering looks like this: 2, 5, 4, 3, 1.
- We perform similar actions with strip number 2. We stretch it under 5 over 4 and 3.
Important! It is worth noting that in this braid the middle braid does not budge, but the rest entangle it.
- Now we take the rightmost stripe - it is number 1, we put it above 2nd stripe under 3.
- We perform a similar action with the 5th cord. We stretch it over 4 and 1 strip under 3. As a result, the order of stripes is as follows: 4, 1, 3, 5, 2.
- Now we draw the 2nd cord under 5 over 3, and 4 under 1 over 2 and 3.
- At this step, our first stage ends, all stripes have returned to their original positions. Next, you need to repeat steps 1-6 until the length of the product ends.
- When the work is completed, process the edges of the product.

Method 3
In this method we will talk about how to make leather weaving with your own hands using 7 threads of leather. As usual, we describe the algorithm using thread numbering from left to right:
- Place the first strip over 2 under 3 and 4 from left to right.
- Next we draw the 7th cord over 6 under 5 and 1.
- Now we carry out 2 in the same way as 1. We intertwine it over 3 under 4 and 7.
- We intertwine the sixth one over 5 under 1 and 2.
- Actions are repeated similarly throughout the entire work.
- At the end of the work, the edges of the product are secured.
Important! The appearance of such a braid is very unusual, because it comes out double.
Leather baubles
In addition to original braids and other braids, there are also DIY leather baubles. We'll talk about how to weave one like this below.
For such an unusual bracelet, we will need 2 pieces of leather of different colors, preferably not very hard. We make 2 ribbons of them, 7 mm wide and 50-60 cm long. We tie these 2 ribbons together, fix them on the work surface and begin weaving the product:
- We take the tape that is located below, fold it into a small loop immediately after the place where the tapes are tied together.
- Now we carefully wrap this loop with the second ribbon.
- We fold the loop from the ribbon that was on top, and thread the lower one, also folded into a loop, into it.
- We alternate these steps until the required length of the bauble is obtained.
Processing the edges of the product
Weaving leather with your own hands requires not only the ability to beautifully mix up strips of leather, but also the ability to correctly complete the work. And the final stage of any product will be its fastening.
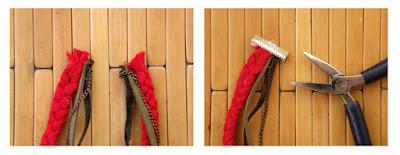
The most common method for finishing the edges of a product is metal clips. They can be purchased at any sewing store, they come in a wide variety of shapes - from flat to round, and they cost pennies.
Important! This type of processing not only looks neat, but also gives the product a more expensive, presentable look.
In order to attach a similar option to the material, you don’t need a lot of skill:
- You will need pliers and precision.
- In order to secure the clip to the product, you need to carefully insert the edges of the product into the middle of the clip.
- Afterwards, squeeze it well with pliers.
Important! Fasteners can be very diverse - from carabiners to magnets and ordinary fasteners, which we have long been accustomed to. Also interesting option will use a decorative cord inserted inside the clamp rings and a tightening bracelet around the arm.


