A universal selection of gift ideas for any occasion and occasion. Surprise your friends and loved ones! ;)
DIY paper flowers: simple and clever
There will be a lot of master classes, get ready. Good news for all rose lovers: there will be as many as 4 of them.
Aster
Guys, honestly, I'm not very good at naming colors. So if you see a discrepancy that is obvious to you, write in the comments.
So, first in line is the aster. For it, cut out five circles: two large, two medium and one very small. Fold each circle in half three times, then decorate the edge as in the 4th photo. After unfolding the structure, squeeze each petal to give it volume. Stack all the circles and decorate the middle.
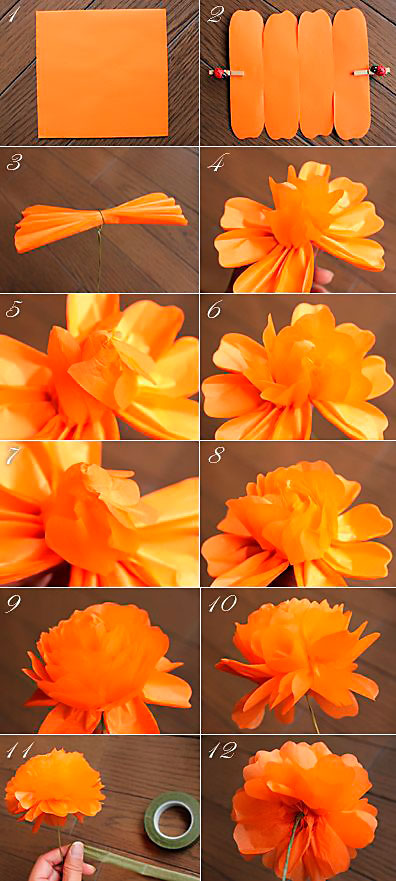
Almost calendula
This flower looks much more like a packaging bow. Prepare a square of paper of the required length for it and cut the edges according to step 2. You will need several such blanks. Place them one on top of the other and squeeze them in the center, tightening them with wire or thread.
Now the most important thing is to straighten the petals so that you get a beautiful resemblance to a flower. Accordingly, the more layers, the more petals and the more magnificent the flower in the end.
Tip: make several of these flowers of different sizes and glue them on the packaging next to each other, then you will get a beautiful bouquet.
Calla
To create calla lilies, you can use either regular double-sided paper or foam rubber (I wrote about what it is in the section about the minion).
For calla lilies, take a stamen (you can crumple it out of paper or make it from polymer clay) and a petal made in the shape of a heart. Place the stamen in the petal, fold the edges of the petal over the stamen, gluing them together. All that remains is to unscrew the edges to get maximum resemblance to a calla lily.
Such flowers are well suited for decorating postcards, packaging, and as an independent gift in the form of a bouquet.

Bell
The master class for the bell is very simple and straightforward. Cut the blank according to the first photo. Glue the edges together and carefully straighten the ends. To make everything look natural, make a center of several elongated stamens, which will need to be glued inside the flower.
By the way, these bells would be great to decorate packaging for March 8th or just a spring birthday.

Lilies of the valley
Well, or something similar. For one flower, take a long rectangle and bend its edge, as in the photo. Cut the wide part so that you get many small strips. Using scissors, twist the strips (to do this, you just need to run the sharp side of the scissors along these strips, lightly pressing the blade against them).
To prevent the flower from falling apart, take a rod and wrap a green stripe around it. Then start carefully twisting the “flower” part, previously coated with glue, on top. Apply the layers tightly so that the greenery does not show through.
But making green leaves is not at all difficult - for them, just fold a rectangle of green paper like an accordion and trim the edges into a triangle. When you unroll, you will get a lot of green leaves ready to be glued to the base.

Poppy
Now we use corrugated paper. Cut out about ten teardrop-shaped petals from it. Stretch the wide part so that the blanks resemble mushrooms.
Take a thin wire and wrap some paper around it - this will be the core. Wind the petals onto this core so that each one slightly overlaps the previous one. When everything is ready, the structure can be pulled together at the bottom so that it does not fall apart.
The master class shows how this flower can be attached to a festive cap, but, believe me, gift box poppy will look great.

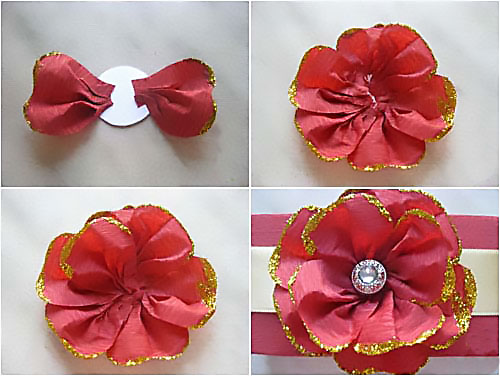
Red flower
What is its species? No associations came to mind. But that’s not the point - to create it you will need about ten petals (corrugated paper is used, by the way). Their shape is almost teardrop-shaped. but with a cut end.
Cut out a base circle from thick cardboard. Glue all the petals in layers to this circle, slightly crumpling (doubting? God, how right :_D) the bases, thus forming folds - then the flower will be more voluminous and “fluffy”. Decorate the center with some button or bead.
Such a flower, by the way, will look great from soft felt- this way it will gain durability. And if you attach the base for the brooch at the back, you get two in one - the decoration of the gift and the gift itself.
Extravaganza of color
There are only two flowers, but the bright combinations create a very unusual effect. Take the crepe paper again, cut out a circle and fold it into a “doll” shape. Cut a “skirt” for it, which you wrap around the doll. Attach the petals on top, gluing them in a circle. Glue two wide leaves at the base.
The second flower is very simple - cut the fringe and twist it into several layers. The flowers are very simple, they can make a very interesting gift arrangement.
Unseen flower
To prepare the base for this flower, I advise you to look here - here the base for the second Christmas tree is created in exactly the same way. But then the differences begin - each of the corners needs to be wrapped using a thick wire or knitting needle so that it turns out to be a spiral.
You can leave this design alone, but I suggest you connect several (say, three) pieces using the existing spirals - the wow effect is guaranteed. Then you can also experiment - connecting elements with spirals into unprecedented designs.
Advice: going to a party in Japanese style? Then make such a flower very big size and take it with you - it will serve as an excellent decoration for a chandelier.

Peony
“Pio-, pio-, peonies are given by a new acquaintance...” - words from the song of the underground group “My Michelle” (I’ve been listening to it often lately, inspired by it). We will make from corrugated paper. You will need five sizes of petals, approximately five copies of each ( appearance as in the photo).
Stretch the petals so that you get something like a wave (for both large and small ones). Then form a stamen from the same corrugated paper by folding the paper and further compacting it. You can do this on a wire skewer, or you can do it without it.
Glue the petals onto the finished stamen, each one overlapping the previous one. Do not pull the petal too tightly. In the end, all that remains is to cut the green leaves and stick them around the peony.

4 in 1: dandelion, clove, aster, chamomile
All these wonderful creations of nature are made according to one principle - cutting the edge of a strip from which a flower will be made. The final shape of the flower depends on the cutting shape. Please note that some require a core and others do not.
Please note: despite the very simple design, the flowers turn out very realistic. If you have very little time to make, then this is an ideal option.
Experiment and discover your unprecedented plants - be sure to tell us what happens.

Paper roses
Magic roses are one of my favorite flowers
Rose with twisted edge
The main difficulty here is to carefully twist the edge of the corrugated paper, straightening out the folds. Then make sure that the folds are even. Now twist the strip so that the layers fit tightly together. At the end, secure with thread, trim off the excess.

Simple rose
Need to make a plant in five minutes? Then this rose is definitely for you! Just cut out a circle and draw a spiral in it. Cut out a spiral as in the photo and twist the rose, starting from the longest link of the spiral (the central part will serve as the base).

Big rose
Even gigantic, if you follow these exact dimensions. The heart petals are stretched and placed on top of each other in a circle, secured with glue. Green petals are attached at the end. Of course, the flower doesn’t have to be as big as in the photo – go with your preferences.
Twisted paper rose
Once upon a time I already described this method of creating a rose (here is the second one). The principle is absolutely the same, but the sizes of the triangles resulting from twisting must be the same along the entire length of the ribbon, otherwise the flower will not be very neat.
Once I even made a Rosemary doll, which took part in a city exhibition. Her whole body was covered with roses, made exactly according to this method (the roses were made from ribbons, however).

Clover
I'll just show you how to make the base for the four leaf clover. To do this, take a square of paper and fold it in half lengthwise and in half again. Fold the ends towards the center. Cut out a heart from the resulting design. The result will be exactly what we wanted - a happy flower.

Nameless
No matter how I tried, I couldn’t give a clear name. As a result, the product remained just a beautiful flower, reminiscent of kanzashi motifs ( Japanese art production of jewelry from satin ribbons).
The beginning here is the same as in clover. But after bending the edges, you will need to bend the ends so that the length of the bent part is equal to the length of the visible side in the middle. Then these parts are straightened out and their edges are folded so that the sides are even. They are folded again and glued together to form three stamens. There should be three such petals.
This flower is most suitable for decorating a gift in Japanese style.

And again the aster
This time you need to glue the petals along the edge until you reach the desired volume. Decorate the center as you wish or simply fill it with as many petals as possible.

With this, I declare the big flower review closed. I hope you have found exactly the option that will help you decorate your gift in the best possible way. See you soon, subscribe and share with your friends!
Sincerely, Anastasia Skoracheva
If you want to decorate your home or garden for a special occasion or give a gift to a loved one, then you can make a ball of flowers. Such balls can be made from both artificial and fresh flowers.
Creation of such flower arrangements originates from France, where in the thirteenth century “flower kissing balls” were considered protectors from enemies and the evil eye. And in modern world They made a wonderful holiday accessory! Let's try to make such a ball with our own hands?
The time and effort spent on compiling such compositions is fully compensated by the admiration of your relatives and friends. They will help everyone present remember the holiday for a long time.

And so, to begin with, we decide from what flowers we are creating a ball - live or decorative.
If you prefer fresh flowers, then you need to approach the preparation more seriously and responsibly. After all, fresh flowers require care and special care.
For ball of fresh flowers The best flowers are less fragile and more stable, which do not crumble at the slightest touch. These can be carnations, daisies, gerberas, decorative sunflowers and other “solid” flowers.

Another feature of such a “living ball” is the base ball itself; it must be made of a floral sponge. This base must first be soaked in water, after which we fill it with flowers. The length of the stem on flowers should not exceed 5 centimeters for the ball to look beautiful.

It is preferable to use these live compositions at more serious celebrations: weddings, anniversaries, christenings, etc. Because they are more expensive to perform. But if you have your own flower beds at home or in the country, then this version of a flower ball will not be a problem for you for any special occasion.

Ball of decorative flowers not only looks very stylish, but is also practical in its use. It is also durable, unlike a ball of fresh flowers, in other words, it can be used repeatedly for decoration.

To make such a flower ball you will need:
Styrofoam ball;
Artificial flowers;
Pins;
Satin ribbon. 
How to make a ball of decorative flowers:
1. For the flower ball, we took artificial branches with flowers and now we need to prepare them for decoration - we remove them from the branches.

2. Cut off the back of the flower so that the flowers fit more tightly to the ball.

3. Now we take a pin, string a bead on it first, then a flower. You can buy pins with beautiful caps and then you don’t need to use beads.


5. We do this with all the flowers, fastening them tightly, next to each other, so that there are no unsightly gaps left.

6. Fill the entire ball with flowers. But there are small nuances: if the ball will stand on a stand or in a vase, then we do not decorate the lower part of the ball, and if the composition will hang, then you need to completely fill the ball and attach a loop.

7. To make a beautiful loop, you need to fold the satin ribbon in half and secure it to the ball with a pin with a flower.

That's all, a wonderful decorative element for the holiday is ready! Really, beauty?
The fantasies of florists are limitless, thanks to which we are often delighted with the most unusual flower decorations. Despite the complexity of many compositions, we are nevertheless able to do some things ourselves. The Land of Soviets will tell you how to make an elegant ball of flowers.
DIY flower ball
We will need:
A sponge ball (also known as an “oasis”) with a diameter of about 20 cm
Flowers – about 50 pieces. Chrysanthemums, carnations and others are suitable.
Scissors
Step 1. Prepare the flowers. To do this, they need to be cut at an angle so that they absorb moisture better. Leave 3-5 cm of stem to insert the flower into the oasis.
Step 2. We insert the first flower at the top of the sponge and continue to arrange the flowers around the circumference to form straight line. This will allow the finished ball to look neat. The flowers should fit tightly together so that the surface of the oasis is not noticeable.
Step 3. Turn the ball over so that the first row you make runs parallel to the table. Continue filling the oasis, starting this time from any flower. We continue to insert flowers around the circumference.

Step 4. Now you can arrange the flowers in the oasis in the way that suits you. Make sure the composition looks neat. The finished flower ball will be a wonderful decoration for any table, including festive and business ones. You can make a balloon bouquet for the bride in almost the same way. But it requires a smaller sphere, about 7-9 cm in diameter. The choice of colors will also require a separate approach. You can combine white, soft pink, blue and green colors. Roses, ranunculus, and white carnations are suitable. They can be combined with irises, astromerias and other flowers, as well as with green twigs.
DIY flower bouquet for the bride
Step 1. Since the bride must hold this ball in her hand, it will need a convenient mount. It is made from wire and lace. It is better to sew lace on satin ribbon. First, we determine the size for the ribbon by wrapping it around the bride’s hand. Then we place the wire in the middle, bend it in half and twist it - the wire loop now tightly holds the tape.
Step 2. We pierce through the oasis with the ends of the wire folded together. The ribbon with lace should fit snugly against the ball on the other side. To prevent it from getting dirty during operation, wrap the tape with film.
Step 3. We bend the protruding ends of the wire and hide them in the oasis. To secure the lace more firmly, you can take a light, thin die and wrap the same loop around it as for the ribbon. Also, before distributing the colors, the ball can be wrapped in mesh.

Step 4. Attach the flowers. If we use different types, as well as green branches, the composition must be thought out in advance. The oasis is filled with flowers, starting from the lace handle. It is important to monitor the balance so that it is not pulled to one side. If the twigs or stems of the flowers are very soft, then you will need to make shallow holes in the sphere with a thin stick. Such festive and elegant balloons are made not only from fresh flowers, but also from artificial flowers. Often they are even lighter and are used to decorate rooms - they are hung on the ceiling, walls and window openings.
They can be attached to a floral sponge in the same way as live ones. But for greater reliability, it is necessary to apply glue to the stem and only then insert it into the sphere. If you use flowers of different sizes for the ball, then first place large inflorescences over the entire surface. Place medium flowers between them, and the remaining gaps can be filled with small ones. Balloons made from fabric flowers look very airy. Paper ones also look beautiful. Their size, design and application will depend only on your imagination.
In this master class I will tell you how to make a flower ball out of paper. Plus, I picked detailed photos to every step of the process. With such products it is very original to decorate the interior for a holiday or just for no reason.
It’s very easy to make, the main thing is to prepare necessary materials, namely:
- Corrugated paper in two shades, which is sold in craft stores, or you can use regular napkins;
- A foam or plastic ball as a base.
- Thin wire;
- Scissors;
- Pencil;
- A glass or round cardboard blank;
- Ribbon.
Start making flower balls from corrugated paper by creating flowers. To do this, first fold the paper into several layers in a strip and draw circles on it.

Now we carefully cut them out and put them together in at least ten circles and secure them with a clothespin for convenience.

The more layers, the more magnificent the future flower will turn out. Next, in the middle of each group of circles we pierce two holes at a distance of about a centimeter from each other.

We bend the wire into a hairpin shape and push it through the prepared holes.


On the other side we twist it well.

Now we fluff the flower as shown in the figure.

First of all, we stick a loop into the foam base and insert a ribbon into it so that the ball can be hung. Next, we begin to fill the foam base with prepared flowers over the entire area, alternating different shades flowers.

This is how it turns out beautiful balls made from paper with your own hands, which will magically decorate any interior.

Photos taken from the Internet. Unfortunately, it was not possible to determine their author. In any case, thanks to the author for the idea.

Any adult periodically experiences certain skin problems. For treatment of serious skin problems, of course, you need to contact specialized doctors, but we can and should provide daily balanced care ourselves. In this material we will tell you what emollient creams are and how you can use them to moisturize dry skin on the body.
Our dermis requires special attention during the cold period, which also includes the dry heating season. Unfortunately, with age, tightness and unpleasant discomfort can be felt by the skin, regardless of the time of year. And it is very difficult to ignore the signals coming from the largest organ in our body.
Hello everyone! Another master class on the ShkolaLa blog! Today we will make large paper balls, the same ones that are used as a festive design at various parties.
Come with us! Join our creative fraternity! And making pom-poms from corrugated paper with your own hands is not difficult and very interesting. For your convenience, here are step-by-step photos.
Corrugated paper applique – Natalia Vadimovna Dubrovskaya | Buy a book with delivery | My-shop.ru
So look what we got.
It all starts with preparation.

To make a pompom we will need:
- a roll of corrugated paper, also called crepe paper;
- scissors;
- pencil;
- ruler.
Paper standard size. Its width is 50 cm and its length is 2.5 meters.

We take a roll and use a ruler to determine where its middle is. Draw a line in this place with a pencil.

Without unwinding the roll, use scissors to cut it into two equal parts. There was one long roll, but now there are two short ones.

Then the rolls still need to be unrolled and cut into identical rectangles. You can make rectangles measuring 25cm X 50cm, then each roll will produce 5 rectangles. We made 25 X 40, and we got 6 pieces each.
The larger the rectangles, the more voluminous the pompom will be.
Then the rectangles need to be folded in a neat stack, on top of each other.

Since our paper always wanted to curl back into tubes, we pressed it with scissors on one side and a ruler on the other to take a photo. And, if you noticed, a ball of thread appeared in the photo! It should have been mentioned at the very beginning, during the preparation process. But we remembered that it is needed only now and immediately declare it. Instead of threads you can take a beautiful ribbon. But we didn’t have it and we made do with threads.

Then we turn the stack of sheets on one of the short sides towards us and begin to fold the sheets into an accordion.

It should look something like this.

Using a ruler, we determine where the middle of our corrugated accordion is and make a mark with a pencil.

We take a thread and tightly tie our accordion in the middle. One end of the thread should remain long.

Now let's start decorating the ends of our pompom. We will trim them a little and round them off so that the pompom looks like a flower. The photo shows which trajectory we will use to cut.

First, cut off one corner.

Then another. Well, we've sorted out one end. We do the same with others.


First, we unfold one side in the form of a fan.

Very carefully, so as not to tear, grab the first layer of paper and lift it.

Then the second one.

Well, then the third, fourth, fifth and sixth too. It's already beautiful!

We turn our “fan” over to the other side and fluff out the remaining six layers of paper. Only at the same time we try not to crush those that have already been issued.

It turns out like this. Very similar to a bridal bouquet. If you make half a pom-pom out of white paper and decorate the handle in green, it will look exactly the same. But now we have a different task, we are making not a white bouquet, but a pink pom-pom. Therefore, using the same principle, we fluff the other end of our accordion.
Flowers made of corrugated paper - Sherstyuk Yulia Valerievna | Buy a book with delivery | My-shop.ru

And we get such beauty! We adjusted it a little with our hands so that the pompom took the shape of a ball. Then we decided to experiment and make another smaller pompom from the remnants of yellow corrugated paper that Tema found in the closet with all sorts of creative things. That’s what we call it – a creative locker. We have paints there, plasticine, glue and colored paper too. In principle, it worked.

And now we know that it is possible to make a small pompom, but it is much more difficult than a large one. And in this little yellow ball, we got not 12 layers of paper, like in the big one, but only 8, and that’s where the paper ended.

We hung these two pompoms on the chandelier in the children's room. And it immediately became more fun there! Well, holidays are coming soon in our family. First it’s my birthday, then our beloved grandmother’s. And now we know exactly how to decorate the premises so that it is elegant and beautiful.
But if we had a lot more of this paper, we would try to make the same beautiful flower as in the video below. Very beautiful! And the manufacturing principle is similar to pompoms.
Friends, you can leave your opinions about our master class in the comments. We will also be very grateful if you share the link to the article on social networks.
Thank you for your attention!
Happy creativity!
Always yours, Alexandra, Artem and Evgenia Klimkovich.


