While there is no need to make square boxes yourself, craftswomen always experience a shortage of round and shaped boxes. You can make packaging of this shape at home from ordinary scrap materials. Our article has unique master class for making round and shaped decorative boxes with your own hands.
DIY gift box: simple patterns
First of all, you need to prepare stencils for the paper box. There are a variety of schemes for creating this type of souvenir. Gift wrapping can be rectangular, round or shaped.
Today we use boxes in everyday life, for work, and as gifts. Meanwhile, these things appeared in our civilization relatively recently - in the 18th century. Their predecessors were bulky wooden boxes. Prefabricated structures were invented by the Scot Robert Geyer, who needed light, compact packages for seeds.
Square box diagram
The diagram shown in the photo will help those who need a classic square box. It is enough to make a paper or cardboard stencil and glue it along the fold lines.

Diagram of a polyhedral box
The original hex pack will not require a cap. It is easy to create such a product with your own hands, even without any special artistic or design skills. It is enough to use beautiful thick paper. Elements of this shape are often made from cardboard.

Scheme of the original box in the form of a handbag
We offer simple diagram for making a gift box with your own hands. The product has the shape of a small handbag. Even an expensive gift made of precious metals can be packed in a box.


Scheme of a box in the form of pieces of cake
Are there any holidays coming up at work? Use the idea of decorating a gift in cardboard products in the form of cake slices. A gift made with your own hands, even if only partially, will remain in the memory for a long time. Your colleagues will definitely like this idea.


Heart-shaped box diagram
Romantic people will appreciate any gift made with their own hands. It is better to pack the gift for them in a heart-shaped box. Made from bright paper or cardboard, it will be an excellent gift idea. Use our pattern to make your own gift box in the shape of a voluminous heart.

DIY round box: master class with video
The hardest thing to do with your own hands round box from paper, because there are no schemes for collecting it. To make such a product, you will have to cut out all the elements separately and then glue them together one by one.

First, make stencils for the box from paper. To do this, draw a circle and cut it out. You will apply the paper stencil to the cardboard, creating the constituent elements of the bottom and lid. Make the same blank for the sides. It looks like a strip, the length of which should correspond to the size of the bottom circumference. Now you can start the main work:
- Cut out the first circle for the bottom and the side from cardboard.
- On the side strip, cut off the extreme corner.
- On the other side of the strip, cut a corner of the same size and slope.
- Connect the cardboard blank into a circle and glue the cut.
- Glue the bottom to the circle.
- Wrap the outside of the structure with a piece of decorative material.
- Using a stencil, cut out the same strip, but shorter and higher in height. It is needed to create the inside of the product.
- Insert the workpiece inside and wrap it with decorative material.
- Cut a circle larger in diameter than the bottom of the box.
- Make a strip of the side of the lid and connect it to the new blank.
- Wrap the lid with paper or cloth.
You can decorate gift wrapping in any way. The most common option is tape. The product is wrapped several times, and a lush bow is tied on the lid. Decorating the top with artificial flowers, leaves, beads or small soft toys looks beautiful.
The product is used not only for decorating gifts. It can be useful to you in everyday life or to decorate your interior. The video shows a diagram of creating a round box with your own hands from cardboard and decorated with patchwork fabric:
On the eve New Year's holidays Shop windows are full of gift boxes, decorative bags, and wrapping paper for every taste. Smiling sellers helpfully offer to provide packaging services New Year's gifts. And it all seems great, because you must admit, it’s much nicer to receive a New Year’s trinket in a beautiful package. But on the other hand, the whole meaning of the gift is lost, the very gift that should be intended specifically for you.
The recipient of the gift will be doubly pleased if, in addition to choosing the gift, you spend a little more time on wrapping it. In this article we will teach you how to make gift boxes from paper or cardboard with your own hands. This is not at all difficult to do, because all the crafts presented with us are accompanied by ready-made diagrams, templates and step-by-step master classes. All you have to do is choose suitable option boxes, print the diagram and glue the paper box according to the instructions. By the way, some of the boxes we present are made using the origami technique, which means that you don’t even need glue!
So, before we get started, let's check if everything is ready. To make a paper gift box with your own hands, you will need: beautiful wrapping paper (you can get by with plain white paper and then decorate it), scissors, pencil, ruler, glue or double-sided tape, and a stationery knife. Everything is? Well then, let's create!
#1 Box “Herringbone”
A great way to pack a small trinket for friends or family is this New Year's themed box. By the way, it’s very easy to do. You will need green paper and hole pliers (although you can do without them). Well, any rhinestones, beads, sequins are suitable for decoration, in general, to your taste!
#2 Gift box “Mint Candy”
And here's another one original version gift box, which you can very easily make with your own hands, especially with our step-by-step master class. You will need red thick paper (for the box itself), as well as White paper for decoration. You can make the upper part of the box with applique or simply color the white sheet with pencils or felt-tip pens. By the way, there doesn’t have to be a lollipop on top. You can dream up a New Year theme and decorate the top of the box, for example, with a snowflake, Christmas ball or angry red M&M's.

#3 Box with lid (diagram)
Well, if you don’t have the time or desire to tinker with the box for a long time, you can use a simple ready-made template. You need to download it, print it, cut it and glue it. Voila, the box is ready! Please note that we have prepared 2 diagrams for you: square (size 5x5) and rectangular (size 7x6x4).

#4 Cup with a gift
But here is a gift packaging option for those who want to surprise with originality - gift box-cup. It's quite simple to do, but looks impressive! To create, you will need thick paper, scissors and glue. And of course our step-by-step instructions!
#5 New Year's box “Cake”
If new Year party planned in big company, for example in a circle big family, it makes sense to pack gifts for everyone in one large multi-pack box. Packing box the cake consists of 8-10 pieces, each of which is a separate paper gift box.

#6 Gift box with lid for muffins and other small items
During the New Year holidays, edible gifts are quite common: various sweets and baked goods. An original gift will be a muffin prepared with your own hands in a designer gift box.
#7 New Year's box “Diamond”
You can pack a New Year's gift in a diamond-shaped gift box. With our scheme, making such intricate packaging will not be difficult. All you have to do is print out the box template, cut it out and glue it according to the instructions. It's simple!

#8 New Year's packaging "Santa"
Very cute New Year's packaging will come out of ordinary paper bag, decorated with paper Santa. Download the Santa pattern, cut it out and glue it onto the bag. DIY Christmas packaging is ready!

#9 Boxes “Harry Potter”
Fans of stories about Harry Potter will be indescribably delighted when they receive a piece of their favorite hero as a gift. By the way, such a box with magic sweet beans can be a wonderful addition to a set of books about the adventures of a young wizard.

#10 Box “Gingerbread House”
The symbol of the Christmas and New Year holidays, well known to everyone from Hollywood films, is the gingerbread man. You can make a paper box in the shape of a gingerbread man's house. By the way, put yourself in such a house gingerbread men It will be very symbolic, but if you also make them with your own hands, there is no price for such a gift at all! The “Gingerbread House” box is made according to a special pattern, which you can download below. Also below is a master class on making a box with your own hands.
New Year's time is coming - a time of miracles, when everyone can feel like a little helper...
#11 Box “Heart of four parts”
A cute package consisting of four boxes can be made using our pattern. Giving your loved one not one, but four New Year's gifts at once is a true manifestation of love. You can download the diagram with four boxes and the base for them below.

#12 Box made using origami technique
To make such a gift box you will not need a diagram or template. To make a paper box with a lid, you only need a sheet of paper. The main condition is that the sheet must be square. Strictly follow the instructions of the master class and in 10 minutes you will have the cutest origami gift box made by yourself.

#13 And another option for an origami box
This box is very similar in appearance to the previous one, but the manufacturing method is slightly different. To make this box you will need scissors, but you don’t need a diagram: just a square sheet of paper. Follow the instructions of the master class and you will succeed!

#14 Box using origami technique “Volume Triangle”
If you want to get confused and ready-made templates not for you, then be sure to pay attention to this complex and very impressive gift box. You will need paper and patience. Well, then follow the instructions and everything will work out!
If you like to make gift boxes without templates, glue and scissors, but only with the help of the correct folds of paper, then you will appreciate this box.
#16 Closing box using origami technique
Well, another version of the box using the origami technique. It's quite easy to do, especially if you follow the instructions. By the way, the steps of making the box are described below in the photo instructions.
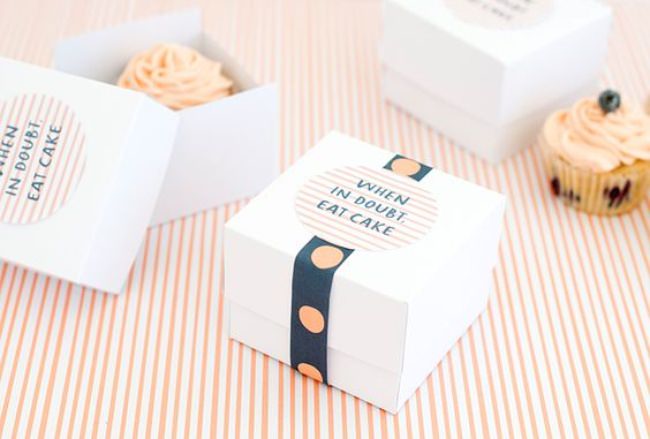
#17 Box “Cupcake”
Original gift packaging For a New Year's gift there will be a box in the shape of a cupcake. It looks very impressive, but it will take a little work to create. In general, there is nothing complicated in creating this box; you just need patience and imagination! A step by step wizard see class below.

#18 And another "Cupcake"
And here is another variation on the theme of a gift box in the form of a cupcake. The manufacturing scheme is very similar to the previous one, but you might like it!
#19 Gift box for cookies
A ready-made diagram for making a cardboard box with your own hands. All you need is to use our ready-made diagram, which you need to print, cut out of cardboard, and then glue it together in accordance with the master class.

#20 Chinese style gift box
You can put anything you want in this handmade box. And most importantly, it is done quickly and simply. You can download the box diagram from the link below.
Download the diagram

#21 Gift box in the shape of a cup

Truly original packaged gifts are valued much more than conventional gifts. gift bag. Please note Special attention for this charming paper box, which you can make with your own hands using our diagram.
How to make a cup

How to make a lid

#22 Box “New Year's Sweater”
This beautiful gift box can be made with your own hands. To do this you will need a diagram, which you can download on our website, scissors, glue and a little patience.

#23 Box with bow closure
Quite simple to make, but very original gift box. You will need a square sheet of wrapping paper, glue and instructions from the master class. 15 minutes - and your gift box is ready!

It’s very easy to make a cardboard box for a New Year’s gift, but for this you will need not only cardboard, but also scissors (a stationery knife) and glue or double-sided tape (for secure fixation). Below is a step-by-step manufacturing master class, following which you can quickly and easily make a cardboard box with your own hands.

If you want to give a delicious gift in the form of cupcakes or muffins, then a paper egg tray would be the ideal packaging for such a gift. Cut the required number of compartments, decorate the top of the box with decorative elements, tie with a ribbon and Voila! The gift is ready!

You may be interested in:
#26 Original box “Milk package”
Another incredibly cool New Year's box that will amaze anyone. You can pack a simple trinket in such an unusual box. It’s quite simple to make it if you use a ready-made diagram, which you can download on our website.

#27 Box with lid
Using our simple pattern, you can easily make a gift box with a paper lid with your own hands in just a few minutes. You can put anything in such a box as a gift: from a cute trinket to sweets self made. You can download the box diagram below.

#28 Packaging box with flower clasp
A simple design for a cute packaging box with a flower clasp. Fast, beautiful, original. Please dear people a gift made with your own hands. You can download the finished diagram from the link below.

#29 Gift box “Petals”
You can make a wonderful box for a New Year's gift with a petal-shaped lid with your own hands. In fact, making such a charm not only won’t take much time, but will also delight you with its cutest quality.
#30 Gift box for New Year's cupcake
You can make a very cute cardboard box with your own hands. It will turn out no worse than store bought. You can make a special bottom for the cake in the box. By placing your little delicious gift in a special stand, you don’t have to worry that all the cream will remain on the box. To make such a cardboard box with your own hands, you need to print the template and follow the instructions of the master class.

#31 Gift box for children “Ice cream”
A New Year's gift should be packaged not just well, but with taste. In the “Ice Cream” gift box, your gift will be appreciated! With our scheme, making a delicious box will only bring pleasure!

#32 Packaging box “Candy”
Another option for “delicious” packaging would be a candy-shaped box. To create a New Year's atmosphere, the packaging can be slightly enlivened by adding eyes and a mouth. Download the diagram, print it and glue the box in the right places.

#33 Gift box “Cheerful Bunny”
I always want to give to my dear and close people special gift. And it’s best when this gift is not only special, but also in special packaging that emphasizes the significance of a particular person. Making such a paper box with your own hands is not difficult if you download the diagram from the link below.
Download the diagram

#35 Box “Funny Frog”
Another very cheerful and positive box for New Year's gifts is “Cheerful Frog”. It’s done quickly and gives a lot of emotions! Download the diagram and please your loved ones with a merry New Year's box.

#36 Box with a face
You can also pack a gift in an original way in a box made of plain white paper, adding some details on it in the form of eyes and a mouth, thus bringing the gift to life. With our ready-made diagram, making such a box is not at all difficult. Just download the diagram, print and glue.

#37 Gift box “Birdhouse”
Let's start with perhaps the most unusual paper gift box. Making such a birdhouse is quite simple when you have ready-made diagram. The diagram needs to be printed, transferred to suitable paper, cut out and glued in certain places. Complex and intricate at first glance, DIY boxes will be ready in 10-15 minutes. 
#38 Box “Apple”
A gift in a paper box in the shape of an apple will be original. With such a box, choosing a gift is quite easy - gelatin worms will come in handy. Making such a box with your own hands with the appropriate diagram is very simple; the manufacturing process will take no more than 10 minutes!

#39 Box “Christmas wreath”
There is no limit to your originality, we just give you direction, and then you create on your own. You can come up with a lot of boxes for the New Year theme, for example, in the form of a Christmas wreath. Very symbolic!
Well, what would a real New Year be without the Nutcracker and music from the famous ballet by P.I. Tchaikovsky? A great gift would be a bag of nuts with a nutcracker tag attached. himself fairy tale hero You can draw it yourself, but if you have no inclination to draw, you can find an image of the Nutcracker on the Internet and print it, then cut it out and attach it to the bag.

They often say that beautiful packaging is already half the gift. And this is actually true. Modern materials, tools and work techniques allow you to create real masterpieces. Read on for DIY gifts. This type of creativity can be not only useful for you, but also very interesting and exciting. See ideas, choose the samples you like. Create something exclusive yourself.
Making ideas and options
Create beautiful packaging can be done in two different ways:
- Decorate the finished cardboard base.
- Make a product from scratch.
In the first case, you will need to find a blank suitable size and shapes if you want something unusual. This method of working is quite simple as you don't have to think about how to create a strong, neat structure with right angles and a suitable lid. Here you immediately begin to get creative - decorate the surface of the box. However, in this case you are limited to the shape you can find. Usually this is a cube or parallelepiped.
The second way of working makes it possible to create absolutely any design: standard or unusual in the form of a pyramid, cone, heart, Christmas tree, etc.

However, here the work will be somewhat more complicated. Before you start decorating, you will have to glue the structure yourself. The template can be downloaded and printed to the required scale.

If you understand what you are doing and have at least minimal experience in drawing and design skills, it is not difficult to create a diagram yourself using a pencil and ruler.

Materials and tools
How to make gift boxes - choose for yourself. In any of these methods, the set of accessories for work is approximately the same. So, you will need the following:
- cardboard, thick paper or ready-made box;
- ruler;
- pencil;
- scissors or stationery knife;
- glue or heat gun;
- packaging, decorative, design, corrugated paper for creating decor or gluing workpieces;
- textile;
- satin or paper ribbons;
- decorative tape;
- any decoration materials for making applique elements, such as hearts or snowflakes, beads, bows, stickers, etc.).
As you can see, nothing fancy or expensive is required. The main thing is to create or find ready-made base, and you can decorate it in any way, focusing on the means at hand or the theme of the gift (New Year, anniversary).

How to make from an existing blank
If you decide not to complicate your life and prepare a cardboard blank the desired shape and size, proceed immediately to the decorating process. Work like this:
- Measure the box and draw it on decorative paper or a fabric diagram of the part with which you will paste over the base.
- Don't forget about the gluing allowances. They are necessary so that the base material is not visible at the joints, for example on the ribs, as well as on the upper edges of the box.
- Cut the blank out and carefully glue the surface.
- Do the same with the lid, if you have one.
- Glue any suitable decor on top, such as paper flowers, lace, snowflakes, hearts.
- Make an imitation of tying with ribbons using decorative tape.
- Decorate the packaging with a spectacular bow.
In a word, let your imagination run wild, but remember: everything is good in moderation. Do not turn the surface of the product into a motley carpet. It should remain stylish and harmonious.
How to make packaging from scratch
So, you have learned how to make a gift box with your own hands from an existing blank. The second option is to make the product from a regular sheet of cardboard. Work like this:

Now you know how to make gift boxes from regular sheets. In fact, you can work in different sequences: according to the plan described above, or decorate the product before gluing, while it is still laid out on the plane. Choose the method that is more convenient for you. Try both.

Unusual decor ideas
If you have already decided how to make a gift box, but have not chosen a decoration option, you can use another interesting technique - decoupage. It is also called a napkin, since napkins with thematic images, such as New Year’s or romantic, are glued to the prepared surface. Everything is varnished on top. Although the instructions are presented in a very abbreviated form, in fact the whole process is quite simple. And most importantly, in this way you can get gift boxes that themselves will resemble a souvenir - a box or an old chest.

So, you've learned how to make one from existing packaging or completely from scratch. Choose your favorite design methods and decoration ideas. Create original “clothes” for gifts for any holiday.
Often we are used to seeing in films how happy people take out from under the Christmas trees or receive some kind of gift as a gift, but the key here is that the gift is packaged in beautiful box. This is done mostly to create intrigue, less often to preserve the integrity of the gift. Of course, it’s much easier and less time-consuming to pack a prepared gift into packaging from a store, but it’s much more interesting to make a box
So, your product will look the way you want, and besides, such boxes are unique in their kind, so you will make them yourself. Making such boxes is not at all difficult, and most likely you yourself will receive indescribable pleasure from the work done with your own hands.
First you will need to roughly estimate the size of your gift, taking into account several important factors, such as height, gift thickness and gluing allowances. We will take these dimensions as a basis when making boxes for New Year with your own hands.
 We will need:
- Long ruler;
- Scissors;
- Thickened paper(preferably corrugated cardboard) sizes 15x15 cm and 14x14 cm.
You need to draw squares of the indicated sizes, draw a diagonal and bend the corners to the center. Next, the same corners that you just bent at the middle need to be bent to the opposite bend line, and then to the nearest fold line.
Focus on the fact that we have a square in the center, which will be our reliable bottom for the gift box that we will make with our own hands.
Next, on both sides of our diagonal, along the first deflections, we make cuts to our central square. The cut edges need to be folded along the bends - this is how we get the walls of the box for gift wrapping. 
The sharp ends of the box need to be bent inward, towards the center of the bottom square. Using the remaining uncurved ends, we grab the bent ones and wrap them inward. This will be our cover.
We make the second box using the same principle, and due to the fact that this square is one centimeter smaller, the box will close perfectly. Moreover, if you are thinking about how best to do a beautiful box for a gift, then for the other half of the box, take thick paper, not cardboard. 
Such a home-made box will fit a gift measuring 5 or 6 cm and up to 3 cm high, i.e. approximately the size that could fit in your palm. If the gift is very small, and you don’t want it to dangle in the box like a rattle filler, then you can put light tissue paper on the bottom, prudently crumpling it.
A more convenient alternative would be simple napkin. As you have seen, making such a small gift box is not at all difficult.
Such a box with a gift inside should be tied with a ribbon or a beautiful ribbon.
And since making such packaging boxes is not difficult, we want to show a few more options.
Box-cone
 Necessary materials:
- Thick paper of any size;
- Compass;
- Glue;
- Pencil;
- Scissors.
First you need to decide how high the cone is needed, the size of the circle will depend on this. The higher the cone, the larger the circumference. After drawing a circle, divide it in half. Now form a cone and glue the edges. 
The bottom of such a gift box will be a piece of foil, which you will use to seal your box. The cone can be beautifully disguised by making a Christmas tree out of it.
Try it - it's great inspiration!
Box in the form of a prism
Prepare the following: 
- A square cut out of thick paper measuring 18x18cm;
- Scissors;
- Ruler;
- Pencil;
- Ribbon and hole punch.
So, we draw the square in half and diagonally. We bend the corners towards the center, and then from the center of the edge into the deflections of the central square you need to draw even arcs. 
After this, use scissors to cut off unnecessary corners, and at the rounded ends we pierce small holes using a hole punch and stretch a thin ribbon into them.
Box with a hiding place
And now we want to suggest making a gift box that will contain a little surprise. The box is a fake - it will fall apart when you remove the lid. By the way, the lid is made according to the same principle as we described in the classic box.
 So, we will need:
- Glue;
- Scissors;
- Thick paper;
- Decorative ribbons and other decorations;
- Beads, ribbon, old postcards.
If the bottom is made from a sheet 18x18cm, then for the lid we take 1 cm more, i.e. 19x19cm.
Bottom: cut the sheet into nine even squares, cut off the corner ones. Bend the ends of the resulting cross inward, forming the shape of our future gift wrapping box. 
You can decorate the inner surface to your liking, glue pictures of old postcards, beads, and then put the gift in the finished box and pack it.
Don't forget the tape!
Felt box
 We will need:
- Felt of different colors;
- Thread and needle;
- Glue;
- Scissors;
- Ruler.
Draw the fabric into nine squares or rectangles, cut out the corners. If desired, the outer side can be decorated with patterns; the walls need to be evenly bent and sewn together. Even if the seams are noticeable and the threads differ from the color of the felt, don’t worry: consider it a design move. 
You can decorate the box according to your preference. This box would be good as a handmade New Year's gift box.
So that's it. These are just the basics, but more complex circuits Suitable for those who already have experience in creating simpler box models.
Good luck and inspiration!
And other concerns).
But recently I made a box as a gift and decided to post a small master class.
So let's do it surprise clamshell box.
The idea is this: a person receives a huge box as a gift, opens it, inside there is another smaller box, then another one, and so on until we have a tiny box with a small gift in front of us.
This packaging is very convenient when you want to give small gift like jewelry (rings), money or any other memorable gift.
The clamshell box solves several problems at once:
1. It looks impressive and does not create the impression that the gift is too small (this is for lovers of gigantism))));
2. It’s much nicer to receive such a box than just a banal envelope with money;
3. The box can be decorated with various wishes, photographs, small memorable items and becomes a repository of pleasant memories, and this, you see, is more valuable than even the gift itself.
What you will need for work:
1. Cardboard (binding or corrugated)
2. Wrapping paper is different
3. Decorative elements from paper, wood, beads and whatever you want to decorate the box with.
4. Double-sided tape (thin and foam)
5. Paper glue (PVA, Moment Crystal or any other that you are used to working with)
6. Paper or masking tape of different widths
7. Scissors
8. Ruler
Working hours:
The time it takes to assemble a box depends entirely on the size. A box measuring 30x30x30 cm can be assembled in 1-1.5 hours (this is only one outer box!), smaller inner boxes can be assembled in 30 minutes to 1 hour. Plus add here the time for decorating - about half an hour for each box. In general, you can spend 10-15 hours assembling and decorating the entire package. Therefore, plan to create such packaging in advance; you definitely won’t be able to do it at the last moment.
I’ll say right away that this option does not pretend to be highly artistic, it is made quite simply and quickly, so we believe that this is a version of a simple clamshell box))) You can get confused and make a clamshell box that is ideal in all respects, but be prepared to spend a few on it full days, since working out the details will require an appropriate approach.
Begin?
1. Before starting work, decide on the size. I recommend starting with the largest, outer box, as this takes up the largest amount of material and can be used to plan the size of the inner boxes from there. It is better to make the box in the form of a cube, then it will be easier to calculate the dimensions - all dimensions of a cube are equal. Each subsequent box should be 3 cm smaller so that decor and a lid can be placed between the boxes inside. Also decide what size you should have the smallest inner box that will contain the gift.
2. Select base material.
Corrugated cardboard(from old boxes or purchased specifically in sheets) are much lighter, so the overall weight of the finished clamshell box will be relatively light. But keep in mind that the boxes will be larger, so the appearance will not be very compact and neat.
Binding cardboard much heavier, but it is smooth, sticks well and holds the paper, and is much thinner than corrugated, so the box will turn out smooth, beautiful and neat.
3. We will use 5 sheets of cardboard of the same size for the base of the box. In my case, these are sheets of 30x30 cm (in what follows I will give all sizes based on the size of my box).
We put one sheet in the middle and place 4 on its sides. Leave a small gap between the sheets (about 3-4 mm) so that the sides of the box can be laid out freely.
4. Use paper tape to glue all the joints of the sheets on one side, turn the workpiece over and do the same on the other side. Thus, we obtain a blank of 5 sheets, glued at the joints on both sides.

5. We are now working with the largest, outer box, so we need to glue the outer bottom so that the box looks decent from the outside.
Cut from wrapping paper square measuring 35x35 cm (it should be slightly larger than the cardboard bottom).

6. Glue strips of thin double-sided tape to the cardboard bottom, not too often and not too rarely, so that the paper sticks evenly.

7. Cleaning up protective paper with tape and glue on a sheet of wrapping paper that we cut out in advance.

8. In the corners of the protruding parts of the paper, make cuts at an angle of 45 degrees.


9. Turn the bottom blank over, bend the corners and glue them to the base.


We bend the extra centimeters and glue them to the base. Here it is better to use glue, since you need to coat quite large areas of paper.
Before gluing the sides, you need to bend the corners of the paper so that the corners of the base look decent.


This is what the inside of a large box should look like after gluing the paper to the outside:


13. We have the base of the largest box ready, now we need to make the lid. We know that the size of our large box is 30x30 cm, so the size of the lid should be a centimeter larger. We cut out a square 31x31 cm and 4 strips measuring 31x5 cm from cardboard. Here 5 cm is the height of the lid, I took this size in particular because of the paper tape (I had it wide, 5 cm), so that it would be convenient to paste over and not need I had to constantly cut off the excess width. You can make the height of the lid smaller by adjusting it to suit your needs.
We lay out the cut out parts in the same way as when creating the base of the box, but close to the middle sheet (that is, we do not make spaces between the parts)

14. Cover the joints of the parts with paper tape only on one side of the workpiece

15. It turns out this design (we have glued joints inside)

16. Fold the corners tightly and cover them on the outside with a strip of paper tape. It is important to ensure that the parts are glued evenly and tightly - this directly affects appearance covers.


We get such a cute blank. By the way, you can “learn” this method of gluing at the post office - watch how they pack your box with your parcel, the principle will immediately become clear.


You should end up with a neat lid like this:

I successfully forgot to take a photo of the process of gluing the lid, but in principle it’s worthy separate master class, since the process is interesting, but in order to have at least something, I’m posting the process of gluing the lid from corrugated cardboard.
First you need to cut out a sheet of wrapping paper taking into account the height of the lid, that is, if the base of the lid is 31x31 cm, its height is 5 cm, then we cut out a sheet of at least 42x42 cm so that it is possible to seal the outer and inner heights of the lid:


19. Ufff. Are you tired?)) And this is just us who did the first, most big box! Go ahead. Each subsequent box needs to be made 3 cm smaller, that is, we cut out 5 sheets of cardboard measuring 27x27 cm.
Laying the sheets:
Cover both sides of the workpiece with tape


You should end up with something like this without the bottom covered with paper:

20. Now we glue the smaller box to the larger one. To do this, place the base of a large box on a flat surface, coat the bottom of the smaller box with glue and carefully glue it exactly to the center of the inside of the bottom of the large box. Like this:

21. Next, we repeat all the above procedures several times with a corresponding reduction in the size of the boxes. Here's what I got:
1 box – 30x30 cm, lid 31x31 cm
2 box – 27x27 cm, lid 28x28 cm
3 box – 24x24 cm, lid 25x25 cm
4 box – 21x21 cm, lid 22x22 cm
5 box – 18x18 cm, lid 19x19 cm
6 box – 15x15 cm, lid 16x16 cm
I didn’t make the box smaller, because... I needed to put an envelope with a gift card, and 15x15 - the smallest box was very convenient for this.
In general, you can make a larger number of boxes, increasing them, for example, to 9 pieces. Then the smallest box will fit a box with a ring or any other small gift.
22. Now we need to decorate all the boxes of our packaging.
We start with the smallest one, and in front of us lies this structure:

Decorate congratulatory inscriptions, stickers and other decor, insert the envelope right away!

We close the box with a lid (you also need to make decorations on the lid) and start decorating a larger box.

Close the lid again and decorate the following:


And finally, our big box!

To prevent the box from opening prematurely, it must be tied with a beautiful ribbon and solemnly presented to the recipient. Delight and tears of happiness are guaranteed!
Here’s another small gif where you can briefly see the process of creating a similar clamshell box:


