Step-by-step master classes By self-production gift boxes
A beautiful homemade box is not a gift in itself, but it can serve as an excellent gift package for any occasion. Such options original products a great variety - from the simplest to the incredibly complex. On this page you will receive step by step instructions How to make your own boxes using the origami technique, in the form of handbags, cradles, small cakes and envelopes. For ease of production, master classes are accompanied by diagrams and templates.
How to make an origami box out of paper (with video)
This simple origami box, made by hand, does not require gluing. Simply fold a piece of paper as shown below.
- Cut a square from a sheet of paper as shown in the photographs.
- Fold the square along the diagonals. Unfold the paper.
- Bring the corners of the square to the intersection of the diagonals and bend the paper.
- Separate the opposite sides as shown in the photo.
- Fold the corner of the square as shown in the photo. Unfold the corner.
- Bend and straighten the remaining corners in the same way.
- Bend the workpiece as shown in the photo.
If you want to make your paper box as durable as possible with your own hands, you can glue it. To do this, coat the sides of the box with glue.
These photos show how to make a box out of paper using the origami technique:


You can leave the box in this laconic form, or you can give it some zest by adding decorative elements:

Detailed instructions for making an origami box with your own hands are given in this video:
And if you want to give a gift to your loved one, then decorate the box in a romantic style:


Beautiful boxes-handbags with your own hands: master classes with video
Such a beautiful handmade gift box also does not require gluing. The difference is that you first need to cut out the template according to the template, and then fold the box.


Your box-bag is ready! But if you think it looks a bit boring, we suggest using our ideas for decorating it.
Box-handbag in a classic style:


Here you can see a diagram for making a box-bag with your own hands:

Box-bag with embroidery:

- Make a box from thick silver paper.
- At the bottom of the front wall, attach a piece of lace or canvas to the corner. Cover the bottom of the fabric with a piece of silk ribbon.
- Tie a bow from the same ribbon.
- Glue the embroidered flower applique and bow onto the box flap.
This video explains in detail how to make a box-bag out of paper:
Gold box-handbag:

- Make a box from thick gold paper.
- Glue strips of gold paper lace at the bottom of the front and back walls and on the fold of the flap.
- Glue a rosette of artificial leaves with second glue.
- Attach the rosette to the box flap. Glue a star bead in the center.
- Attach the same beads to the front wall of the box.
In the next section of the article you will find templates for making your own envelope boxes.
Making gift envelope boxes: instructions with templates

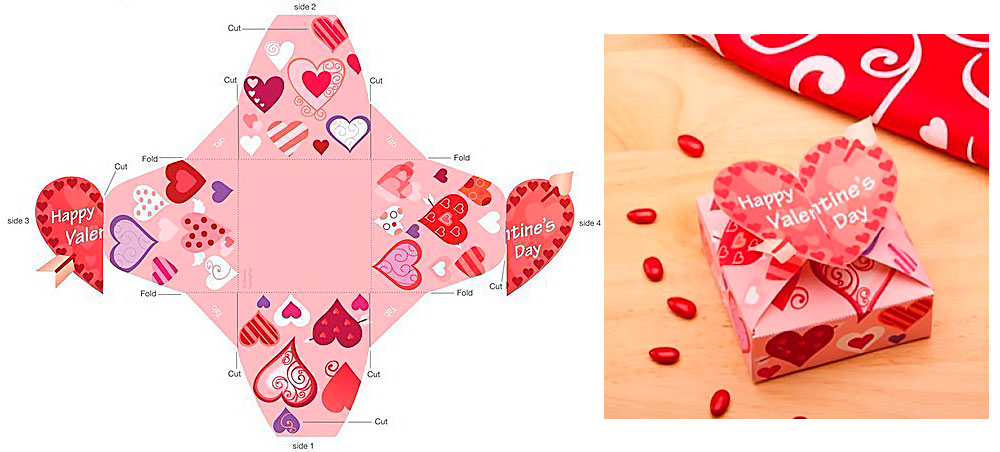
A DIY gift box-envelope also does not require gluing. Please note: the side flaps are bent in an arc, due to this the box is voluminous.

Use these templates to make your own paper envelope box:

There are a lot of options for decorating such a box. Let's look at some of them:
New Year's style envelope box:

- Cut and fold a box from thick green paper.
- Cover the box decorative tape
- Cut out a Christmas tree from thick green paper and secure it in the center of the long side of the box.
- Decorate the Christmas tree with beads and pearl rhinestones.
- Glue New Year's figures on both sides of the tree.
- Using a white acrylic outline, place dots on the box to represent snow.
Advice. The envelope box can be opened not only from the long side, but also from the short side. In this case, the decor can be attached to the entire long side of the box.
Romantic style envelope box:

- Cut and fold a box from thick pink paper.
- Glue a strip of white paper lace on the left side of the front wall.
- Using hole punchers, cut out some flowers and polka dots from white printer paper.
- Glue small parts onto the box.
- Glue it on the valve artificial flower. Attach a pearl rhinestone in the center of the flower.
Advice. If you don’t have a flower at hand, you can cut it out of thick paper and emboss it to add volume.
To make an envelope box with a bow with your own hands, proceed step by step:

- Cut and fold a box from thick silver paper.
- Cut three pieces of silver/pink ribbon.
- Glue a ring from one piece so that it can be put on the short side of the box.
- Fold the second piece into a bow and glue it to the ring, covering the gluing area.
- Cover with a third piece of ribbon long side boxes and both side flaps.
Advice. Before cutting the tape, apply it to the surface of the box in the places where it will be glued. Cut pieces 2-3 cm longer than the surface to be pasted.
Below you can find a master class on making a box with a lock.
How to make a box with a lock with your own hands: master class with photos

This box also does not require gluing and is made on the basis of one template, but the design allows you to change the shape of the sides, so the packaging can look different.

You can make a paper box with your own hands using these patterns:


Leave the box as is or add decoration according to the following instructions:


Advice. If you don't have an acrylic outline on hand, use a gel pen or corrector. You can also cut out circles with a hole punch and stick them on the box.
We make a beautiful gift box-cradle with our own hands

This box cannot maintain its shape without gluing. Apply glue to the valves indicated in the template.

Look at the photo on how to make a cradle box with your own hands:

If you think the box doesn’t look festive enough, follow these instructions:

- Cut and fold a box of raspberry paper.
- Donyshko and side walls Cover the inside of the box with decorative tape. Trim off any excess tape along the top edges of the side walls.
- Glue the box together.
- Paste over top part boxes with decorative tape. Glue paper lace along the edges of the strip of tape.
- Attach angel figures to the inner surface of the side walls.
- Using a gold acrylic outline, place dots on the surface of the box. Using the same outline, draw lines along the edges of the strips of tape and the top edge of the sides of the box.
Advice. Instead of metal figures, you can use stickers made of golden paper or simply cut out silhouettes of angels from such paper.
Below you can find instructions on how to make a pillow box with your own hands.
Master class on making a pillow box
A pillow box is similar to an envelope box, but, unlike it, it requires gluing. And it closes due to its own shape.


Advice. When gluing, make sure that the sides of the box completely cover the flaps.
The pillow box can be made more solemn:

- Cut, fold and glue a box of thick silver paper with a holographic effect.
- Cover the middle of the top and sides of the box with decorative tape, forming a strip approximately 2/3 the width of the box.
- Cut out a cloud-shaped tag from lilac paper.
- Gather a bouquet of artificial flowers and stamens and tie it with a thin lilac ribbon.
- Place the tag on a strip of tape and secure the bouquet on top.
- Glue a small figurine ladybug- it will create a bright accent.
Advice. It is quite difficult to work with paper with a holographic effect: it is too active in itself, and it is not easy to come up with a design for packaging. The background for decoration can be created from a strip of tape.
The final section of the article is devoted to the step-by-step production of a cake box with your own hands.
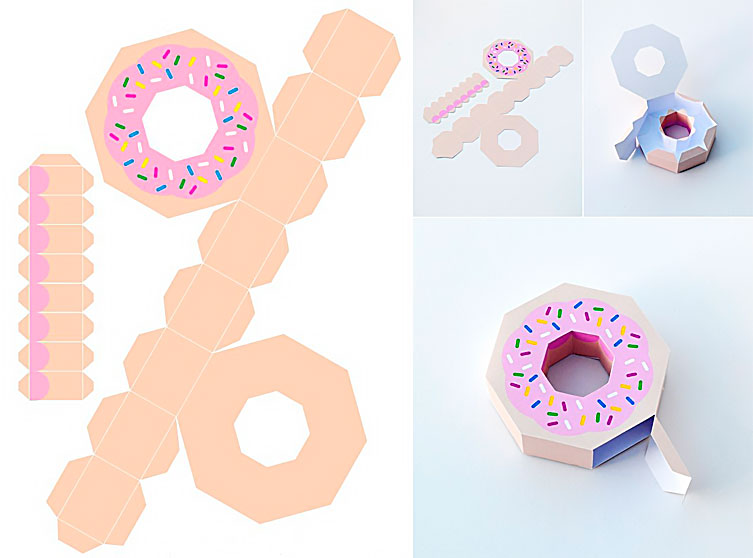
How to make a cake box with your own hands: step-by-step instructions
This cake box also needs to be glued so that it retains its shape. But a “lock” will help close the box.


Use these templates to make a cake box:

You can create a box in the shape of a chocolate piece of cake. To do this, follow the instructions:


Advice. When making a ring for a cake gift box, you can use thin colored corrugated cardboard - it gives additional volume, and the box looks like a real chocolate cake. But be careful: corrugated cardboard is often brittle.
Paper boxes are a great way to decorate gifts with your own hands, create original packaging for storing household items, as well as a wonderful opportunity to bring creative impulses to life.
A big plus is that you can start training on plain paper or unnecessary thick cardboard, after which you can move on to making beautiful boxes from special paper.
To gift box with your own hands it turned out neat and pretty; when doing it, it wouldn’t hurt to take the advice of professionals and follow the step-by-step instructions with photographs and diagrams that can be found in our material.
Method No. 1: Square origami box

Beautiful and easy to make - this is how your first homemade box should be. This is exactly how it will turn out if you do it according to these simple instructions. IN in this case origami style is used.
- Colored or wrapping paper for gifts;
- Scissors;
- Ruler;
- Pencil;
- Decorations optional - satin, velvet or lace ribbon, 3D applique, flower bud.
How to make a box:
To make gift wrapping easy, it will come in handy step-by-step instruction with photo. In order to do a beautiful box, you need to take care to create the lid and the main part in the same style. The top can be presentable, bright or playful. The bottom can be made from plain paper of a suitable color.
- You should start by creating a lid for the box. You will need paper for this square shape. The sizes can be anything - depending on the author’s idea. In this case, the square will be 21.5x21.5 cm. You need to draw a square of paper diagonally to make a cross, as in the photo below.
- The bottom corner must be bent so that it lies at the central point of intersection of the drawn lines. You can navigate by the photo. Then you need to bend the resulting fold again, but this time so that its edge exactly coincides with the drawn strip. The folds must be smoothed out well so that they are imprinted on the paper. You can use the body of a pencil. After this, we bend the square back, keeping on the paper the folds necessary for further work.

- We repeat these steps for the three remaining corners, resulting in a finished square with a grid of folds we need. After this, we cut two side parts on both sides, which now look like houses.

- We do the next step according to the photographs: we fold the lid of the future box.

- After this, you can begin to make the base of the box. To create it, you will need a square of paper 3 mm smaller than the previous one. In our case - 21.2x21.2 cm. The bottom is folded in the same way as the lid. The result is a beautiful box that can be decorated with ribbon, applique, or flower.
- The inner ends can be glued on the inside with double tape.

We learned how to make a box out of paper, but there are also more reliable materials for such an important product as gift wrapping.
For clarity, you can watch a video where the box is also made in origami style:
Method No. 2: Rectangular box made of thick paper

Plain paper is good, but a gift box made from this will not always be a good idea if its purpose is to keep a heavier gift intact. For the next craft, you will need thick paper - that is, cardboard.
To make the box you will need:
- Cardboard;
- Double-sided tape/glue;
- Scissors;
- Pencil;
- Ruler;
- Decorative decorations.
How to make a box:

- First you need to print and cut out the template. If this is not possible, you can redraw it on your thick paper, taking into account required sizes. The main thing is to maintain proportions.
Sample:

- Having cut out the future box from cardboard, you need to bend all the ends in the places marked with a dotted line. Since the paper is thick, you can help draw the fold lines with an object with a sharp end (pencil, nail file, screwdriver).
- Now that the silhouette of the gift box has already appeared, you need to stick double-sided tape or apply glue to the places where the edges of the paper should meet - that is, on the sides, as in the photo. Then all that remains is to fold the cardboard into a finished box and, if desired, decorate the product with stamps, appliqués, ribbons, and inscriptions.
Method No. 3: Triangular cake box

Not only simple square and rectangular boxes can be made from paper and cardboard, but also gift and packaging products are very original forms. Step-by-step photographs will help you understand the manufacturing process faster.
As in the previous case, making this box will make the job much easier ready-made template. The edges of the lid can be wavy, which is associated with cream, or straight. You can choose the colors of the paper at your discretion, the main thing is that everything looks harmonious together. The dimensions of the future box can be anything, the main thing is that the template of the bottom part is 3 mm less template covers.
To make the box you will need:
- Cardboard or thick paper;
- Glue;
- Scissors;
- Pencil;
- Ruler;
- Decorative decorations - optional.
How to make a box:
Advice: For the first time, you should try to make this box from plain paper to understand the manufacturing principle, and only then proceed to the original on more expensive paper.
Templates:
 Box lid template with straight edges.
  Box lid template with wavy edges.
  Template for the base of the “cake” box.
 Important: Be sure to check the template sizes, these examples may not fit each other in size. The dimensions of the base template should be slightly smaller than the dimensions of the lid template.
- We draw a template for the lid and the base of the box on two separate sheets. Cut out blanks from paper.
If this is the final version of the product and you want to work with cardboard, then paper templates you need to attach it to the cardboard and outline the edges, mark the dotted lines of the folds, and then cut out the components of the box.

- Then you need to make even folds on the cardboard in the dotted areas. You can help yourself with a ruler and a pointed object.

We are often accustomed to seeing in films how happy people they take it out from under the Christmas trees or receive some kind of gift as a gift, but the key here is that the gift is packaged in a beautiful box. This is done mostly to create intrigue, less often to preserve the integrity of the gift. Of course, it’s much easier and less time consuming to pack a prepared gift into packaging from a store, but it’s much more interesting to make a box
So, your product will look the way you want, and besides, such boxes are unique in their kind, so you will make them yourself. Making such boxes is not at all difficult, and most likely you yourself will receive indescribable pleasure from the work done with your own hands.
First you will need to roughly estimate the size of your gift, taking into account several important factors, such as height, gift thickness and gluing allowances. We will take these dimensions as a basis when making boxes for New Year with your own hands.
 We will need:
- Long ruler;
- Scissors;
- Thick paper(preferably corrugated cardboard) sizes 15x15 cm and 14x14 cm.
You need to draw squares of the indicated sizes, draw a diagonal and bend the corners to the center. Next, the same corners that you just bent at the middle need to be bent to the opposite bend line, and then to the nearest fold line.
Focus on the fact that we have a square in the center, which will be our reliable bottom for the gift box that we will make with our own hands.
Next, on both sides of our diagonal, along the first deflections, we make cuts to our central square. The cut edges need to be folded along the bends - this is how we get the walls of the box for gift wrapping. 
The sharp ends of the box need to be bent inward, towards the center of the bottom square. Using the remaining uncurved ends, we grab the bent ones and wrap them inward. This will be our cover.
We make the second box using the same principle, and due to the fact that this square is one centimeter smaller, the box will close perfectly. Moreover, if you are thinking about how best to make a beautiful box for a gift, then for the other half of the box, take thick paper, not cardboard. 
Such a home-made box will fit a gift measuring 5 or 6 cm and up to 3 cm high, i.e. approximately the size that could fit in your palm. If the gift is very small, and you don’t want it to dangle in the box like a rattle filler, then you can put light tissue paper on the bottom, prudently crumpling it.
A more convenient alternative would be simple napkin. As you have seen, making such a small gift box is not at all difficult.
Such a box with a gift inside should be tied with a ribbon or a beautiful ribbon.
And since making such packaging boxes is not difficult, we want to show a few more options.
Box-cone
 Necessary materials:
- Thick paper of any size;
- Compass;
- Glue;
- Pencil;
- Scissors.
First you need to decide how high the cone is needed, the size of the circle will depend on this. The higher the cone, the larger the circumference. After drawing a circle, divide it in half. Now form a cone and glue the edges. 
The bottom of such a gift box will be a piece of foil, which you will use to seal your box. The cone can be beautifully disguised by making a Christmas tree out of it.
Try it - it's great inspiration!
Box in the form of a prism
Prepare the following: 
- A square cut out of thick paper measuring 18x18cm;
- Scissors;
- Ruler;
- Pencil;
- Ribbon and hole punch.
So, we draw the square in half and diagonally. We bend the corners towards the center, and then from the center of the edge into the deflections of the central square you need to draw even arcs. 
After this, use scissors to cut off unnecessary corners, and at the rounded ends we pierce small holes using a hole punch and stretch a thin ribbon into them.
Box with a hiding place
And now we want to suggest making a gift box that will come with a little surprise. The box is a fake - it will fall apart when you remove the lid. By the way, the lid is made according to the same principle as we described in the classic box.
 So, we will need:
- Glue;
- Scissors;
- Thick paper;
- Decorative ribbons and other decorations;
- Beads, ribbon, old postcards.
If the bottom is made from a sheet of 18x18 cm, then for the lid we take 1 cm more, i.e. 19x19cm.
Bottom: cut the sheet into nine even squares, cut off the corner ones. Bend the ends of the resulting cross inward, forming the shape of our future gift wrapping box. 
You can decorate the inner surface to your liking, glue pictures of old postcards, beads, and then put the gift in the finished box and pack it.
Don't forget the tape!
Felt box
 We will need:
- Felt of different colors;
- Thread and needle;
- Glue;
- Scissors;
- Ruler.
Draw the fabric into nine squares or rectangles, cut out the corners. If desired, the outer side can be decorated with patterns; the walls need to be evenly bent and sewn together. Even if the seams are noticeable and the threads are different from the color of the felt, don’t worry: consider it a design move. 
You can decorate the box according to your preference. This box will be good in the role New Year's box for a handmade gift.
So that's it. These are just the basics, more complex circuits Suitable for those who already have experience in creating simpler box models.
Good luck and inspiration!
Gift packaging can be very diverse. But there is one rule - the cardboard or paper from which you want to make a box must be required quality. Classic in this sense children's cardboard Not all fit.
Where can I get such cardboard or paper? First of all, in specialized stores for creativity or even scrapbooking separately. It’s good if there is such a store in the city, you say, but what if you don’t have one at hand or the prices are sky-high?
These leaves will be enough for you to make small souvenir boxes (for jewelry, sweets, toys, etc.). Your family will appreciate it
And now I suggest you start with the actual detailed photo master classes, which will include a diagram for creating each individual box.
Master classes on creating boxes from cardboard and paper
Small boxes
First of all, I want to give you 5 designs with very cute patterns that will make this wonderful packaging:

The first one has red roses. If you want to impress your lover, then she is definitely for you.
Principles of working with templates:

Large rectangular
This is perfect for large gifts (for example, wall clock). You will need specialized binding cardboard to make the box really convenient. By the way, binding cardboard can also be purchased in specialized stores or on Ali.
The incision sites are marked in orange. The lid can be made the same way, but with slightly larger dimensions (2-3 mm).

For a man
If the gift is intended for a man, then I suggest choosing one of the following options.
Simple shapes are on trend - this is proven by the following 4 templates for creating strict, classic boxes. For these you will again need thick cardboard.


If the gift is intended for a loved one, then there should be more than enough romance ^^ There are butterflies, hearts, and all kinds of declarations of love. They can be made from thick cardboard or thick paper.


Heart
Heart boxes are very popular because you can use them to express your feelings. Or admit them


Cake
Are you getting ready for a party where everyone will need to be given a little surprise? Or maybe a wedding is planned? In both cases, cardboard pieces of cake will come to the rescue.
A beautiful and clear diagram is suitable for both the bottom and the lid.

Paper boxes
Boxes don't always need to be tight - sometimes it's enough just to create beautiful picture. Then I suggest you use this convenient scheme of 6 different packages:

If you are going to a child’s party (or maybe you want to please your child), then make him a cute box in the shape of an animal.

Boxes for the New Year
The mood can be created not only with the help of gifts) Just look at these 8 lovely boxes, each of which can also become an excellent New Year's decoration
This is especially necessary if for some reason there is no New Year's tree. The main thing in this packaging is to trim the edges beautifully and neatly.

Snowflake
Of course, this box itself is wonderful, but the silver paint on the tips of the snowflakes can add some zest.
Tip: Give something in this package to a girl who loves Frozen.

Bag
For giving a gift - one of the simplest options.

Box of sweets
For all lovers of beautiful New Year's favors and quick handmade items! Take a plastic cup with a smooth surface, cut the edge and cut the edge.
Fold the cut pieces inward so that they cling to each other. Place some goodies inside and cover the top with something cute.
And other concerns).
But recently I made a box as a gift and decided to post a small master class.
So let's do it surprise clamshell box.
The idea is this: a person receives a huge box as a gift, opens it, inside there is another smaller box, then another one, and so on until we have a tiny box with a small gift in front of us.
This packaging is very convenient when you want to give small gift like jewelry (rings), money or any other memorable gift.
The clamshell box solves several problems at once:
1. It looks impressive and does not create the impression that the gift is too small (this is for lovers of gigantism))));
2. It’s much nicer to receive such a box than just a banal envelope with money;
3. The box can be decorated with various wishes, photographs, small memorable items and becomes a repository of pleasant memories, and this, you see, is more valuable than even the gift itself.
What you will need for work:
1. Cardboard (binding or corrugated)
2. Wrapping paper is different
3. Decorative elements from paper, wood, beads and whatever you want to decorate the box with.
4. Double-sided tape (thin and foam)
5. Paper glue (PVA, Moment Crystal or any other that you are used to working with)
6. Paper or masking tape of different widths
7. Scissors
8. Ruler
Working hours:
The time it takes to assemble a box depends entirely on the size. A box measuring 30x30x30 cm can be assembled in 1-1.5 hours (this is only one outer box!), smaller inner boxes can be assembled in 30 minutes to 1 hour. Plus add here the time for decorating - about half an hour for each box. In general, you can spend 10-15 hours assembling and decorating the entire package. Therefore, plan to create such packaging in advance; you definitely won’t be able to do this at the last moment.
I’ll say right away that this option does not pretend to be highly artistic, it was made quite simply and quickly, so we believe that this is a version of a simple clamshell box))) You can get confused and make a clamshell box that is ideal in all respects, but be prepared to spend a few on it full days, since working out the details will require an appropriate approach.
Begin?
1. Before starting work, decide on the size. I recommend starting with the largest, outer box, as this takes up the largest amount of material and can be used to plan the size of the inner boxes from there. It is better to make the box in the form of a cube, then it will be easier to calculate the dimensions - all dimensions of a cube are equal. Each subsequent box should be 3 cm smaller so that decor and a lid can be placed between the boxes inside. Also decide what size you should have the smallest inner box that will contain the gift.
2. Select base material.
Corrugated cardboard(from old boxes or purchased specifically in sheets) are much lighter, so the overall weight of the finished clamshell box will be relatively light. But keep in mind that the boxes will be larger, so the appearance will not be very compact and neat.
Binding cardboard much heavier, but it is smooth, sticks well and holds the paper, and is much thinner than corrugated, so the box will turn out smooth, beautiful and neat.
3. We will use 5 sheets of cardboard of the same size for the base of the box. In my case, these are sheets of 30x30 cm (in what follows I will give all sizes based on the size of my box).
We put one sheet in the middle and place 4 on its sides. Leave a small gap between the sheets (about 3-4 mm) so that the sides of the box can be laid out freely.
4. Use paper tape to glue all the joints of the sheets on one side, turn the workpiece over and do the same on the other side. Thus, we obtain a blank of 5 sheets, glued at the joints on both sides.

5. We are now working with the largest, outer box, so we need to glue the outer bottom so that the box looks decent from the outside.
Cut from wrapping paper square measuring 35x35 cm (it should be slightly larger than the cardboard bottom).

6. Glue strips of thin double-sided tape to the cardboard bottom, not too often and not too rarely, so that the paper sticks evenly.

7. Cleaning up protective paper with tape and glue on a sheet of wrapping paper that we cut out in advance.

8. In the corners of the protruding parts of the paper, make cuts at an angle of 45 degrees.


9. Turn the bottom blank over, bend the corners and glue them to the base.


We bend the extra centimeters and glue them to the base. Here it is better to use glue, since you need to coat quite large areas of paper.
Before gluing the sides, you need to bend the corners of the paper so that the corners of the base look decent.


This is what the inside of a large box should look like after gluing the paper to the outside:


13. We have the base of the largest box ready, now we need to make the lid. We know that the size of our large box is 30x30 cm, so the size of the lid should be a centimeter larger. We cut out a square 31x31 cm and 4 strips measuring 31x5 cm from cardboard. Here 5 cm is the height of the lid, I took this size in particular because of the paper tape (I had it wide, 5 cm), so that it would be convenient to paste over and not need I had to constantly cut off the excess width. You can make the height of the lid smaller by adjusting it to suit your needs.
We lay out the cut out parts in the same way as when creating the base of the box, but close to the middle sheet (that is, we do not make gaps between the parts)

14. Cover the joints of the parts with paper tape only on one side of the workpiece

15. It turns out this design (we have glued joints inside)

16. Fold the corners tightly and cover them on the outside with a strip of paper tape. It is important to ensure that the parts are glued evenly and tightly - this directly affects appearance covers.


We get such a cute blank. By the way, you can “learn” this method of gluing at the post office - watch how they pack your box with your parcel, the principle will immediately become clear.


You should end up with a neat lid like this:

I successfully forgot to take a photo of the process of gluing the lid, but in principle it’s worthy separate master class, since the process is interesting, but in order to have at least something, I’m posting the process of gluing the lid from corrugated cardboard.
First you need to cut out a sheet of wrapping paper taking into account the height of the lid, that is, if the base of the lid is 31x31 cm, its height is 5 cm, then we cut out a sheet of at least 42x42 cm so that it is possible to seal the outer and inner heights of the lid:


19. Ufff. Are you tired?)) And this is just us who did the first, most big box! Go ahead. Each subsequent box needs to be made 3 cm smaller, that is, we cut out 5 sheets of cardboard measuring 27x27 cm.
Laying the sheets:
Cover both sides of the workpiece with tape


You should end up with something like this without the bottom covered with paper:

20. Now we glue the smaller box to the larger one. To do this, place the base of a large box on a flat surface, coat the bottom of the smaller box with glue and carefully glue it exactly to the center of the inside of the bottom of the large box. Like this:

21. Next, we repeat all the above procedures several times with a corresponding reduction in the size of the boxes. Here's what I got:
1 box – 30x30 cm, lid 31x31 cm
2 box – 27x27 cm, lid 28x28 cm
3 box – 24x24 cm, lid 25x25 cm
4 box – 21x21 cm, lid 22x22 cm
5 box – 18x18 cm, lid 19x19 cm
6 box – 15x15 cm, lid 16x16 cm
I didn’t make the box smaller, because... I needed to put an envelope with a gift card, and 15x15 - the smallest box was very convenient for this.
In general, you can make a larger number of boxes, increasing them, for example, to 9 pieces. Then the smallest box will fit a box with a ring or any other small gift.
22. Now we need to decorate all the boxes of our packaging.
We start with the smallest one, and in front of us lies this structure:

Decorate congratulatory inscriptions, stickers and other decor, insert the envelope right away!

We close the box with a lid (you also need to decorate the lid) and start decorating a larger box.

Close the lid again and decorate the following:


And finally, our big box!

To prevent the box from opening prematurely, it must be tied with a beautiful ribbon and solemnly presented to the recipient. Delight and tears of happiness are guaranteed!
Here’s another small gif where you can briefly see the process of creating a similar clamshell box:


