We offer a bright, creative box for your gifts in the form of a hat with a real bubo, like Santa’s. It’s very simple to make, and most importantly, quickly, because the New Year and Christmas holidays are coming very soon, and you still need to prepare what will be hidden within you. Soap will fit perfectly in this box self made, jars with creams and lip gloss, small New Year's candles, this is a wonderful packaging for a bath bomb with New Year's scents, made as a gift, etc.
New Year packaging Santa Claus hat made of cardboard
For a small square box with a cap lid you will need:
- 1 sheet of red corrugated cardboard (for the base of the hat)
- 1 sheet of white corrugated cardboard white(for the edge of the cap and box)
- Scissors and wavy scissors (optional)
- Ruler, pencil and checkered leaf
- A small skein of white thread and a large fork for the bubo
- Double sided tape
- Decorative elements for the edge of the hat (optional)

Economical New Year's packaging
Step-by-step instruction
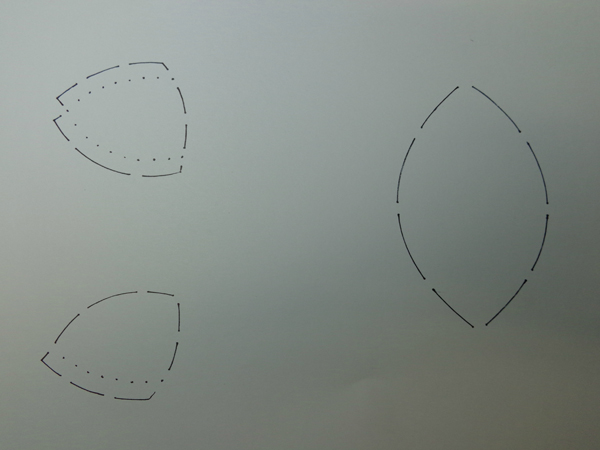
1. For clarity, let’s create a packaging template on a checkered piece of paper. Element 1 and 2 are the white box and cap edge, respectively; element 3 is the red cap.

Instructions for making packaging for New Year's gifts

2. Let's start with the box, to do this we transfer element 1 to white corrugated cardboard, cut along solid lines, and bend along dotted lines.

3. Assemble the boxes and glue them with PVA or staple them. The useful area of the resulting box is 6.5 cm x 6.5 cm, with a height of 3 cm.
4. Let’s start with the Santa hat, to do this we transfer element 3 of the template onto red corrugated cardboard, trace it, cut it along the solid lines, and bend it along the dotted lines.

DIY New Year gift boxes

Instructions on how to make New Year's gift boxes
5. Glue the cap flaps with PVA glue and assemble the cardboard cap.

DIY gift box for New Year 2016

Christmas boxes scrapbooking
6. We return to our templates, transfer element 2 (edge) to white corrugated cardboard, cut out and bend along the dotted lines. If desired, this strip of paper can be trimmed with zigzag decorative scissors to create wavy edges.
7. Glue the white cardboard edge to the red cap.

Packaging for New Year's gifts
8. Now you need to decorate the hat with a fluffy bubo. How to make a bubo on a fork quickly? Very simple. For a box of this size, it is better to choose a large and wide one; the diameter of the bubo will be approximately equal to the width of the fork.

Packaging for New Year's gifts for children
9. Wrap the white fluffy thread tightly around a fork. Depending on the thickness of the thread, you will need from 5 to 15 meters of yarn.

Manufacturing of packaging for New Year's gifts

How to make New Year's packaging
10. Cut the ball from the skein on the fork and additionally cut off a thread of ≈10 cm, with this thread we pull the skein on the fork, threading it through the hole between the central teeth. Tighten the thread well and tie it in a knot, long ends We don’t cut off the threads, they will still be useful to us for the next stage.


DIY New Year's crafts

Package New Year's gift Master Class
11. Using scissors, cut the skein along the outer tines of the fork, fluff the threads and get a charming bubo.

Boxes for New Year's gifts
12. Secure the bubo to the cap; to do this, thread the long threads of the bubo through the hole at the top of the cap, stretch them all the way and tie them in a knot, after which you can cut them off long tails threads

Boxes for children's New Year's gifts

DIY Christmas packaging ideas
13. If desired, the edge of the hat can be decorated decorative element, attaching it with double-sided tape.

New Year's box decoration

Box for Christmas toys
14. Connect Santa's hat with the box and admire the result.

How to make a New Year's gift box

DIY New Year's gift boxes

How to make a New Year's gift box

Gift box templates

Christmas box Santa Claus hat
Result:
Very little time and money was spent on this New Year's packaging, but the result was a wonderful box. A Santa hat made of cardboard, made in other colors, can turn into an original package in the form of multi-colored hats, which will fit your corporate orders for DIY soap, for example, or bath bombs for all your loved ones. Inspiration to everyone and happy New Year holidays!
For friends and family, and have already bought it, you might want to wrap it up nicely. You can make original packaging for any gift with your own hands, and it’s not at all difficult.
You will need a few simple things ( colored paper, glue, scissors, etc.) and a couple interesting ideas which you can find here.
On our website you will also find:
Textile New Year's packaging
You will need:
Any cardboard packaging
Square piece of bright fabric
Bright ribbon.

1. Place your gift wrapping in the center of the fabric.

2. Tie the opposite ends together.
3. Gather all the ends into a bun and tie them with a bright ribbon.
New Year's wrapping paper packaging

You will need:
Wrapping
Scissors
Scotch tape or washi tape (tape with a pattern)
Thread or tape.

1. Prepare a large sheet of wrapping paper and fold it in half. Next, turn it and insert one end of the paper into the other (see image).

2. Secure the structure with tape.
3. Bend the bottom 7-8 cm upward. After this, bend half of the folded part to form a hexagon.
4. Bend each end of the folded half towards the middle of the hexagon and secure with tape.
5. Make small holes in the top of the package and thread threads, strings or ribbons through them to create handles for the package.
How to make a bow for gift wrapping

You will need:
Colored paper or unwanted colored magazine
Scissors
PVA glue or tape.

1. Prepare a bright page of a glossy magazine (or a sheet of colored paper) and cut it into strips 2 cm wide and the following lengths: 3 strips 28 cm long, 3 x 25 cm, 2 x 22 cm and one strip 9 cm long.
2. Fold each strip to create a loop at each end (see image). Glue the ends with PVA glue or tape. Make a circle from the smallest strip.
3. Carefully begin gluing the strips one on top of the other, starting with the longest one. At the end, glue a circle from the smallest strip.
Beautiful packaging for New Year's gifts

You will need:
Simple paper bag
Corrugated paper in pastel colors
Scissors (regular or fringe)
PVA glue or glue stick.

1. Cut corrugated paper into several strips of the same size.
2. You can cut the fringe and then partially glue it paper strips to the package or vice versa, i.e. Apply a little glue along one side of each strip and stick them to the bag, then cut the fringe.

3. You can tie a tag with congratulations to the handle.
And here is an option with colored corrugated paper:

New Year's packaging for candies

You will need:
Wrapping
Small box or cardboard cylinder of toilet paper
Scissors

1. Spread it on the table wrapping paper(large enough to wrap around the box) and place the box of candy on it.
* Try to cut such a piece of paper that after you wrap the box in it, there will be a lot of margin left and right.
2. Press the paper firmly against the box and secure it with tape.
3. Gently crumple the ends of the paper along the sides of the box and tie them with ribbon.
Men's gift packaging for New Year's gifts


You will need:
White and colored paper
Button
Double-sided tape
Scissors
PVA glue or glue stick.
Video instructions are attached below.
1. Place the gift box on a large piece of white paper.
2. Wrap the gift in paper.
* To make the central part of the shirt, you can fold the paper towards the middle of the box and then bend its ends where the lines are drawn in the image. You can wrap the top part of the paper in the same way as the bottom or as shown below in the video (at 2:12 min).


Side view

* You can also wrap the paper in the usual way, secure its ends with tape, cut a strip from another paper, bend it and glue it to the main paper.
3. To create a collar, you can cut a wide strip of paper, fold it in half lengthwise and bend it so that it resembles a collar (see image).


The video shows another option for making a collar for such packaging (at 2:30 min) using double-sided tape and tape. The ribbon is then tied like a tie.
4. You can make a bow from thick fabric or paper.

Fold a small rectangular piece of fabric or paper in half
Fold the ends towards the middle and secure with glue (superglue or fabric glue) to create two loops
Cut another piece of fabric or paper and wrap it around the piece, with loops
Glue the bow to the package and wrap the package in colored wrapping paper.


Video instruction:
Children's New Year's packaging (photo instructions)


New Year's packaging for children's gifts: "Hedgehog"

Do you want to learn how to make gift boxes with your own hands?! In this review we will present to your attention as many as 25 ideas for making them.
Below you will find a wide variety of examples. gift boxes, which you can make yourself without any special skills. Well, the result will be an exclusive copy of the packaging for the selected gift. Moreover, even if you follow the instructions in this review step by step, your box can still be considered exclusive. Since in any case, to make it you will use your own materials (paper, cardboard, ribbons, rhinestones, buttons), which will differ in color and texture from those presented in a particular master class. Well, let's get started.
How to make a gift box with your own hands.
1. Box house.
You need to print out the template below on beautiful paper. As a last resort, you can try to redraw it by hand. Then the workpiece must be cut and folded along all the dotted lines. In the bottom of the box you need to create two slits with a stationery knife into which you should insert the tape. All that remains is to glue the house, cut out two rectangles for the roof from matching paper, bend each of them 1 cm, and also make slits in each of them (see photo). Insert a ribbon into these slots, place the gift inside, and tie the ribbon on top in the form of a bow. 


2. Round cardboard box.
You need to cut 4 circles from porous packaging cardboard, two of them should be slightly larger than the other two. From beer cardboard, cut two strips the size of the circles, with a margin for overlap, one wide, the other narrow. Glue together 2 large circles using double-sided tape or instant glue, then glue the remaining 2 circles separately. We will create the base of the box from smaller circles; to do this, we apply a transparent moment to the sides of the circle, glue a strip of cardboard here, for strength, you can stick another one on top of this strip. We do the same with the lid, glue a narrow cardboard strip around the perimeter of the large circle. You can create a bow from a ribbon; to do this, cut the ribbon in half, glue its ends to the inside of the lid, and tie the remaining ends on top in the form of a bow.

3. Cake made of felt and a plastic container.
Must be purchased Plastic container round shape with lid. We cut out strips of felt with a width and length comparable to the side of the container. Glue the felt using double-sided tape. Glue a round piece of felt fabric onto the lid. We glue openwork braid along the bottom and top of the “cake”. Glue flower-shaped ribbon to the top of the lid and create roses from cotton pads. See the photo below for how to make these. In the center of the cake you can glue two or three felt strawberries stuffed with padding polyester. All that remains is to put the gift inside and the present can be given to the recipient.


4. Box made using origami technique.
This box is quite simple to make, but looks very presentable. Especially if you take beautiful thick paper as a basis, for example from a scrapbooking kit. How to do gift box We described this technique in detail in.


5. A box in the shape of a flower bud.
We print out the template presented below on suitable paper (although, however, it can be redrawn by hand). We cut out the workpiece and create folds along the dotted lines using a ruler. We turn the workpiece over to the front side, and lightly tint it along the edges using a foam sponge and a stamping pad (you can just use ink). We put the gift inside and collect the “petals” on top (see photo). 


6. Box in the shape of a carrot.
This packaging is ideal for New Year and Easter celebrations. To make it, plain orange paper or one that imitates the skin of natural carrots is suitable (you can look for it in the creativity departments). We described in detail how to make such a “carrot” in.

7. A neat box with a bow.
You must print the template below on suitable paper. Not writing pen or with a running tool, you need to run the lines marked with dotted lines. You need to create folds along these lines, put the gift inside and close it. To prevent the box from “falling apart,” you need to tie it with a ribbon and tie a bow on top.


8. Square box.
Print out the templates below. On the side parts, where the “wings” are, you can make marks with a pencil and create folds along them. Similar folds must be made in the central part of the box and lid. We glue the box and the lid separately from each other using instant glue applied to the wings. Finally, the box can be decorated with sticky leaves. cute paper, as well as cute braid.


9. A box in the form of a Lego piece.
Children will definitely like this packaging. Well, we told you how to make it yourself. Or you can watch the video below.

How to make a Lego box (step-by-step video):
10. Hexagon box.
We print out the box and lid templates below on thick paper. We run them along the dotted lines, bend them, and glue them together. We decorate the lid and box with beautiful paper, rhinestones and ribbons. You can glue a few cute buttons on top of the lid.


11. Lockable box.
You need to print the template below or redraw it by hand. Then you need to cut it out and make cuts on the wide parts (see photo). All “wings” must be bent, glue applied to them, and the product glued together. All that remains is to put the gift inside and close the box at the top.


12. Pyramid box.
This box is rightfully considered one of the most interesting and beautiful. To make it, it is better to use thick, beautiful paper. You will find all the details on its production.

13. Box with basic manufacturing.
You need to print the template that you will find below. Print immediately on beautiful paper. Next, this blank needs to be cut out, folded along the central dotted lines, and closed by tucking the petals in the desired order (as in the photo below).


14. Box in the shape of a diamond.
Just imagine how nice it is to receive something in such a non-standard packaging beautiful decoration, let's say a ring, earrings or a pendant, or maybe cufflinks for a man or a tie clip. We told you how to make such a diamond.

And here is another version of the diamond box + template (video):
15. Square box.
Take some nice thick paper and print out a template on it (look below). We cut it out, bend it along the “wings”, as well as into square parts. We glue the product into a single whole, and glue the tape from the back of the box, right up to the end of the lid and the beginning of the box.


16. Box of candy.
It is not necessary to give any sweets in such “sweets”; you can put jewelry, lipstick, nail polish, a small doll or a car here. We described how to make this candy.

17. Box corset.
It is necessary to redraw the example templates presented below. Cut out the workpiece, create slits in the right places, glue the product, and insert a ribbon into the holes of the “corset”. If desired, decorate with paper flowers and braid.


18. Neat bonbonniere.
You can put small items in such a cute package: candy, tiny toys or jewelry. Well, you will find out how to do this.

19. Rectangular box.
Take a sheet of paper and cut it in half (you can take two sheets of paper at once). We cut 4-5 mm from one sheet, from the long edge and the short one (this will be the bottom of the box). We draw each sheet according to the example below. We create cuts from the side hems. We create folds, glue double-sided tape to these parts, and form a box. You also need to do the same with the lid.


20. Box - a round cake with candles.
Very original packaging for a birthday gift. Well, you will learn how to make it by studying.

21. A quick square box.
Take a square sheet of paper. From corner to corner we draw two intersecting lines. We first bend the right side of the sheet to the center, then the left, as well as the top and bottom. You need to make cuts along the formed fold lines, according to the photo below. Using glue or double-sided tape, the box must be glued into a single whole. From a square sheet bigger size(more by about 5 mm) you need to make a lid according to the method described above. If desired, the finished box can be decorated with rhinestones, ribbons, and buttons. 

22. Box in the shape of a house.
Such a box will definitely please the recipient. Step-by-step master class on its manufacture you will find.

23. Box dress.
This dress is created according to a template, which, together with step by step examples production you will find. Or you can watch the video below. Such a cute box will definitely appeal to every representative of the fair sex.

Video with details on how to make a box dress:
24. Box shoe.
You need to print the template below with the details. Then transfer it to dense beautiful paper and bend along the dotted lines. Glue the product into a single whole: the long part is the sole, the top part is the side wall, you need two of them, the triangle is the front part, and the outer part is the heel. Finally, the shoe can be decorated with ribbons, rhinestones and paper flowers.


25. Box in the shape of a piece of cake.
This packaging looks absolutely wonderful. In addition, it couldn’t be easier to do, see for yourself by studying. This “piece of cake” will fit sweets, small toys, some cosmetics, small mittens, a chiffon scarf, etc.

How to make a box - a piece of cake (video with details):
How to make a box for a photo album (video):
Today the Confetti.ru website showed you the best, cute, beautiful and impressive DIY gift boxes. Believe me, each of them is easy to do, but the result is a delight! Moreover, this delight will be experienced not only by you when you finish making gift wrapping, but also by the person to whom you are going to give it! Happy crafting and happy holidays! See you again on the pages of our website!
The most pleasant moments New Year's holidays- They are gifts. Everyone is waiting for them, they are happy about them and unpack them with pleasure. Therefore, not only the gift should be good, but also the packaging in which it lies. We suggest abandoning store-bought gift bags and make a New Year's box with your own hands. Agree, because something made by hand and from the heart has its own irresistible energy, such a design will definitely delight and surprise everyone.
New Year's box for a small gift
What you will need:
- Round template, its size depends on the volume of the gift. You can use a disk, a plate, or draw with a compass.
- A ruler, scissors, a simple pencil, cardboard or paper with New Year's colors.
- Ribbon or bow.
Instructions for making a New Year's box:
- Place the cardboard on a flat surface. Take a round template and trace it twice so that the design resembles folded wedding rings.
- Divide the edges of the circles, using sequential transfer of templates, into 4 semicircular identical sectors. A pointed diamond shape should appear in the center of each ring.
- Cut out the rings and bend the cardboard along the marked bends.
- You can put a gift inside the formed box, then you need to fold it along the folds and tie it with ribbon.
Such New Year's boxes can be used not only as gift wrapping, but also as a toy for the Christmas tree.
New Year's pyramid box
You will need:
- Bright paper.
- Ribbon to match the paper.
- Glue.
- Scissors.
- New Year's decor.
Let's get started:
- Cut out a stencil from paper.
- We make bends on the dotted lines. We fold the paper into a pyramid, glue 3 edges together, the fourth will be the lid of the box.
- We wrap the pyramid with tape on four sides and tie it in a knot at the top.
- We tie artificial fir branches to a ribbon or glue them to the box.
- We string New Year's balls onto a ribbon and tie it with a bow. The pyramid box is ready.

Christmas tree box
To make such a box you will need:
- Cardboard or thick paper.
- Stationery knife or scissors.
- PVA glue.
- A simple pencil.
- Hole puncher.
- Scissors.
- Bow.
Operating procedure:
- Print the template on a printer and transfer it to thick paper. You can use white cardboard, paper with New Year's image or paper gift bag.
- Attach the template to the worksheet and trace along the outline. Using a non-cutting sharp object, press down the bend lines to create a groove.
- Cut out the blanks from the worksheet, bend them in the places where the grooves are pressed.
- Use a hole punch to make holes at the top of the resulting Christmas tree.
- Glue your blanks together. Assemble the inner box, don't forget to put the gift inside, then tie a bow on the outside of the box.


New Year's box house
You will need:
- Template paper.
- Scissors and stationery knife.
- Ruler.
- Double-sided tape.
Instructions for creating a house box:
- On paper desired color print out the template for the future house.
- The house looks equally cute with painted windows or cut out with a stationery knife. Decide what kind of windows you will have - cut them out or decorate them with pencils.
- Carefully roll the workpiece along the fold line.
- Make sure the house works out correct form. If everything is in order, seal the edges with double-sided tape.
- There is still a final New Year's detail left - a wreath above the door. It can be made from tinsel or cut out according to a template and glued.
- Before you seal the Christmas box with tape, don't forget to put a gift inside.

Christmas round box
To create it you will need:
- Cardboard and thick paper.
- Compass.
- A simple pencil.
- Scissors.
- PVA glue.
Step-by-step instruction:
- Take cardboard, it is needed for the lid and bottom of the future box. Mark two circles on it using a compass; the diameter of the lid should be 2 mm larger than the diameter of the bottom.
- Now you can make a blank for the side surface of the box; its circumference is equal to π×2R. Using a ruler on thick paper, draw a rectangle of the required length; you can adjust the height to your liking.
- Cut a strip for the side of the New Year's box, carefully make a roll out of it, avoiding cracks and breaks. Glue the ends from the inside with glue or tape.
- Now you need to glue it to the bottom side wall, to do this, make small cuts along the entire length of the strip, bend them inward, apply glue on the outside and attach to the bottom.
- Use the same principle to make a lid for the box.
- Now it's time to decorate the New Year's round box, for this you just need to turn on your imagination. It can be decorated with paints, covered with New Year stickers or snowflakes, and added with a bow.

As you can see, there are many original ideas, which allow you to make your New Year's gift box irresistible. All you need for a good result is desire. If it is, the box will be a good addition to your gift.
DIY souvenir packaging. Master class with step by step photos
Supervisor: Raisa Ivanovna Bolba, teacher additional education I qualification category, MBOU DOD TsTT city of Belaya Kalitva.
The packaging in the form of a box is made of colored office paper and decorated with half beads.
This master class is intended for children aged 6 years and older, additional education teachers, and educators.
Purpose: wrapping a small gift.
Target: making your own packaging box
Tasks:
- introduce origami techniques;
- develop creative imagination, fine motor skills, improve paper skills;
- cultivate artistic taste and accuracy.
For work you will need the following materials and tools:

2 sheets of colored office paper,
White paper,
White or colored cardboard,
Half beads,
Ruler,
Pencil,
Scissors, simple and curly,
Hole puncher,
Glue "Moment-Crystal"
For the box you will need two squares of colored paper measuring 21x21 cm.

1. We start work from the bottom of the box. To do this, bend the square twice diagonally and unfold it.


2. Bend the corner of the square so that the top touches the intersection point of the folds.

In this way we bend the sheet on four sides.

3. We bend three corners, fold the remaining one so that the fold line aligns with the diagonal of the square.


Fold the opposite side in the same way.

4. Open the sheet and fold the remaining two corners in the same way. The result was a square divided into small squares.

5. Draw the cutting lines as shown in the photo:

Cut along the lines.

6. Next, bend one corner to the middle along the finished fold,

then we bend the edges so that the fold is at the cut point.


We do the same with the opposite side.

7. We connect parts 1 and 2 so that they become vertical.

8. Then we fold the corner so that parts 1 and 2 are inside, and the corner itself lies on the bottom of the box.

Then we connect parts 3 and 4, turn in the corner, the bottom of the box is ready.

9. Cut out a square from cardboard to the size of the bottom of the box (7x7 cm) and glue it inside the box. This is done for greater rigidity.


For the lid of the box, we also take a sheet of paper measuring 21x21 cm. Repeat steps 1 and 2.
We make a change to the 3rd point: the fold line should run from the diagonal at a distance of 2-3 mm so that the lid can be easily put on the box.


Then everything is the same as in the first case.


Using a hole punch and curly scissors, we make a lace strip.

Glue the strip onto the lid of the box.

We will make a Christmas tree from half beads.


Let's add snowflakes

and the packaging is ready.

Here are some details,


as well as box options for all occasions.

You can see how to make a wonderful sheep here: