If you think that making a gift box is very difficult, then you are deeply mistaken. To make it yourself original packaging For a present you just need to stock up on colored cardboard and patience. If you show at least a little imagination, you can please your family and friends with an originally wrapped gift.
Ideas, shapes and photos of beautiful DIY gift boxes
Gift box with openwork decor
 Gift box: heart
  Square gift box
 New Year's box for a gift
  Gift box: star
 If you want to show your friend or relative all your respect and love, then try making a gift box with your own hands. If possible, try to use all your imagination and create the most original packaging possible. If you wish, you can make the box round, triangular or diamond-shaped or make a package visually similar to a flower, house, fruit or even a diamond.
Of course, the latter options will require a little more craftsmanship, but in the end you will get a unique item that definitely cannot be purchased in a store. The only thing you must remember is that such crafts love precision. In this case, when cutting out the template, you cannot afford to deviate from the line in one direction or the other.
You must cut all the lines as accurately as possible, taking care to create perfectly straight edges. If this stage of work is not carried out as it should be, then with a high probability we can say that in the end the box will not be entirely presentable.
How to make a cardboard box for a gift: template, pattern

 Step #1
 Step #2
 If you are new to this business, then you need to start your acquaintance with this type of needlework with the simplest things. Believe me, if you do everything correctly, even an ordinary square box will look attractive. Now we will present to your attention a master class with which you can make a rectangular gift box.
To make it, you only need glue, scissors and special cardboard. If you don't have one, don't be too upset. You can quite easily take even the one that children use in school lessons and make a frame for a craft from it. It’s just that in this case, after the box is ready, you will have to decorate it additionally. This can be done using the decoupage technique or using organza, tulle or satin ribbons.
How to make a small mini gift box from paper: template, pattern

 Scheme for work
 Gift box
  Ready box
 Template No. 1
 Template No. 2
 If you are planning to give a loved one a small gift, then you can make a small box for such a gift. It is best to make a similar craft, like the previous one, from thick paper. If you make it out of thin material, then there is a chance that it will not hold the desired shape, or it will simply tear due to the mechanical impact that the gift will have on its walls.
Yes, and in this case it is extremely important to take the most responsible approach to fastening all the side parts. Since these crafts do not have secret locks, it will be better if you secure everything with glue or double-sided tape. If the first box seems too simple to you, then below we have placed two more quite interesting templates, by printing which you can easily make some pretty cute crafts.
How to make a scrapbooking box for a gift?

 Template No. 1
  Box of squares
 In case you want to surprise your loved one for real, then make a scrapbooking box for him. To make it, you will need both regular cardboard and special paper for scrapbooking. You will make a durable frame from cardboard, and use paper to give it a festive look. The best part is that in this case you will have a huge field for imagination. Since this box is supposed to be untied, you can decorate it both inside and outside.
Moreover, if you wish, you can even provide places for small gifts in those parts of the craft that will recline. For example, you can make places there for notes in which you write the most pleasant words. But keep in mind that in order for the congratulatory notes to fit well into the overall style of the gift box, they must be in the same color scheme as it.
How to make an origami gift box?
 Step #1
 Step #2
  Step #3
 Recently, the origami technique has become so popular that even gift boxes have been made with its help. In principle, you can make such a craft from any colored paper, but since you are still making a product for an important holiday, it will be better if you spend money on scrapbooking paper.
In this case, you will not need additional decoration of the inside of the product, as you will immediately make it as it should be. The only thing you have to take into account is that to create a box, the master class for which is posted above, you need to use two square sheets, one of which will be literally 11-12 millimeters smaller. If you do not take this nuance into account, then in the end you simply will not be able to combine the two parts into one craft.
How to make a gift box with a lid?
 Recommendations for making a round box
 Gift box with lid is ideal packaging for heavier and heavier gifts. If you make it a little larger than shown in the master class, you can supplement the main gift with sweets, boutonnieres made of fresh flowers and cards made by yourself. As you probably already understood, it is best to make such a box from thick cardboard.
If you have the opportunity, purchase it at a specialty store, or go to the nearest supermarket and pick up any paper box there. When you bring it home, lay it out horizontally and place it under something heavy. Leave it in this position for literally an hour, and then proceed to drawing the frame of the future craft. This little trick will help you smooth out any kinks that would probably get in your way when creating your masterpiece.
How to make a surprise gift box?

 Box in the form of a piece of cake
 Template #1
 Template No. 2
 In principle, a surprise box can have a completely different shape, color and decor. In this case, everything will depend solely on what event you are going to. If you are going to an employee’s birthday party, then it can be a completely standard square and rectangular box, inside of which, in addition to the present itself, a piece of paper with wishes will be placed (it should be as long as possible and folded into an accordion).
If you are going to a child's party, then make a gift box for him in the form of a piece of cake and be sure to place a couple of cartoon characters made of cardboard inside. And in order for them to really turn out to be a surprise for the baby, attach the figures to flexible springs that will push them out as soon as the lid is removed from the box.
How to make a gift box with wishes?

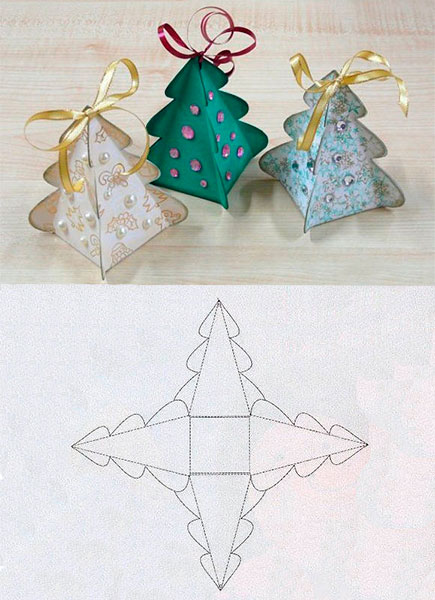
 Master class on making a pyramid
 Recommendations for making a pyramid
 If you want your gift box to be both packaging and greeting card, then make it in the form of a pyramid. In the photo above you can see templates that can be used to make a pyramid small size. But if you try to enlarge the scale of the drawing, you will eventually be able to make a pyramid on which you can place wishes.
Remember, in order for such a surprise to look interesting, the scale of the picture must be increased at least twice. Only in this case will you have the opportunity to make pockets on the outside of the product, in which you can later put cute notes. Yes, and remember, these pockets do not have to be made of paper; you can quite easily use, for example, lace for this. Just when you attach them, use a stapler instead of glue.
How to make a transparent gift box?

 Rectangular gift box
 Tall gift box
  Triangular gift box
 Above, we have already shown you how to make a gift box from cardboard and plain paper, and now you will learn how to make a very cute transparent package. The best part is that you don’t have to buy material to make such a craft.
Since it is made from an ordinary plastic bottle, you only have to buy ribbons and gobbets for decoration. So, take a transparent one plastic bottle and cut off the neck and bottom from it. As a result, you should be left with a perfect cylinder in your hands. Then take your scissors and carefully cut it exactly as shown in the picture.
After you're done with this, start bending the material so that you can clearly see all the edges of the future craft. If you can't do this with your hands, then use scissors for this. As soon as you realize that the plastic has become more obedient, you can safely assemble the box. To be safe, bandage it satin ribbon.
How to make a box for a women's gift on March 8?
 Template #1
 Template No. 2
 Template No. 3
 It just so happened, but for some reason most women associate March 8 with delicate branches of mimosa and scarlet tulips. That is why when making a box for this holiday, you must remember that there must be flowers on its outside. Whether they will be drawn or made using appliqué is up to you to decide. The main thing is that your packaging shows with all its appearance that spring is coming very soon.
If you don't want to spend extra time decorating the box, then invest in scrapbooking paper. If you are ready to work a little, then you can download some interesting template on the Internet, make flowers using it and cover the finished box with floral applique. Also, if you wish, you can simply paint it beautifully.
How to make a box for a men's gift on February 23?

 Template No. 1
 Template No. 2
  Template No. 3
 If there are real men in your family, then you simply must make February 23 a special day. The right gift wrapping will help you create a festive atmosphere. In principle, it can be done quite simply. You can make a box according to any template or master class that we introduced you to, only taking into account the fact that you are preparing a present for a representative of the stronger sex.
That is, in this case it is best to forget about flowers, curls and all sorts of women's things. It will be better if you make a gift box from paper with a camouflage print, or simply paint it ready product different shades green and Brown. If you want to pack a present for an older man in this way, you can try decorating the box with a red star or any other attributes of the Soviet era.
You can also draw it, or print out the template and use the resulting blanks to make the desired applique. Well, if you are a lover of everything new, then try making a box in the form men's shirts. You can see how to do it in the picture, which is located a little higher.
How to make a gift box for lovers on February 14?

 Box for February 14
  Template No. 1
 Template No. 2
 Template No. 3
 Many people think that making a heart-shaped box is very difficult. In fact, such a product is made according to the same principle as all other packaging. All that will be required of you in this case is simply to find the correct template and use it to glue the box together. We decided to make the task easier for you and therefore offer you several options to choose from. interesting ideas for gift boxes on February 14th.
If you decide to make the largest and most voluminous one, remember that in this case you will also have to make a product consisting of two parts. One part will act as the gift box itself, and the other will be the lid. Therefore, when cutting out the frame of a future craft, be sure to double-check whether one of the parts is slightly larger in size.
As in the case of a rectangular product, this is necessary so that in the end you can easily put the upper part on the lower part. As for the color of the box, it doesn't have to be red, if you want you can make the heart pink, raspberry or even purple and white.
How to make a wedding gift box?

 Template #1
 Template No. 2
 Template No. 3
 Template No. 4
 Template No. 5
 It’s probably not even worth mentioning that the box is for wedding gift must be special. And the point here is not in the shape of the product, but in its decor. Therefore, feel free to choose a template according to which you would like to make such a craft, and then begin to think about what the finishing of the finished product will be like.
I would like to say right away that in order for you to end up with something truly festive, the decor should be multi-layered. That is, you can create volume using flowers, leaves or hearts glued to each other and complement all this beauty elegant curls, lined with rhinestones and sequins.
It is best for beginning needlewomen to opt for square and rectangular crafts. Such products are not only made faster, but also easier to decorate. Since you will actually have a canvas in front of you, you can first lay out the future picture from the elements, see how all the details will look together, and only after that start fixing them.
How to make a birthday gift box?
 Template for making a cake
 Template #1
 Template No. 2
 Template No. 3
 Birthdays are one of those holidays that everyone looks forward to. It makes no difference how old the hero of the occasion is; on this day he still wants to feel most loved and dear. And what else can take us back to childhood and give us wonderful memories if not a gift packed in a box simulating a birthday cake. It’s easy to make such a craft, the main thing is to show a little patience.
Above you can see a template that you can use to make one piece of cake. If you see that in the end the gift wrap will be smaller in size than you need, then increase the scale to the desired size, just making sure that all proportions are respected in the process. Then make the required number of pieces, fold them into a circle and measure the diameter of the resulting figure.
But based on the data obtained, cut out a round stand on which you will place all the workpieces. If you wish, you can cover its edge with openwork snowflakes or lace. When the stand is ready, fill all the boxes with presents, form them into a cake and secure everything with a satin ribbon.
How to make a gift box for the New Year?

 Template #1
 Template No. 2
 Template No. 3
  Template No. 4
 Template No. 5
 As you probably already understood, if you wish, you can make a holiday box of any shape and color with your own hands. As for the New Year, in this case too you will have plenty to choose from. If you show a little patience and ingenuity, then with the help of our templates you can make a beautiful snowman, a fluffy Christmas tree, a house or Santa Claus.
If you print the templates on a color printer using photo paper, then all you have to do is cut out the parts of the future gift box and carefully glue them together. If you don't have the opportunity to print templates, you can always make gift wrapping from paper bag and winter appliqué, for example, the head of Father Frost, the Snow Maiden or a snowman.
In this case, the bag, depending on the chosen character, will need to be made red, white or blue, and then a head, for example, Santa Claus, will be glued to the very top of the bag. You will need to stack two of them and be sure to provide holes at the very top for ribbons, which you will later use to tie your gift.
How to make a box for a cash gift?


 Template #1
 Flowers for decoration
 Nowadays you won’t surprise anyone with a gift envelope for money, so most people try to present it in a more original way. The best option for such a case there will be a box for cash gift. You can do it quite simple template. True, when making such a craft, you must remember that in this case you will be making a box, the inside of which will slide out.
Therefore, if you see that the sides of the product do not hold their shape well, then be sure to strengthen them. If you do this using cardboard, then one strip will be enough. If you use less dense paper, then first glue several pieces together, and only after that fix this element on your craft. And, of course, remember that until all the parts of the product are fastened together, it is not advisable to move the internal part.
If we talk about the finishing of such products, then everything depends solely on your imagination. You can decorate a cash gift box with whatever you have on hand, or try making flowers from scrapbooking paper. You can see how they can be made a little higher.
How to make a gift box for sweets?

 Recommendations for making a box

 Simple box for sweets
 In principle, the box for sweets can be anything. You can, for example, make a cake from boxes that imitate pieces of dessert (we described how to do this in the previous paragraph of our article) or make something simpler, for example, a round or rectangular box. Therefore, choose which shape you like and start making your holiday craft. If you don’t like such products, then try making boxes using the templates located a little higher.
But I would like to immediately say that no matter what you choose Special attention you need to pay attention to the material from which you will make your craft. In this case, it is strictly forbidden to use thin standard paper as it is unlikely to be able to withstand the weight of the sweets. Therefore, it will be better if you spend money and find the most dense cardboard in a specialized store that will not require additional reinforcement.
Scrapbooking paper is also suitable for creating such a masterpiece, just try to find a material on which a child's drawing will be applied. These can be castles, princesses, cute animals, racing cars or even legos. But even if you don’t manage to buy something like that, then just use your imagination and decorate the product with applique.
How to design and decorate a gift box with your own hands?

 Paper roses
 Lush flower
 Flowers from corrugated paper Applique for decorating a gift box
 If you were attentive, you probably realized that you can decorate a gift box with any decor. Therefore, you can use even simple colored paper. So draw a flower on it the desired shape in different sizes. After this is done, all you have to do is carefully cut out the blanks and then layer them on top of each other in 3-4 layers.
At the same time, you must ensure that the petals of your flowers are not located opposite each other. It will be better if the petals of each new ball move a little. This way you can achieve the effect of fluffiness and visual realism of the flower. You can also paste over the finished box with hearts, stars, openwork snowflakes, small notes with wishes and various kinds of signs.
In addition, you can make bows of different shapes from paper and also place them on the craft. And, of course, don’t forget that paper can be easily decorated with crafts made from ribbons and fabric. You can see how they can be made in the master classes posted a little higher.
Video: How to make a gift box in 10 minutes?
Greetings to all of you, dear audience. Holidays never end in our entire life - as soon as Someone’s Birthday has passed, it’s already arrived New Year, and then there are other winter-spring holidays... And for each of them we give gifts that we want to present at least interestingly. And what if not a DIY gift box will help with this?
I myself really like to congratulate my relatives in an original way. It’s very nice to see the smiles of those you congratulate. And cute boxes always contribute to this! After all, they are the first thing that catches your eye when presenting a gift.
How to make a gift box with your own hands
Gift packaging can be very diverse. But there is one rule - the cardboard or paper from which you want to make a box must be required quality. Classic in this sense children's cardboard Not all fit.
Where can I get such cardboard or paper? First of all, in specialized stores for creativity or even scrapbooking separately. It’s good if there is such a store in the city, you say, but what if you don’t have one at hand or the prices are sky-high?
These leaves will be enough for you to make small souvenir boxes (for jewelry, sweets, toys, etc.). Your family will appreciate it
And now I suggest you start with the actual detailed photo master classes, which will include a diagram for creating each individual box.
Master classes on creating boxes from cardboard and paper
Small boxes
First of all, I want to give you 5 designs with very cute patterns that will make this wonderful packaging:

The first one has red roses. If you want to impress your lover, then she is definitely for you.
Principles of working with templates:
- Print the layout you like on thick paper.
- Cut out the future box along the contour and cut in those places where there are straight lines (focus on the light scans - the location of the lines is the same everywhere).
- Fold the box along the dotted lines and glue it so that the parts with semicircular ends lie between the other two and the round ends point up.
- That's it, all that remains is to bend the lid properly.


And again roses, but more delicate.

And now there are two options for Birthdays - candies with balls and lollipops.


Large rectangular
This is perfect for large gifts (for example, wall clock). You will need specialized binding cardboard to make the box really convenient. By the way, binding cardboard can also be purchased in specialized stores or on Ali.
The incision sites are marked in orange. The lid can be made the same way, but with slightly larger dimensions (2-3 mm).

For a man
If the gift is intended for a man, then I suggest choosing one of the following options.
Simple shapes are on trend - this is proven by the following 4 templates for creating strict, classic boxes. For these you will again need thick cardboard.


If the gift is intended for a loved one, then there should be more than enough romance ^^ There are butterflies, hearts, and all kinds of declarations of love. They can be made from thick cardboard or thick paper.


Heart
Heart boxes are very popular because you can use them to express your feelings. Or admit them


Cake
Are you getting ready for a party where everyone will need to be given a little surprise? Or maybe a wedding is planned? In both cases, cardboard pieces of cake will come to the rescue.
A beautiful and clear diagram is suitable for both the bottom and the lid.

Paper boxes
Boxes don't always need to be tight - sometimes it's enough just to create beautiful picture. Then I suggest you use this convenient scheme of 6 different packages:

If you are going to a child’s party (or maybe you want to please your child), then make him a cute box in the shape of an animal.

Give such a boot to happy parents. Follow the traditions: pink for girls, blue for boys.

Boxes for the New Year
The mood can be created not only with the help of gifts) Just look at these 8 lovely boxes, each of which can also be a great New Year's decoration
This is especially necessary if for some reason there is no New Year's tree. The main thing in this packaging is to trim the edges beautifully and neatly.
Snowflake
Of course, this box itself is wonderful, but the silver paint on the tips of the snowflakes can add some zest.
Tip: Give something in this package to a girl who loves Frozen.

Bag
This is one of the simplest options for giving a gift.

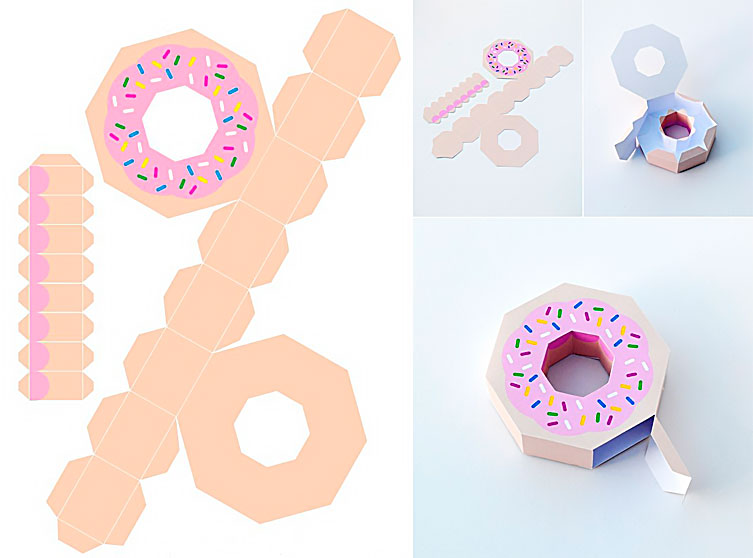
Box of sweets
For all lovers of beautiful New Year's favors and quick handmade items! Take a plastic cup with a smooth surface, cut the edge and cut the edge.
Fold the cut pieces inward so that they cling to each other. Place some goodies inside and cover the top with something cute.

Another option for candy packaging is a donut. It is a little more labor-intensive, but more effective.


How to decorate a box with your own hands
The design of the box can be very diverse - from simple figures in the form of birds and hearts to intricate flowers and bows. I will write more about box decor in the future - don’t miss it.
In the meantime, subscribe and comment - see you soon!
Sincerely, Anastasia Skoracheva
And other concerns).
But recently I made a box as a gift and decided to post a small master class.
So let's do it surprise clamshell box.
The idea is this: a person receives a huge box as a gift, opens it, inside there is another smaller box, then another one, and so on until we have a tiny box with a small gift in front of us.
This packaging is very convenient when you want to give a small gift such as jewelry (ring), money or any other memorable gift.
The clamshell box solves several problems at once:
1. It looks impressive and does not create the impression that the gift is too small (this is for lovers of gigantism))));
2. It’s much nicer to receive such a box than just a banal envelope with money;
3. The box can be decorated with various wishes, photographs, small memorable items and becomes a repository of pleasant memories, and this, you see, is more valuable than even the gift itself.
What you will need for work:
1. Cardboard (binding or corrugated)
2. Wrapping paper is different
3. Decorative elements from paper, wood, beads and whatever you want to decorate the box with.
4. Double-sided tape (thin and foam)
5. Paper glue (PVA, Moment Crystal or any other that you are used to working with)
6. Paper or masking tape of different widths
7. Scissors
8. Ruler
Working hours:
The time it takes to assemble a box depends entirely on the size. A box measuring 30x30x30 cm can be assembled in 1-1.5 hours (this is only one outer box!), smaller inner boxes can be assembled in 30 minutes to 1 hour. Plus add here the time for decorating - about half an hour for each box. In general, you can spend 10-15 hours assembling and decorating the entire package. Therefore, plan to create such packaging in advance; you definitely won’t be able to do it at the last moment.
I’ll say right away that this option does not pretend to be highly artistic, it is made quite simply and quickly, so we believe that this is a version of a simple clamshell box))) You can get confused and make a clamshell box that is ideal in all respects, but be prepared to spend a few on it full days, since working out the details will require an appropriate approach.
Begin?
1. Before starting work, decide on the size. I recommend starting with the largest, outer box, as this takes up the largest amount of material and can be used to plan the size of the inner boxes from there. It is better to make the box in the form of a cube, then it will be easier to calculate the dimensions - all dimensions of a cube are equal. Each subsequent box should be 3 cm smaller so that decor and a lid can be placed between the boxes inside. Also decide what size you should have the smallest inner box that will contain the gift.
2. Select base material.
Corrugated cardboard(from old boxes or purchased specifically in sheets) are much lighter, so the overall weight of the finished clamshell box will be relatively light. But keep in mind that the boxes will be larger, so the appearance will not be very compact and neat.
Binding cardboard much heavier, but it is smooth, sticks well and holds the paper, and is much thinner than corrugated, so the box will turn out smooth, beautiful and neat.
3. We will use 5 sheets of cardboard of the same size for the base of the box. In my case, these are sheets of 30x30 cm (in what follows I will give all sizes based on the size of my box).
We put one sheet in the middle and place 4 on its sides. Leave a small gap between the sheets (about 3-4 mm) so that the sides of the box can be laid out freely.

4. Use paper tape to glue all the joints of the sheets on one side, turn the workpiece over and do the same on the other side. Thus, we obtain a blank of 5 sheets, glued at the joints on both sides.

5. We are now working with the largest, outer box, so we need to glue the outer bottom so that the box looks decent from the outside.
Cut from wrapping paper square measuring 35x35 cm (it should be slightly larger than the cardboard bottom).

6. Glue strips of thin double-sided tape to the cardboard bottom, not too often and not too rarely, so that the paper sticks evenly.

7. Cleaning up protective paper with tape and glue on a sheet of wrapping paper that we cut out in advance.

8. In the corners of the protruding parts of the paper, make cuts at an angle of 45 degrees.


9. Turn the bottom blank over, bend the corners and glue them to the base.


We bend the extra centimeters and glue them to the base. Here it is better to use glue, since you need to coat quite large areas of paper.
Before gluing the sides, you need to bend the corners of the paper so that the corners of the base look decent.


This is what the inside of a large box should look like after gluing the paper to the outside:


13. We have the base of the largest box ready, now we need to make the lid. We know that the size of our large box is 30x30 cm, so the size of the lid should be a centimeter larger. We cut out a square 31x31 cm and 4 strips measuring 31x5 cm from cardboard. Here 5 cm is the height of the lid, I took this size in particular because of the paper tape (I had it wide, 5 cm), so that it would be convenient to paste over and not necessary I had to constantly cut off the excess width. You can make the height of the lid smaller by adjusting it to suit your needs.
We lay out the cut out parts in the same way as when creating the base of the box, but close to the middle sheet (that is, we do not make gaps between the parts)

14. Cover the joints of the parts with paper tape only on one side of the workpiece

15. It turns out this design (we have glued joints inside)

16. Fold the corners tightly and cover them on the outside with a strip of paper tape. It is important to ensure that the parts are glued evenly and tightly - this directly affects appearance covers.


We get such a cute blank. By the way, you can “learn” this method of gluing at the post office - watch how they pack your box with your parcel, the principle will immediately become clear.


You should end up with a neat lid like this:

I successfully forgot to take a photo of the process of gluing the lid, but in principle it’s worthy separate master class, since the process is interesting, but in order to have at least something, I’m posting the process of gluing the lid from corrugated cardboard.
First you need to cut out a sheet of wrapping paper taking into account the height of the lid, that is, if the base of the lid is 31x31 cm, its height is 5 cm, then we cut out a sheet of at least 42x42 cm so that it is possible to seal the outer and inner heights of the lid:


19. Ufff. Are you tired?)) And this is just us who did the first, most big box! Go ahead. Each subsequent box needs to be made 3 cm smaller, that is, we cut out 5 sheets of cardboard measuring 27x27 cm.
Laying the sheets:
Cover both sides of the workpiece with tape


You should end up with something like this without the bottom covered with paper:

20. Now we glue the smaller box to the larger one. To do this, place the base of a large box on a flat surface, coat the bottom of the smaller box with glue and carefully glue it exactly to the center of the inside of the bottom of the large box. Like this:

21. Next, we repeat all the above procedures several times with a corresponding reduction in the size of the boxes. Here's what I got:
1 box – 30x30 cm, lid 31x31 cm
2 box – 27x27 cm, lid 28x28 cm
3 box – 24x24 cm, lid 25x25 cm
4 box – 21x21 cm, lid 22x22 cm
5 box – 18x18 cm, lid 19x19 cm
6 box – 15x15 cm, lid 16x16 cm
I didn’t make the box smaller, because... I needed to put an envelope with a gift card, and 15x15 - the smallest box was very convenient for this.
In general, you can make a larger number of boxes, increasing them, for example, to 9 pieces. Then the smallest box will fit a box with a ring or any other small gift.
22. Now we need to decorate all the boxes of our packaging.
We start with the smallest one, and in front of us lies this structure:

Decorate congratulatory inscriptions, stickers and other decor, insert the envelope right away!

We close the box with a lid (you also need to decorate the lid) and start decorating a larger box.

Close the lid again and decorate the following:


And finally, our big box!

To prevent the box from opening prematurely, it must be tied with a beautiful ribbon and solemnly presented to the recipient. Delight and tears of happiness are guaranteed!
Here’s another small gif where you can briefly see the process of creating a similar clamshell box:

The sizes of the boxes can be adjusted to fit the gift simply by maintaining the proportions. Choose the color and any decorations to your taste.
1. Heart gift box
What do you need
- White paper;
- scissors;
- pencil;
- thick paper;
- glue gun.
How to do
Print the template on plain white paper. Cut and fold along the lines. On a narrow part you need to make a horizontal cut along the line indicated by the arrow.
Trace the templates onto construction paper and cut out. You will need two hearts and two stripes of each type. Follow the fold lines with scissors, without cutting through the paper, and fold it.
 YouTube channel Sarah Johnson - Pugdemonium
 On all four long pieces, make many vertical cuts up to the fold. Glue the wider pieces to the smaller heart so that the cuts are reverse side. Details are shown in the video.
 YouTube channel Sarah Johnson - Pugdemonium
 To get the box lid, make the same vertical cuts on the narrow parts. Glue these parts to another heart so that the cuts are on the inside. Close the box with the resulting lid.
 YouTube channel Sarah Johnson - Pugdemonium
 2. Polygonal gift box
What do you need
- Thick paper;
- compass;
- ruler;
- pencil;
- scissors;
- glue;
- bow.
How to do
Draw two circles with a diameter of 5 cm on paper. Without changing the pitch of the compass, make six marks on the circles at an equal distance from each other. Connect these marks straight lines inside each circle.
Draw lines on the outside of each corner as shown in the video. For one figure they should be 4 cm long, and for the other - 2 cm. Connect these lines so that you get six rectangles. To the right of each of them, draw a small detail with a beveled top.
Cut out the shapes along the lines. Using scissors, draw along the sides of the polygon inside the circle and along the line of the piece with the beveled top. Bend the shapes along the marked lines and glue each of them. Place a lid on the box and decorate it with a bow.
For such a craft, you can make a voluminous lid. It looks very original. By the way, the box itself in this video is made using a different, more intricate technique:
3. Square gift box
What do you need
- Scissors;
- thick paper;
- ruler;
- pencil;
- glue;
- bow.
How to do
Cut out a square measuring 20 × 20 cm from paper. Draw two vertical and two horizontal lines on it, stepping back 5 cm from each edge. In the middle you will get another square.
Use scissors to follow the marked lines and make grooves without cutting through the paper. Bend it along these indentations. Cut along short lines, bend the resulting parts and glue them together as shown in the video.
Cut out a square measuring 16 × 16 cm from paper. Draw two horizontal and vertical lines on it, 3 cm away from the edges. Then cut, bend and glue in exactly the same way as the previous piece. Place the lid on the box and glue a bow on top.
Instead of a regular lid, you can make two triangles that fit completely onto the box:
4. Pyramid gift box
What do you need
- Scissors;
- thick paper;
- ruler;
- pencil;
- plate or disk;
- hole puncher;
- yarn or ribbon.
How to do
Cut out a square from paper. Using four lines, divide it into nine parts. Make a mark in the center of each side of the large square. Inside the squares adjacent to the marks, draw triangles as shown in the video.
Place a plate or disk on the sides of the triangle and trace. Cut out the shape along the marked lines. You should end up with something like a flower.
Bend the figure along all straight lines and connect the pyramid. Make holes in the tops of the triangles, thread yarn or ribbon through and tie.
Such a pyramid can also be made using the origami technique:
5. Gift clamshell box
What do you need
- Pencil;
- disk;
- thick paper;
- ruler;
- scissors;
- ribbon.
How to do
Trace the disc on paper. Draw two perpendicular lines through the center of the resulting circle. Place the disk so that its edges touch the beginning of the lines at the top right and trace. New circle divide in the same way as the first one.
In each part, trace the disc as shown in the video. Then deepen the lines.
Cut out the piece along the outer contours and bend along the deepened lines. Place the gift inside, fold the box and tie it with a ribbon.
6. Gift box with flip lid
What do you need
- Ruler;
- pencil;
- thick paper;
- scissors;
- glue.
How to do
Draw two lines on the two narrow sides of the sheet at a distance of 1.5–2 cm from the edge and fold the paper along these lines. Bend and straighten the sheet as shown in the video. You will get two folds in the middle.
Draw lines on the long sides of the sheet at the same distance. For clarity, draw the bends made in the middle. Make cuts down to long horizontal lines. Glue the paper together as shown in the video.
The hinged lid can be made from a separate sheet:
7. Flat gift envelope box
What do you need
- Thick paper;
- pencil;
- scissors;
- glue;
- ribbon or decorative tape.
How to do
Draw four identical circles on paper and cut them out. Fold each one in half. Glue the halves together, placing the pieces on top of each other.
Bend them slightly so that they become convex. Place the gift inside, close the box, tie it with a ribbon or wrap it with beautiful tape.
8. Gift box-chest
What do you need
- thick paper;
- scissors;
- stationery knife;
- glue.
How to do
Print the template, cut along the solid lines and cut along the bottom dotted lines. Fold the shape along the remaining dotted lines. Glue it together as shown in the video. Connect the top pieces and thread them through the holes to close the chest.
You can leave the box as is or cover it in the middle with paper of a different color and decorate it with a bow.
9. Gift box-bag
What do you need
- Thick paper;
- ruler;
- pencil;
- scissors;
- disk;
- glue;
- yarn or ribbon.
How to do
Fold the wide side of the sheet, moving 5 cm from the edge. Fold the resulting strip and cut off the remaining paper along the edge. Bend it back once.
Make one mark at the top and bottom, stepping back 5 cm from the narrow edge. Fold the edge along these marks, then fold the entire piece like an accordion.
Unfold the paper completely and make cuts along one wide edge of the sheet to a horizontal line. Cut off the narrow part, folded into an accordion, at the top and bottom. It should remain in the middle.
On the other wide side, mark the middle of the resulting squares with a pencil. Take a disk or some other round object and connect the center marked points of the squares with the corners opposite.
Fold the paper along semicircular lines. Glue the box together as shown in the video. Punch holes at the top, thread yarn or ribbon through them and tighten the bag.
10. Gift bag with a bow
What do you need
- Paper;
- glue;
- ribbon.
How to do
Fold the piece of paper in half crosswise so that a mark appears in the top center for clarity. Fold both sides of the sheet to this mark, slightly overlapping one another, and glue them together.
Fold and glue the bottom of the bag as shown in the video. Bend long sides so that the bottom touches the seam at the bottom of the bag. Open the bag and fold it again along the side lines so that it is straighter and more beautiful.
Place the gift inside and fold the top of the package into an accordion shape. Press it in the middle and straighten the edges of the resulting bow. Tie the bag with a ribbon.
If you prefer to make boxes using ready-made templates, use the website templatemaker.nl. There are a lot of boxes collected there different shapes. Moreover, their parameters can be calculated automatically.
Gift packaging is no less important than its contents. Just as you greet a person by his clothes, so do gifts by their wrapping. Seeing a sloppy wrapper, the thought immediately creeps in that the gift is no less cheap, even if there is expensive decoration. The portal site invites you to do it yourself a beautiful box for gifts, which will delight the gifted person for a long time.


DIY diagram of a box with a lid, master class
It’s quite simple to make a box with a lid, and the base can be multi-colored cardboard, scrap paper, cardboard from boxes, which can be covered with fabric or multi-colored paper, making it presentable. We suggest making a box with a hinged lid.
For the craft, prepare:
- cardboard;
- ruler;
- Moment glue or glue gun;
- pencil;
- scissors.
To get started, you'll need a template. You can print what we offer on a printer, use it as a stencil, or you can draw it yourself. To do this, you need to decide on the dimensions of the box and draw 4 squares vertically and add horizontal squares on both sides to the second square from the top. All squares must be the same size. Next, you need to add allowances of 1 cm to the outer squares horizontally. In our picture, the allowances are indicated by the letters A, B, C, D and E.

Then cut out the model of the future box. You should end up with the same blank as below.

We bend the workpiece along the lines. We form a box and glue the seams together. This is the box you should end up with.

How to make a small box with your own hands, templates with photos


DIY Valentine's box, step by step with photo
We suggest you make an open “Valentine” box in the middle of which you can put both a gift and sweets.
Materials:
- cardboard or thick scrap paper;
- pencil;
- glue (PVA or Moment will do);
- scissors;
- pencil;
- The marker is a shade darker than the cardboard.
Using a printer, print out the diagram below, which will serve as a template. If you don’t have a printer, you can draw the diagram yourself. The larger your hearts are, the larger the final Valentine will be.

Trace the outlines of the hearts with a marker on the back and outside. Work along the dotted lines (aka fold lines) with the blunt end of the scissors. This is necessary so that in the end the bends are even, especially if thick cardboard was chosen as the material.

Fold the box along the folds and glue the sides of the hearts together. After the box has dried, write on the outside of it with a marker congratulatory words or recognition beautiful font. Place sweets or gifts in the box. Valentine's card is ready.

DIY box for a man, photo 5 options


DIY wedding box, photo 5 options


DIY round box diagrams, templates


How to make a heart box with your own hands, master class
You can pack gifts for your loved one not just in a rectangular box, but in an impressive heart-shaped box, which you can easily make yourself. The decoration of the box can be anything that comes to hand, for example, beads, rhinestones, artificial flowers, pieces of lace, beads, etc.
To work you need:
- cardboard;
- Moment glue or glue gun;
- decorations;
- scrap paper;
- satin or grosgrain ribbon 2.5 cm wide;
- ruler;
- compass;
- pencil;
- paper clips;
- scissors.
First of all, you need to draw 2 identical hearts on cardboard. A compass will come in handy in this case. Draw 2 circles that are on top of each other (see picture), and then draw straight lines on the sides of the circle so that visually you get a heart. Exactly the same blanks need to be made only in a smaller size from scrap paper, which will serve as a substrate for subsequent decoration. For example, if you get large hearts 16 cm high and the same width, then make hearts from scrap paper 14x14 cm. Select the size of the heart according to the size of the gift or your personal preferences. Cut out the hearts.

To decorate the sides of the heart, cut out 2 strips of paper from the same cardboard. The length of the strip should be equal to half a heart + 1 cm for sizing, and the width should be equal to the height of the box itself + 2 cm for the cloves for sizing. Select the width at your discretion; the larger it is, the higher the box. Then exactly the same strips need to be cut out of scrap paper, only without allowances for the cloves. Heart diagram with details in the picture below.

We bend the cut strips of cardboard by 2 cm and draw them with the blunt side of the scissors to form a bend line. Use scissors to cut triangles (teeth). Stepping back 0.5 cm from the edge, glue the strip to one of the cardboard heart blanks.

We glue the second strip onto the second half of our heart, gluing it onto the previous one in the upper and lower parts, slightly overlapping, and fix it with paper clips.

Cut 2 pieces grosgrain ribbon approximately 5 cm (adjust the length at your discretion), and glue it in the middle of the heart. The tape is needed to connect the base of the box with the lid.

Glue the tops of the ribbons to the lid.

Now we paste the lid with the scrappaper heart cut out earlier, and the box from the middle and outside with stripes.

Decorate the box as you wish.

DIY gift box made of cardboard on March 8, step by step with photos
We invite you to make a small box for March 8th in the Tiffany style, which every girl will definitely like.
To create a box, prepare:
- cardboard;
- blank paper;
- compass;
- pencil;
- ruler;
- glue brush;
- glue;
- lace or lace doily;
- satin ribbon 0.5 cm wide.
The first step is to make a blank in the form of a circle with a diameter of 10 cm from any paper. Place the circle on a piece of cardboard and trace it with a pencil. Mark the center of the circle and use a ruler to divide it into 4 equal parts.

We apply the template to the circle we just drew so that it touches the 2 closest lateral points (see picture). In the same way, mark the center and divide the circle into 4 parts.


Apply the template to each section of circles so that it touches the 2 closest points and trace.


We cut out the part from cardboard and use the blunt end of scissors to work out the rounded lines.

We collect the box.


We decorate the middle of the box with a lace napkin, forming the number 8, applying glue with a brush. You can also use lace.

We decorate the top of the box with a satin ribbon, tying it crosswise, and form a bow. The Tiffany style box for March 8 is ready. In such a box you can safely present jewelry as gifts.

DIY scrapbooking box, master class
The gift box can also be made using scrapbooking technique. The following are different gift packaging its originality and beauty. In addition, you can use the entire flight of your imagination to create it, timing it to coincide with a specific holiday, making it in the appropriate color scheme.
To work you will need:
- cardboard with a density of 250 grams;
- decorative elements in appropriate colors;
- scissors;
- pencil;
- glue "Moment Crystal".
1. For work you will need 2 cardboard blanks. We take the first blank measuring 24x24 cm and form the box itself from it. We retreat 6 cm from the edges and connect opposite points with lines. We cut each side square to a perpendicular line. We make cuts opposite each other.
2. In the same way, take a second cardboard blank measuring 25x25 cm, retreat 5.5 cm from the edges and do the same as with the first blank. This will be the lid. Press the fold lines thoroughly with a blunt object, such as a hook or scissors.

3. We assemble and glue both boxes with Moment glue.
Important: Given the parameters of the workpiece, the lid of the box will cover it completely. If you don't want the lid to be so deep, cut the edges to a length that suits you before you begin the gluing process.


4. Let’s start decorating the box lid. At this stage, you can use all your imagination. Glue a square of scrap paper onto the lid that is 0.5 cm smaller than the lid itself.

5. Apply the desired decorative elements, trying not to overload the composition, and once you are satisfied with the appearance, glue the parts to the lid.

The scrapbooking style box is ready.

DIY box for February 23rd, photo 5 options


DIY boxes with wishes, photo 5 options


DIY birthday gift boxes, photo 5 options


DIY triangular box, diagram with photo


How to make a surprise box with your own hands, master class
A box with a surprise looks impressive, and in its middle you can easily place several small gifts. To create a box, prepare:
- colored cardboard;
- colored paper;
- scrap paper or any other with a print;
- satin ribbons;
- decorative elements at your discretion;
- glue gun;
- scissors;
- ruler;
- PVA glue;
- pencil.
For this craft you will need several sheets of cardboard. It is advisable to use cardboard of one color for the lid and base, and another color for the remaining tiers. Let's make the first tier. To do this, take a sheet of cardboard measuring 36x36 cm. You will find such non-standard sheets of cardboard in craft stores. We divide each side of the cardboard into 3 equal parts with sides of 12 centimeters.

Connect the dots opposite. You should end up with 9 equal squares.


Using the blunt end of the scissors, we work out the lines of the squares, and then we fold all the squares into the middle, forming the walls of the future box.

From 2 sheets of cardboard measuring 33x33 and 30x30 cm we make exactly the same crosses, dividing the sides into equal sections of 11 and 10 cm, respectively.

We take the smallest cross, which will serve as the top tier, and decorate it with colored paper. For this, squares of scrap paper measuring 10x10 cm were taken.

We decorate each side of the cross at our own discretion. In this master class we used decorative clothespins, purchased in a handmade store, decorative inscriptions, envelope and stickers. You can use photographs, print wishes on a printer, glue flowers, ribbons, etc.

We will decorate the center of the cross with a pedestal on which you can place the main gift. To do this, we will make a small box. We take cardboard measuring 12x12 cm. Mark 3 cm from each edge. Connect the dots opposite and press the lines with the blunt end of the scissors.

We take a medium-sized cross-shaped blank and glue interesting printed paper onto the side squares.

We do the same with the largest workpiece. We leave the center in both blanks without decoration.

We collect tiers. We take the largest cross, glue the center of it and glue the center of the middle cross to it. We do the same with the small piece, gluing it to the middle one.

Now you need to form the lid of the box. We take a square of cardboard 24x24 cm. We retreat from the edges by 6 cm, connecting lines with dots opposite. Thus, in the center you will get a square measuring 12x12 cm.

We cut the side squares in the same way as in the small pedestal box. We use scissors to work out the folding lines and, clockwise, fold and glue the lid in the same way. Glue a satin ribbon to the lid, tucking the edges of the ribbon into the middle of the lid and the bow.


