Beautiful and original 3D cards that you can make yourself are an excellent gift for any occasion, for example, a birthday or March 8th. You can involve children in the process of making three-dimensional cards: thanks to such activities, children develop fine motor skills hands, spatial thinking and logic, and the child learns to be diligent and careful.
This article will present master classes on making cards with a three-dimensional volume effect for Birthdays and March 8th.


This article presents a selection of videos in which needlewomen share their original ideas and manufacturing secrets. greeting cards with a three-dimensional volume effect. A master class with a simple execution scheme will be offered; this version of the card can be made with a child, and other options for making cards not only for birthdays, but also for the New Year, and for March 8 will also be presented.
Bright 3D cards
In order to make a bright three-dimensional birthday card, you will need sheets of colored cardboard, colored paper, as well as a pencil, ruler, scissors and glue.
First you need to prepare the basis for the future postcard, for this you need a sheet of cardboard bright color fold in half. Then, using scissors, you need to make cuts on the fold, then the resulting strips must be moved inside.
After this, you need to cut out the constituent elements from sheets of colored paper according to templates, these can be colored balloons and congratulatory inscription, which says “I wish you good luck.” Next, the prepared elements must be glued onto the strips. To prevent the cuts from being visible, you need to glue a sheet of cardboard on top of the card. You can also make a congratulatory inscription on the outer cover, and the card is ready.


Wonderful 3D cards can be made from colored paper, for example, holiday card For a birthday, it can be decorated with a voluminous cake. In addition to sheets of colored paper, you also need sheets of cardboard, scissors and glue.
First of all, you need to fold a sheet of colored cardboard in half, then draw three squares on the fold, the sides of the smaller square should be two centimeters, the sides of the middle square should be three centimeters, and the sides of the larger square should be four centimeters.
Then you should make cuts along the upper outlined lines and move the resulting strips inside. After this, you should cut out rectangles from sheets of colored paper and glue them onto the strips. At the final stage, a sheet of cardboard should be glued over the postcard, and the work can be considered complete.
3D postcard with voluminous tulips
On March 8, you can present your mother with a postcard decorated with a voluminous bouquet of tulips as a gift. To work you will need a sheet of colored cardboard, sheets of colored paper, as well as scissors and glue.
First of all, you need to glue two strips of colored paper overlapping by one centimeter, as an option - a green strip is used for foliage, and a strip is used for flowers Pink colour. Then you should attach the template of half the flower to the edge of the sheet, folding the sheet like an accordion, that is, the sheet must be folded, changing the directions of the stripes.
Next, the flower must be cut along the contour, resulting in three flowers at once. Then the outer halves of the flowers should be glued to both sides of the card. The front side of the card can be decorated with applique or a congratulatory inscription can be pasted on. Schemes for manufacturing such a product are shown below.

There are not many big holidays in the summer, however, this does not mean that birthdays, weddings and memorable dates. It is for this occasion that I propose to make a very simple and positive summer card with a flowering tree, which you can make together with your children so that they do not get bored during the summer holidays.
- sheet of thick, double-sided colored A4 paper for the base
- brown paper for tree trunk
- different colored paper for crown
- scissors, pencil
- paper glue

Making a summer card with your own hands
Unlike postcards using the scrapbooking technique, you don’t need any special materials or tools, so you can make such a postcard even at the dacha. To begin with, we decide on the color scheme of the future flowering tree: it is optimal to use 3-4 shades that combine with each other.
Advice: It will be interesting to make 4 of these cards with crowns of different colors, corresponding to different seasons.

Fold the sheet of paper for the base in half, rounding the corners slightly with scissors if desired. Now we print out or transfer the template to tracing paper. We'll need to cut enough a large number of petals of different sizes. The easiest way to do this is by folding a sheet of paper in half and placing a petal template on one side so that the fold lines (marked with a dotted line in the figure) coincide.

The number of petals and their sizes can be varied arbitrarily, taking into account that one full-fledged flower will require 8 parts. The blanks can be immediately laid out on the base, roughly planning the relationship between colors and sizes.

We glue the tree trunk in the center and arrange the finished petals around it, forming the final composition.
Please note that you only need to glue the lower part of the petal, leaving the upper “wing” free. We begin gluing first with the largest parts of the composition.
Advice: Additionally, you can lighten or darken the core of the flowers with colored pencils to match, mark the bark on the tree with a black pen, easily tint the edges of the card and add any other details to your taste.
The summer card is ready, all that remains is to sign it and give it to the recipient!
A voluminous postcard, which is made by hand, will be unexpected and very pleasant surprise to a loved one and close person. There are a huge number of beautiful cards for any event, so you can easily find the right holiday gift.
This is an original postcard, despite its apparent intricacy.
It is wonderful for every person close to you. The occasion could be Women's Day or New Year, and even Valentine's Day.
To make a postcard you will need:
- cardboard or paper thick enough
- knife
- First of all, you need to make a printout of the postcard template located here. There are several copies there.
You can try to sketch a drawing with a heart yourself. For this you need a ruler and a simple pencil. - Take a knife and use it to make special cuts on the resulting template.
- Try to fold the card as carefully as possible so as not to wrinkle it. First of all, you need to make the folds; in the picture they are drawn with a yellow pencil. Then slowly fold the card where you want it.
The remaining parts will form themselves. Iron each curve on the card well to ensure each individual element works smoothly.
To make it more convenient, you can attach the card with tape to the table. - Now it's time to decorate the card. Cover the edges with colored paper.
Almost everything is ready, you just need to add pleasant and good words.


Volumetric postcard Volcano of Hearts
This postcard consists of several parts that need to be connected using glue.

To create a postcard you will need:
- cardboard and colored paper
- scissors
- white glue.
- Download the template in a suitable format.
Templates for a three-dimensional postcard, which is made with your own hands.
Knowing some rules, you can draw hearts yourself. You will find the rules below. - Take out a huge heart from the middle. It is located on the fold.
- When cutting out the hearts, try not to touch the places where they bend (see picture).
- On the hearts shown in this figure, you need to make cuts to connect them together.
To three-dimensional postcard could be closed as tightly as possible, you need to cut the paper on the middle fold to glue individual hearts to the base in the form of red cardboard. This cardboard is the background of the postcard. - After you have glued the halves to the base, you need to fasten the hearts using the cuts previously made on them.
The size of the hearts should be the same on all sides.
The line on the diagram, which is drawn in blue, indicates the same distance that there is from the center fold to the beginning of the cut, and the lines in red indicate that there is exactly the same distance between the hearts that are located closer to the middle of the card.


Ideas to note


A beautiful card is an invariable attribute of any holiday. After all, with its help you can tell a person about your feelings for him and wholeheartedly congratulate him on his triumph. There is a huge variety of postcards in the world for every taste and any theme. But the best of them is considered to be created with your own hands. To make a presentable greeting craft, all you need is creative thinking and the right materials. Our article will tell you how to decorate a postcard correctly so that it has all the necessary parameters.
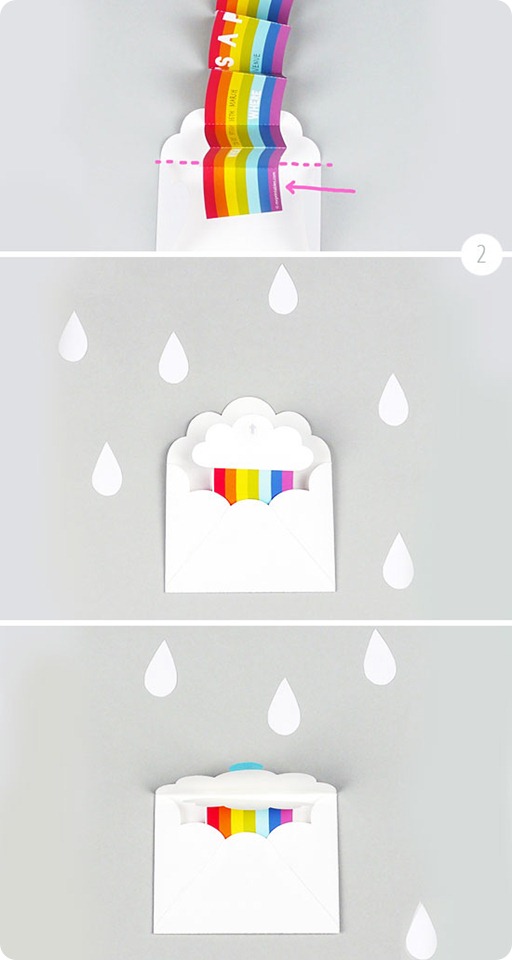
Spring drops
Speaking of postcards for this happy holiday, like March 8, we can say that they should all look sunny, as they symbolize the arrival of spring. Therefore, each product dedicated to this holiday must be filled with light, warmth and tenderness of colors. In such cards it is best to use a combination of light green, pink and yellow tones, because they inspire and saturate with the energy of the sun’s warmth after a long day. cold winter. An example of what homemade postcards from March 8th can be are the photos below and a master class on making crafts. To do this you will need the following materials: colorful cardboard with an ornament, pearl beads different colors, double-sided colored paper, glue and scissors.
Progress:
- A sheet of colorful cardboard should be folded in half and formed right size future postcard. If necessary, cut off the edges on it, making them slightly rounded.
- On a sheet of pink paper, draw an oval with openwork edges and use a special knife to cut out all the necessary details. The result should be a figure with a solid middle and lace edges. The oval should be glued in the center of the postcard in a horizontal position.
- From white and pink paper you need to cut seven with carved edges (preferably different shapes). In order for all the flowers to be beautiful, they must first be drawn and then cut out.
- You need to cut out a lot of leaves of different shapes and sizes from green and light green colored paper. The more lacy the edges of the finished leaves are, the more beautiful the postcard will look.
- Next you should start making parts for the large flower. It will consist of several parts. To do this, you need to draw 15 elongated petals on a sheet of white paper and cut them out. Then you need to bend each petal in half (vertically) and press the edges with your fingers. After this, you need to cut out 10 petals from pink paper, but of a different shape (as indicated in the photo). There is no need to bend the pink parts.
- When all the details for decorating the card are ready, you need to glue them. In the lower right corner of the card you need to glue white petals in the shape of a flower. The parts should be placed close to each other, with sharp folds down. Next, you need to start forming the center of the flower, gluing the pink petals so that they have a cup shape. In the center of the resulting flower you need to use glue to attach many small white beads.
- To the left and right of the large flower you need to glue pink flowers with pearl beads in the middle.
- In the upper left corner you need to fix 3 white flowers with pearl centers.
- Now all that remains is to decorate the craft with carved leaves, and it is almost ready for use.
Similar postcards "Happy March 8th!" can be made in absolutely any color and have other shapes of flower petals. And in the center of the lace oval you can write a beautiful wish.
Friendly congratulations
Original cards for congratulating friends are especially popular. To make an unusual card for a teenager, you can use fashion trends. Namely, the image of outfits on paper products. Let's look at how to decorate a postcard with your own hands using design methods.
Initially, you should choose a base for the craft using a sheet of folded cardboard. Then you need to draw a girl with a sophisticated figure on it. Next you need to cut out thin fabric and glue the clothes onto the girl. The skirt or dress should be made very fluffy so that the fabric blows out of the postcard. This craft can be decorated with sparkles or beads, as well as ribbons.
To my beloved mother!
For the most loved one in the world, for mom, you always want to make the best and most unique surprise. Therefore, let's look at how to decorate a card for mom that is suitable for any occasion. To make it you will need the following materials: double-sided cardboard purple, a sheet of white paper, a satin ribbon (lilac).

You will also need: 2 sheets of white paper, rhinestones, a butterfly stamp, glue, scissors and any paints.
Work progress:
- Bend a sheet of cardboard in half.
- On a sheet of white paper, trim the edges using scissors.
- Next, on the same sheet, make prints of butterflies of different colors.
- From the satin ribbon, cut a piece the size of the width of a white openwork sheet.
- Then you need to glue a sheet of white paper with curly edges in the middle of the cardboard. At the same time, you need to stick a piece of cut tape onto this sheet, bending its edges under the paper. The tape should be located at a height of 3-4 centimeters from the bottom of the white sheet.
- Make a bow from another piece of ribbon with beautiful edges and secure it with glued tape.
- On another sheet of white paper, leave several butterfly prints in different colors. Then they need to be cut, folded in half and flattened. The resulting butterflies must be glued onto the postcard, applying glue to the sharp folds of the parts.
- The final stage in decorating the product is gluing rhinestones onto the openwork edge of white paper.
If you don’t have the necessary stamps to make such a craft, you can draw the butterflies yourself. They will look no worse than printed ones.
Citrus delight
In the process of creating a unique postcard, all means and materials are good. After all, you can also use organic things to decorate them, for example, slices of dried citrus fruits, coffee beans and dry herbs.
If you beautifully arrange these decorative particles on the surface of the card, they will give the item a completely different, more interesting view. To do this, you don’t need to know how to decorate a card with citrus fruits correctly. The main thing is to follow your feelings and create your own vision of a beautiful world. If desired, you can glue pieces of burlap and lace to the card. Also, by using cinnamon sticks and dried mint leaves, a person will create not just a paper product, but a whole aromatic complex that will refresh the room and please the eye.
To the delight of lovers
The bright holiday of Valentine's Day has millions of fans all over the Earth. Therefore, lovers try to give each other the most beautiful cards and valentines. How to decorate homemade postcard in the style of lovers, consider below.

As you can see from the photo of the craft, it is not at all difficult to make. For this you will need: a sheet of cardboard folded in half, hearts made of paper of different colors, a bow made of satin ribbon, white thick threads, a sheet of gray cardboard. Do all the work in the following order:
- Glue a rectangle made of gray cardboard onto a sheet of cardboard folded in half.
- Glue hearts with threads in the form of balloons onto the rectangle.
- At the bottom of the threads collected in a bundle, glue
The card is completely ready, but if you wish, you can stick a lot of multi-colored hearts of different sizes inside it.
And the ribbon curls...
Using ribbons helps make the craft more sophisticated and delicate. That is why this material is so popular in this type of creativity. Let's look at an original idea on how to decorate a card with ribbon to make it look great.

This craft can be given to anyone for their birthday, but it is most suitable for men. To make this card, you need to cut out car parts from any suitable materials and glue them onto a sheet of cardboard folded in half. Also need from corrugated paper make gift boxes and tie them with ribbons. Such a postcard can be glued around the edges with thin satin ribbon. To make the craft more colorful, it must be made on a sheet of light green or pink cardboard.
Photo for your loved one
Sometimes it happens that you want to make a postcard to your loved one for no reason. But it's not always enough creative thinking to create things like this. Not knowing how to decorate a card so that it evokes bright feelings, and not vice versa, some risk finding themselves in an awkward position. Therefore, in this case it is better to use ready-made ideas for making such crafts.
One of the interesting ideas is the use of photographs in the making of postcards. You need to take pictures of both lovers (faces) and beautifully glue them onto a cardboard base. It is advisable to use colored hearts, rhinestones and lace to decorate crafts. The result will be not just a postcard, but a frame that will stand in a prominent place.
Strong defenders
Men, by their nature, do not particularly like to accept various souvenirs. But the only time, besides their birthday, on which all men wait for them is Defender of the Fatherland Day. Therefore, it is extremely important to prepare appropriate crafts for husbands and sons. Knowing how to creatively decorate a postcard for Defender of the Fatherland Day, you can please your husbands an unusual souvenir. You should not depict weapons and other attributes of military life on such crafts. It is best to depict peace and love throughout the land, which is protected by men.

This card requires a lot of time to make a large number of butterflies and glue them. But creating something beautiful is worth it. They can be pasted not only on the front, but throughout the card, as a symbol of freedom and joy. If it doesn't suit someone White background crafts, then it can be replaced with any other.
For the little ones
Children love when they are given colorful cards. To do this, they need to be made using a lot of decorative details. Not every mother knows how to beautifully decorate a card for her baby, so you need to use a clear example or recommendations for its production.
Generally, little boys and girls like toys. You should take advantage of this and create a postcard with various game elements. For example, cut out a bunny from fabric and glue it to cardboard. The bunny should be dressed in clothes, preferably in colorful colors. You also need to use lace details and ribbon bows. The inside of the card should also look bright and colorful.
Hidden Splendor
Any postcard created with your own hands must have beautiful view not only outside, but also inside. There are such homemade crafts, which when opened transform into interesting details. Let's figure out how to decorate the inside of a card in an unusual way.

As you can see in the photo, the creation interesting crafts It won’t require a lot of time and materials, but despite this, the greeting card looks great. All that is required is just to cut out a few balloons and stick them on cardboard, connecting the threads in a bundle. This card has a congratulatory inscription in honor of the birthday, but you can write any wishes on the flags. You also need to take into account that to give the balls volume, they are glued onto small pieces of foam.
Breath of the sea
There are a large number of original ideas for creating postcards. Crafts using a marine theme look especially unique. To understand how to beautifully decorate a postcard for lovers of sea travel, you should use this product description.
So, first you need to prepare the necessary materials. These are sand, blue cardboard, shells, blue cardboard, glue and scissors.
- You should take a sheet of blue cardboard and bend it in half.
- Cut a rectangle out of blue cardboard, smaller in size than the card itself. Then you need to glue it in the center of the craft.
- Sand and shells should be glued onto the rectangle.
In principle, the card is ready, but if desired, it can be further decorated with sparkles and small pieces of glass.
Drawing Joy
Do beautiful postcard You can not only use a lot of decorative details, but also by drawing it. Many people do not know how to decorate a card beautifully with pencils without having the talent of an artist. Using only pencils and colorful buttons, you can create an interesting greeting element as you work. For example, like in the photo below.

The use of buttons in in this case is unexpected and unusual. Together with framing them with colored pencils, they began to play in a new way. The brighter and more colorful the buttons and pencils used to design the card, the more original it will look. You shouldn’t stop at this type of product, because you can add stems and leaves to the buttons. And also depict the sun and blue clouds in the sky.
For grandparents
Some people have a question about how to decorate a card for older people so that they like it. After all, many modern ideas they don't like it. But in this case, you can come up with an interesting solution by using applique to decorate the product.
This applique can be made from paper, as in quilling, or from magazine clippings. If all these elements are skillfully placed on folded cardboard, you will get quite interesting models greeting cards. Do not forget that in such a craft, not only flat objects will look great, but also those with three-dimensional shapes. For example, a house with open shutters and flower bed. Surely this will please the elderly.
An ordinary postcard will not surprise anyone. That's why I had the idea to make a 3D card with flowers. It’s not difficult to make, but it looks unusual and interesting. This card will be remembered for a long time.
To make a postcard we will need:
- a sheet of double-sided colored cardboard (card base) of any color;
- double-sided colored paper (for flowers) of any color;
- pencil glue;
- scissors;
- pencil;
- felt-tip pens.
Step 1. Cut out 7 10x10 cm squares from double-sided colored paper.

Step 2. Fold the square 3 times to form a triangle.

Step 3. Draw a petal.

Step 4. Cut and open.


Step 5. In this way we make all 7 flowers.

Step 7. Using a blue and blue felt-tip pen, we draw small strokes from the middle, also along the edges of the flower. We leave two petals uncolored!

Step 8. Also color the remaining 7 flowers.

Step 9. Cut out one of the unpainted petals. We do the same with the rest of the flowers.

Step 10. Coat the remaining unpainted petal with glue and connect it to the adjacent petal. It should be voluminous. We do all the other flowers the same way.


Step 11. Take 3 flowers. We bend each flower in half. We mark crosses on one of the flowers. We coat the places marked with a cross with glue and glue the other 2 flowers bent in half there.


Step 12. Coat the places marked with a cross with glue and glue another flower bent in half.

Step 13. Place the crosses again, coat these places with glue and glue 2 more flowers, bent in half.

Step 14. Place the crosses again, coat with glue and glue one flower bent in half.


