On the eve of the revered and beloved Easter holiday, many housewives begin painting eggs and making Easter cakes traditional for this holiday. It is not surprising, because on this day it is customary to treat all your loved ones and friends with a painted egg. Yes, it's nice to feel in the role Easter bunny and delight others with sweet signs of attention. However, is it so good to receive in return an unimaginable amount of the same eggs that need to be used in the near future, otherwise they will simply go bad? And some of these gifts look so beautiful: covered in bright paint and decorated with patterns or holiday stickers. How wonderful it would be to put such beauty on a shelf and admire the symbol of the past holiday for many more months. Why not? In our master class on making Easter eggs from beads, especially for beginners, you will learn how to make beautiful and durable gifts that will delight your loved ones with their appearance for many years.
Master class on braiding eggs with beads for beginners
Before you start making an original Easter egg, you need to prepare all the necessary materials for work. Most of them can be bought at a specialized craft store.
Necessary materials:- 3 jars with multi-colored beads.
- A skein of fishing line.
- Wooden egg.
- Thin needle.
- Scissors.
1) The first step is to measure the number of beads for the width of the egg. To do this, we collect beads on the fishing line until there are enough beads around the egg at the widest point.

Be sure to remember the resulting number of beads!
2) Now we begin to weave a pillow for the egg. We connect 5 beads into a flower with a needle, and then weave the first row, adding one bead each between the same “flower” elements of the previous row.
3) Before weaving the next row, change the color of the beads. Then insert two beads in the space between the beads of the previous row. We do the third row in the same way, but again insert one bead at a time.
4) To weave the fourth row, insert one bead once, two beads the second time, then one again, and repeat in a circle.

5) Change the color again for the new row. Now we begin to weave several rows in the same way as we did in the previous step, until there are as many beads in the row as we got in the first step, measuring the width of the egg.
6) Now it’s time to reduce the number of beads in the row. To do this, we need to use the same approach that we used when increasing them. In other words, in rows where three beads were inserted at intervals, you need to decrease by three. It's better to just skip them while weaving the next row.
At the end of the weaving, we tie a knot of wire on top and that’s it, our beaded Easter egg is ready!
Learning the technique of mosaic weaving Easter eggs
The mosaic method is completely simple to implement and is perfect for beginning needlewomen. You don’t need to look for a pattern or calculate the number of beads per egg. It is enough to choose the desired color and size of beads, thin fishing line and needle.
Mosaic egg weaving is performed in the following sequence:
1) We start with a small flower with a core of one bead and petals of six.

2) We weave the second row of beads between the “petals” of the first row.
3) We do the third row in a manner similar to the previous step, but between the beads of the second row we weave not one, but two.
4) When weaving the fourth row, we place one bead on the needle and also distribute them between the elements of the previous row.
5) The next, fifth row, goes for expansion, so we weave three beads between the beads of the fourth row.
6) We weave the sixth row, inserting 2 beads in the spaces of the fifth row.
7) Now the “top” of the egg is ready and you can begin to further braid it.
8) The seventh row goes for expansion: we pass the needle through 2 beads of the previous row and, stringing one bead on a fishing line, pass the needle through every third bead of the 5th row.
9) In the eighth row we alternate weaving two and three beads into the previous row.

10) Chains 9 and 10 are typed in the same order, but for the ninth row of the pattern of the main part of the mosaic weaving, one bead is strung on a thread, and for the tenth - 2 at a time.
11) After finishing the 10th row, the braid must be gradually narrowed. The process is similar to expansion: as much as we increase the number of beads in a particular row, we decrease it.
12) Finish the mosaic weaving of the Easter egg by creating a flower with one bead in the center. The thread is secured by inserting it into several beads of the upper chains.
In addition to the usual braiding of eggs with beads, you can also use more complex circuits with other patterns. For example, this photo shows a pattern of weaving with a diamond-shaped mesh of beads.

The technique of double-sided weaving is also interesting. An Easter egg made according to this pattern looks quite simple, but at the same time original.
Video on the topic of the article
For further training in braiding eggs from beads, we suggest you study a selection of video materials on this topic. Good luck!
Easter is the main Christian holiday of spring. Recipes for Easter baking, Easter cakes, Easter basket decorations, and Easter eggs have long been passed down from generation to generation.
And if earlier eggs were colored in broth onion peel, oak leaves, today there are many more options for decorating eggs. One of them is decoration with beads.
Using various techniques beadwork, which I will demonstrate in this master class, you can create an exclusive Easter decor.
I would like to show you several options for decorating Easter eggs with beads, from the simplest to the most complex.
First you need to do preparatory work. You can take a raw egg for braiding, having rid it of its contents, or you can take a boiled one, but it is best to take a wooden blank (such an egg, your beaded masterpiece, will last a long time and will delight you and those around you).
Options for decorating Easter eggs with beads:
- Pasting.
This is the easiest way to decorate eggs, without requiring special effort. Necessary:
- egg blank;
- epoxy adhesive;
- pencil;
- multi-colored beads and beads.
First, we draw a sketch of the future ornament on the blank. Then we apply glue to the parts that need to be filled and begin gluing the beads in accordance with the pattern.
 Here are examples of folk motifs laid out with beads:

 Eggs can be decorated not only with beads, but also with sequins. They can be used to decorate a pysanka in the shape of a goldfish like this:
 A couple more ways to decorate an Easter egg with sequins.
This is the simplest one
 And another option is more magnificent.
 We need:
- a blank egg made of polystyrene foam or foam rubber;
- sequins in the shape of flowers;
- colored pins;
- glue moment.
We pierce the sequin with a pin - this will be our flower.
 We begin to insert such blanks into the egg. To strengthen the tip of the pin, you can coat it with glue.
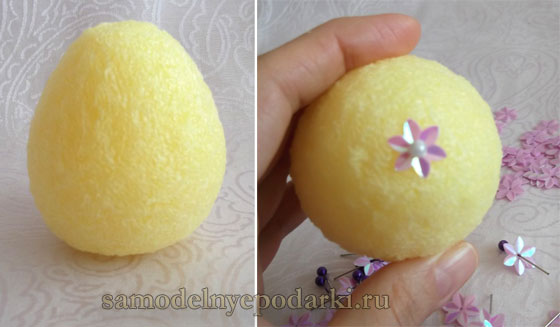 We pass over the entire surface of the egg, leaving no voids.
 Ready
Ready

Now let's start making the stand. A pin mold will be useful for this. Glue green sequins along its edge.
 This is how it should work out.
 Glue our egg to the base - and our Easter miracle is ready!
 1.
Weaving an Easter egg with a beaded mesh
1.
Weaving an Easter egg with a beaded mesh
The technology of braiding an egg with a beaded mesh is that the egg itself has a streamlined shape, so the braiding is carried out in several stages. The egg itself is conventionally divided into 3 parts: a central belt (2) and two poles (1, 3). First the belt is braided, and then the poles.
 Visual demonstration. Let's prepare:
- wooden blank;
- beads;
- nylon thread, needle.
We braid the belt with a mesh, according to this diagram:
 Beginning of mesh weaving
 turn
turn
 We tighten the thread and weave according to the diagram
 We measure the mesh to the required length so that it completely encircles the width of the egg.
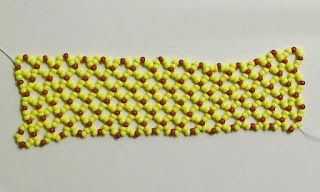 Place the mesh on the workpiece and connect its edges.
On the eve of the bright holiday of Easter, I want to create an atmosphere and beauty in the house. Following tradition, we paint eggs and buy or make souvenirs for our loved ones. Just a beautiful decorative Easter egg made of beads, made by yourself, can become such a souvenir and decoration for the holiday. In this article we will look in detail at how to make Easter eggs from beads, weaving patterns for beginners and tips on choosing material and execution techniques.
The most important thing in beading is the beads themselves. Sometimes they give advice to beginners to choose simpler and cheaper beads. But it’s better not to do this. Buy several shades of good quality beads and weave with pleasure. You will understand in your work that no other material can compare with high-quality Japanese or Czech beads. It is smooth, with smooth edges, and the same size.
IN finished product even if made by the hands of a novice craftswoman, it will look decent and will add neatness and dignity to your product. So, the best beads are Japanese. We will include Toho beads among them. But Czech also looks good, only if it is not a fake. You should think about the pattern and color scheme for your product in advance and buy the colors that will be useful to you. It is important to know that the beads differ in numbers. The larger the number, the smaller size beads. No. 10 is suitable for braiding eggs.
In addition, you will also need fishing line. This can be a special thin monofilament for weaving or regular sewing thread to match the main color of the beads. You will also need a needle. There are special needles for beading. They are flexible and thin.
Now we come to the next one, very important point- basis for Easter eggs. You can take any artificial egg made of plastic, foam, or wood. It is better to pre-glue a foam egg with a simple one. toilet paper and paint it so that it is smooth and does not crumble. But if the foam is well compressed, then this need not be done.

Some craftswomen braid natural eggs. To do this, you need to pierce the shell at the top and bottom and pump out the contents. Dry the shell, cover it with toilet paper and PVA glue, dry it and start weaving. Each craftswoman chooses an acceptable and more convenient base for weaving.
Simple weaving patterns
Beaded holiday eggs always look festive, bright and interesting. They certainly attract attention. The pattern on them can be completely different. This includes a geometric pattern, which is obtained by combining beads of different colors and even sizes in a certain sequence, and floral motifs. In addition, it is quite possible to weave letters, traditional “ХВ” for Great Easter. Even a beginner can master such interesting and at the same time simple Easter eggs made of beads, and weaving patterns for beginners are presented step by step in the article below.

Let's try to make an egg with letters and a geometric pattern. Detailed master class with descriptions and diagrams for braiding Easter eggs from beads, created especially for beginners.
For work we will prepare:
- Czech beads No. 10 several shades. Choose no more than 3-4 shades that combine well with each other and match your idea.
- Monofilament or sewing thread with a beading needle.
- The base is in the form of a wooden egg blank. You can choose plastic or plastic.
- Glue "Moment Crystal" or any other suitable for polymer surfaces.
When everything is ready, let's begin the process:
- First we string several beads for the base, the lower part of the egg. We do this according to the diagram in the photo.
- First, we collect 7 beads in a circle.
- Then we expand the diameter, attach beads in a circle, alternate colors according to the diagram and our idea.
- The important point is the closure of the series. It is important to return the needle and thread to the bead with which the row began, so that it is completed and secured.
- When we have a small heel for the bottom of the testicle, we need to carefully glue it to the base.
- Let's wait a little for the glue to dry and the surfaces to set.
- Now we continue weaving along the egg. We expand the surface.
- We weave in rows, alternating the color of the beads.
- From the 17th row you can already see the formed flower.
- We continue weaving the pattern, carefully alternating the color of the beads.
- Now you need to mark on the workpiece the place where the letters will be located for convenience.
- When we have reached the intended letters, we begin to weave beads according to a pattern of a different color to represent these letters.
- The letter diagram is given below for convenience.
- Forming letters.
- Now the final stage, we braid the crown.
- Here comes the tapering cloth.
- We weave beads different shades according to the drawing.
- We complete our weaving with one bead, as at the beginning of the process, placing it in the center.
- Pass the finishing circle of 6 beads several times to secure and secure the thread, hide the tip.

This is not the easiest weaving option, but it is very interesting and quite accessible for beginners.
The easiest way to braid eggs with beads
And now another option for how you can braid an egg with small beads simply and quickly. The result is no less beautiful and amazing than in the previous description.

The video that follows shows in detail the pattern of weaving an Easter egg from beads for beginners. This is a simple geometric weaving option that is accessible to everyone. Its principle is to string a certain number of beads on a thread in a certain order of colors and paste tightly in a spiral along the entire surface of the workpiece.
You will also need a blank, a thread with a needle and beads of the selected colors for this work. It is important to choose a good glue. It’s better to take Moment Crystal. It dries quite quickly and no traces are visible.
A stick will also come in handy to adjust the spirals of beads so that they lie flat.
During the weaving process, we string beads onto a thread, alternating shades of beads in a certain sequence. We fix the thread with beads with glue, coating a small area of the surface of the workpiece.
Easter egg made of beads and beads
Here is another amazing option for creating an Easter egg from beads and beads. It is suitable for beginners, the work here is quite simple. Be sure to make yourself such a souvenir for the Easter holiday. It will decorate your holiday table or room and will definitely attract the attention and admiration of your guests.

- To work you need to prepare:
- Egg preparation.
- Beads in white and blue shades.
- Monofilament and needle.
- Beads are blue or dark blue.
Follow the diagram shown in the video. After the base is ready, start weaving the belt for the middle. The diagram and sequence of actions is presented in the video below.
After the top, bottom and middle parts are ready, connect them together on the surface of the workpiece with a seam using monofilament and a needle.
Easter eggs made of beads, braided with a belt with pictures

Eggs braided with a belt of beads and beads with a picture in the form of an icon or a temple are very interesting. Let's figure out how to do this. It's actually very simple. For work, prepare:
- The basis is in the idea of the egg.
- Thermal film for decorating Easter eggs with the image of an icon.
- Beads of the required colors.
- Monofilament and needle.
- Belt pattern.
Sequencing:
- We put a thermal film with the image of the icon on the blank. We lower the workpiece into boiling water to shrink the film. It takes the shape of an egg.
- According to the pattern for the belt, we weave a belt for the egg from beads of the desired color.
- When the middle part of the belt is woven, we place it on the testicle and finish the rim according to the size of the testicle.
- Everything is ready, you can leave it like that. But you can decorate the top of the egg with a woven crown, glued rhinestones, and half beads.
Easter eggs can be installed on stands made of the same beads or artificial flowers. You can hang them on ribbons from the branches of a bouquet or attach bead legs to them. And also such beautiful eggs You can put it in a basket and make a whole composition for the holiday. Have fun creating!
As we approach Easter holidays everyone is thinking about delicious menu For festive table, bright and homey decor, as well as about unusual gifts this topic. I present to you several master classes on how to make an Easter egg from beads with step by step photos. These will be an excellent symbol and gift for the upcoming holiday.
"Awakening of Spring"
To create an Easter egg from beads you will need:
- wooden egg (or plastic);
- beads of mother-of-pearl or milky color;
- green beads;
- pearl-colored rice beads;
- beads white circumference 0.3 cm;
- white beads with a circumference of 0.6 cm;
- Easter sticker – 2 pcs.;
- fishing line and bead needle.

First we need to create a beaded belt for an Easter egg. Place 8 milk beads, 1 green bead and 3 milk beads on the fishing line. Secure the first bead.

Count three milk beads from the green one to reverse side and thread the fishing line through it. You should get some kind of beaded loop.

Then put on 3 milk beads and pull the line through the very first bead put on the line.


Then put on three milk beads and pull the line through the middle bead of the second loop.

Once again, alternately put on 1 milk bead, 1 green bead and 3 milk beads. Pass the needle through the middle bead of the outer loop.

Continue weaving the egg belt this way to the required length.

Connect the edges of the belt and put it on the workpiece (egg).

Now we will directly fly around the Easter egg itself:
1. First row: between each green bead of the belt, weave three beads of the same color.

2. Second row: Pull the needle through the middle bead of each green loop and weave in three green beads.

3. Third row: now stretching the needle through all three green beads of the previous row, weave one pearl bead-rice in turn.

4. Fourth row: put 2 green beads, 1 milk bead and 2 green beads on the fishing line, pull the needle through the middle bead of the green loop from the third row. Continue the row to the end.

5. Fifth row: weave one large white bead between the milky beads.

6. Sixth row: stretching the fishing line through the milky outer beads, weave 2 milk beads, 1 green bead and again 2 milk beads between each of them.

7. Now is the time to stick on the Easter picture or icon.

8. Seventh row: weave one small white bead between the green beads of the last row.

9. Eighth row: The last row consists of woven 5 pieces of green beads between each green beads of the sixth row.

The Easter gift will certainly become a table decoration, a symbolic gift and a pleasant memory of the holiday.


Option 2 - Easter egg “Golden motives”
Easter crafts for Holy holiday Easter is already a long tradition. In this tutorial I suggest you create such a magnificent Easter egg. Thanks to step-by-step photographs, you can easily weave this egg from beads and beads.

For production you will need:
- white beads;
- gold colored beads;
- white beads with a circumference of 3.5 mm;
- white rice beads;
- fishing line and bead needle;
- scissors;
- Easter iron-on sticker;
- wooden blank in the shape of an egg.
At the very beginning, we will weave a beaded belt for an Easter egg:
1. Place 8 pieces of white beads, 1 gold bead and 3 pieces of white beads on the fishing line. Pass the needle through the 5th dressed white bead. You should get some kind of bead loop.


3. Then put on 1 white bead, 1 gold bead and 3 white beads. Pull the needle through the middle bead of the second loop formed.

4. Then put on 3 white beads and pull the needle through the middle bead of the first loop.


6. Continue weaving the belt according to this pattern.

Now let’s carefully look at how to make an egg from beads step by step:
1. First, put a heat-seal on the egg and put it in boiling water. Dry the workpiece with a towel.


3. Weave 3 gold beads between each gold bead.

4. Then fly 3 more gold beads between the middle gold beads. Weave these beads through one gold bead loop.

5. Then weave one white round bead between the middle gold beads of the first row.

6. Pull the needle through the middle beads of the second row, weave in: 2 gold beads, 1 white and 2 gold beads.

7. Weave one bead-rice between the white beads of the last row.

8. For the final row, it is necessary to weave 5-6 white beads between each white beads of the penultimate row.


This Easter craft with your own hands you can easily give a festive mood and a lot of positive emotions to both adults and children.


Video master class on knitting eggs from beads
Easter is a holiday when people not only serve liturgy in churches, but also exchange gifts at home. Easter eggs are used as gifts, which are hand-painted and pasted over with patterns.

An original one will be an Easter egg braided with beads.
Easter eggs made of beads, weaving patterns
This craft will look like a king. To work, you need to use fishing line, beads, and the egg itself. You can use egg preparation, which is sold in the store. But if you couldn’t find it, you can make a preparation yourself from a natural egg step by step.

Bead weaving pattern for an Easter egg
You just need to pour out the contents of the egg, then cover it with several layers of toilet paper to obtain additional rigidity of the product. In the end, the egg is painted and after it has dried, you can begin to work.
Weaving Easter eggs from beads for beginners
The easiest way to make one is to string beads onto a fishing line or thread (it is better to use multi-colored beads), and then simply coat the egg with glue, wrapping a thread with beads around it.


