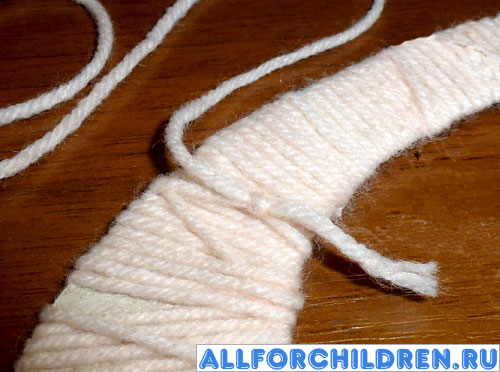
Take a regular A4 sheet of cardboard (297 x 210 mm) and cut it in half crosswise. The size of the resulting sheet is A5 (210 x 148 mm). Cut out an egg-shaped shape from this sheet. In our example, cardboard is used white, but it will turn out even more beautiful if you take a sheet of cardboard of the same color as the thread with which you will then wrap the basket. Then the gaps between the threads, if they appear during the winding process, will not be so noticeable. Here's a little trick.

Now, using a pencil, draw another smaller oval inside this oval. Draw a line, retreating from the edge of the large oval by about 1-1.5 cm. But in the lower part of the oval, make a larger indent - 3-4 cm.

Cut out the shape along the drawn outline. You will get a basket with a long handle.


Now it's time for the threads. The thicker the thread, the better. Take the thread of the color you chose for the basket. Absolutely any will do, except perhaps green. And it is not suitable only if your flowers have leaves. If there are no leaves in your craft or if you simply do not have enough other threads, green will do. Even a gloomy black color will do if the flowers in the basket are large and bright.
How many threads do you need to wrap the entire basket? It is difficult to calculate, so it is better to use the entire skein. Our basket is large enough for it to easily fit through the inner hole when wrapping. If you don't feel comfortable working with a large skein, make a small ball - but it's extra work and time.
Start winding the thread around the basket in circles. Try to make each turn close to the previous one so that there are no gaps between them, otherwise the craft will look sloppy.

To prevent the thread from unraveling, it is better to temporarily secure its end, for example, with a paper clip.

As you wrap, tighten the thread from time to time, as it tends to gradually relax, and this again gives the craft a sloppy look.

Having reached the place where you started wrapping, tie the ends of the thread with a regular double knot on the back of the craft and cut the ends short with scissors so that they are not visible.
Again, take a thread of the same color and wrap it around the handles of the basket according to the principle: from left to right, from top to bottom. Make something like a web in this way. There is no need to do too many turns: 4-5 will be enough. This “web” is needed not only for beauty, it will perform an important task: we will tie flowers to it with threads.
Try to wind the "web" so that the end of the thread returns to its beginning to tie them together, as we did with the basket winding.


To make flowers and leaves, cut out several circles and figurine in the form of drops from cardboard.

Now we need to do some delicate work: just as we cut out the inner outline of the basket, you will need to draw exactly the same figure inside each figure, stepping back from the edge by approximately 5 mm. Then you will need to cut them out along the drawn contours. It is best to use manicure scissors rather than ordinary paper scissors for this delicate work. You will get rings and “hollow” (empty from the inside) droplets.

Take wool threads bright colors and wrap them around the cut out parts. For each of them you will need about 60-100 cm of thread. IN in this case cut the thread of this length from the skein for each part, preferably with a margin. If you didn’t calculate correctly and there wasn’t enough thread, it doesn’t matter: take another thread and tie their ends together. back side details. Cut off the tails, and the junction will be almost invisible.

As in all previous cases, we finish wrapping in the same place where we started, tie the ends of the thread with a knot and cut off the protruding tails.

Tie the resulting parts to baskets in the form of flowers and leaves with threads of the same color as these parts. Tie them to the threads of the “web” and to the handles of the basket.
You can sew flowers with thin threads. Sew with small, invisible stitches.

The basket can be decorated with flowers, berries and leaves various shapes. Imagine!
Step-by-step instructions on how to make a ball from threads:
1. Inflate the balloon until the right size. Wrap a thread around the tail of the ball with a reserve of ~10 cm - for the future loop on which the ball will subsequently be hung to dry.
2. Lubricate the surface of the ball with Vaseline to make it easier to detach from the glued threads.
3. Soak the threads with glue. When using threads of different colors, very beautiful weaves are obtained.
There are several ways:
Pour the glue into some container that is convenient for you to work with, and soak the threads in it for 5-10 minutes. Dilute PVA glue with water (1:1) before soaking, as it is too thick. Make sure that the threads do not get tangled when soaking.
Take a tube of glue and use a hot needle to make two holes in it opposite each other. Thread a thread through the holes using a needle (when pulled through the tube, the thread will be smeared with glue). Instead of a bottle of glue, you can take a Kinder Surprise egg, or another small plastic bottle, for example, a medicine bottle or the same silicate glue, and pour the glue into it.
Wind the dry thread around the ball (skip step 4 and go straight to step 5), and then thoroughly saturate it with glue using a brush or sponge.
4. Secure the end of the thread soaked in glue to the ball (to secure the thread to the inflatable ball, you can use adhesive tape, tape, or protective tape). Then randomly wrap the thread around the entire surface of the ball, like a ball - each turn in the opposite direction. If the threads are thick, make fewer turns; if the threads are thin, wind them more tightly. Hold the threads in your hands with a slight tension, and also make sure that the thread is well wetted with glue. If the can runs out of glue, refill it.
5. After winding, leave again a long tail for the loop, wind it again around the tail of the ball, cut the thread and hang the ball wrapped in thread to dry. Dry the ball thoroughly for 1-2 days - the finished cocoon should be hard. Do not try to speed up the process by hanging the balloon next to a heating device - the rubber from which balloons are made does not like this, and the hot air can cause the balloon to burst. An indispensable thing for drying is a clothes dryer with clothespins. You can dry several balls on the dryer at once, and they will not stick together.
6. When the glue is completely dry and hardened, balloon ic needs to be removed from the web craft.
There are two ways:
1. Peel the ball off the web using a pencil with an eraser at the end. Carefully pierce the ball with a needle in several places and remove it or what is left of it.
2. Untie the knot that tied the balloon and it will gradually deflate. This method is mainly practiced when, instead of a balloon, you used an inflatable ball as the basis for winding.
7. Glue the finished cobweb balls together with a hot gun, pressing the gluing area slightly inward. The balls can also be sewn together, but this is not easy, because the balls become very strong and hard when dry.
8. Decorate the resulting design using beads, beads, feathers, braid, ribbons, artificial flowers, or any other materials at hand. Cover with paint. To do this, take a can of paint and go out onto the balcony or into the yard. With a slight movement of your hand, direct the colorful streams towards the balls awaiting a miraculous transformation. Create a snow effect: moisten the balls with glue and dip them in semolina or powdered sugar. Spray the ball with glitter hairspray. Don't expect much shine, but light sparkles are guaranteed.
Imagine...
small BIG tricks:
To prevent the table from getting dirty during the wrapping process, it is better to lay something plastic on it, not paper - everything will stick to the paper. Will fit plastic coasters under hot. If not, you can use a document corner made of thick plastic. The bottom seam is cut off, the folder is unbent and straightened, and it turns out universal remedy to save the table from glue, paint and other creative deposits. In extreme cases, polyethylene is suitable for protecting the workplace.
Instead of glue, you can use sugar syrup or paste. Recipe for making paste: 4 teaspoons of starch per glass of cold water, mix thoroughly and bring to a boil.
Instead of thread, you can take a thin one copper wire and also wrap it around the ball.
To prevent glue from leaking through the hole in the thread tube, place a thin needle on the end of the thread and poke a piece of tape through it. Pull the thread in the opposite direction and firmly glue this tape to the jar. Thus, through a small hole in the electrical tape, the glue will not wet the thread so abundantly and will stop randomly dripping from the thread onto the table and clothes.
Be careful when winding the kokan. When dried, a poorly tied cocoon cracks and loses its shape as the ball descends.
Spider web balls can be not only spherical in shape. As a basis for winding, you can take a cone-shaped object (roll thick paper or cardboard into a cone), a heart, etc.
If you decide to change the color of a thread ball, then it is best to paint the ball before deflating and removing its base - so that the web does not become wrinkled when painting. In addition to aerosols, it is convenient to apply paint with a small sponge, but inconvenient with a brush and takes much longer.
To make the surface of the ball textured, you can coat the balls with glue and roll them in cereals, for example, millet or coffee beans.
And a few more words about threads...
If an air structure is being prepared, then the threads should be thin and light. For flower pots, it is better to take thick threads or even ropes and do not skimp on glue. The thread color can be any. True, it depends on the glue used. When the glue is transparent and leaves no traces, you can experiment by wrapping the ball with threads different shades. It will turn out even more interesting.
On the eve of Easter, we all strive to decorate our home with themed gizmos and souvenirs, which by their very presence create festive atmosphere. Well, the most beautiful thing is if such things are made with your own hands, because then they have special energy and warmth.
And if you involve children in creativity, then you can get even more pleasure and positive emotions from the process itself. I’m just sure that your child will really enjoy such a fun and educational pastime.
That's why the editors "So simple!" I have prepared a master class for you on how to how to make an unusual Easter basket from threads and a balloon. Never before have I come across such a simple and at the same time original idea!
Thread basket

You will need
- balloon
- skein of coarse thread
- cup
- scotch
- PVA glue
- satin ribbon
- hot melt adhesive
- scissors
- plug, hair dryer (optional)

Progress
- First you need to inflate the balloon. Then we place it on a stable stand - a glass, vase or plate. For greater convenience, secure the ball with tape.

- Coat the balloon well with PVA glue and wrap it halfway with thread.

- Carefully coat everything on top with glue.

- Wait until the glue on the ball is completely dry. In order to speed up the process, you can use a hairdryer. Thanks to this, I was able to make the entire basket in almost an hour.

- In order to decorate the basket, use it satin ribbon. Using hot glue, secure the ribbon around the perimeter of the basket, and also make a bow in the center.
I left the basket without a handle, it’s easier to put Easter sweets in it. However, if desired, it can be supplemented with a handle made of wire and thread. You can attach the handle to the basket using the same hot glue.

- Another similar creation option blanks for the basket.

- This option can be complemented with a beautiful Easter bunny figurine. To do this, use this rabbit template. But you can just as easily choose a chicken or just an oval egg.

- Cut out an Easter figurine from paper and draw eyes, a nose, and glue a bow on it.

- And to finish decorating your Easter basket, add a small bow to it. Glue the bunny's face to the back of the basket and the paw to the front. You can also decorate the basket with a “grass” stand cut out of felt or colored paper.

It's so wonderful, at least once a year
Master class on how to make an unusual Easter basket from threads and a balloon. Never before have I come across such a simple and at the same time original idea!
WILL BE NEEDED
balloon
skein of coarse thread
cup
scotch
PVA glue
satin ribbon
hot melt adhesive
scissors
plug, hair dryer (optional) 
To get started, you need to inflate the balloon. Then we place it on a stable stand - a glass, vase or plate. For greater convenience, secure the ball with tape. 
Coat the balloon well with PVA glue and wrap it halfway with thread.  Carefully coat everything on top with glue.
Wait until the glue on the ball is completely dry. In order to speed up the process, you can use a hairdryer. Thanks to this, I was able to make the entire basket in almost an hour.
Next, turn the workpiece over and use the sharp tines of a fork or any other sharp object to deflate the ball. That's all, the blank for the basket is ready. 
To decorate the basket, use a satin ribbon. Using hot glue, secure the ribbon around the perimeter of the basket, and also make a bow in the center. I left the basket without a handle, this makes it easier to put Easter sweets in it. However, if desired, it can be supplemented with a handle made of wire and thread. You can attach the handle to the basket using the same hot glue. 
Another similar option for creating a blank for the basket. 
This option can be complemented with a beautiful Easter bunny figurine. To do this, use this rabbit template. But you can just as easily choose a chicken or just an oval egg. 
Cut out an Easter figurine from paper and draw eyes, a nose and glue a bow on it. 
And to finish decorating your Easter basket, add a small bow to it. Glue the bunny's face to the back of the basket and its feet to the bottom. You can also decorate the basket with a “grass” stand cut out of felt or colored paper. 
Hello, friends!
You've probably come across information more than once on how to make three-dimensional balls from thread and glue.
What we need for this:
- Balloon;
- Jute thread;
- PVA glue;
- Scissors;
- Masking tape;
- Hot glue.
Step 1.
First, you need to inflate a balloon of the size you need; the size of the basket and the amount of thread required will depend on it, respectively. And then, you need to wind the thread around the ball in a chaotic manner - the more layers there are, the stronger the craft will be.


Step 2.
Pour PVA glue into a small container, since the glue itself is thick and will not saturate the thread well, add a little water to it and stir thoroughly.

Step 3.
Carefully, with a brush, apply the resulting adhesive solution to the entire thread wound around the ball so that it is well saturated. We hang the ball and wait for the glue to dry.


Step 4.
The glue has dried and now you can remove the balloon from the thread ball, or you can remove it later, when we cut off unnecessary parts from our workpiece.

Step 5.
Using masking tape, we delimit the shape of our future basket and cut off the two extra parts with scissors. The photo below clearly shows what needs to be done and how.


Step 6.
Since the edges of the basket turned out to be not quite even and ugly, they need to be refined somehow. This can be done by gluing a previously woven braid of jute thread to these edges with hot glue. You can act at your own discretion.


The basket is ready now, it can be decorated, for example, with artificial or real plants and flowers, or you can put it on the table on Easter and decorate it beautifully with decorative or real Easter eggs - there are a lot of options))).

Please don't forget to share our articles on in social networks, This is important for us!


