← Did you like the material? Subscribe!
I have long wanted to sew pajamas for my daughters myself, and the other day it happened. For pajamas in the summer, a sweatshirt is suitable, for the winter and mid-season, interlock, and warmer fabrics are also suitable for the winter, for example: fleece footer. I have interlock, soft and delicate knitwear. The fabric was provided by the online store martapillow.ru.
Free pajama pattern from the website mamashilamalishu.ru (size 68-152 cm). The pattern is suitable for both girls and boys. My daughter is 103 cm tall, I took the blouse (sweatshirt) pattern for a height of 104 cm (the size fits perfectly, there is even a small reserve), but for the panties pattern it is better to take a size larger, since this one turned out to be close to us.

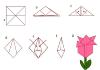
So let's start with the pajama top. Cut out all the pattern pieces + 0.8 cm for the seams: front, back, 2 sleeve pieces in a mirror image. It is better to sew cuffs and neck from ribbed or cash-corse. Don't forget to transfer the marks from the pattern to the fabric.

Lay out the details of the front, back and sleeves as shown in the photo below.

Sew the sleeves to the back and front, aligning the marks. A total of 4 seams need to be made. Iron the seams. I sew pajamas using an overlocker, but you can also use an overlock stitch on a sewing machine using knitwear needles. If in this case the knitwear stretches greatly, then you can under the foot sewing machine place the paper and scribble on it.

Then we place the front and back with the right sides on top of each other, straightening the sleeves and sewing the sleeves and the front with the back, where marked with a dotted line, making only 2 seams.

Let's move on to the cuffs. We bend the parts and sew them into a ring, where it is marked with dotted lines.

We bend the cuff parts in a circle so that the seams remain inside.

Sew the cuffs into the sleeves, aligning the marks. At the same time, stretch the cuff a little so that it coincides with the neckline of the sleeve.


Let's move on to the neck. We bend the strip in half and sew it where it is marked with a dotted line.

We bend it in a circle in the same way so that the seam remains inside.

Divide the neck of the blouse into 4 equal parts and make marks on it. We combine the facing so that the marks on it and the blouse match. The neckline facing is slightly smaller than the neckline on the blouse, so the facing needs to be stretched a little when we sew it on.

Iron the neckline, giving it a finished look.

If you want to close the seam on the back of the neck, you can proceed as follows: measure the distance between the seams at the back of the neck, add a couple of centimeters to the hem and cut a strip 3 cm wide. In my case, the size of the strip was 14x3 cm.

Sew one edge to the seam, folding the edges, as shown in the photo below.

We bend the second edge and sew it below.

Ironing. This creates a neat seam on the back.

We decorate the bottom cut of the blouse. If you don’t have a cover stitching machine, then first process the edge using an overlocker.

Then we bend the edge by 2-3 cm and sew a straight line on a sewing machine. If you have a cover stitching machine, this will make the task much easier. Iron all seams.
Such clips for fixing fabric can be used.

The blouse with raglan sleeves is ready.

Let's move on to the pants. I changed the pattern of the trousers a little by connecting the front and back so that there was no seam on the side. We cut out all the details of the pattern + 0.8-1 cm for the seams: 2 parts of the legs in a mirror image, 2 parts of the cuffs and a strip for the belt. It is better to sew cuffs and a belt from ribana or cash-corse.

We place both parts of the legs with their right sides on top of each other and sew the central seams where marked with a dotted line.

We place the front and back of the legs with their right sides facing each other and sew a crotch seam where marked with a dotted line.

We also sew the cuffs of the trousers into a ring and bend them in a circle so that the seams remain inside.


We sew the cuffs into the pants.


All that remains is to sew on the belt. We bend the strip for the belt in half and stitch it where it is marked with a dotted line.

We bend it in a circle so that the seam remains inside.

At this stage, you need to insert the elastic into the waistband (between the layers of fabric). The length of the elastic is usually 1-2 cm less than the circumference of the tummy, but this depends on the ductility of the elastic itself.
We sew the belt to the pants, connecting the marks.

To prevent the elastic from turning over during washing, it can be sewn to the belt itself from the back, where it is marked with a dotted line.


Children's pajamas are ready.

Katerina is 4 years old.

Pajamas - one of the most comfortable options for sleepwear. The more comfortable it is, the better you will be able to relax during sleep and get a good rest. In addition, pajamas can be used as casual wear at home. You can acquire this wardrobe item by visiting a specialized department shopping center, online store of women's pajamas or... sew it yourself!
Necessary materials
For sewing you will need cotton fabric (if you sew infrequently, for the first time it is better to choose inexpensive fabrics), piping for finishing, elastic band or elastic band, buttons and other materials for finishing.
Preparing for sewing
First you need to decide on the model and download (copy) the required pattern. Patterns can be found on the Internet or in specialized magazines sold in Ukraine. For example, these are:
pattern from the site: odensa-sama.ru

pattern from the site: odensa-sama.ru
Then the pattern is transferred to paper. In this case, be sure to follow the lines indicating your size! Special tables will help you determine it. The elements marked on paper are cut out and applied to the fabric, which is subsequently cut out.
Sewing the top
- It’s best to start by sewing the top part, which is usually a blouse (but it can also be T-shirt).
- It is best to start working by making side and shoulder seams. The hem must be connected to the facing, tucked and stitched, after ironing. The outer cut of the collar is decorated with piping.
- Along the stitching line, it is necessary to set aside the ends of the edging for allowances. The collar pieces are folded right sides inward and stitched, seam allowances are cut close to the stitching. The collar is turned inside out and ironed, and then basted to the neckline with open cuts.
- The edging is basted along the edge of the sides and overlaps the allowances at the bottom. The neckline and hem are connected to the blouse. Then lines are laid along the cuts.
- The hems are turned over to press in the seams on the short sides, then turned inside out and sewn on. The back neck facing is folded with the cut inwards, the edges of the collar and lapels are stitched next to the hem.
- The piping is basted and stitched onto the upper edges of the cuffs, then the cuffs are sewn from the inside out to the edges of the sleeves. After this, the cuffs are turned to the front side and sewn with the top edge to the hem.
- Finally, the sleeves are sewn together, the lower ends are sewn at the seam allowances, the sleeves are sewn in and the loops of the right front are sewn.
Sewing the bottom
- Pajamas can be sewn with trousers or with shorts. The sewing steps are similar. First of all, the side seams are sewn down, then the cuffs are attached to the bottom edge (by analogy with a blouse). After this, the step cuts are ground down.
- The trouser elements are folded with the right sides inward, the middle seams are sewn with one line. For subsequent threading of the elastic, the allowance at the top is not used, but is left open.
- The final stage is completing the drawstring. The facing of the upper edge is turned inside out, tucked under and secured with a stitch. Then, just below the top edge, lace is basted, the ends of which need to be stitched. The border is adjusted along the edge, and an elastic band is threaded into the resulting drawstring.
So, having done the above work, you will become the owner best pajamas hand-sewn. And if you don’t want or don’t have the opportunity, you can pay attention to presented on the site www.halatik.com.ua models. The variety of options ensures that you will find something to suit your taste!

View pajamas catalog and you can choose the most suitable model for you on the website. You can also place an order online And buy whatever you like.
Pajamas are a set of sleepwear that consists of a T-shirt or jacket and pants or shorts. Almost every person has such a purchased kit. And still, many people want to emphasize their uniqueness and individuality even at home, in privacy and peace, which is why they want to make pajamas with their own hands.
To sew pajamas, you should select natural fabrics that allow the body to breathe during sleep and avoid the greenhouse effect.
Suitable materials
- Cotton.
- Calico.
- Satin.
- Chintz.
- Silk.
- Viscose.
- Biomatin.
womanadvice.ru
Not everyone knows about ways to sew pajamas with their own hands in a few hours. The instructions are intended for both beginners and advanced experienced craftsmen. The given pajama pattern can be used for sewing T-shirts and pants from any fabric.
Materials and tools
- About 5 meters of fabric.
- Drawstring or elastic for pants.
- Pattern.
- Sewing machine.
- Scissors.
- Chalk or soap.
- Needles.
Creating a top
- Typically, a night top fits quite loosely on the figure so as not to restrict movement during sleep. Therefore, when creating a T-shirt based on a sample, be sure to add about 5-6 cm to the measurements. You should also add 1-2 cm to the seam allowances.
- Trace the resulting pattern onto the fabric with chalk or soap. You should end up with two identical parts: front and back. If you want to make the neckline larger at the front, then draw an additional line and cut off the unnecessary fabric along it.
- Connect the back piece to the front piece. This is done using side and shoulder seams. Secure both sides of the product with needles along the edges. You need to start stitching from the shoulder seams.
- Since this is one of the most simple options sewing a top, then you will not need additional manipulations to create darts and other seams.
- Once you have stitched all the necessary parts of the top, start working on the neckline, arm openings and bottom of the product. This can be done with an overlocker or folded in all the edges and sewn with a straight stitch.

klubok.com
Making Pants
- Sewing pajama pants is very similar to sewing regular ones. sweatpants. In our example, the pattern is not divided into four fragments, but only two remain, which will be sewn with one seam on the inside of each leg. Place the template on the fabric folded in half and make two identical pieces.
- Cut two strips to form elastic bands on the shins. The strips measure about 15 cm wide and 20 cm long. Fold them in half and secure them with needles at the bottom of the legs. Then sew with a straight stitch.
- Fold each pant leg in half, secure with needles and stitch the opening to the base of the hips.
- Connect the right pant leg to the left. Sew center seams at the back and front of the garment. Fold the top edge down 2-3 cm and stitch. This way you have formed a belt for an elastic band or a tourniquet.
- Leave a small hole in the center (1 cm). Attach a pin to one end of the elastic or cord and insert it into the hole. You can leave the adjustable waistband or sew the elastic or cable cord along with the main fabric, thereby covering the hole.

londonstreet.com
Your own set of sleepwear is ready.
 It’s not for nothing that pajamas are considered perfect clothes for sleep. Women's pajamas can be strict and creative, classic and seductive. It does not restrict movement, it can be made of warm fabric to keep you warm in cold weather or thin fabric to keep you cool. In a word, it gives you the opportunity to sleep well and restore strength after a hard day.
It’s not at all difficult to sew such a thing with your own hands, you just need to decide on the model. Those who like warm clothes for sleeping can choose pajamas with long sleeve and pants, and for those who like lighter clothes, a set of a sleeveless T-shirt or sweater and shorts is suitable.
 Even a novice dressmaker can sew pajamas for women quickly and without much difficulty. Moreover, you have the opportunity to choose the style, material and color of this product yourself. We will tell you how to sew simple pajamas consisting of a T-shirt and shorts in this article.
Selection of materials
Pajamas can and should be stylish, but we must not forget that their main purpose is to be comfortable and pleasant to wear. It is best to use natural fabrics for sewing pajamas. They are hypoallergenic, breathable, and do not accumulate static electricity.
The most common are cotton, linen, bamboo, jersey, fleece, flannel and silk. Fleece and flannel retain heat well, and silk fabrics keep you cool in hot weather. The presence of synthetic fibers in natural fabrics. However, it is better that there are no more than 20%. The main criterion for choosing fabric is a pleasant feeling when touching the body.
 We will use knitted cotton fabric. Knitted fabric can be different types– jersey, knitted openwork and relief fabrics, velvet based on knitwear, fabric with pile or terry on the reverse side and others. These fabrics are soft and stretchy, they are pleasant and comfortable to wear.
When sewing things from knitted fabric, you need to take into account some nuances:
- It is more correct to sew parts of the product with a fine zigzag stitch.
- Use a machine needle for knitted fabrics, which does not damage the material.
- Sew the bottom hem with a double needle to keep it elastic.
- Use bias tape to sew seams that should not stretch later.
- If there is a fastener, its edges are fixed with adhesive fabric.
Let's determine the material consumption for the product based on calculations:
- Fabric consumption for a T-shirt, with a fabric width of 150 cm, is calculated by the formula: DI (product length) + 0.4 m.
- Fabric consumption for shorts or trousers, with a fabric width of 150 cm, is calculated by the formula: CI + 0.2 m.
Thus, the fabric consumption for a top (T-shirt) with a fabric width of 150 cm will be approximately 90 cm, for shorts - approximately 80 cm.
The top part of the pajamas - a T-shirt - is assembled from one solid back piece, one solid front piece and two sleeve pieces. Please note that the pattern shows ½ back, ½ front and ½ sleeve. The front and back patterns are cut out by applying them to the fold of the fabric. And the sleeve is cut by unfolding the pattern.
The shorts pattern is assembled from 2 front pieces and 2 back pieces. Please note that the pattern shows ½ front and ½ back.
What measurements are needed
In order to create a pattern you need to measure your figure.
Length of T-shirt and shorts; neck girth; chest girth; waist circumference; hip girth; chest height; back height; shoulder length; shoulder circumference and sleeve length measurement.
How to make a pattern
Correct body measurement is already half the success. Before you begin, you should secure your waistline with a thin braid, this will make it easier to take measurements. The person being measured stands straight and relaxed. At the same time, you should not slouch, retract or, conversely, stick out your stomach.
It is advisable that the clothes are not thick, so as not to distort the real parameters of the body. The measuring tape should fit snugly, but not squeeze, the figure of the person being measured.
DI T-shirts – measured from the shoulder line to the bottom of the T-shirt;
DI shorts– measured from the waist to the bottom of the shorts;
OS– measured through the base of the neck and closes above the jugular cavity;
OG– horizontally around the body, passing through the protruding points of the mammary glands;
FROM– at the narrowest part of the waist;
ABOUT– through the protruding points of the buttocks;
VG– from the line of the shoulder slope down to the most protruding point of the chest;
Sun– from the base of the neck to the waist line;
ShP– from the base of the neck to the shoulder point;
OP– measurements must be taken with the arm down.
Making a T-shirt pattern

Making a paper pattern for the back of a T-shirt:
- From the top right point ( VPT) we put 2.8 cm down, and to the left of the VPT measure OSH/4 (10.5 cm).
- From this point to the left we put another measurement of the width (8.5 cm). From the obtained point we go down 9 cm.
- From VPT down DI (60 cm), from it to the left OB/4 (96 cm).
- From the VPT down – VG (23 cm), from it to the left OG/4 (24 cm).
- From VPT down - BC (42 cm), from it to the left OT/4 (23 cm).
We connect the points: the line of the neck, bottom, shoulder and side using a pattern, the rest with a straight line.
Before:
We build the front pattern similarly to the back pattern, only we make a deeper neckline. To do this, set aside 9 cm from the VPT downwards.
Sleeves:
- From the VPT downwards we put the DR measurement (20 cm), from this point to the left OP/2.
- From the VPT downwards we put 14 cm, from this point to the left OP/2.
Let's connect all the dots. We connect the sleeve piping line using a pattern.
Constructing a pattern for shorts

When creating a pattern for shorts, we will use a simplified version. To do this we will need shorts or jeans that fit. So:
- We fold the old shorts along the seams (without turning them inside out), place them on tracing paper or graph paper and use a ruler to trace first one, then the other leg (you should get two parts - front and back).
- If narrow shorts were used for the pattern, then you need to add 2-3 cm from the side seams.
- We draw a straight line from the femoral line up and down. Since our shorts are sewn using elastic, the waist should not be narrow.
- It is also necessary to note the length of the product. To do this, we will use the DI shorts measurement.
- From the waist line up, add 4–5 cm to bend the drawstring and insert the elastic.
These pajamas can also be sewn with trousers; to do this, simply add the desired length.
The pattern is ready.

Before cutting the fabric, it is better to iron it over the entire surface from the wrong side.
ATTENTION: Before cutting, it is necessary to wash the fabric to avoid further shrinkage. The fabric should be washed at the water temperature at which it is intended to be washed in the future. ready product. If the model uses fabrics of different colors, then when washing you need to make sure that they do not fade. Pre-wash a 10x10 cm piece of fabric.
T-shirt:
- Fold the material right side inward. We apply the pattern of 1/2 of the back of the T-shirt to the fold of the fabric, trace it with a pencil or chalk.
- Let's add allowances: 1-1.5 cm on all cuts. We outline the second time with allowances.
- We cut out the front part in the same way.
- We cut the sleeve in a mirror image so that we get two symmetrical parts. Leave an allowance along the sleeve length of 3–4 cm.
Shorts:
- We fold the material face to face and apply the pattern of 1/2 of the front of the shorts onto it. We trace the outline of the pattern with chalk or pencil.
- Let's add allowances: 1 - 1.5 cm on all cuts. We trace a second time with allowances.
- We cut out the back part in the same way.
- We will also need to cut out two cuff parts. Its length is equal to the circumference of the leg, that is, the width of the bottom of the front plus the width of the bottom of the back, and the height will be about 4–5 cm.
ADVICE: If you cut all the parts with the same allowances, then it is not necessary to trace the pattern along the contour the first time. You can simply replace the sewing machine foot with a foot with a ruler, and sew the parts together, setting aside the same width of allowance.

We sew the top part of the pajamas - a T-shirt:
- We wrap all sections of fabric to prevent it from fraying. To do this, we use an overlocker or a zigzag stitch, having previously selected the length and width of the stitch on an unnecessary piece of fabric.
- Sew the shoulder seams. Iron them towards the back.
- Sew down the edges of the neck strip. Fold inside and out. Let's iron.
- Align the neck seam with the left shoulder and secure with a pin. Stretching the neck strip, we sew it to the front and back. Iron from the neckline.
- We bend the bottom of the sleeve twice and stitch it using a double needle.
- We adjust the sleeves and sew them into the armholes of the front and back of the T-shirt.
REFERENCE: To fit a part means to reduce its dimensions by creating assemblies in order to give the required shape and length.
- Iron seam allowances. On each side, use a single stitch to sew the side seam and the sleeve seam.
- We bend the bottom and stitch it with a double needle.
We sew the lower part - shorts:
- We sew all the cuts using an overlocker or a zigzag stitch.
- We fold the parts face inward, baste them, and then sew the inner and outer side sections. Iron the seams.
- We fold the parts face to face (inserting one trouser leg into the other) and baste it, and then sew the middle seam. Iron the seams.
- Sew the elastic on the sides.
- At the waist we make a drawstring for an elastic band. Fold approximately 1 cm inside the product. Then we turn it inside again to the width of the elastic +0.6 cm. We put the stitched elastic there and sew the allowances along the bottom hem line. We sew the drawstring from the inside out, retreating 1–2 mm from the edge.
- Take the cuff and baste the edging tape to its front side. Then we flash it.
- Sew the side sections of the cuff.
- We baste, then sew the cuff along the bottom edge of the shorts, folding it facing inward. Fold the cuff right side out. Let's iron.
- Sew on the cuff. At the same time, we make a minimum indentation from the edge seam.
Your pajamas are ready! Wear it for your health!
How nice it is after a long, eventful day and evening to put on soft, comfortable pajamas, wrap yourself in a blanket and plunge into the world of sweet dreams. Pajamas from natural material A must have in every woman's wardrobe. After all good dream- this is not only a pledge good mood, but also female beauty. It is not for nothing that many manufacturers of face creams equate their effect to eight hours of healthy sleep. Do you now understand how important good sleep is for our body? And so that you can sleep well, we suggest making yourself pajamas from natural cotton jersey, decorated with a print with a cute teddy bear. Such pajamas will set the mood, and you will only have romantic, magical dreams.
Pajamas consist of trousers with elastic and a T-shirt. To save you time, we've taken care of the pajama pants pattern for you! You don’t have to build and model it, just download the pattern for 5 sizes, print it and choose your size according to the size chart.
The T-shirt pattern is modeled after the hoodie dress pattern that we gave in the previous lesson. If you have already built it, use it for modeling.
Pajamas are a type home clothes, used primarily for sleeping. The word pajama comes from the Hindi language. It originally comes from a Persian word literally meaning “leg clothing,” that is, trousers. Typical pajamas consist of loose pants and a shirt, but the current interpretation of pajamas has changed somewhat and modern pajama sets can consist of trousers, breeches or short shorts, and the shirt is quite harmoniously replaced by a T-shirt with long or short sleeves.
Knitted pajama pattern - T-shirt and trousers
T-shirt modeling
The length of the T-shirt along the back is about 70 cm. The increase in looseness of fit is 5.5 cm to the half-circumference of the chest.
Back modeling. To model a T-shirt pattern, deepen the back neckline by 2 cm and widen it by 4 cm. Draw a new line for the back neckline as shown in Fig. 1. Along the back waistline from the side seam, set aside 2 cm to the left, draw a fitted line for the side seam.
Shelf modeling. Deepen and widen the neckline of the shelf by 7-8 and 4 cm, respectively. Draw a new neckline of the front, fit the side seam 2 cm as shown in Fig. 1.

Rice. 1. Pattern of pajamas - modeling of a T-shirt
Sleeve pattern. for knitwear we gave earlier. The sleeve length of the T-shirt is equal to the sleeve length according to your measurements, the width of the sleeve at the bottom = Wrist circumference according to your measurements + 5-6 cm.

Rice. 2. Pattern of sleeves for a T-shirt
How to transfer an image of a teddy bear to a T-shirt
In this model, the image of a bear cub is applied to a T-shirt using thermal printing. You can choose any image you like and print it on a T-shirt. Today, in almost every city there are companies that offer printing images on fabrics and canvases. Print the image on the knitted fabric according to the markings, and then cut out the front. You can download the image we offered below.
IMPORTANT! Before buying fabric, be sure to ask printing specialists what kind of knitted fabric it is possible to print an image on and whether there are any restrictions on the quality of the fabric and what is needed for this.

T-shirt image of bear cubs
How to cut a T-shirt for pajamas
To sew a T-shirt you will need: about 0.8 cm of gray knitted fabric 1.8 m wide (a cooler is ideal).
Details of the T-shirt cut are given in Fig. 3. Additionally, cut out a bias strip of fabric in a contrasting color, 4 cm wide (1.5 cm in finished form) and the length of the neck of the back and front. When cutting pieces, be sure to add 1 cm allowances on all sides, 2 cm at the bottom of the T-shirt and sleeves. We recommend sewing pajamas - a T-shirt and trousers - with a four-thread overlock stitch.

Rice. 3. T-shirt cut details
The length of the trousers according to the pattern along the side seam is about 104 cm. The pajama trousers pattern is given in natural size in 5 sizes, you just need to download and print it. We have prepared two formats for you - A0 (can be printed in A0 format at a copy center) and A4 (can be printed in A4 format on any printer, then the sheets must be glued together).
IMPORTANT! The waistline of the trousers is lowered by 4 cm. Take this into account when checking the pattern. Patch and side pockets on pajamas can be omitted.
How to determine your size
Take measurements from the figure and compare them with the measurements from the Table. The main measurement for trousers is the hip circumference. When choosing the size of a trouser pattern, it is also important to take into account the Seat Height measurement. It is the seat height that determines the level of location (depth) of the middle seam. And if the seam depth is insufficient, the trousers will be “shallow” and vice versa.
Compare your measurements with the table and determine your trouser size. Then check the selected size as shown in fig. 2.

Rice. Table of women's measurements
How to check a pattern
Sometimes when printing, due to printer settings, the pattern may be forcibly compressed. It is for this purpose that a “test square” with sides of 100 x 100 mm is applied to the pattern pieces. After printing the pattern, first measure the sides of the square and make sure that the pattern is printed correctly.

Rice. 5. How to check your pajama pants pattern
To check the suitability of the size you have chosen (in Fig. 2, size 50), measure according to the pattern:
- Middle seam length: X1+X2
- Waist: X3+X4
- Pants length X5
- Pants width at the bottom: X6+X7
Compare the values obtained with your measurements. Since trousers are made from knitted fabric, the measurements should be equal to those taken from the figure, or have slight deviations up or down.
How to cut pajama pants
To sew trousers you will need: 1.2 m of azure blue knitted fabric, 160 cm wide, about 0.9 m of elastic, 3 cm wide, thread.