No matter what your kitchen is, it won't be easy to work in without one small but important accessory - an oven mitt. And so that this product is not only convenient, but also decorates the interior, I’ll tell you how to sew a pot holder yourself, and what you need to take into account.
To buy or not to buy potholders?
The list of advantages and disadvantages of potholders is inappropriate: as for me, these products have one undeniable advantage that overrides everything - they prevent you from burning your hands.


But one standard question may arise: “why try to invent a bicycle if you can go and just buy it?” Of course you can buy it in store ready-made option, but will it be better than something created by yourself?
The answer is simple and consists of at least 3 components:
- hand-made potholders are even more practical than store-bought ones;
- they will help in unifying all accessories under the banner of a single style;
- this same element will add a bit of exclusivity - after all, you won’t find potholders decorated exactly like yours even during the day.
I think that when the advantage of tacks and the need for their creation has been proven, it’s time to move on to more offensive actions.
Making potholders - getting started

In addition to its direct functions, a potholder can serve as a present. This is where the rule “the best gift is a gift made with your own hands” comes into play. But regardless of the purpose for which you are making this accessory, it is important to remember some points.

The individual design of the potholder makes it a popular holiday gift, and the price of such a gift is minimal

Main features of cutting and sewing
Making potholders is both easy and difficult. Easy because you don’t need any special skills, hard because you need to take into account a lot of nuances.
I'll make your job easier by listing the main ones:

- To ensure that your potholders meet all the requirements for heat resistance and strength, you should give preference to natural cotton fabrics.
Remember that synthetic fabrics are easy to melt and catch fire, so you should avoid using them.
- To prevent you from burning your fingers, keep in mind that the oven mitt must have a certain thickness that protects the skin from heat. Suitable dense fillers include: cotton wool, padding polyester, batting or felt.


- To save on materials, you can use blouses and sweaters that have lost their appearance.


Selection of materials
As mentioned earlier, the most effective potholder can be created using natural materials for the front frame:


- chintz;
- cotton.

Don't forget that you have the opportunity to carefully consider the shape and appearance potholders.
In the process of decorating it, you can use all your imagination to the maximum by using:
- beads;
- small beads;
- appliqué;
- embroidery threads.


Creating potholders step by step
Sewing a stylish pot holder is quite simple - believe me, you don’t need any special skills. By following the sequence of steps, you will get a good result the first time.

Mittens
Instructions for creating a potholder:

- The first is the pattern. It's very easy to do. To do this, just place your palm on a regular A4 piece of paper, fold your hand as if you were going to put on a mitten and trace its silhouette, retreating from it at least 2.5-4 centimeters.


- Using the resulting template, cut out 2 pieces of the front material and the inner one. For the front side, choose a bright, beautiful fabric that will decorate the kitchen, but for the internal filling you should give preference to soft and pleasant-to-touch fabrics.


- Next comes the processing of filling the mitten. Having chosen a dense non-synthetic fabric for it, cut out two flaps from it according to the already outlined pattern.
- And now the most interesting and important stage begins.
You need to put all the parts in the correct order:
- first, two flaps with the colored side facing each other are laid out on a flat surface, intended for the front framing of the potholder;
- after that, we apply cut-outs from the filler on top and bottom of the finished parts;
- and at the end we put on both sides (again, top and bottom) along the flap intended for the inner lining.
- To prevent all the parts from fidgeting on the table during the sewing process, they can be secured with safety pins.
- Now you can proceed directly to sewing. Sew all edges of the potholder with a distance of 5-7 mm from the edge.
- When you have such an inverted pot holder, trim off the excess fabric along the edges, not getting closer than 3 mm to the seam.

- Now make tiny cuts in all the rounded areas (between your fingers, for example). This will allow our mitten to turn out better.

- There is very little left - turn the product outside and decorate it decorative ribbon or braid. And again, it is better to choose natural materials.
This is the easiest option for creating potholders with your own hands. If you are confident in your abilities, you can complicate the task slightly and make a quilted one. Its tailoring is in many ways similar to the previously mentioned model.

- Before cutting out the flaps according to the patterns, you need to sew the fabric elements selected for the front finishing with a diamond, a check, or as you please. Please note that the threads must match perfectly with the color of the facing fabric.
- Fold the quilted flaps right sides together as indicated in the instructions above and repeat the above steps.
Square
When creating a mitten-shaped potholder has been mastered, all horizons are open to you and sewing a square potholder will seem like a cakewalk.
And yet I will suggest a way to make it:

- To begin, prepare 2 beautiful flaps for the front side and the same amount for the inside (from batting, for example).

- Create a pattern that is a square with dimensions of 20 by 25 cm (I give standard sizes, you can measure others).

- Using the pattern, cut out 4 pieces of fabric.
- Lay them out like this:
- the first layer is the filling fabric (the same batting);
- place a piece of decorative material on it, face up;
- Place the same decorative fabric on top, but face down;
- and finally cover the pattern with a layer of batting.

- Without changing the sequence of the flaps, sew the workpiece on three sides.
- Next, prepare a loop from a beautiful piece of fabric (can be of a different color) with dimensions 8x15.
- The loop is applied to the fourth unstitched side, after which it is processed with a sewing machine.
- The potholder turns outward.
- The fourth side of the potholder is stitched in the same way as the previous 3.
For added practicality, you can always sew an additional outer pocket to the potholder. Using this pattern, you can sew an accessory of any shape, be it a star, a circle or a rectangle.
Circle in patchwork style

I offer you one more interesting option creating potholders for the kitchen.

- Create a pattern with a circle of arbitrary diameter.
- Using the template you made, make a blank from the internal filler, and one solid piece for the outer side of the potholder.
- Cut out several scraps of randomly patterned fabrics.

- Connect all the previously created patches together using sewing machine stitch them together into a single fabric.
- Press all seams thoroughly.
- Connect the circle of scraps to the corresponding piece of filler. Next, apply another layer of filler, and a piece of decorative fabric on top of it.
- Sew the entire potholder in a circle, carefully trim the remaining threads and pieces of fabric. Enjoy the results.

Instead of results
Oven mitts are one of the necessary items in the kitchen. In addition, with their help you can add to the interior special chic. Now you know how to sew such an accessory, you are convinced that it’s easy!

If you have any questions while sewing, ask them in the comments. Watch the video in this article - it contains a lot of useful information.
This idea was born due to the confluence of two circumstances in one short period of time: every day using oven mitts and removing a hot saucepan from the stove, I thought that it was high time to refresh these oven mitts, but somehow no idea was born for this. This means there was no creative incentive. One day, while cutting out blanks for the next patchwork, and putting aside the remaining narrow strips of fabric, no longer suitable for anything else, it suddenly dawned on me that creative idea, which you definitely want to implement. Having sewn two potholders, I was so inspired by this game of stripes that I couldn’t stop and decided to complicate my task and make an additional mitten-potholder in the set.
So, mitten.
To work you will need:
- 1. Mitten template made of paper (or cardboard, fabric, plastic, etc., in general, from any available material.) - 1 pc. See photo. The template is drawn on an unfolded sheet of squared notebook so that the size is clear.
2. The base for the mitten is made of fabric (dense, inelastic fabric, for example, flannel), it will also act as insulation, so the density of the texture is in this case has the meaning. We cut out 2 parts that should be a mirror image of each other.


4. Any scraps of fabric, remnants of braid, lace, accessories (for additional decor).

So, let's get to work.
1. Cut out the template, cut out the base and lining.

2. Take a strip of fabric and place it along the bottom of the mitten, right side up.
3. Place the next strip on the previous one with the wrong side up, sew a stitch, simultaneously connecting the edges of the strips with the base fabric. (

4. We grind the second (and each subsequent) strip, turn it over and iron it.


 Advice: edge with two separate pieces of binding. The beginning of one part and the end of the second - when moving to the finger.
 I wish you all creative success!
How to decorate a kitchen and at the same time ensure that all things play a practical role and are used? The best thing to do is to make potholders that always find use and are used daily. With the help of potholders you can emphasize the style of the interior and create unique design. How to make oven mitts with your own hands for the kitchen - interesting tips.
Many people may ask this question - why sew potholders from fabric with your own hands if you can buy them in a store. There is a simple answer to this. As a rule, fabric accessories now sold in stores are mostly made in China. And many of them are sewn poorly and come apart at the seams a few days after purchase. And it’s better to sew them yourself and be completely confident in the quality and long service life.
Moreover, hand-sewn potholders perform a number of functions:
- They play a practical role - they serve to pick up dishes standing on the stove;
- Decorate the kitchen;
- Create a unified style.
Original oven mitts are especially appropriate if the kitchen is made in folk eco style - Russian, country, Provence. In some interiors, potholders made of fabric are not very appropriate. It’s so difficult to imagine them in high-tech interiors.
Potholder made from old jeans (video)
What kind of potholders can there be?
You can use fabric to make some very interesting oven mitts for the kitchen. At the same time, the style in which they are made and the technique can be completely different. This is where their charm lies: oven mitts can be sewn in different ways and they will also look completely different.
Potholders sewn using the patchwork technique look very interesting. They are easy to make even for a novice craftswoman, and they look very original. Likewise, potholders with appliqués, embroidery, and stencil painting look very interesting.


What materials will you need?
In order to sew oven mitts for the kitchen, you will need:
- textile;
- padding polyester;
- threads;
- needle;
- scissors.
Depending on what decorative elements are planned, you may need:
- floss threads for embroidery;
- beads;
- adhesive application.
You can develop patterns for potholders yourself, or you can download them from the Internet.
Patchwork potholders

You can make oven mitts for the kitchen using the patchwork technique. To do this, you need to select fabrics that are in harmony with each other in color and pattern.
Important: A win-win option is a combination of plain fabric and fabric with a pattern. You can try combining striped fabric and fabric with a small pattern. Such beautiful potholders look especially good in Provence style interiors.
The easiest way is to cut the fabric into squares and sew a cloth from them. A pattern is applied to the resulting canvas and a potholder is cut out. The inner parts of the potholders and part of the padding polyester are cut out from a plain fabric using the same pattern.

After this, we sew potholders: padding polyester is applied to the piece of patchwork fabric, and then a plain lining is one part of the potholder, on the front side of the hand. You need to do the second part of the tack in exactly the same way - back side. Then both of these parts are sewn together to form a mitten - a potholder. A loop is attached to its edge, after which the edge is edged.
Potholder - mitten (video)
Square potholders
You can sew potholders not in the form of mittens, but in the form of a simple square. Making them is even easier since there are no curly edges. The sewing principle is the same. You can make them from multi-colored fabric, plain fabric, patchwork style. We sew a loop for hanging potholders on the corner.


The application can be:
- flat;
- volumetric.
The applique is cut out from pieces of multi-colored fabric. To do this, you need an initial applique pattern. Next, its individual details are transferred to the fabric and parts of the applique are cut out. All details are sewn onto the front side of the potholder using a decorative seam. And only after this the front part is sewn with padding polyester and the back side.
Important: You can make the task much easier and cut out a ready-made applique motif from fabric. To do this, take fabric with a printed large pattern. The motif you like is cut out, duplicated with non-woven fabric and sewn to the front side of the potholder.
We sew voluminous appliqués in much the same way. Only the applique is not sewn to the end at first - pieces of holofiber are placed under the applique to add volume. As soon as the applique acquires volume, it must be sewn to the end. Potholders made of fabric with 3D appliqués are especially beautiful. And they are not at all difficult to make.
Master class on how to sew a pot holder (video)
Painted potholders
It’s not at all difficult to sew such potholders with your own hands. Take pieces of any plain fabric you like. A design is applied to it using a stencil. You can make stencil patterns yourself with your own hands or download them from the Internet. In principle, any drawing you like in a magazine can be turned into a stencil.
The design is applied to the fabric with acrylic paint with a brush or sponge. To prevent paint from leaking under the design, the stencil must be tightly attached to the fabric - this can be done with tape. When the pattern on the fabric has completely dried, you can sew together parts of the fabric potholder for the kitchen.
Original ideas

You can turn your homemade potholders into a real work of art. It is enough to sew a couple of dolls from fabric and attach them to the front side of the potholder. This tack becomes mostly decorative element kitchens.
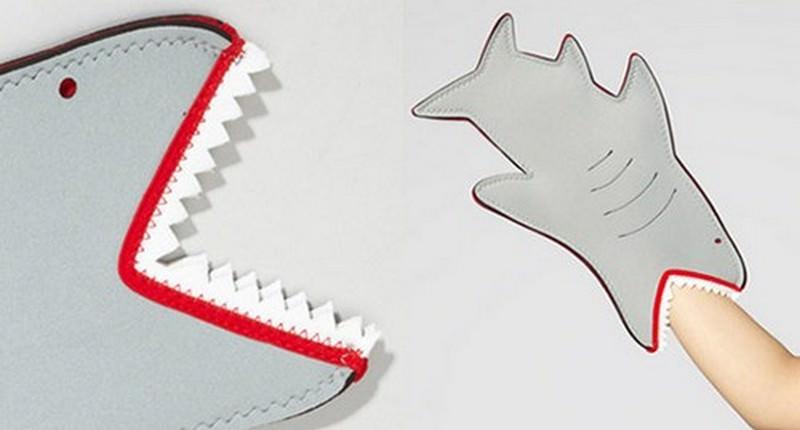
You can do it differently - the parts of the potholder are knitted and the individual elements are sewn together. In this way, you can make potholders for the kitchen in the form of vegetables, fruits, figures of people, animals, and fish. Such potholders become a real decoration of the kitchen. Especially if they are complemented with embroidery.
You can make various figures of animals, vegetables, berries from fabric, duplicate them with padding polyester and sew oven mitts for the kitchen. They will create a special mood and positivity in the kitchen.
Sew a potholder - heart (video)
Sewing potholders with your own hands is not difficult. Tasteful fabric, two or three interesting ideas and things are already ready that can make the kitchen cozy and original. Handmade potholders can make any interior unique.
DIY kitchen mitts (photo)


Takes ~3 minutes to read
Modern kitchens can be equipped with high-tech household appliances, furnished with the most expensive fittings and furniture combinations. However, there is one thing that no kitchen can do without. We are talking about an oven mitt with which you can pick up a hot pan from the hob or remove a baking sheet from a heated oven. Ready-made Christmas potholders, sewn together, as well as those dedicated to other themes, can be bought at any home goods store. However, we suggest trying your hand at this and making potholders with your own hands from fabric with patterns. This article will talk about how to sew a potholder for beginners and amateurs.

DIY potholders: materials, tools and skills
Sewing potholders with your own hands is not as difficult as it might seem at first glance. To make it, you will need inexpensive materials and a little creativity to make something new and original. In case you don’t have time to fantasize, there are many photos on the Internet from already ready-made templates. Numerous videos are also provided to help you understand the process.
Let's figure out what materials we need for the external design and internal filler, and also decide on the shape of the potholder.

External material
First of all, it is important to remember that you can choose material for external decoration only from natural fabrics. Double potholder made from synthetic fabric, will instantly flare up and ignite upon contact with fire, and from excessive heat it will simply melt on your hand. Another disadvantage of synthetics is the toxicity of the fibers upon contact with food.
Among natural fabrics, give preference to the following:
- chintz – used for applying full-color designs;
- Linen is a dense fabric with a pronounced texture, consisting of dense threads. It does not slip on the surface and is pleasant to the touch. To ensure that the material does not wrinkle, it is possible to add synthetic threads to the composition (no more than 20%);
- cotton is a dense, high-quality and inexpensive material. Widely available in a variety of colors and prints, there is plenty to choose from.
Internal filling
For the internal filler, as well as for the external part, only natural and wear-resistant materials are selected. The main thing is not to forget that you need to print out the patterns correct sizes. Patterns are always specified larger than the final potholder. The thing is that the material inside implies the volume of the product.
The following options would be excellent materials for filler:
- felt - felt potholders are the most common due to the strength, reliability and low price of the material. The material is not afraid high temperatures and pleasant to the touch;
- drape - the material has low thermal conductivity and high strength. Choose an option that is not the thickest, since the needle of the machine simply will not “bite through” it;
- Batting – It is important to be careful with potholders that are filled with batting. If the top fabric cannot withstand the heat from the hot surface and breaks through, then the batting can also burn through. There is a risk of burns.
Note to those who want to decorate a finished potholder with elements that are crocheted or looped: make a choice in favor of natural wool. This material is not only environmentally friendly and high quality, but will also look great in any kitchen. It is advisable to choose the color of the wool so that it matches the shade of the kitchen curtains.
Tack form
Before you start working, it is important to think about the shape and appearance of the potholder as a whole. Practical and functional aspects play the most important role in the choice. The accessory should fit comfortably in the hand, comfortably grasp hot kitchen utensils and simply look stylish lying on the kitchen countertop or hanging from a nail.
The most common and popular forms of potholders:
- square;
- circle;
- mitten or mitten;
- elongated rectangle;
- leaf, berry, fruit, heart and other creative shapes.
You can make the potholder unusual already at the moment of its shape by choosing the heart option or any other from the last point. Or you can stay with a simple, laconic form, but add originality with further decoration.
Interesting exterior design options:
- applique;
- crochet embroidery using a special pattern;
- crochet binding;
- decorative seam.
If you are thinking about how to sew a pot mitten and how to design it, don’t worry, it’s not at all difficult. The most important thing in this matter is to follow the instructions and experience of those people who know a lot about their hobby. For them, the question of how to sew a pot mitten no longer arises. Perhaps you too, having gained knowledge and skill in this area, will become such a person.
Do-it-yourself pot holder: interesting ideas
Handicrafts are, in fact, a very useful and profitable hobby. Using just a few scraps of fabric, filling material and your limitless imagination, you can create unique masterpieces with your own hands. You can either leave them at home or give them as gifts to friends, loved ones and family. And in such large cities as, for example, Moscow, the idea of starting even a small business producing potholders from scraps with your own hands, passing on patterns to others, sharing experience and knowledge, and launching master classes, is becoming a real idea. All this can be achieved if you want to develop in this area. But for now we’re just learning how to properly sew a potholder at home.
Especially for you, we have prepared some interesting ideas for making and decorating homemade potholders.
Quilted
These potholders are the most popular. They are very common in both domestic and foreign kitchens. There is a specific reason for this popularity. The thing is that quilted household items make the interior of the room warmer, homely and cozy. They are also easy to make with your own hands.
Patchwork
This type of product looks no less nice in the kitchen and adds the same feeling of coziness and comfort to the interior as the quilted version. The noticeable difference lies in the fact that the process of making patchwork potholders for the kitchen with your own hands, patterns and printing is much more complicated. You will need a significantly larger amount of time, as well as a clear sewing pattern and the ability to cut out the necessary parts.
Loop or crochet
Experimenting with hooks or eyelets will ensure that accessories stay in place. Knitted potholders will create a special, colorful atmosphere in your kitchen. Quirky products will add zest to your home and breathe life into it. new life.
For beginners the most simple option will make dense, non-voluminous crochet patterns. It is not at all difficult and does not require a lot of time and effort.
Let's sum it up
We told you the whole theoretical part. Now the time has come to try out the acquired knowledge in practice. We will tell you how to sew beautiful potholder mitten:
- The first step is to create a pattern. To do this, take a regular A4 sheet and place your palm on it. Fold the sheet as if you were going to put on a mitten and trace the outline of the silhouette. Do not forget to retreat 2-4 centimeters from the edges. At the end of this action you will receive a pattern.
- Elements of internal and external material cut according to the resulting template. For the front part, choose a natural fabric that matches the color of the interior of your kitchen. If you want something more interesting, you can purchase a brightly colored fabric to make it stand out and serve as an accent color. For the internal filling you also need natural fabric that will be pleasant to the touch and soft.
- The next step is to process the filler. Cut two pieces of thick natural fabric according to the intended pattern.
- Fold the parts as follows: place two pieces of colored fabric, intended for the outside of the potholder, face to face on a flat surface. Next, attach cut-outs from the filler to the finished elements on top and bottom. Then place the piece of fabric again to interior decoration on both sides.
- All parts should be pinned together so that they do not move while sewing.
- Sew the edges, retreating from the edge 5-8 millimeters.
- You received a mitten turned inside out. Before reaching the seam about 3 millimeters, trim off the excess fabric.
- Using scissors, make small cuts where the mitten curves. This will make it easier to turn the potholder right side up.
- Turn out the finished mitten, try to put it on, evaluate how comfortably it sits on your hand. If desired, decorate it with ribbons, buttons, braid, or paint it with fabric paints.
Now you know how and from what materials to make potholders different forms with your own hands. Experiment with patterns and shapes, create, fantasize. Happy crafting!
Photo: beautiful handmade oven mitts


DIY kitchen mitts
Kitchen oven mitts are a nice interior detail, associated both with home comfort in general and with the decoration of the kitchen. And buying them is sometimes harder than making them yourself. Do you know what fabric the potholder should be made of, what shape, and what exactly it should be combined with in the kitchen?
Preparation of materials
Before you start sewing with your own hands, you need to prepare the materials. The selected new fabric must be washed and ironed. Washing is necessary for the fabric to shrink. Otherwise, shrinkage will occur during the process of using the product. After washing, the potholder may become deformed.
Important: Do not use new and old fabric without pre-washing the new one.


Before sewing potholders from new fabric, it needs to be prepared for work
You can use old scraps to sew potholders using the patchwork technique.
Choice of motives
The next step is choosing a tack pattern. It can be done in different ways.
So, what kind of potholders can be:
in classic patchwork style,
with applique,
with embroidery.
Combinations of these styles are quite appropriate. The simplest is to sew potholders in a simple patchwork technique. And only after mastering it, you can start making appliqués from scraps. The applique can be made up of different scraps, or a ready-made motif cut from fabric can be sewn on top of a panel sewn using the patchwork technique.

There are many patterns and techniques for sewing a classic patchwork potholder.
The application can be:
flat,
volumetric.
The volumetric applique looks especially impressive. It’s not difficult to make it with your own hands from scraps - just put a padding polyester or holofiber under the sewn parts
Schemes for tacks
You can search for ready-made diagrams on the Internet. Today they exist a large number of. But not all patterns are suitable for sewing potholders in the patchwork style.
Let's look at what schemes there are.
The most basic patterns:
"Squares"
"Ohio Star"
"Carousel or mill"
"Hourglass"
"House"
"Solomon's Star"
"Vortex",
"Russian".
Sewing from squares is a universal patchwork that can be used to make potholders with your own hands. This is the simplest method, so in order for the potholders to turn out original, it is worth using additional tricks. For example, you can place embroidery in each square or sew an applique on top of the base.

Patchwork crazy does not imply drawing up specific patterns, only consistency is important
For sewing potholders, the remaining patterns can be used as a separate independent element. Particularly good in this sense are such schemes as the Ohio star, mill, Solomon star, Russian, where combinations of triangles and squares are used. This patchwork technique allows you to achieve interesting effects.


The simplest patchwork potholder can be sewn according to the “hourglass”, “house” or “square” pattern
“Ohio Star” is a classic pattern for patchwork products that requires certain skills in working with fabrics
In patchwork style, only the front part of the product, located on the outside of the palm, is sewn. The back side is sewn from plain fabric.
The tack itself consists of the following parts:
patchwork sides,
the sides of the mittens are made of plain fabric,
gaskets or insulation,
two internal lining parts, which can be sewn from the same plain fabric.
The gasket is designed to make the product thicker and help it perform its main function - to protect it from exposure to high temperatures during operation. You can use padding polyester or batting as a padding.

Any tack using the patchwork technique requires a dense base.

A dense lining can serve as the basis for a composed pattern
A pattern is first made in the form of a regular mitten. Next, the front part is sewn according to the pattern in patchwork style. If the simplest patchwork technique of sewing with squares is used, then a panel is sewn, and then a part is cut out of it according to the pattern.

Assembling the artichoke-style potholder is done in stages
Assembling the potholder
The tack assembly is done last.
First, sweep the following parts together:
front side, gasket and inner lining,
reverse side, gasket and inner lining.
It’s not at all difficult to sew a product in the patchwork style with your own hands. For the simplest potholders, you can choose a bright, colorful material and the most simple technique. Even a novice craftswoman can handle this work, and such a product, sewn with your own hands using the patchwork technique, will always look impressive.

You can’t sew such things without a pattern; if patterns are offered, strictly follow them.
Examples of original potholders:
Knitted models in the form of animals.
Washing is problematic, at least you need to wash it carefully so that the item does not change its shape. But if there are children in the house, they will also be delighted with such potholders.
Jar of jam.
Well, these are very cozy potholders! I really don’t want to take them off the wall, let them hang and please the eye. And if you can’t use it, let such a jar-pot be intended for kids, who may have a hard time carrying their cup of broth to the table, but they really want to act on their own. And if the decor of such a craft has something in common with the decor of the curtain on the window, the ensemble will turn out wonderful. Patterns can be found on the Internet, but the pattern can be so simple that you can handle it yourself.
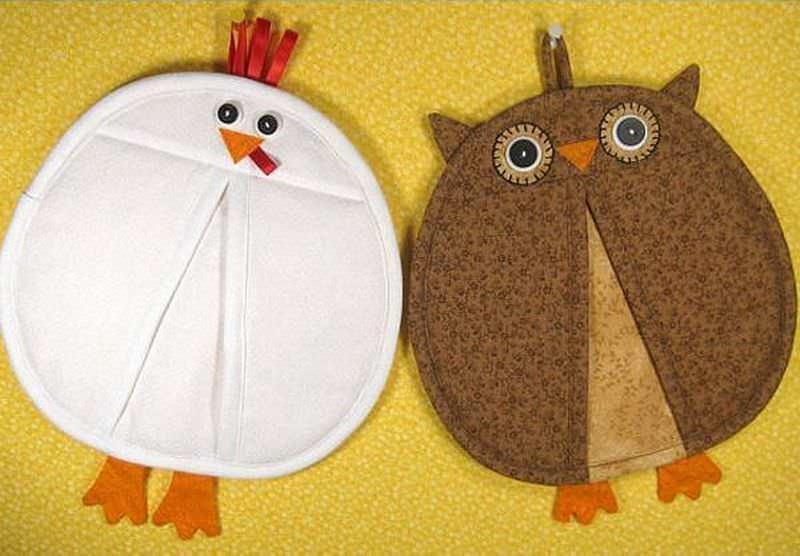
Owl.
Such a potholder can only be called original because owls are now the most fashionable design object. Well, place such a fabric owl in your kitchen. You can make a potholder from felt (look at the examples in the photo gallery). And some craftsmen “settle” a whole family in the kitchen - an owl with its owlets (according to the number of family members).
Maple leaves.
These are seasonal potholders; it would be good to decorate the kitchen interior with them only in the fall. If the item is strictly decorative, make it from felt (you can find many similar photos).
Knitted potholders never go out of style. Make them with your own hands and teach your children how to make them - they will become attached to needlework for a long time.
Knitted potholders for the kitchen, patterns
By the way, you can knit the same jar of jam. What’s great about knitted potholders is their immediately noticeable warmth. Soft, gentle, warm things in which your energy is invested - in every thread and every loop.

The choice of type of knitted potholder is not limited by the flights of your imagination
Knitted potholders of this type are good for the kitchen:
Berry;
Grandmother's Square;
House;
Heart;
Mittens (yes, knitted ones look great too);
Animal faces;
Snail;
Fish;
Square with a rose.

Knitting patterns describe each step in detail, and photos show the final version.
All you have to do is experiment with color. But it will be difficult for potholders made of fabric and knitted to “get along” together in the kitchen - it’s better not to mix different types potholders.
Cross stitch: tack patterns
Cross stitch is always beautiful, delicate and handcrafted “tasty”. Of course, such potholders will have to perform almost only a decorative task. But this is also good. Embroidery patterns, simple and complex, are easy to find. Photos are usually included.
If you want to make a potholder as a gift, you can embroider:
Any traditional symbol that means some wish (look at embroidered shirts and the meaning of their elements);
You can embroider the initials of the person to whom this gift is intended with a cross;
Berries are always cute and lift your spirits;
Embroidering desserts on fabric is always on point for the kitchen;
A hen with chicks - they say it brings wealth to the house.
Embroidery is always some kind of coded message. Therefore, think about what your embroidery will mean, what it can bring to your home. Of course, it is better to embroider on a special fabric so that the pattern is even. Do it yourself simple embroidery maybe a child. And such embroidery on a potholder can become a child’s first handicraft project.
What potholders are in fashion now?
Interior fashion, of course, tirelessly dictates, but... Handmade is such a thing that what is more important here is not the trend, but the style. Traditional oven mitts are a tribute not to fashion, but to history. Respecting tradition, sew such mittens from fabric with the whole family, and teach new generations to sew similar mittens with their own hands. Patterns are also passed down from generation to generation. Family and home love traditions; this is one of the means of bonding and an indicator of good relationships.
The mitten potholder can be modernized - made of felt, for example. Or it will be decorated with bead embroidery. It is clear that such mittens will become strictly decorative, but this, as we found out earlier, is not bad.

The design of a traditional “mitten” can be used for various design experiments
The mitten can be sewn from old material, baby dress or blankets, as something memorable. One suitable pattern, a little imagination and... it was a dress - it became a mitten for the kitchen. Such a mitten will give new life to a once-loved item.
The butterfly mitten is also popular. Butterfly is a very convenient type of oven mitt that will certainly prevent you from getting burned. A butterfly mitten is more difficult to sew than a regular potholder, but the butterfly looks fresher and more interesting.
If you have already made simple accessories with your own hands, this butterfly will definitely suit you.
When decorating your home, remember how much the little things matter. Well, the kitchen is a hearth, and the energy of your hands is especially important there. I wish you good finds, discoveries and cute accessories that will decorate your home.


A pot holder can be sewn in different ways
We sew a potholder in several ways, choose the one that seems more convenient to you.
Patchwork technologies:
Regular blocks.
For tack, you will have to prepare several elements, usually these elements are squares, which can be easily processed on a sewing machine.
Sewing according to a template.
In this case, patterns are used. These can be such familiar elements as a star, heart, sun, birds, leaves, diamonds, etc.
We sew on the base.
The elements are not sewn to each other, but to the base, which is prepared in advance. This is convenient, because the reverse side of the product will always be beautiful. But still, such tacks are only one-sided, and this is not for everyone suitable option. Although for beginners patchwork this type of potholder may be suitable.
Using any technology, you can make a beautiful pot holder, the main thing is to choose the appropriate color scraps and take some kind of sketch as a basis. Be sure to trim the edges of each piece; edges with fringe are not the best story.
How to make a potholder in patchwork style: master class
Fun scrap potholders can be made from three types of fabric. It is important that the fabrics for the tacks are uniform and of the same density. Such conditions are desirable, because the aesthetics of a thing and its integrity are very important.

Detailed diagram and final photo of a butterfly potholder using the patchwork technique
Master Class. We sew a potholder from scraps:
You will need three types of fabric (cotton with three different patterns), threads, a roller cutter, pins, and a ruler. Armed with this, cut out several pieces of fabric, the sizes of which are the same.
Each square piece will have a side of 10 cm - these sizes are the most optimal.
A potholder for a frying pan can consist of four squares from the main fabric, and four squares from the two remaining types (two for each).
You cut out the elements yourself with a roller knife, 90 degrees is the pressure angle;
Cut each of the cut out squares into two equal triangles;
As the sketch says, lay out the triangles, after which they need to be sewn together;
You will need to sew the other two sides together, not forgetting the lining in the middle. For example, it could be batting. Since the oven mitt is for a frying pan, the gasket should not be thin in order to protect it from heat.
Attach a loop to one of the corners.
This is the simplest MK (master class) using the patchwork technique. But any project needs to start with something small, and if you figure out how to sew such a potholder, then you can definitely master a more complex option with your own hands.
Potholders with applique
Last time Special attention chained oven mitts to themselves unusual applique from felt. Why made of felt? This material and modern needlework are inseparable friends today. Almost any felt craft project turns out elegant, fashionable, and warm. The very texture of the felt lends itself to this.
And in the kitchen, where warmth is so valued, such a potholder for a frying pan will be very appropriate. And for beginners, experience working with felt will be useful.
Actually, the base of the potholder will be ordinary - cotton, always with a border braid. But the applique itself will be cut out of felt.

What pictures can be the basis of such an application:
The same heart. You can get cute, cool images, and it will always be appropriate as a gift to a loved one.
Star. We sew a star and make a wish for the year, and why not? This option was suggested by one master who believes that needlework and similar practices are quite compatible.
Thematic application. For example, by Easter it could be Easter eggs, for the New Year - a snowman, for the holiday - a cake, etc.
Logo. Pot holders with a family or corporate logo are also gaining popularity. They can be supplied with an apron and gloves, which are also made with your own hands from felt. There's always something for a potholder with a logo place of honor, and besides, this is a very original project.
If you decide to make a beautiful felt potholder as a gift to a young family, or more precisely, a young housewife, it is very symbolic if there is a chicken on the potholder.

A chicken is a symbol of a strong family, an established life, order, and prosperity. This is an old story, and the chicken as a wish, as a kind of amulet, will be clear to everyone
How to sew a potholder with a chicken? Mostly - don't overdo it. The chicken should be stylized and simple. If you try, you can sew a very simple apron to boot.
Knitted potholders: MK
Potholders can also be tied. The result is cool, funny little things that you can master on your own in a couple of evenings. We usually crochet; for most housewives it’s easier to knit this way. Many people basically knit from old threads, that is, threads from unraveled old things. This is a kind of project for the reincarnation of a thing, when something worn out takes on a new life. And why not life in the form of a potholder, because it is the easiest to knit.

Even children have the ability to crochet, so knit original potholder possible without much difficulty
Which knitted potholders You can quickly do it yourself:
Matryoshka potholder. Yes, in addition to quilted potholders, the matryoshka version is also available in knitted form. True, this is not the fastest oven mitt, but you can find simplified options, a matryoshka doll is always cozy and warm in the kitchen.
Heart potholder. And even children can cope with this. They start with things like this at the “Knitting with your own hands” circle, etc.
Butterfly potholder. The brighter the better. And if such a potholder is two-layer, in terms of practicality it will not be inferior to such types of potholders as a glove and a mitten.
Tack watermelon slice. Such knitted potholders have already become iconic; every craftswoman should knit them at least once. And ideas can be updated - first we knit in one color combination, then we knit in a different size, etc.
The most important thing in this matter is to follow the pattern. Study any MK thoroughly, without missing the nuances. You can knit a simple two-color rectangular potholder, or a complex potholder with an unusual pattern.
Ideas for potholders
But if you're in no rush to knit a potholder, take on another project. These can be unusual potholders made from the remains of jeans, or potholders from beautiful embroidery. A competent master class, your attention and diligence, and everything is ready. But you can also go the more familiar beaten path. For example, sew a mitten that has already become traditional.
For a simple but bright mitten you will need:
Bright, variegated cotton fabric;
Lining fabric;
Sintepon;
Threads;
Acrylic paints (especially for fabric).

The master class will be simple:
Cut out a template - what your mitten should be like. Usually the mitten is made according to the size of the hand of the largest family member. Don't forget about seam allowances.
Fold the fabric that will be on top in half. Place the template on top, trace, cut out.
Do the same with the lining fabric.
If the mitten will have an appliqué, make all the details for the pattern in advance. The details need to be basted onto the mitten, and then stitched in the desired sequence. The seam is zigzag.
If the applique is a character, then you can draw facial features for him acrylic paints, this will be the highest class in such a seemingly simple potholder. For example, your oven mitt will be a cook. You can designate an apron for him, and even gloves. But then make sure that the assembly of the parts is perfect, otherwise the project will not be so perfect.
Fold the tack parts right side inward and stitch. Notches are made along the rounded parts of the tack.
Each part of the glove should be quilted with padding polyester, then stitch the item together.
Treat the cuts of both pieces with tape. A loop is made from the same binding.
The master class assumes that the assembly is carried out very carefully, the mitten must be neat on all sides.

You can sew not just one mitten, but a whole set
Use different ideas in decor:
Retro style mitten;
Owl mitten;
Mitten in the shape of a fruit;
Mitten in the shape of a cat's paw.
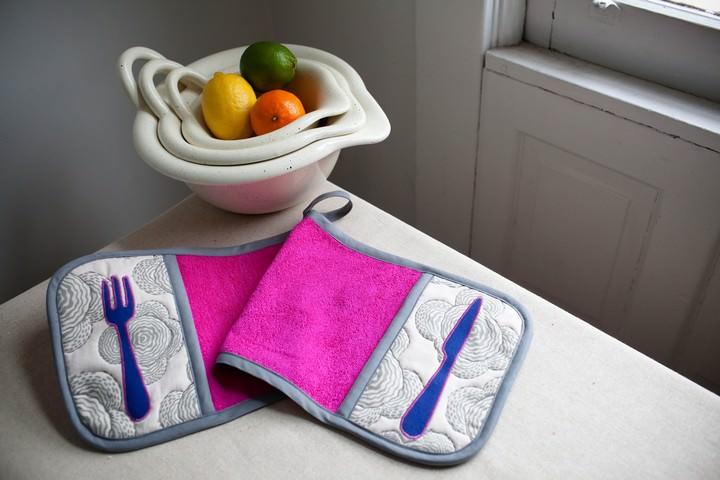
The most rewarding DIY project you can make is an apron plus pot holders. Standard store-bought gloves and the same standard apron are clearly not something that can surprise anyone. But, for example, a peacock pot holder and an apron to match the theme - best gift and you can’t imagine it if you are focused on handmade gifts.
The highest class is what is done with your own hands. Create your own art project, use online ideas, and you can make an apron, gloves, and potholders yourself. Pay close attention to such stages as assembly of parts, sewing accuracy, and selection of fabrics.


.jpg)

Why do this
Many people may ask this question - why sew potholders from fabric with your own hands if you can buy them in a store. There is a simple answer to this. As a rule, fabric accessories now sold in stores are mostly made in China. And many of them are sewn poorly and come apart at the seams a few days after purchase. And it’s better to sew them yourself and be completely confident in the quality and long service life.
You can be one hundred percent sure of the quality of a hand-sewn potholder.
Moreover, hand-sewn potholders perform a number of functions:
They play a practical role - they serve to pick up dishes standing on the stove;
Decorate the kitchen;
Create a unified style.
Original ideas
An original potholder can become a real work of art, not only decorating your kitchen
You can turn your homemade potholders into a real work of art. It is enough to sew a couple of dolls from fabric and attach them to the front side of the potholder. Such a potholder becomes mostly a decorative element of the kitchen.
You can do it differently - the parts of the potholder are knitted and the individual elements are sewn together. In this way, you can make potholders for the kitchen in the form of vegetables, fruits, figures of people, animals, and fish. Such potholders become a real decoration of the kitchen. Especially if they are complemented with embroidery.
You can make various figures of animals, vegetables, berries from fabric, duplicate them with padding polyester and sew oven mitts for the kitchen. They will create a special mood and positivity in the kitchen.
Sewing potholders with your own hands is not difficult. Tastefully selected fabric, a couple of interesting ideas and ready-made things that can make the kitchen cozy and original. Handmade potholders can make any interior unique.
Do-it-yourself fabric potholders (video)


