To create a paper star you may need:
- Thick sheets of colored cardboard and paper.
- PVA glue, tape.
- Scissors.
- Wire and pliers.
- Tinsel and sparkles.
- Hairspray
- Colored markers, markers and pencils.
- Measuring instruments: protractor, ruler.

Cardboard can be of different colors or with a print. The options for a flight of fancy are unlimited. Including, you can come up with the perfect option for the style of your Christmas tree or room:
- lids from candy boxes beautiful pictures or patterns;
- fragment of a staff;
- children's drawings;
- newspapers;
- gift wrapping paper;
- collage of old postcards, etc.
Five pointed star
The easiest model to make is a regular 5-pointed star. First you need to draw a star blank on a sheet of cardboard. Draw a circle with a diameter that will then correspond to the size of the decoration. This can be done with a compass or by circling a round object. Draw a vertical line from the center of the circle to its edge. Next, using a protractor, draw radii from the center every 72°: the result will be 5 lines. Connect the points of contact of the radii with the edge of the circle through one another - the 5-pointed star is ready.
Repeat the same procedure with another sheet of cardboard. Having cut out both figures, carefully bend them so that you get 2 halves of the future three-dimensional star. Glue the parts together with tape, having first made a core: a piece of crumpled paper or fabric to give mass and volume to the star with the wire fixed in it. The other end of the wire must be brought out in the form of a spiral. It will be attached and hold the star on top.

The glued figure must be decorated. You can do this to your taste and in accordance with the chosen color. For plain material, the following option works well:
- lubricate the surface with glue;
- sprinkle with dry glitter;
- Sprinkle with varnish to secure the glitter in place.
- You can glue tinsel around the perimeter.
Advice. At the stage of drawing two blanks, you can add a small “extra” piece of cardboard to each top of the star, which, during the joining process, will be wrapped inside and glued together. Then you won't need tape.
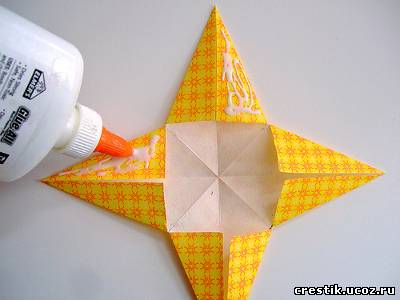
Two 4-pointed figures are made for it. The square sheet is folded as follows: in half horizontally, in half vertically, and twice in half diagonally. Next, you need to make 4 cuts: along the line of perpendicular folds, a little less than half its length. The resulting corners need to be bent inward and glued one on top of the other.
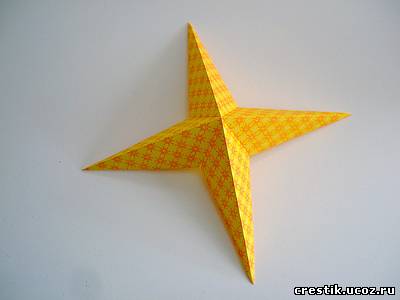
Glue the two halves of the star together so that its rays overlap one another. You can mount this decoration on the Christmas tree according to the diagram of the previous model.
Advice. A paper star is perfect for decorating rooms or hanging on a tree as a toy. It is advisable to use cardboard for the top of the tree.
New Year's decor is worth doing not only because of the decorations themselves. This good way spend time with your family or children and create a New Year's mood.
How to make a star out of paper: video
Take a square sheet, fold it in half (to make a triangle), then make cuts! departing from the middle approximately 1 cm. text on hover
then we arrange the sheet (rhombus) and glue the edges one by one, forward, then back, so that it looks like this:
We make 6 such parts and glue them together!

I suggest another way to simply cut out a star from cardboard, then cover it with foil. This is the simplest method and no worse than the previous ones; I did this as a child. You can take foil from coffee or tea.
I like this version of making a star out of paper best:

The beauty of this method is that in winter it is a Christmas, New Year's star. And in the summer, without changing the technique, you can make a starfish out of it, just by adding the appropriate colors :)

Make a New Year's star out of paper Can in different ways, but, in my opinion, voluminous stars look better. You can use origami techniques or assemble them from cones, you can even take scrap materials at hand, which will make a very beautiful star.
The simplest three-dimensional star can be assembled from two stars made of thick paper or cardboard.


And here it is
New Year's three-dimensional star
made from thick paper, painted on both sides.
Squares of 4 sizes (8 squares each) need to be folded as in the picture, and then glued according to size. The very first will be a large square and then in descending order.


make an origami star

Below, the process of making such stars is shown in detail in the photo.

Star from book pages
V in this case old unnecessary technical books that have lost their relevance are used; they can be replaced with old newspapers.

A plastic or cardboard three-dimensional star is not used as a basis. It's very easy to do. Cone-shaped blanks (in the form of small bags) are made from the halves of the pages and glued to the base. After this, you can apply a little glue to the edges of the star and sprinkle it with glitter.
Star of Bethlehem
made from A-4 paper (you need about 50 sheets, you can take colored)
Cut sheets of paper in half lengthwise, twist each half into balls, coat the edges with glue and roll tightly. Using a stapler, fasten 3 rays in the form of a fan, and then string the fans onto a thread, pulling them tightly and tying the ends. You should get a star, shaped like a ball. If the paper is white, you can spray paint it.


small voluminous stars
Can be used for interior decoration, and for cards, gifts.


Will need colored paper(you can use glossy magazines). The strips of paper should be even and should be done carefully so as not to tear the workpiece.
How to make such an asterisk. You need to make a loop from the strip, then wrap the short tail, tying it into a knot. Carefully tighten the knot, press it and hide the remaining tail in the middle. You should get an even pentagon.
Then you need to wrap long end strip each side of this pentagon 12-15 times, that is, at least twice each side. The remaining tip of the paper needs to be hidden inside the star.
To give the star volume, you need to take the pentagon with two fingers and, with the tip of the finger of your other hand, lightly press on one edge (you need to get into its middle). A similar operation must be done with all the faces, then you will get a beautiful three-dimensional star.


Here are a few more video tutorials on how to make a three-dimensional New Year's star
There are a lot of different techniques for creating New Year's stars from paper. Stars can be voluminous and flat, cut out and glued, large and small.
I offer several techniques for creating stars.
It is quite possible that you will like some of them.
the simplest example of a beautiful paper star
But the technique is more complicated)
New Year's star with your own hands
Winter time is craft time for kindergarten, schools, homes. If you want to do paper star, then I offer you a couple of simple options.
Making a star out of paper is quite easy and, most importantly, low-cost, which is especially important in December, when you have to spend large sums on gifts.
To make such a star, you will need to cut out a square of paper with sides of 21 centimeters. The paper needs to be folded according to the pattern to form a star. Details of the process can be seen in the video.
A New Year or Christmas star made from paper with your own hands will decorate your home for... New Year and will help create a festive mood in us. You can make such stars in various ways.
For example, such voluminous two-color stars are made very quickly and simply, but they look very beautiful - especially if you hang them on a bow:


These homemade eight-pointed Christmas stars can be used as original wall decorations, or used to decorate a window or chandelier in a room.
The New Year is getting closer and closer, and it's time to seriously think about creating a festive atmosphere in the house. Stores offer us an incredible amount holiday decorations. But what could be more exciting than creating wonderful things with your own hands?
We will share with you how to make it yourself beautiful star to the Christmas tree. This craft can also serve as door decoration or will become an unusual decorative element.
Star on the Christmas tree
YOU WILL NEED
- 2 sheets of cardboard 30 × 30 cm, golden or silver color
- silicone glue
- scissors or utility knife
- glitter
PROGRESS OF WORK
- If a sheet of cardboard is golden on only one side, you need to glue the two sheets together. If there is no shiny cardboard, make it yourself: apply a thin layer of regular glue to thick paper on both sides and sprinkle it thickly with glitter. Cut the cardboard into 20 identical strips, each 1.5 centimeters wide.

- Take two strips and fold them in the middle crosswise at an angle of 90 degrees, as in the photo.

- Add more stripes on the sides. Interlace the vertical stripes with the horizontal ones, as shown in the picture. Secure the structure with glue. As a result, there should be 10 stripes in a row.

- Add stripes at the top and bottom in the same way. Don't forget to fix them with glue at each joint.

- Unfold the workpiece so that its middle forms a diamond in front of you. Glue the two nearest bottom strips together to make a loop.

- In the same way, connect 4 strips on each side of the workpiece. You should have 2 loops in each corner.

- Make another identical figure.

- Glue both halves together to make a star.

- Stretch the strips that remained unused inside each ray of the star. Secure with glue.

- This is such a wonderful star in the end. You can further decorate it or install a garland inside to make it really shine.

All that remains is to decorate the Christmas tree with a star. You can make several of these toys and hang them from the ceiling.
Everyone's favorite holidays are coming very soon - New Year and Christmas! It's time to think about decorating your home and New Year's gifts. Since ancient times, the star has symbolized Christmas festivities. Of course, it is impossible to get a star from the sky, but anyone can make one with their own hands.
Try yourself as a decorator, involve your children in this activity and create a small New Year's miracle to the delight of your family and friends!
The easiest way to make a star is out of paper. You can use any paper - white, colored, velvet, it is only desirable that it be thick. I like vintage things, so I decided to make a star out of old, worn sheet music.
In my opinion, the notes in the decor look very romantic. I pasted the sheet music onto cardboard. Using the template, I cut out two identical parts and bent them along the indicated lines: along the long line of the beam - outward, along the short line - inward. These folds give the star volume. I then joined the two pieces together by bending and

gluing the side allowances using stationery glue, and lightly shaded the outline and radial lines with a dark brown marker. If desired, you can paint the outline with gold or silver paint. Everything is very fast and simple!

There is no need to throw away the template; it may come in handy more than once. For example, for soft fabric stars. Which fabric to choose? It all depends on your preferences. Very cute stars are made from soft fleecy fabrics - velvet, plush, but you can use any other fabric. The choice of color and pattern is also unlimited.

Only basic needle and thread skills are required. So, we cut out two parts from the fabric according to the template. future star, be sure to take into account seam allowances. We fold them face to face and sew them on the wrong side using a machine or sew them by hand, not forgetting to leave room for stuffing. We turn out the star through the remaining hole and fill it with padding polyester or cotton wool. Carefully sew up the hole and decorate the star to your liking.
It's not difficult to make a star from twigs. We lay out five even branches in the shape of a star, fasten the ends of the rays using a hot glue gun or any wood glue and tie them together with thin wire for reliability.

And then we begin to wrap the star with twine or twine. I used regular tow for this purpose. Lightly touching the surface, apply white paint in several places with a brush. acrylic paint- and now the star is covered with snow.
The twigs may be useful for another star. First, we make the base for the star - we cut out its outline from plywood according to the template using an electric jigsaw. If it's not available, don't worry. The base can be cut out of very thick cardboard.

We clear the branches of bark, cut them into small pieces with pruning shears and glue them onto the base using a hot glue gun. You can replace it with carpentry

glue, construction PVA and others. Finally, we glue on decorations - burlap, sprigs of barberry and spruce.
If these ideas inspire you to create New Year's stars, then I advise you to make wishes while working. I am sure that they will certainly come true, because these stars are not simple, but New Year’s, wonderful, and let them illuminate your home, filling it with light, peace and goodness!
We offer you a very easy to manufacture christmas decoration- a three-dimensional New Year's star made of paper. It can be hung on the Christmas tree as an original homemade one. Christmas decorations, or you can decorate a window or chandelier with this New Year’s craft.
Volumetric paper Christmas star
You will need:
- sheets of colored paper square shape(the paper should be thick enough
so that the finished star keeps its shape) - simple pencil
- scissors
- thread or ribbon
Work plan:
1. To make one three-dimensional star you will need two sheets of square paper. Fold each sheet of paper as shown in the photo below (in half horizontally, in half vertically, and twice in half diagonally).


2. Now with scissors you need to cut approximately half the line along the line of perpendicular folds, a little less.

3. Only 4 cuts. Now we bend the edges, as in the photo.

4. Lubricate one of the sides of each of the four rays of the future New Year's star with glue and glue it together, as shown in the photo.
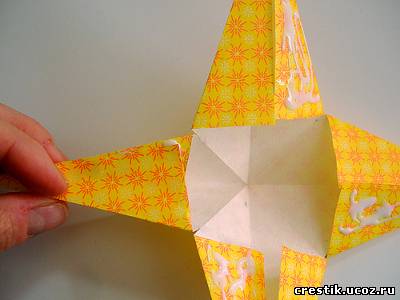
5. One half of the star is ready.
6. Following the instructions, make the other half.

7. All that remains is to glue the two halves together. The New Year's star is ready! All that remains is to decorate her house for the New Year.


